版权归作者所有,如有转发,请注明文章出处:https://cyrus-studio.github.io/blog/
源码下载
LineageOS官网:https://lineageos.org/
LineageOS源码 github 地址:https://github.com/LineageOS/android
LineageOS源码国内镜像地址:https://mirrors.tuna.tsinghua.edu.cn/help/lineageOS/
源码大概需要150GB的硬盘空间,编译完成差不多300G

1. 配置git
git config --global user.email "you@example.com"
git config --global user.name "Your Name"
2. 安装 repo
mkdir ~/bin
PATH=~/bin:$PATH
curl https://storage.googleapis.com/git-repo-downloads/repo > ~/bin/repo
chmod a+x ~/bin/repo
3. 安装 Git LFS
sudo apt install git-lfs
git lfs install
4. 安装 Android SDK Platform-Tools
在 Linux 中配置 Android SDK Platform-Tools,可以按照以下步骤进行
4.1 下载 Android SDK Platform-Tools:
# cd 到存放 platform-tools 的目录
cd /mnt/case_sensitive
# 下载 platform-tools
wget https://dl.google.com/android/repository/platform-tools-latest-linux.zip
# 解压 platform-tools
unzip platform-tools-latest-linux.zip
4.2 配置环境变量:
为了在任何地方都能使用 adb 和 fastboot 命令,你需要将 platform-tools 目录添加到你的 PATH 中。
编辑 ~/.bashrc 文件
nano ~/.bashrc
在文件末尾添加以下行
export PATH=$PATH:/mnt/case_sensitive/platform-tools
然后重新加载 .bashrc 文件
source ~/.bashrc
4.3 验证配置
你可以通过以下命令检查 adb 是否配置成功
adb version
测试连接设备,确保你的 Android 设备已经通过 USB 连接,并且启用了开发者模式和 USB 调试。
adb devices
这将列出已连接的设备。
5. 镜像设置
找到 repo 所在路径
which repo
编辑 repo
nano /home/cyrus/bin/repo
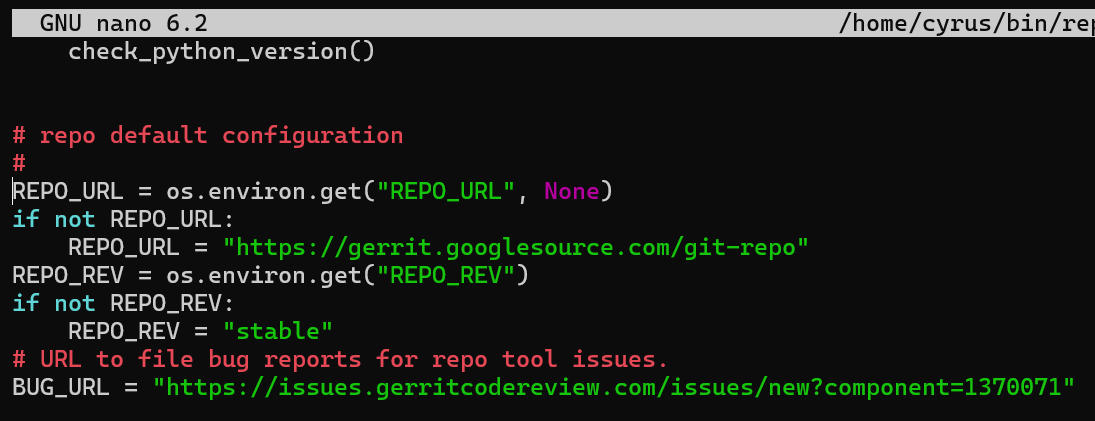
可以看到repo会优先取环境变量中的REPO_URL,否则默认使用googlesource
Ctrl +X 退出nano
通过下面的脚本设置 REPO_URL 环境变量的值为清华大学镜像源,解决国内访问不了 googlesource 问题,并且修改 .gitconfig,把访问 LineageOS 仓库的 url 替换为使用清华大学镜像源。
add_mirrors.sh(设置镜像)
#!/bin/bashexport REPO_URL=https://mirrors.tuna.tsinghua.edu.cn/git/git-repo/
echo "REPO_URL="$REPO_URL# 定义要添加的配置
config=$(cat <<EOF
[url "https://mirrors.tuna.tsinghua.edu.cn/git/git-repo"]insteadof = https://gerrit.googlesource.com/git-repo
[url "https://mirrors.tuna.tsinghua.edu.cn/git/lineageOS/"]insteadof = https://review.lineageos.org/
[url "https://mirrors.tuna.tsinghua.edu.cn/git/AOSP/"]insteadof = https://android.googlesource.com/
[url "https://mirrors.tuna.tsinghua.edu.cn/git/lineageOS/LineageOS/"]insteadof = https://github.com/LineageOS/
EOF
)# 检查配置是否已存在于 ~/.gitconfig
if grep -q "https://mirrors.tuna.tsinghua.edu.cn/git/git-repo" ~/.gitconfig; thenecho "URL替换已经存在,未进行重复添加。"
else# 如果配置不存在,添加到 ~/.gitconfigecho "$config" >> ~/.gitconfigecho "URL替换已添加到 ~/.gitconfig"
ficat ~/.gitconfig
remove_mirrors.sh(移除镜像)
#!/bin/bashunset REPO_URL
echo "REPO_URL="$REPO_URL# 使用sed命令删除整个URL配置块,包括URL和相关的instedof行
sed -i '/\[url "https:\/\/mirrors\.tuna\.tsinghua\.edu\.cn\/git\/git-repo"\]/,+1d' ~/.gitconfig
sed -i '/\[url "https:\/\/mirrors\.tuna\.tsinghua\.edu\.cn\/git\/lineageOS\/"\]/,+1d' ~/.gitconfig
sed -i '/\[url "https:\/\/mirrors\.tuna\.tsinghua\.edu\.cn\/git\/AOSP"\]/,+1d' ~/.gitconfig
sed -i '/\[url "https:\/\/mirrors\.tuna\.tsinghua\.edu\.cn\/git\/lineageOS\/LineageOS"\]/,+1d' ~/.gitconfigecho "URL替换已从 ~/.gitconfig 中移除"cat ~/.gitconfig
给脚本文件增加执行权限
chmod +x add_mirrors.sh remove_mirrors.sh
设置使用镜像
./add_mirrors.sh
6. 下载源码
创建目录
mkdir lineage-17.1
进入到 lineageos 目录
cd lineage-17.1
如果可正常访问 github,使用下面的命令初始化 repo
repo init -u https://github.com/LineageOS/android.git -b lineage-17.1 --git-lfs --depth=1
否则,使用清华大学镜像初始化 repo,并修改 default.xml
repo init -u https://mirrors.tuna.tsinghua.edu.cn/git/lineageOS/LineageOS/android.git -b lineage-17.1 --git-lfs --depth=1\
最后,同步源码
repo sync
或者使用下面命令下载浅克隆的源码
repo sync --no-clone-bundle --current-branch --no-tags -j$(nproc)
这会浅克隆当前分支最新的 LineageOS 源码,节省下载时间和空间。
7. 解决 webview 同步失败问题
error: Unable to fully sync the tree
error: Checking out local projects failed.
Failing repos:
external/chromium-webview/prebuilt/arm
external/chromium-webview/prebuilt/arm64
external/chromium-webview/prebuilt/x86
external/chromium-webview/prebuilt/x86_64
Try re-running with "-j1 --fail-fast" to exit at the first error.
================================================================================
Repo command failed due to the following `SyncError` errors:
Cannot initialize work tree for LineageOS/android_external_chromium-webview_prebuilt_arm
Cannot initialize work tree for LineageOS/android_external_chromium-webview_prebuilt_arm64
Cannot initialize work tree for LineageOS/android_external_chromium-webview_prebuilt_x86
Cannot initialize work tree for LineageOS/android_external_chromium-webview_prebuilt_x86_64
从镜像地址同步 weview 一直失败
删除 chromium-webview/prebuilt
rm -rf external/chromium-webview/prebuilt/*
执行 remove_mirrors.sh 移除镜像,开启代理,重新从 github 同步就可以了。
repo sync --no-clone-bundle --current-branch --no-tags -j$(nproc)
8. 手动添加设备仓库
在 .repo/local_manifests 创建 wayne.xml,手动添加 wayne(小米 6x)的设备配置仓库。
执行 nano .repo/local_manifests/wayne.xml 命令
mkdir .repo/local_manifests
nano .repo/local_manifests/wayne.xml
配置 Device tree、Common tree、Kernel、Vendor 仓库
<manifest>
<remote  name="real_github"fetch="https://github.com" /><project name="LineageOS-MI-A2-MI-6X/android_device_xiaomi_wayne" path="device/xiaomi/wayne" remote="real_github" revision="lineageos-17.1"/>
<project name="LineageOS-MI-A2-MI-6X/android_device_xiaomi_sdm660-common" path="device/xiaomi/sdm660-common" remote="real_github" revision="lineageos-17.1"/>
<project name="LineageOS-MI-A2-MI-6X/android_kernel_xiaomi_sdm660" path="kernel/xiaomi/sdm660" remote="real_github" revision="master"/>
<project name="LineageOS-MI-A2-MI-6X/android_vendor_xiaomi_sdm660-common" path="vendor/xiaomi/sdm660-common" remote="real_github" revision="master"/>
<project name="LineageOS-MI-A2-MI-6X/android_vendor_xiaomi_wayne-common" path="vendor/xiaomi/wayne-common" remote="real_github" revision="master"/>
</manifest>
其中:
-
name=“GitHub 用户名/仓库名称”
-
path 是存放代码的位置。
Kernel:内核是操作系统的核心,负责硬件与软件的交互。Android 内核是基于 Linux 内核开发的,负责管理设备的资源和硬件驱动。
Device Tree:设备树是一种硬件描述文件,用来告诉操作系统设备的硬件布局,避免内核代码与具体硬件的紧耦合。设备树通常位于 device/ 目录中,包含设备特定的配置。
Common Tree:通用树包含多个设备共享的通用代码和配置。例如,某些设备共享相同的硬件平台(如 sm7250),这些配置放在 Common Tree 中,避免重复代码。
Vendor Tree:Vendor Tree 包含特定设备或硬件供应商(如 Qualcomm、Xiaomi)提供的专有二进制驱动程序、库和其他软件组件。这些组件是设备能够正确运行的关键部分,特别是涉及专有硬件(如调制解调器、相机、GPU等)的功能。
Vendor Tree 通常包含在 vendor/ 目录中,是设备厂商提供的闭源组件。与 Kernel 和 Device Tree 不同,它涉及硬件相关的二进制文件和库,而不是内核或硬件描述。
完成后,运行 repo sync 同步源码
repo sync --no-clone-bundle --current-branch --no-tags -j$(nproc)
或者手动去 clone 一下
git clone https://github.com/LineageOS-MI-A2-MI-6X/android_device_xiaomi_wayne.git device/xiaomi/wayne
git clone https://github.com/LineageOS-MI-A2-MI-6X/android_device_xiaomi_sdm660-common.git device/xiaomi/sdm660-common
git clone https://github.com/LineageOS-MI-A2-MI-6X/android_kernel_xiaomi_sdm660.git kernel/xiaomi/sdm660
git clone https://github.com/LineageOS-MI-A2-MI-6X/android_vendor_xiaomi_sdm660-common.git vendor/xiaomi/sdm660-common
git clone https://github.com/LineageOS-MI-A2-MI-6X/android_vendor_xiaomi_wayne-common.git vendor/xiaomi/wayne-common
代理设置
由于在编译过程需要连接 github 下载设备树和内核,所以需要先设置一下代理。
关于Linux下代理设置可以参考这篇文章。
设置缓存
创建缓存目录
mkdir -p /mnt/case_sensitive/ccache
把缓存配置添加到环境变量配置文件.bashrc结尾
cat >> ~/.bashrc <<EOF
# 使用缓存
export USE_CCACHE=1
# ccache文件路径
export CCACHE_EXEC=/usr/bin/ccache
# 设置缓存目录
export CCACHE_DIR=/mnt/case_sensitive/ccache
EOF
执行下面命令使配置生效
source ~/.bashrc
设置最大缓存空间为 50GB
ccache -M 50G
启用 ccache 的压缩功能,可以减少缓存文件所占用的磁盘空间
ccache -o compression=true
源码编译
1. 初始化编译环境
# 初始化编译环境
source build/envsetup.sh# 设置编译目标
# 如果本地没有设备仓库将会从LineageOS仓库中下载设备的Device tree和Kernel
breakfast wayne
2. 补充厂商文件
由于厂商文件是闭源的,而且版权原因不能直接放进去, Lineageos 没有直接提供厂商文件。
执行 breakfast 命令后如果提示缺少 vendor
In file included from build/make/core/config.mk:291:
In file included from build/make/core/envsetup.mk:266:
vendor/xiaomi/wayne-common/wayne-common-vendor.mk:782: error: _nic.PRODUCTS.[[device/xiaomi/wayne/lineage_wayne.mk]]: "vendor/xiaomi/wayne/wayne-vendor.mk" does not exist.
16:24:01 dumpvars failed with: exit status 1
根据错误提示可以通过以下2种方式之一补充对应的 vendor 文件
2.1 使用 TheMuppets 的厂商仓库
在 LineageOS 项目中,部分设备的厂商文件已经由社区维护,并保存在名为TheMuppets 的仓库中。
仓库地址:https://github.com/orgs/TheMuppets/repositories

把 vendor 仓库 clone 到本地
git clone https://github.com/TheMuppets/proprietary_vendor_xiaomi_sdm660-common.git vendor/xiaomi/sdm660-commongit clone https://github.com/TheMuppets/proprietary_vendor_xiaomi_wayne-common.git vendor/xiaomi/wayne-commongit clone https://github.com/TheMuppets/proprietary_vendor_xiaomi_wayne.git vendor/xiaomi/wayne
2.2 从设备中提取
注意:此步骤要求设备已经安装当前编译分支对应的 LineageOS。(可以先刷机再提取)
现在确保你的设备通过 USB 线连接到计算机,并启用 adb调试和 root,并且位于 device/xiaomi/wayne 目录下
在这个目录下,通常可以找到两个关键文件:
-
extract-files.sh: 用于从设备或固件中提取厂商文件的脚本。
-
proprietary-files.txt: 该文件列出了设备所需的所有厂商文件。
运行 extract-files.sh 脚本
./extract-files.sh
厂商驱动文件将会自动拉取到 vendor/xiaomi 文件夹中。
3. 开始编译
# 回到 Android 源码树的根目录
croot
# 开始编译
brunch wayne
解决WSL中编译提示文件系统不支持大小写敏感问题
21:38:08 ************************************************************
21:38:08 You are building on a case-insensitive filesystem.
21:38:08 Please move your source tree to a case-sensitive filesystem.
21:38:08 ************************************************************
21:38:08 Case-insensitive filesystems not supported
1. 创建一个区分大小写的文件系统
创建一个大小为300GB的ext4文件系统映像文件,并将其挂载到/mnt/case_sensitive,以提供一个区分大小写的文件系统
# 创建一个大小为300GB的空文件
dd if=/dev/zero of=/mnt/e/case_sensitive.img bs=1G count=300# 将这个文件格式化为ext4文件系统
mkfs.ext4 /mnt/e/case_sensitive.img# 创建一个新的挂载点目录
sudo mkdir /mnt/case_sensitive# 将格式化后的文件挂载到新创建的挂载点
sudo mount /mnt/e/case_sensitive.img /mnt/case_sensitive# 将你的LineageOS源码目录复制到新挂载的虚拟磁盘上
# -a: 归档模式,意味着递归复制目录,并且保留符号链接、权限、时间戳、拥有者等信息。
# -v: 显示详细信息。
# --progress: 显示文件传输进度。
sudo rsync -av --progress /mnt/e/android_source_code/lineageos/ /mnt/case_sensitive/lineageos/
# 或
# 将你的LineageOS源码目录移动到新挂载的虚拟磁盘上
sudo mv /mnt/e/android_source_code/lineageos /mnt/case_sensitive/cd /mnt/case_sensitive/lineageos
为了确保 case_sensitive.img 在每次系统启动时自动挂载到 /mnt/case_sensitive。
1. 打开 /etc/fstab 文件
sudo nano /etc/fstab
2. 添加以下行
/mnt/e/case_sensitive.img /mnt/case_sensitive ext4 loop 0 0
2. 在windows下访问case_sensitive
\wsl.localhost\Ubuntu\mnt\case_sensitive\lineageos
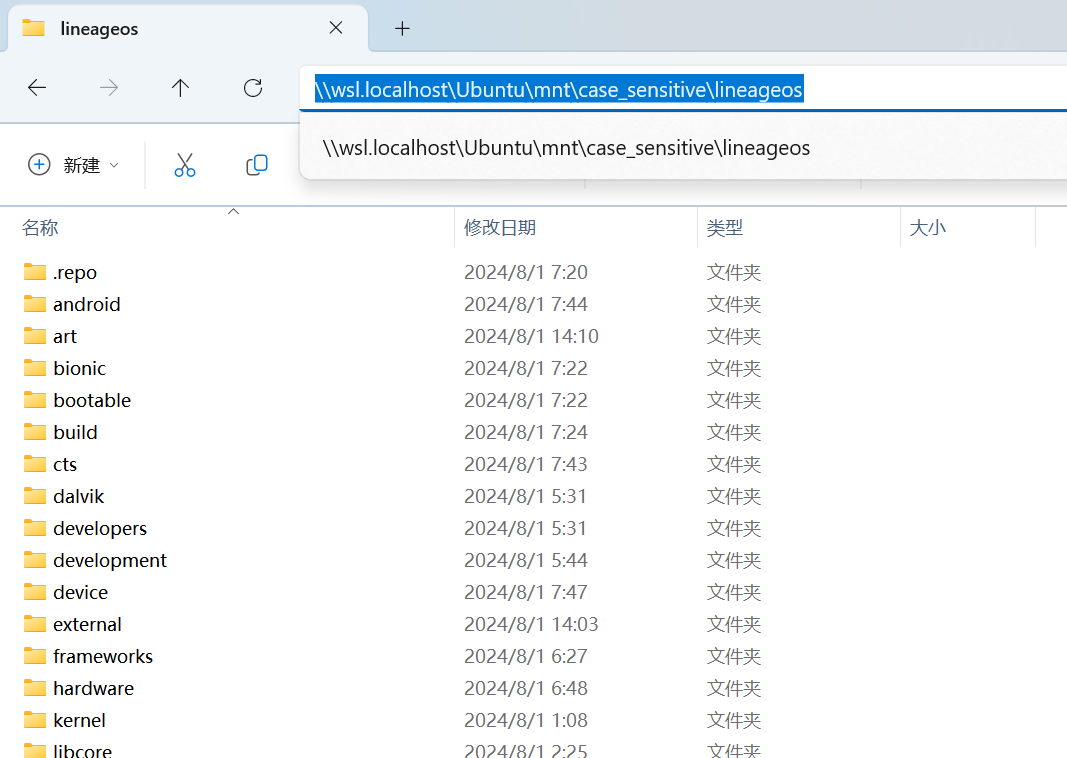
确保 Windows 用户对该目录有足够的权限。你可能需要在 WSL 中设置一些权限
sudo chmod -R 777 /mnt/case_sensitive
这样,你应该可以在 Windows 中访问和使用 WSL 中的大小写敏感文件系统。
3. 如果case_sensitive.img空间不够用如何扩容?
1. 卸载文件系统
sudo umount /mnt/case_sensitive
这一行命令卸载当前挂载的 case_sensitive.img 文件系统,以确保文件系统在扩展过程中不被使用。
2. 增加镜像文件的大小
dd if=/dev/zero bs=1G count=100 >> /mnt/e/case_sensitive.img
参数说明:
-
dd 命令用于向 case_sensitive.img 文件追加 100GB 空间。
-
if=/dev/zero:表示输入文件是 /dev/zero,一个无限输出零字节的设备文件。
-
bs=1G:表示块大小为 1GB。
-
count=100:表示写入 100 个 1GB 的块。
-
>> /mnt/e/case_sensitive.img:表示将输出追加到现有的 case_sensitive.img 文件。
3. 检查和修复文件系统
sudo e2fsck -f /mnt/e/case_sensitive.img
参数说明:
-
e2fsck 命令用于检查和修复 ext2/ext3/ext4 文件系统。
-
-f 选项强制进行文件系统检查,即使文件系统看起来是干净的。
4. 调整文件系统大小
sudo resize2fs /mnt/e/case_sensitive.img
resize2fs 命令用于调整 ext2/ext3/ext4 文件系统的大小以适应新的镜像文件大小。
5. 检查分区表
首先,需要使用 parted 来检查并调整分区表。
sudo parted /mnt/e/case_sensitive.img
在 parted 中执行以下命令
(parted) print
这将打印出当前的分区信息。然后,使用以下命令调整分区大小
(parted) resizepart 1 100%
退出 parted
(parted) quit
6. 重新挂载文件系统
sudo mount /mnt/e/case_sensitive.img /mnt/case_sensitive
通过这些步骤,你可以扩展 case_sensitive.img 的空间而不影响现有数据。
解决编译提示内存不足
21:38:07 You are building on a machine with 7.62GB of RAM
21:38:07
21:38:07 The minimum required amount of free memory is around 16GB,
21:38:07 and even with that, some configurations may not work.
21:38:07
21:38:07 If you run into segfaults or other errors, try reducing your
21:38:07 -j value.
21:38:07 ************************************************************
创建虚拟内存
# 创建一个大小为8GB的文件,路径为/mnt/case_sensitive/swapfile。fallocate是一个快速创建大文件的工具。
sudo fallocate -l 8G /mnt/case_sensitive/swapfile# 更改/swapfile的权限,使其只有所有者(root)有读写权限。这是为了安全,防止其他用户访问交换文件。
sudo chmod 600 /mnt/case_sensitive/swapfile# 将/mnt/case_sensitive/swapfile初始化为交换空间。这个命令会设置文件系统标记,使操作系统知道这是一个交换文件。
sudo mkswap /mnt/case_sensitive/swapfile# 启用/mnt/e/swapfile作为交换空间。这个命令会激活交换文件,使其可以被系统使用。
sudo swapon /mnt/case_sensitive/swapfile# 查看交换空间的使用情况
swapon --show
如何内存还不够?
将虚拟内存大小从8G改为16G
# 关闭当前的交换文件
sudo swapoff /mnt/case_sensitive/swapfile# 创建一个新的16G交换文件
sudo fallocate -l 16G /mnt/case_sensitive/swapfile# 将交换文件的权限设置为600,以确保只有root用户可以读取和写入该文件。
sudo chmod 600 /mnt/case_sensitive/swapfile# 将交换文件格式化为swap格式
sudo mkswap /mnt/case_sensitive/swapfile# 启用新的交换文件
sudo swapon /mnt/case_sensitive/swapfile# 使用 swapon --show 或 free -h 命令验证新的交换文件是否已正确启用。
swapon --show
# 或
free -h
为了确保 /mnt/case_sensitive/swapfile 在重启后仍然有效,将其添加到/etc/fstab文件中
echo '/mnt/case_sensitive/swapfile swap swap sw 0 0
' | sudo tee -a /etc/fstab
设置完成后再编译,如果真实物理内存没有超过16G,提示还会存在,但不影响正常编译。
WSL默认会设置最大可用内存为真实物理内存的50%,如果想修改WSL的最大可用内存可以通过修改.wslconfig 实现:
- [wsl2]- memory=16GB
解决编译报错
‘duplicate entry for genfs entry *’ at token ‘genfscon’
FAILED: out/target/product/wayne/obj/ETC/sepolicy_neverallows_intermediates/sepolicy_neverallowsdevice/xiaomi/sdm660-common/sepolicy/vendor/genfs_contexts:31:ERROR 'duplicate entry for genfs entry (sysfs, /devices/soc/800f000.qcom,spmi/spmi-0/spmi0-00/800f000.qcom,spmi:qcom,pm660@0:qcom,pm660_rtc/rtc)' at token 'genfscon' on line 85793:
# Touchscreen
genfscon proc /nvt_wake_gesture                                 u:object_r:proc_dt2w:s0
checkpolicy:  error(s) encountered while parsing configuration
在 sepolicy 配置文件中存在重复的 genfscon 条目。
路径 /devices/soc/800f000.qcom,spmi/spmi-0/spmi0-00/800f000.qcom,spmi:qcom,pm660@0:qcom,pm660_rtc/rtc 被定义了两次。
在 device/xiaomi/sdm660-common/sepolicy/vendor/genfs_contexts 文件中找到并移除重复定义的那一行。

清理缓存并重新编译
make clean
brunch wayne
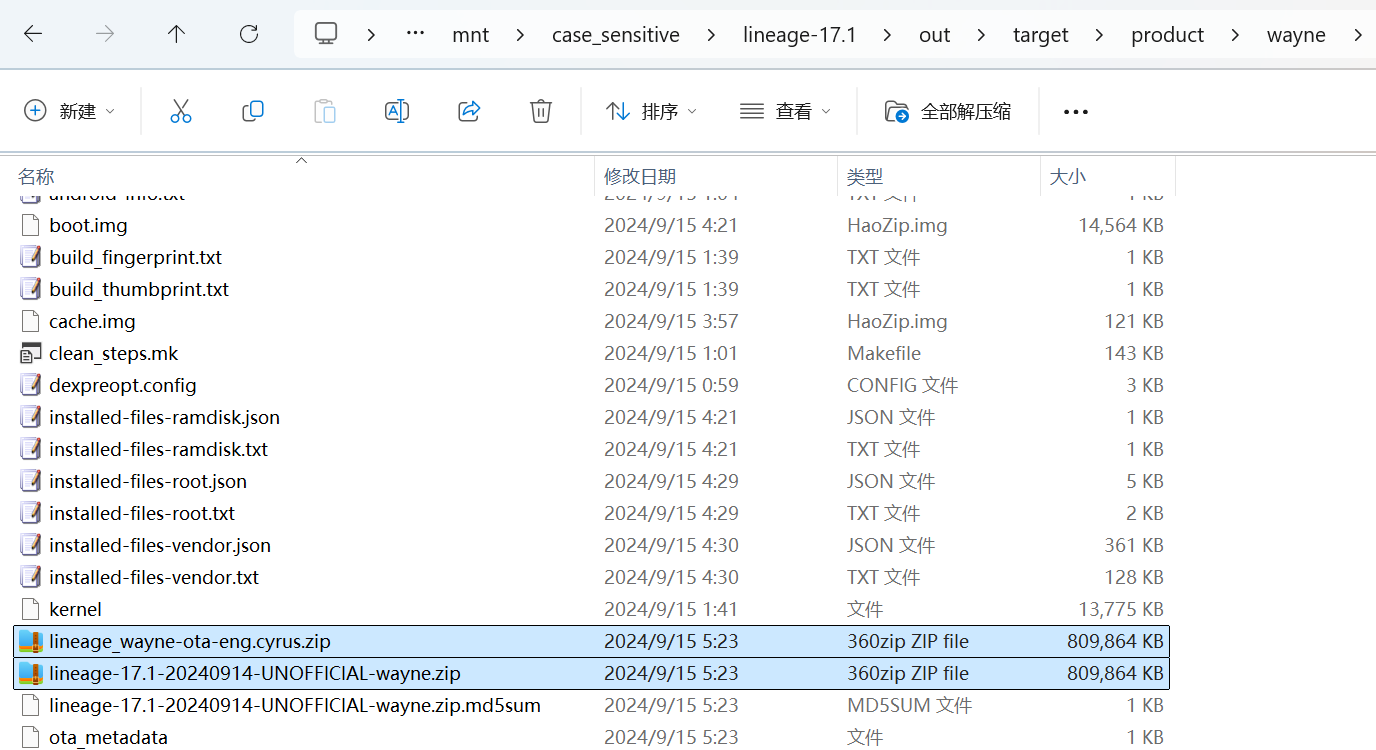
编译完成
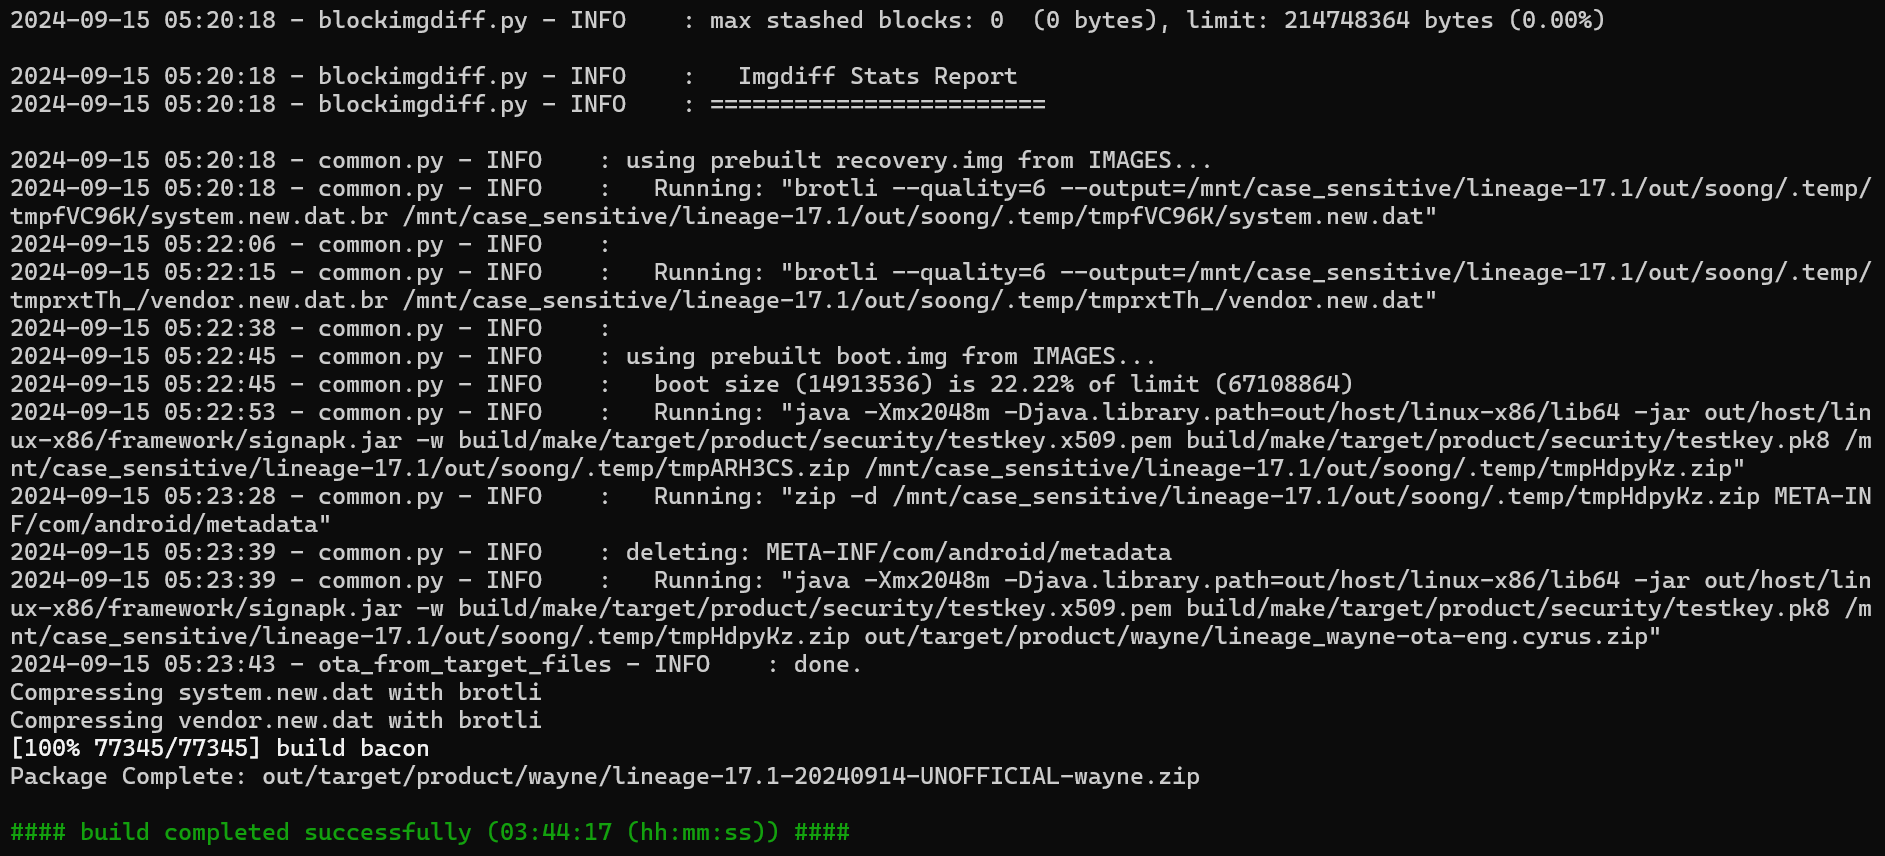
编译完成后可以在 out/target/product/wayne 目录下看到下面两个zip文件:
-
lineage-17.1-20240914-UNOFFICIAL-wayne.zip 是完整的 LineageOS ROM,通常用于全新安装或重刷设备。
-
lineage_wayne-ota-eng.cyrus.zip 是一个 OTA 更新包,可能用于增量更新现有的 LineageOS 安装,通常不用于首次刷机。
刷机
进入recovery,先格式化数据,再用 adb sideload 开始刷机
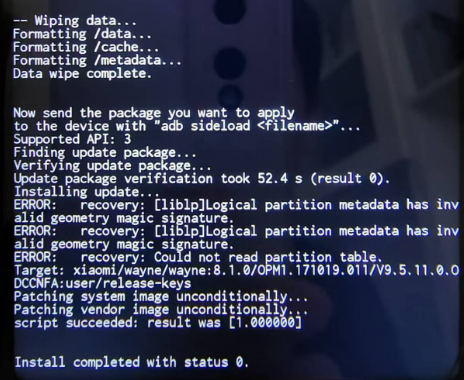
等待刷机完成,重启系统。

详细的刷机教程可以参考这篇文章【LineageOS刷机教程】。
参考:
https://wiki.lineageos.org/devices/wayne/build/
[ROM][OTA][10.x] LineageOS 17.1 Unofficial [wayne/ Mi 6X]


