整合SpringCloud和SpringCloudAlibaba
<dependencyManagement><dependencies><!--整合spring cloud--><dependency><groupId>org.springframework.cloud</groupId><artifactId>spring-cloud-dependencies</artifactId><version>Greenwich.SR1</version><type>pom</type><scope>import</scope></dependency><!--整合spring cloud alibaba--><dependency><groupId>org.springframework.cloud</groupId><artifactId>spring-cloud-alibaba-dependencies</artifactId><version>0.9.0.RELEASE</version><type>pom</type><scope>import</scope></dependency></dependencies>
</dependencyManagement>
服务发现组件Nacos
下载地址:https://github.com/alibaba/nacos/releases
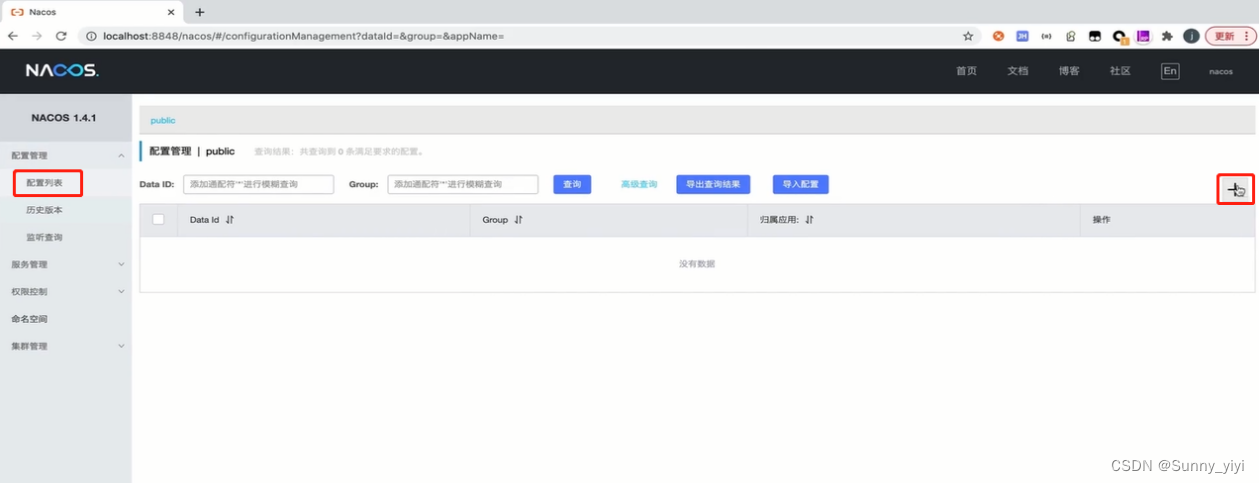
搭建Nacos Server:
解压后打开终端,进入bin目录下,执行sh startup.sh -m standalone
启动nacos
本地访问:http://localhost:8848/nacos/index.html#/login
登录nacos 账号/密码都是: nacos
将一个服务注册到Nacos
1、加依赖
<dependency><groupId>org.springframework.cloud</groupId><artifactId>spring-cloud-starter-alibaba-nacos-discovery</artifactId>
</dependency>
2、写配置
resources/application.yml
spring:datasource:url: jdbc:mysql://localhost:3306/user_centerhikari:username: rootpassword: rootdriver-class-name: com.mysql.cj.jdbc.Drivercloud:nacos:discovery:server-addr: localhost:8848 # 指定nacos server 地址和端口application:name: user-center # 服务名称尽量用- 不要用_
然后再终端:mvn clean install
然后启动服务,服务就会被注册到nacos
此时打开之前启动登录的nacos网页,在 服务管理/服务列表 中就会有user-center服务了
使用测试
java">import org.springframework.cloud.client.discovery.DiscoveryClient;@RestController
public class TestController {@Autowired(required = false)DiscoveryClient discoveryClient;//测试 Nacos服务发现中心,证明内容中心总能找到用户中心@GetMapping("test2")public List<ServiceInstance> getInstances(){//查询指定服务的所有实例信息//处理Nacos服务发现中心外,其他的consul、zookeeper等其他服务发现中心也可以使用DiscoveryClient接口List<ServiceInstance> instances = discoveryClient.getInstances("user-center");//查询服务中心的所有服务名称List<String> services = discoveryClient.getServices();System.out.println(services);return instances;}
为一个服务引入服务发现nacos,调用服务发现中心的服务
java">@Autowired(required = false)
DiscoveryClient discoveryClient;/*** 怎么调用微服务/users/{userId}*/List<ServiceInstance> instances = discoveryClient.getInstances("user-center");String url = instances.stream().map(instance -> instance.getUri().toString() + "/users/{id}").findFirst().orElseThrow(() -> new IllegalArgumentException("没有当前实例"));log.info("请求的目标地址 {}", url);
//参数1:表示请求地址;参数2:返回类型;参数3:参数1请求接口中{}中的参数User user = restTemplate.getForObject(url, User.class, userId);
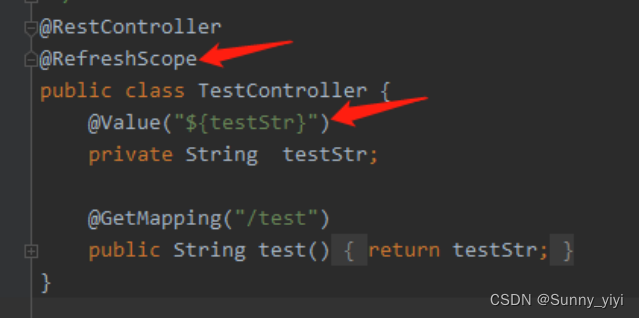
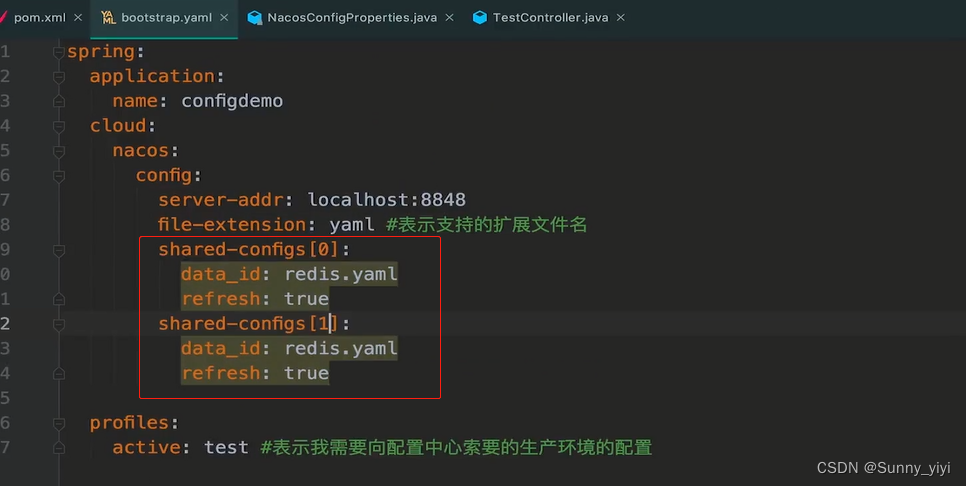
Nacos Config配置中心
主要解决的问题就是配置文件可以动态的配置,发布就生效,不用重启服务
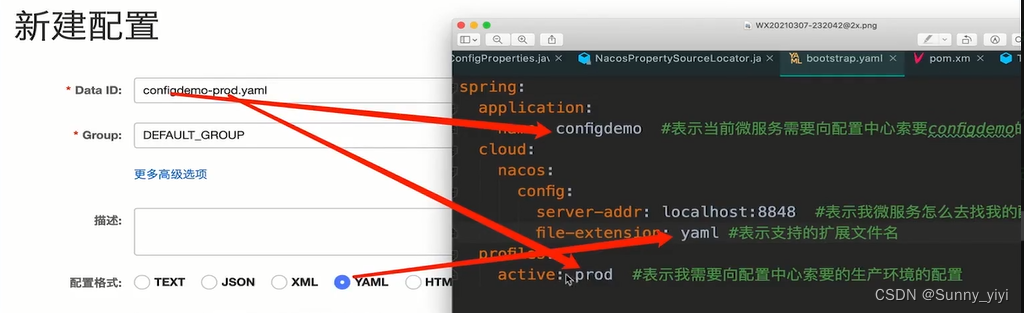
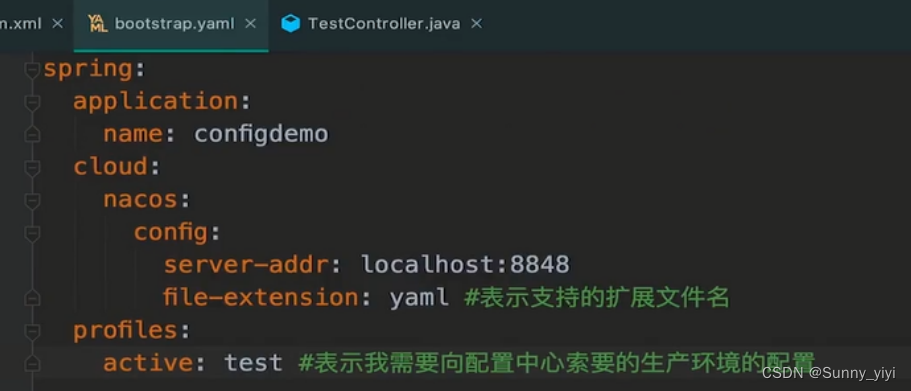
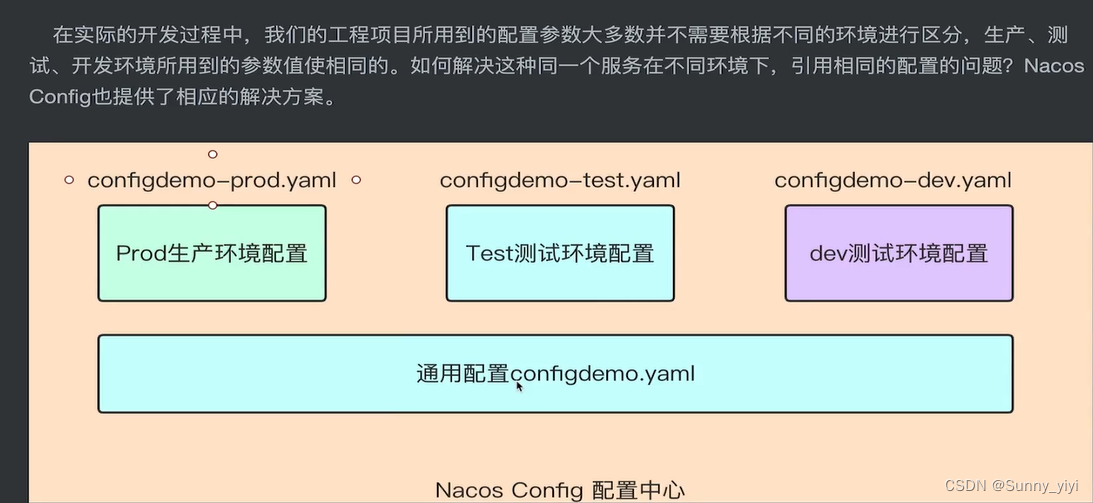
不同的微服务共用同一个配置文件
使用Ribbon实现负载均衡
配置
1.加依赖:不用加,因为spring-cloud-starter-alibaba-nacos-discovery中带有Ribbon
2.加注解:启动类中的restTemplate方法上加@LoadBalanced注解
java">@Bean
@LoadBalanced
public RestTemplate restTemplate(){return new RestTemplate();
}
使用
java">/*** 怎么调用微服务/users/{userId},后面会用Feign发送HTTP请求* 参数1:表示Nacos服务中心的请求地址;黄色的是application.name* 参数2:返回类型;* 参数3:参数1请求接口中{}中的参数*/
String url = "http://user-center/users/{userId}";
User user = restTemplate.getForObject(url, User.class, userId);
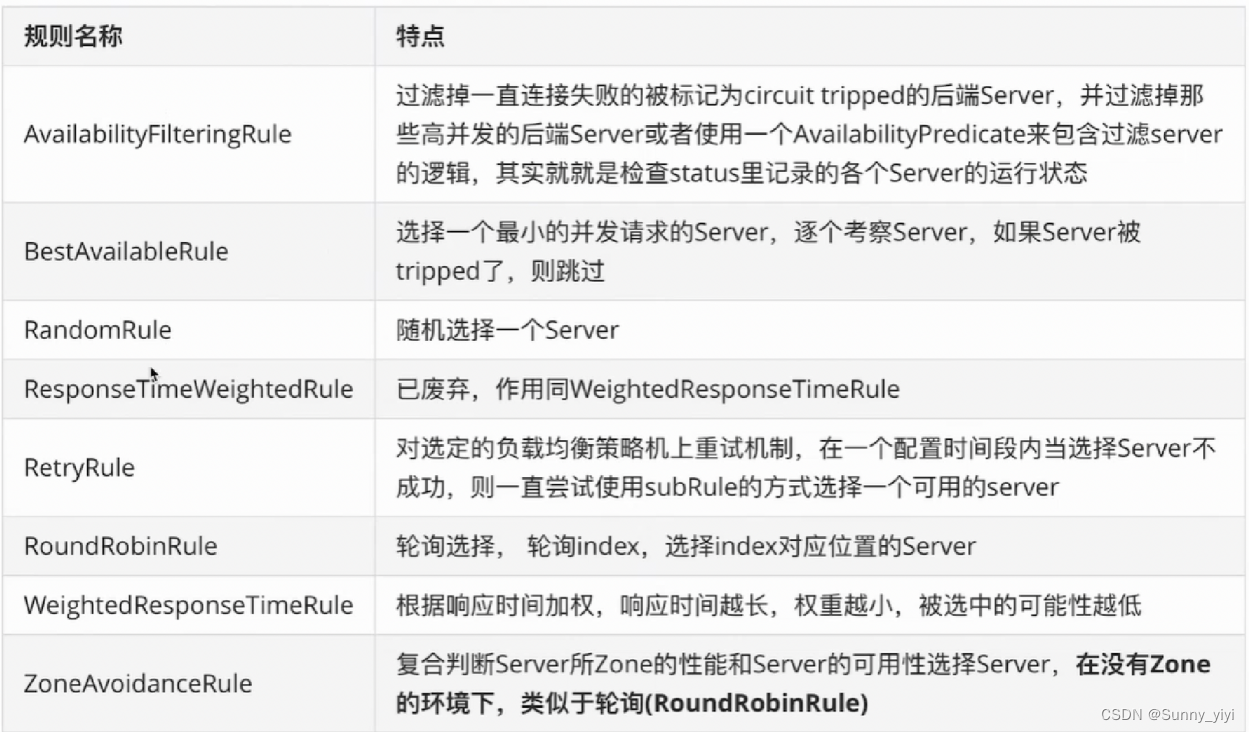
自定义负载均衡规则配置
Ribbon内置负载均衡规则:
细粒度配置
在消费者content-center中配置服务者user-center
默认Ribbon是轮循规则,也可以自定义负载均衡规则:修改application.yml
user-center:ribbon:NFLoadBalancerRuleClassName: com.netflix.loadbalancer.RandomRule
全局配置
1.在com包外面定义一个类RibbonConf,new一个规则
java">package ribbonConf;import com.netflix.loadbalancer.IRule;
import com.netflix.loadbalancer.RandomRule;
import org.springframework.context.annotation.Bean;
import org.springframework.context.annotation.Configuration;@Configuration
public class RibbonConf {@Beanpublic IRule ribbonRule(){return new RandomRule();}
}
2.在com.itcast.contentcenter.conf包里面创建类
java">package com.itcast.contentcenter.conf;import org.springframework.cloud.netflix.ribbon.RibbonClients;
import org.springframework.context.annotation.Configuration;
import ribbonConf.RibbonConf;@Configuration
@RibbonClients(defaultConfiguration = RibbonConf.class) //引用上面的类
public class UserCenterRibbonConf {
}
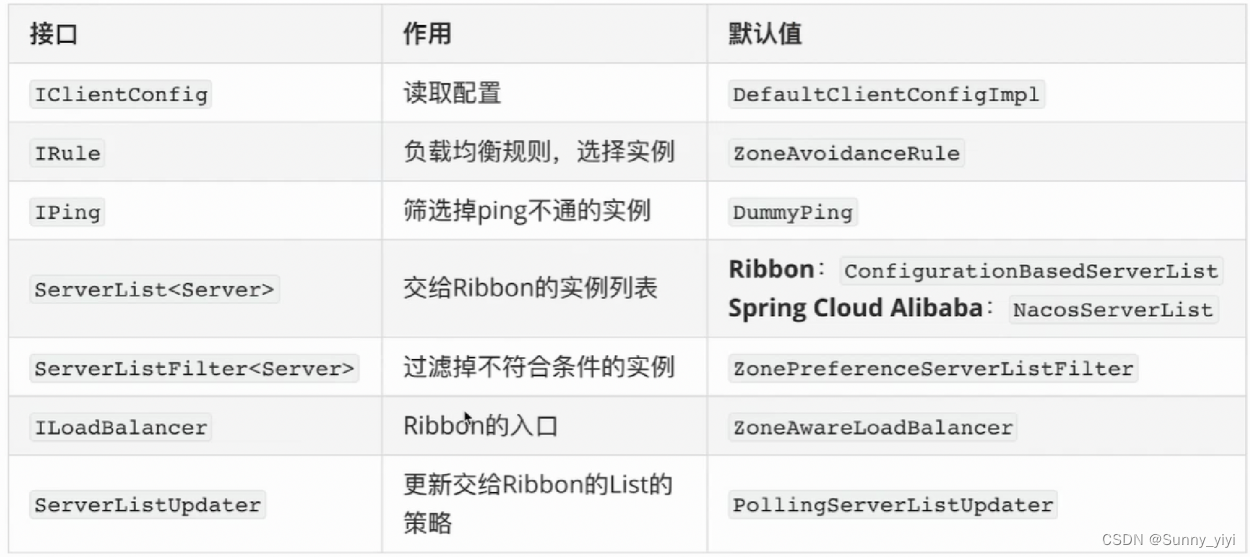
Ribbon支持的配置项:
Ribbon饥饿加载
修改application.yml
ribbon:eager-load:enabled: trueclients: user-center #表示给哪些指定的服务开启饿加载,多个服务之间逗号隔开
扩展Ribbon支持Nacos权重负载均衡规则
1、写一个类NacosWeightedRule
java">import com.alibaba.nacos.api.exception.NacosException;
import com.alibaba.nacos.api.naming.NamingService;
import com.alibaba.nacos.api.naming.pojo.Instance;
import com.netflix.client.config.IClientConfig;
import com.netflix.loadbalancer.*;
import lombok.extern.slf4j.Slf4j;
import org.springframework.beans.factory.annotation.Autowired;
import org.springframework.cloud.alibaba.nacos.NacosDiscoveryProperties;
import org.springframework.cloud.alibaba.nacos.ribbon.NacosServer;@Slf4j
public class NacosWeightedRule extends AbstractLoadBalancerRule {@Autowiredprivate NacosDiscoveryProperties nacosDiscoveryProperties;@Overridepublic void initWithNiwsConfig(IClientConfig clientConfig) {// 读取配置文件,并初始化NacosWeightedRule}@Overridepublic Server choose(Object key) {try {BaseLoadBalancer loadBalancer = (BaseLoadBalancer) this.getLoadBalancer();// 想要请求的微服务的名称String name = loadBalancer.getName();// 拿到服务发现的相关APINamingService namingService = nacosDiscoveryProperties.namingServiceInstance();// nacos client自动通过基于权重的负载均衡算法,给我们选择一个实例。Instance instance = namingService.selectOneHealthyInstance(name);log.info("选择的实例是:port = {}, instance = {}", instance.getPort(), instance);return new NacosServer(instance);} catch (NacosException e) {return null;}}
}
2、在com包外,再写一个类,并配置上面的类(全局配置)
java">package ribbonConf;import com.itcast.contentcenter.conf.NacosWeightedRule;
import com.netflix.loadbalancer.IRule;
import org.springframework.context.annotation.Bean;
import org.springframework.context.annotation.Configuration;@Configuration
public class RibbonConf {@Beanpublic IRule ribbonRule(){return new NacosWeightedRule();}
}
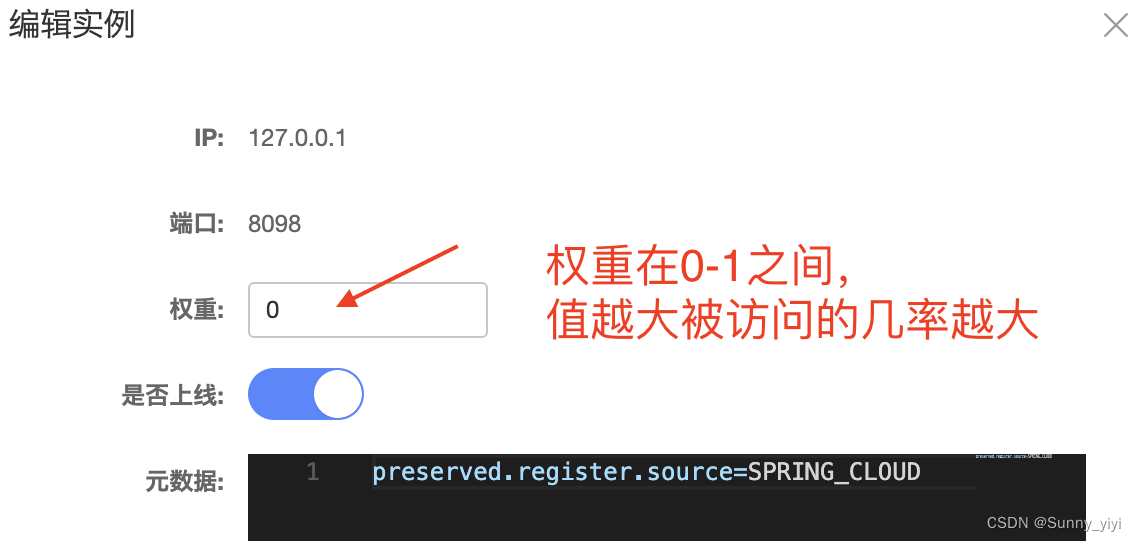
3、在Nacos页面中修改权重

扩展Ribbon同一集群优先调用负载均衡规则
java">import com.alibaba.nacos.api.exception.NacosException;
import com.alibaba.nacos.api.naming.NamingService;
import com.alibaba.nacos.api.naming.pojo.Instance;
import com.alibaba.nacos.client.naming.core.Balancer;
import com.netflix.client.config.IClientConfig;
import com.netflix.loadbalancer.AbstractLoadBalancerRule;
import com.netflix.loadbalancer.BaseLoadBalancer;
import com.netflix.loadbalancer.Server;
import lombok.extern.slf4j.Slf4j;
import org.springframework.beans.factory.annotation.Autowired;
import org.springframework.cloud.alibaba.nacos.NacosDiscoveryProperties;
import org.springframework.cloud.alibaba.nacos.ribbon.NacosServer;
import org.springframework.util.CollectionUtils;import java.util.ArrayList;
import java.util.List;
import java.util.Objects;
import java.util.stream.Collectors;@Slf4j
public
class NacosSamClusWeightedRule extends AbstractLoadBalancerRule {@AutowiredNacosDiscoveryProperties nacosDiscoveryProperties;@Overridepublic void initWithNiwsConfig(IClientConfig iClientConfig) {}@Overridepublic Server choose(Object o) {try {//拿到配置文件中的集群名称BJString clusterName = nacosDiscoveryProperties.getClusterName();BaseLoadBalancer loadBalancer = (BaseLoadBalancer) this.getLoadBalancer();// 想要请求的微服务的名称String name = loadBalancer.getName();// 拿到服务发现的相关APINamingService namingService = nacosDiscoveryProperties.namingServiceInstance();//1.找到指定服务的所有实例 AList<Instance> instances = namingService.selectInstances(name, true);//2.过滤出相同集群下的所有实例 BList<Instance> sameClusInstances = instances.stream().filter(instance -> Objects.equals(instance.getClusterName(), clusterName)).collect(Collectors.toList());//3.如果B是空,则用AList<Instance> instanceToBeChosen = new ArrayList<>();if(CollectionUtils.isEmpty(sameClusInstances)){instanceToBeChosen = instances;log.warn("发生跨集群调用,name={},clusterName={},instance={}",name,clusterName,instances);}else {instanceToBeChosen = sameClusInstances;}//4.基于权重的负载均衡算法,返回1个实例Instance instance = ExtendBalancer.getHostByRandomWeight2(instanceToBeChosen);log.info("选择的实例是 port={},instance={}",instance.getPort(),instance);return new NacosServer(instance);} catch (NacosException e) {log.error("发生异常了",e);e.printStackTrace();return null;}}
}class ExtendBalancer extends Balancer{public static Instance getHostByRandomWeight2(List<Instance> hosts){return getHostByRandomWeight(hosts);}
}
扩展Ribbon-基于元数据的版本控制负载均衡规则
java">import com.alibaba.nacos.api.naming.NamingService;
import com.alibaba.nacos.api.naming.pojo.Instance;
import com.alibaba.nacos.client.naming.core.Balancer;
import com.alibaba.nacos.client.naming.utils.CollectionUtils;
import com.alibaba.nacos.client.utils.StringUtils;
import com.netflix.client.config.IClientConfig;
import com.netflix.loadbalancer.AbstractLoadBalancerRule;
import com.netflix.loadbalancer.DynamicServerListLoadBalancer;
import com.netflix.loadbalancer.Server;
import lombok.extern.slf4j.Slf4j;
import org.springframework.beans.factory.annotation.Autowired;
import org.springframework.cloud.alibaba.nacos.NacosDiscoveryProperties;
import org.springframework.cloud.alibaba.nacos.ribbon.NacosServer;import java.util.List;
import java.util.Objects;
import java.util.stream.Collectors;@Slf4j
public class NacosFinalRule extends AbstractLoadBalancerRule {@Autowiredprivate NacosDiscoveryProperties nacosDiscoveryProperties;@Overridepublic Server choose(Object key) {// 负载均衡规则:优先选择同集群下,符合metadata的实例// 如果没有,就选择所有集群下,符合metadata的实例// 1. 查询所有实例 A// 2. 筛选元数据匹配的实例 B// 3. 筛选出同cluster下元数据匹配的实例 C// 4. 如果C为空,就用B// 5. 随机选择实例try {String clusterName = this.nacosDiscoveryProperties.getClusterName();String targetVersion = this.nacosDiscoveryProperties.getMetadata().get("target-version");DynamicServerListLoadBalancer loadBalancer = (DynamicServerListLoadBalancer) getLoadBalancer();String name = loadBalancer.getName();NamingService namingService = this.nacosDiscoveryProperties.namingServiceInstance();// 所有实例List<Instance> instances = namingService.selectInstances(name, true);List<Instance> metadataMatchInstances = instances;// 如果配置了版本映射,那么只调用元数据匹配的实例if (StringUtils.isNotBlank(targetVersion)) {metadataMatchInstances = instances.stream().filter(instance -> Objects.equals(targetVersion, instance.getMetadata().get("version"))).collect(Collectors.toList());if (CollectionUtils.isEmpty(metadataMatchInstances)) {log.warn("未找到元数据匹配的目标实例!请检查配置。targetVersion = {}, instance = {}", targetVersion, instances);return null;}}List<Instance> clusterMetadataMatchInstances = metadataMatchInstances;// 如果配置了集群名称,需筛选同集群下元数据匹配的实例if (StringUtils.isNotBlank(clusterName)) {clusterMetadataMatchInstances = metadataMatchInstances.stream().filter(instance -> Objects.equals(clusterName, instance.getClusterName())).collect(Collectors.toList());if (CollectionUtils.isEmpty(clusterMetadataMatchInstances)) {clusterMetadataMatchInstances = metadataMatchInstances;log.warn("发生跨集群调用。clusterName = {}, targetVersion = {}, clusterMetadataMatchInstances = {}", clusterName, targetVersion, clusterMetadataMatchInstances);}}Instance instance = ExtendBalancer2.getHostByRandomWeight2(clusterMetadataMatchInstances);return new NacosServer(instance);} catch (Exception e) {log.warn("发生异常", e);return null;}}@Overridepublic void initWithNiwsConfig(IClientConfig iClientConfig) {}
}/*** 负载均衡算法*/
class ExtendBalancer2 extends Balancer{public static Instance getHostByRandomWeight2(List<Instance> hosts){return getHostByRandomWeight(hosts);}
}
使用Feign实现远程HTTP调用(代替RestTemplate,实现了负载均衡)
1.加依赖
<dependency><groupId>org.springframework.cloud</groupId><artifactId>spring-cloud-starter-openfeign</artifactId>
</dependency>
2.加注解
启动类上加 @EnableFeignClients
使用Feign发送HTTP请求
- 定义一个FeignClient接口
java">//name指定要请求的微服务的名称,配置文件中spring.application.name的值
@FeignClient(name = "user-center")
public interface UserCenterFeignClient {/*** http://user-center/users/{id}* @param id* @return*/@GetMapping("/users/{id}")User findById(@PathVariable Integer id);
}
2.在Service中注入上面定义的接口并使用
java">@Slf4j
@Service
public class ShareService {@Autowired(required = false)ShareMapper shareMapper;@Autowired(required = false)UserCenterFeignClient userCenterFeignClient;public ShareVo findById(Integer id){Share share = shareMapper.selectByPrimaryKey(id);Integer userId = share.getUserId();/*** 使用Feign 调用微服务http://user-center/users/{id}*/User user = userCenterFeignClient.findById(userId);/*** 消息的装配*/ShareVo shareVo = new ShareVo();//使用Spring工具类BeanUtils将share属性全部copy给shareVo,不用一个一个setBeanUtils.copyProperties(share, shareVo);shareVo.setNickName(user.getWxNickname());return shareVo;}
}
Feign的日志级别和配置
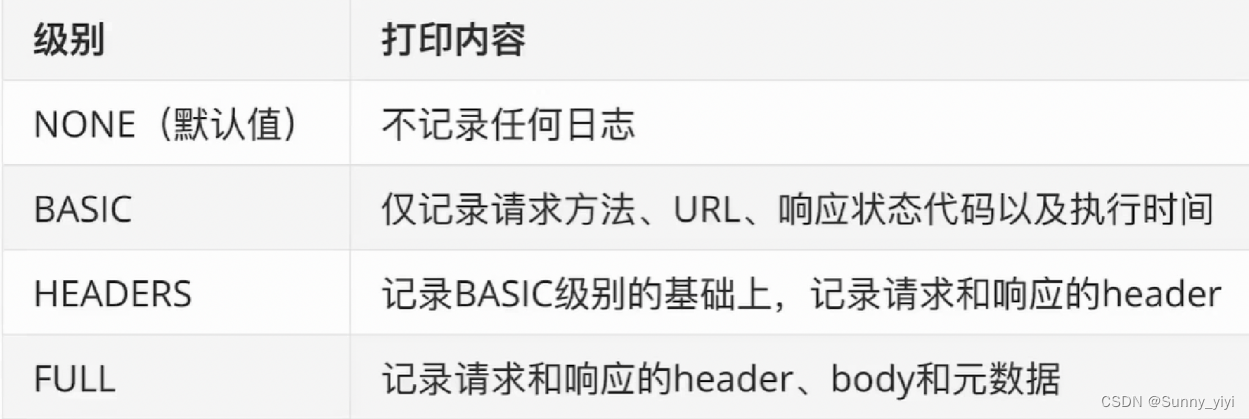
细粒度配置Feign日志:application.yml
#配置Feign日志级别建立在Feign接口的日志级别是debug基础上的
feign:client:config:
# 想要调用的微服务名称,全局配置将user-center改为default即可user-center:loggerLevel: full
logging:level:com.itcast.contentcenter.feignclient.UserCenterFeignClient: debug
全局配置Feign日志:
全局配置将细粒度配置中的user-center改为default即可
Feign脱离Ribbon使用
java">@FeignClient(name = "baidu",url = "http://www.baidu.com")
public interface TestBaiduFeignClient {@GetMapping("")String index();
}
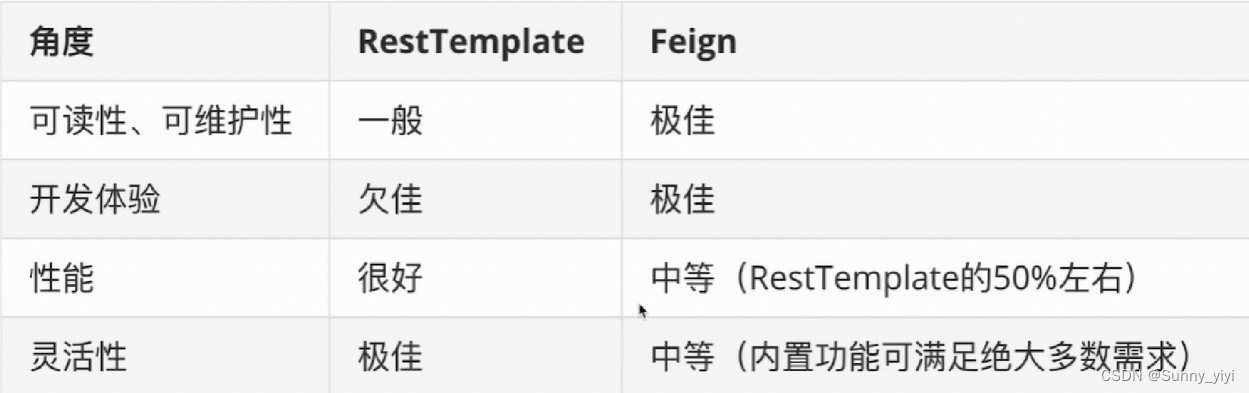
RestTemplate VS Feign
Feign性能优化
1.加依赖
<dependency><groupId>io.github.openfeign</groupId><artifactId>feign-httpclient</artifactId>
</dependency>
2.写配置
#配置Feign日志级别建立在Feign接口的日志级别是debug基础上的
feign:client:config:user-center:loggerLevel: basichttpclient:
#    让feign使用apache httpclient做请求,而不是urlconnection,提升性能enabled: true
#    feign的最大连接数max-connections: 200
#    feign的单个路径最大连接数max-connections-per-route: 50
logging:level:com.itcast.contentcenter.feignclient.UserCenterFeignClient: debug
服务容错限流-Sentinel
整合Sentinel
1.加依赖
<dependency><groupId>org.springframework.cloud</groupId><artifactId>spring-cloud-starter-alibaba-sentinel</artifactId>
</dependency>
2.写配置
#        指定sentinel 控制台的地址
Spring.cloud.sentinel.transport.dashboard: localhost:8080
Sentinel控制台-可视化界面
1.在终端启动控制台jar文件
java -jar sentinel-dashboard-1.6.2.jar
2.浏览器登录Sentinel
http://localhost:8080/#/login
账号密码都是:sentinel
Feign整合Sentinel
1.添加配置:

2.限流/降级发生时,定制自己的处理逻辑
java">@Component
@Slf4j
public class UserCenterFeignClientFallBackFactory implements FallbackFactory {@Overridepublic Object create(Throwable throwable) {return new UserCenterFeignClient() {@Overridepublic User findById(Integer id) {log.warn("远程调用被限流/降级了",throwable);User user = new User();user.setWxNickname("默认用户");return user;}};}
}
java">//name指定要请求的微服务的名称,fallbackFactory指定远程调用失败时的处理类
@FeignClient(name = "user-center",fallbackFactory = UserCenterFeignClientFallBackFactory.class)
public interface UserCenterFeignClient {/*** http://user-center/users/{id}*/@GetMapping("/users/{id}")User findById(@PathVariable Integer id);}
SpringCloud Gateway
基本路由操作
新建GatewayServ项目,并引入下面依赖
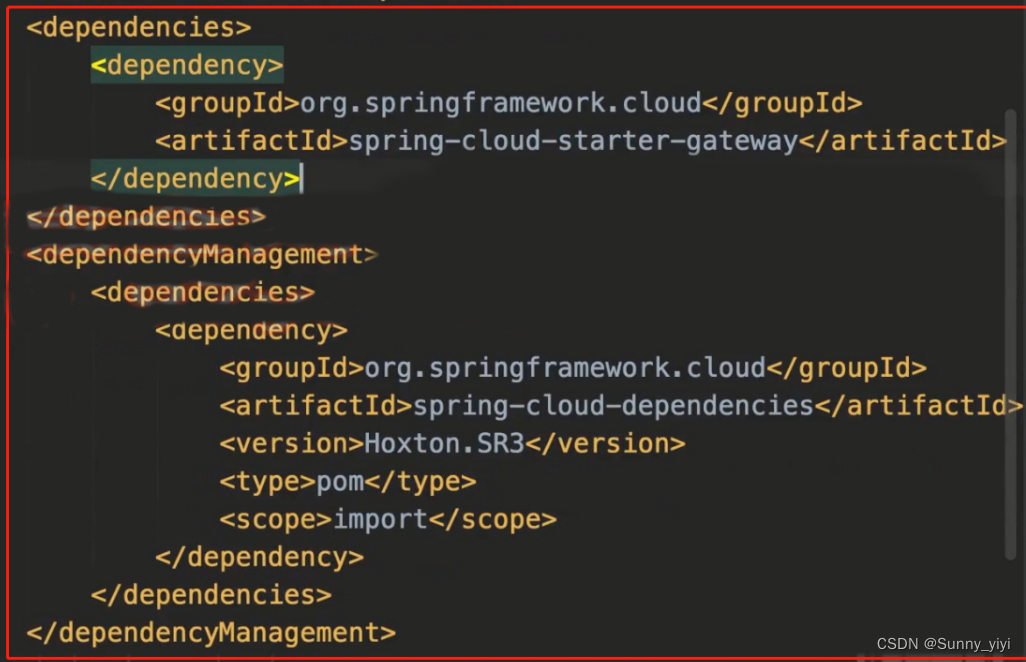
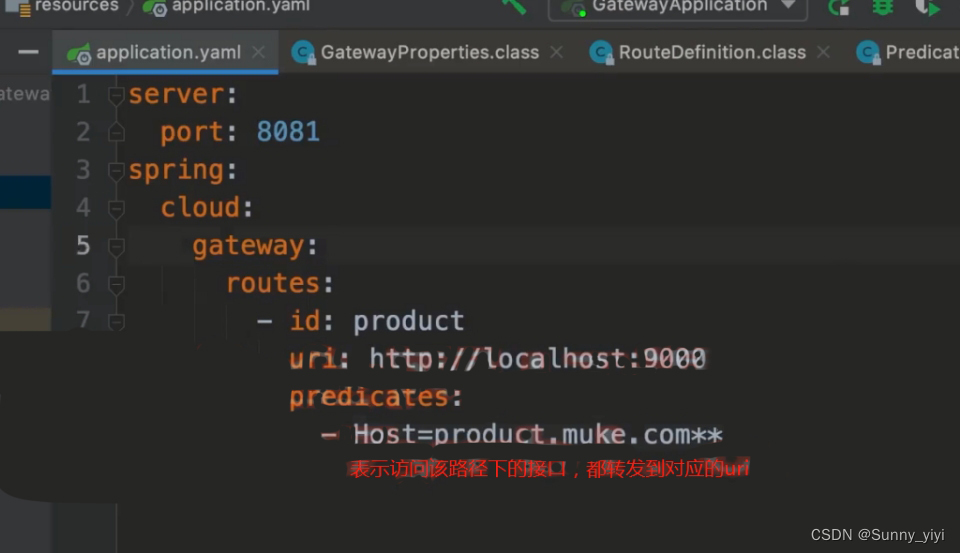
Application.yaml文件配置
分布式事务 Seata
分布式事务seata 点我进入