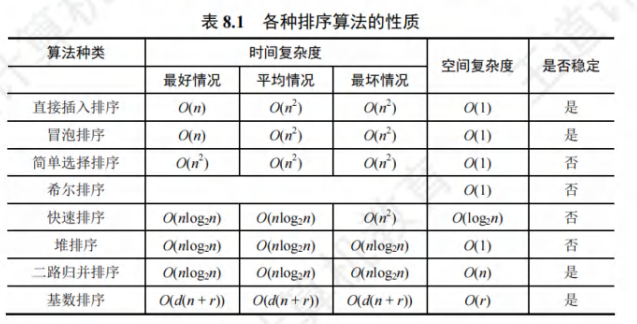
PyTorch:3-基础实战
注:所有资料来源且归属于thorough-pytorch(https://datawhalechina.github.io/thorough-pytorch/),下文仅为学习记录
3.1:ResNet基本介绍
退化现象(degradation):增加网络层数的过程中,随着训练准确率逐渐饱和,继续增加层数,训练准确率出现下降的现象。且这种下降不是过拟合。
快捷连接(shortcut connection):将输入直接连接到后面的层,一定程度缓解了梯度消失和梯度爆炸,消除深度过大导致神经网络训练困难的问题。
梯度消失和梯度爆炸的根源:DNN结构,和,反向传播算法
梯度爆炸:网络层之间的梯度(值大于 1.0)重复相乘导致的指数级增长
梯度消失:网络层之间的梯度(值小于 1.0)重复相乘导致的指数级变小
3.2:torchvision的源代码
卷积核封装
封装3x3和1x1卷积核
python">def conv3x3(in_planes: int, out_planes: int, stride: int = 1, groups: int = 1, dilation: int = 1) -> nn.Conv2d:"""3x3 convolution with padding"""return nn.Conv2d(in_planes, # 输入通道数out_planes, # 输出通道数kernel_size=3, # 卷积核尺寸stride=stride, # 步长padding=dilation, # 填充groups=groups, # 分组bias=False, # 偏移量dilation=dilation, # 空洞卷积的中间间隔)def conv1x1(in_planes: int, out_planes: int, stride: int = 1) -> nn.Conv2d:"""1x1 convolution"""return nn.Conv2d(in_planes, out_planes, kernel_size=1, stride=stride, bias=False)# 解释同上
基本模块设计
ResNet常见的大小有ResNet-18,ResNet-34,ResNet-50、ResNet-101和ResNet-152,其中网络后面的数字代表的是网络的层数。
两个基本模块:BasicBlock和BottleNeck
两个block类输入一个通道为in_planes维的度特征图,输出一个planes*block.expansion维的特征图,其中planes的数目大小等于in_planes。
支路上的downsample操作:对shortcut支路进行大小或维度上的调整。
shortcut connection
【1】同等维度的映射:输入输出直接相加
F ( x ) + x F(x)+x F(x)+x
【2】不同维度的映射:给x补充一个线性映射来匹配维度(通常是1x1卷积)
basic block
BasicBlock模块用来构建resnet18和resnet34
python">class BasicBlock(nn.Module):expansion: int = 1def __init__(self,inplanes: int,planes: int,stride: int = 1,downsample: Optional[nn.Module] = None,groups: int = 1,base_width: int = 64,dilation: int = 1,norm_layer: Optional[Callable[..., nn.Module]] = None,) -> None:super().__init__()if norm_layer is None:norm_layer = nn.BatchNorm2dif groups != 1 or base_width != 64:raise ValueError("BasicBlock only supports groups=1 and base_width=64")if dilation > 1:raise NotImplementedError("Dilation > 1 not supported in BasicBlock")# Both self.conv1 and self.downsample layers downsample the input when stride != 1self.conv1 = conv3x3(inplanes, planes, stride)self.bn1 = norm_layer(planes)self.relu = nn.ReLU(inplace=True)self.conv2 = conv3x3(planes, planes)self.bn2 = norm_layer(planes)self.downsample = downsampleself.stride = stridedef forward(self, x: Tensor) -> Tensor:identity = x # 备份out = self.conv1(x) # 对x做卷积 out = self.bn1(out) # 对x归一化 out = self.relu(out) # 对x用激活函数out = self.conv2(out) # 对x做卷积out = self.bn2(out) # 归一化if self.downsample is not None:identity = self.downsample(x)out += identity # 进行downsampleout = self.relu(out)return out
bottle neck
BottleNeck模块用来构建resnet50,resnet101和resnet152
python">class Bottleneck(nn.Module):expansion: int = 4 # 对输出通道进行倍增def __init__(self,inplanes: int,planes: int,stride: int = 1,downsample: Optional[nn.Module] = None,groups: int = 1,base_width: int = 64,dilation: int = 1,norm_layer: Optional[Callable[..., nn.Module]] = None,) -> None:super().__init__()if norm_layer is None:norm_layer = nn.BatchNorm2dwidth = int(planes * (base_width / 64.0)) * groups# Both self.conv2 and self.downsample layers downsample the input when stride != 1self.conv1 = conv1x1(inplanes, width)self.bn1 = norm_layer(width)self.conv2 = conv3x3(width, width, stride, groups, dilation)self.bn2 = norm_layer(width)self.conv3 = conv1x1(width, planes * self.expansion)self.bn3 = norm_layer(planes * self.expansion)self.relu = nn.ReLU(inplace=True)self.downsample = downsampleself.stride = stride# Bottleneckd forward函数和BasicBlock类似def forward(self, x: Tensor) -> Tensor:identity = xout = self.conv1(x)out = self.bn1(out)out = self.relu(out)out = self.conv2(out)out = self.bn2(out)out = self.relu(out)out = self.conv3(out)out = self.bn3(out)if self.downsample is not None:identity = self.downsample(x)out += identityout = self.relu(out)return out
网络整体结构
python">class ResNet(nn.Module):def __init__(self,block: Type[Union[BasicBlock, Bottleneck]], # 选择基本模块layers: List[int], # 每一层block的数目构成 -> [3,4,6,3]num_classes: int = 1000, # 分类数目zero_init_residual: bool = False, # 初始化#######其他卷积构成,与本文ResNet无关######groups: int = 1,width_per_group: int = 64,replace_stride_with_dilation: Optional[List[bool]] = None,#########################################norm_layer: Optional[Callable[..., nn.Module]] = None, # norm层) -> None:super().__init__()_log_api_usage_once(self)if norm_layer is None:norm_layer = nn.BatchNorm2dself._norm_layer = norm_layerself.inplanes = 64 # 输入通道#######其他卷积构成,与本文ResNet无关######self.dilation = 1 # 空洞卷积if replace_stride_with_dilation is None:# each element in the tuple indicates if we should replace# the 2x2 stride with a dilated convolution insteadreplace_stride_with_dilation = [False, False, False]if len(replace_stride_with_dilation) != 3:raise ValueError("replace_stride_with_dilation should be None "f"or a 3-element tuple, got {replace_stride_with_dilation}")self.groups = groupsself.base_width = width_per_group#########################################self.conv1 = nn.Conv2d(3, self.inplanes, kernel_size=7, stride=2, padding=3, bias=False)self.bn1 = norm_layer(self.inplanes)self.relu = nn.ReLU(inplace=True)self.maxpool = nn.MaxPool2d(kernel_size=3, stride=2, padding=1)# 通过_make_layer带到层次化设计的效果self.layer1 = self._make_layer(block, 64, layers[0]) # 对应着conv2_xself.layer2 = self._make_layer(block, 128, layers[1], stride=2, dilate=replace_stride_with_dilation[0]) # 对应着conv3_xself.layer3 = self._make_layer(block, 256, layers[2], stride=2, dilate=replace_stride_with_dilation[1]) # 对应着conv4_xself.layer4 = self._make_layer(block, 512, layers[3], stride=2, dilate=replace_stride_with_dilation[2]) # 对应着conv5_x# 分类头self.avgpool = nn.AdaptiveAvgPool2d((1, 1))self.fc = nn.Linear(512 * block.expansion, num_classes)# 模型初始化for m in self.modules():if isinstance(m, nn.Conv2d):nn.init.kaiming_normal_(m.weight, mode="fan_out", nonlinearity="relu")elif isinstance(m, (nn.BatchNorm2d, nn.GroupNorm)):nn.init.constant_(m.weight, 1)nn.init.constant_(m.bias, 0)if zero_init_residual:for m in self.modules():if isinstance(m, Bottleneck) and m.bn3.weight is not None:nn.init.constant_(m.bn3.weight, 0) # type: ignore[arg-type]elif isinstance(m, BasicBlock) and m.bn2.weight is not None:nn.init.constant_(m.bn2.weight, 0) # type: ignore[arg-type]# 层次化设计def _make_layer(self,block: Type[Union[BasicBlock, Bottleneck]], # 基本构成模块选择planes: int, # 输入的通道blocks: int, # 模块数目stride: int = 1, # 步长dilate: bool = False, # 空洞卷积,与本文无关) -> nn.Sequential:norm_layer = self._norm_layerdownsample = None # 是否采用下采样####################无关#####################previous_dilation = self.dilation if dilate:self.dilation *= stridestride = 1#############################################if stride != 1 or self.inplanes != planes * block.expansion:downsample = nn.Sequential(conv1x1(self.inplanes, planes * block.expansion, stride),norm_layer(planes * block.expansion),)# 使用layers存储每个layerlayers = []layers.append(block(self.inplanes, planes, stride, downsample, self.groups, self.base_width, previous_dilation, norm_layer))self.inplanes = planes * block.expansionfor _ in range(1, blocks):layers.append(block(self.inplanes,planes,groups=self.groups,base_width=self.base_width,dilation=self.dilation,norm_layer=norm_layer,))# 将layers通过nn.Sequential转化为网络return nn.Sequential(*layers)def _forward_impl(self, x: Tensor) -> Tensor:# See note [TorchScript super()]x = self.conv1(x) # conv1 x shape [1 64 112 112]x = self.bn1(x) # 归一化处理 x = self.relu(x) # 激活函数x = self.maxpool(x) # conv2_x的3x3 maxpool, x shape [1 64 56 56]x = self.layer1(x) # layer 1x = self.layer2(x) # layer 2x = self.layer3(x) # layer 3x = self.layer4(x) # layer 4x = self.avgpool(x) # 自适应池化x = torch.flatten(x, 1) x = self.fc(x) # 分类return xdef forward(self, x: Tensor) -> Tensor:return self._forward_impl(x)
模型步骤
【1】首先是一个7 x 7的卷积作用在输入的3维图片上,并输入一个64维的特征图(即self.inplanes的初始值),通过BatchNorm层,ReLU层,MaxPool层。
【2】然后经过_make_layer()函数构建的4层layer。
【3】最后经过一个AveragePooling层,再经过一个fc层得到分类输出。
【4】在网络搭建起来后,还对模型的参数(Conv2d、BatchNorm2d、last BN)进行了初始化。
一个_make_layer()构建一个layer层,每一个layer层是两种基本模块的堆叠。
输入参数中block代表该layer堆叠模块的类型,可选BasicBlock或者BottleNeck。blocks代表该layer中堆叠的block的数目;planes与该layer最终输出的维度数有关,注意最终输出的维度数为planes * block.expansion。
变体
【1】Wider ResNet。
【2】DarkNet53。只是使用到了残差连接从而复用特征。
【3】ResNeXt。提出了一种介于普通卷积核深度可分离卷积的这种策略:分组卷积。通过控制分组的数量(基数)来达到两种策略的平衡。分组卷积的思想源自Inception,ResNeXt的每个分支的拓扑结构是相同的。
3.3:模型保存
【1】确定保存路径
【2】调用save函数
python">save_path = "./FahionModel.pkl"
torch.save(model, save_path)