从配置文件中获取属性应该是SpringBoot开发中最为常用的功能之一,但就是这么常用的功能,仍然有很多开发者在这个方面踩坑。
我整理了几种获取配置属性的方式,目的不仅是要让大家学会如何使用,更重要的是弄清配置加载、读取的底层原理,一旦出现问题可以分析出其症结所在,而不是一报错取不到属性,无头苍蝇般的重启项目,在句句卧槽中逐渐抓狂~
以下示例源码 Springboot 版本均为 2.7.6
下边我们一一过下这几种玩法和原理,看看有哪些是你没用过的!话不多说,开始搞~
一、Environment
使用 Environment 方式来获取配置属性值非常简单,只要注入Environment类调用其方法getProperty(属性key)即可,但知其然知其所以然,简单了解下它的原理,因为后续的几种获取配置的方法都和它息息相关。
@Slf4j
@SpringBootTest
public class EnvironmentTest {@Resourceprivate Environment env;@Testpublic void var1Test() {String var1 = env.getProperty("env101.var1");log.info("Environment 配置获取 {}", var1);}
}
1、什么是 Environment?
Environment 是 springboot 核心的环境配置接口,它提供了简单的方法来访问应用程序属性,包括系统属性、操作系统环境变量、命令行参数、和应用程序配置文件中定义的属性等等。
2、配置初始化
Springboot 程序启动加载流程里,会执行SpringApplication.run中的prepareEnvironment()方法进行配置的初始化,那初始化过程每一步都做了什么呢?
private ConfigurableEnvironment prepareEnvironment(SpringApplicationRunListeners listeners,DefaultBootstrapContext bootstrapContext, ApplicationArguments applicationArguments) {/** * 1、创建 ConfigurableEnvironment 对象:首先调用 getOrCreateEnvironment() 方法获取或创建* ConfigurableEnvironment 对象,该对象用于存储环境参数。如果已经存在 ConfigurableEnvironment 对象,则直接使用它;否则,根据用户的配置和默认配置创建一个新的。*/ConfigurableEnvironment environment = getOrCreateEnvironment();/*** 2、解析并加载用户指定的配置文件,将其作为 PropertySource 添加到环境对象中。该方法默认会解析 application.properties 和 application.yml 文件,并将其添加到 ConfigurableEnvironment 对象中。* PropertySource 或 PropertySourcesPlaceholderConfigurer 加载应用程序的定制化配置。*/configureEnvironment(environment, applicationArguments.getSourceArgs());// 3、加载所有的系统属性,并将它们添加到 ConfigurableEnvironment 对象中ConfigurationPropertySources.attach(environment);// 4、通知监听器环境参数已经准备就绪listeners.environmentPrepared(bootstrapContext, environment);/***  5、将默认的属性源中的所有属性值移到环境对象的队列末尾,这样用户自定义的属性值就可以覆盖默认的属性值。这是为了避免用户无意中覆盖了 Spring Boot 所提供的默认属性。*/DefaultPropertiesPropertySource.moveToEnd(environment);Assert.state(!environment.containsProperty("spring.main.environment-prefix"),"Environment prefix cannot be set via properties.");// 6、将 Spring Boot 应用程序的属性绑定到环境对象上,以便能够正确地读取和使用这些配置属性bindToSpringApplication(environment);// 7、如果没有自定义的环境类型,则使用 EnvironmentConverter 类型将环境对象转换为标准的环境类型,并添加到 ConfigurableEnvironment 对象中。if (!this.isCustomEnvironment) {EnvironmentConverter environmentConverter = new EnvironmentConverter(getClassLoader());environment = environmentConverter.convertEnvironmentIfNecessary(environment, deduceEnvironmentClass());}// 8、再次加载系统配置,以防止被其他配置覆盖ConfigurationPropertySources.attach(environment);return environment;
}
看看它的配置加载流程步骤:
- 创建 环境对象 ConfigurableEnvironment 用于存储环境参数;
- configureEnvironment 方法加载默认的 application.properties 和 application.yml 配置文件;以及用户指定的配置文件,将其封装为 PropertySource 添加到环境对象中;
- attach(): 加载所有的系统属性,并将它们添加到环境对象中;
- listeners.environmentPrepared(): 发送环境参数配置已经准备就绪的监听通知;
- moveToEnd(): 将 系统默认 的属性源中的所有属性值移到环境对象的队列末尾,这样用户自定义的属性值就可以覆盖默认的属性值。
- bindToSpringApplication: 应用程序的属性绑定到 Bean 对象上;
- attach(): 再次加载系统配置,以防止被其他配置覆盖;
上边的配置加载流程中,各种配置属性会封装成一个个抽象的数据结构 PropertySource中,这个数据结构代码格式如下,key-value形式。
public abstract class PropertySource<T> {protected final String name; // 属性源名称protected final T source; // 属性源值(一个泛型,比如Map,Property)public String getName();  // 获取属性源的名字  public T getSource(); // 获取属性源值  public boolean containsProperty(String name);  //是否包含某个属性  public abstract Object getProperty(String name);   //得到属性名对应的属性值
}
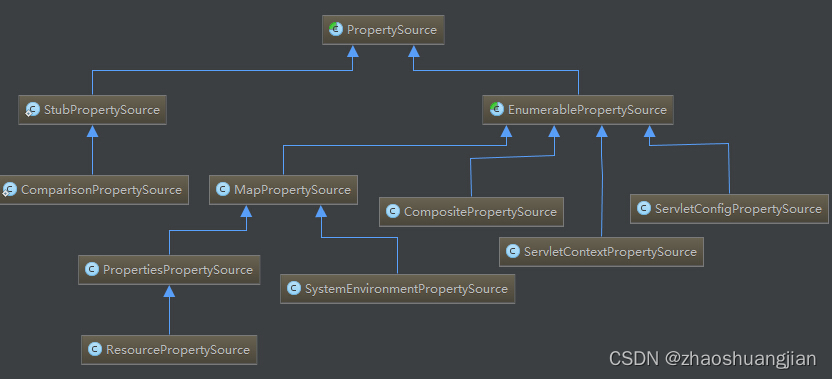
PropertySource 有诸多的实现类用于管理应用程序的配置属性。不同的 PropertySource 实现类可以从不同的来源获取配置属性,例如文件、环境变量、命令行参数等。其中涉及到的一些实现类有:

MapPropertySource: Map 键值对的对象转换为 PropertySource 对象的适配器;
PropertiesPropertySource: Properties 对象中的所有配置属性转换为 Spring 环境中的属性值;
ResourcePropertySource: 从文件系统或者 classpath 中加载配置属性,封装成 PropertySource对象;
ServletConfigPropertySource: Servlet 配置中读取配置属性,封装成 PropertySource 对象;
ServletContextPropertySource: Servlet 上下文中读取配置属性,封装成 PropertySource 对象;
StubPropertySource: 是个空的实现类,它的作用仅仅是给 CompositePropertySource 类作为默认的父级属性源,以避免空指针异常;
CompositePropertySource: 是个复合型的实现类,内部维护了 PropertySource集合队列,可以将多个 PropertySource 对象合并;
SystemEnvironmentPropertySource: 操作系统环境变量中读取配置属性,封装成 PropertySource 对象;
上边各类配置初始化生成的 PropertySource 对象会被维护到集合队列中。
List<PropertySource<?>> sources = new ArrayList<PropertySource<?>>()
配置初始化完毕,应用程序上下文AbstractApplicationContext会加载配置,这样程序在运行时就可以随时获取配置信息了。
private void prepareContext(DefaultBootstrapContext bootstrapContext, ConfigurableApplicationContext context,ConfigurableEnvironment environment, SpringApplicationRunListeners listeners,ApplicationArguments applicationArguments, Banner printedBanner) {// 应用上下文加载环境对象context.setEnvironment(environment);postProcessApplicationContext(context);.........}
3、读取配置
看明白上边配置加载的流程,其实读取配置就容易理解了,无非就是遍历队列里的PropertySource,拿属性名称name匹配对应的属性值source。
PropertyResolver是获取配置的关键类,其内部提供了操作PropertySource 队列的方法,核心方法getProperty(key)获取配置值,看了下这个类的依赖关系,发现 Environment 是它子类。

那么直接用 PropertyResolver 来获取配置属性其实也是可以的,到这我们就大致明白了 Springboot 配置的加载和读取了。
@Slf4j
@SpringBootTest
public class EnvironmentTest {@Resourceprivate PropertyResolver env;@Testpublic void var1Test() {String var1 = env.getProperty("env101.var1");log.info("Environment 配置获取 {}", var1);}
}
二、@Value 注解
@Value注解是Spring框架提供的用于注入配置属性值的注解,它可用于类的成员变量、方法参数和构造函数参数上,这个记住很重要!
在应用程序启动时,使用 @Value 注解的 Bean 会被实例化。所有使用了 @Value 注解的 Bean 会被加入到 PropertySourcesPlaceholderConfigurer 的后置处理器集合中。
当后置处理器开始执行时,它会读取 Bean 中所有 @Value 注解所标注的值,并通过反射将解析后的属性值赋值给标有 @Value 注解的成员变量、方法参数和构造函数参数。
需要注意,在使用 @Value 注解时需要确保注入的属性值已经加载到 Spring 容器中,否则会导致注入失败。
如何使用
在src/main/resources目录下的application.yml配置文件中添加env101.var1属性。
env101:var1: var1-公众号:程序员小富
只要在变量上加注解 @Value("${env101.var1}")就可以了,@Value 注解会自动将配置文件中的env101.var1属性值注入到var1字段中,跑个单元测试看一下结果。
@Slf4j
@SpringBootTest
public class EnvVariablesTest {@Value("${env101.var1}")private String var1;@Testpublic void var1Test(){log.info("配置文件属性: {}",var1);}
}
毫无悬念,成功拿到配置数据。

虽然@Value注解方式使用起来很简单,如果使用不当还会遇到不少坑。
1、缺失配置
如果在代码中引用变量,配置文件中未进行配值,就会出现类似下图所示的错误。

为了避免此类错误导致服务启动异常,我们可以在引用变量的同时给它赋一个默认值,以确保即使在未正确配值的情况下,程序依然能够正常运行。
@Value("${env101.var1:我是小富}")
private String var1;
2、静态变量(static)赋值
还有一种常见的使用误区,就是将 @Value 注解加到静态变量上,这样做是无法获取属性值的。静态变量是类的属性,并不属于对象的属性,而 Spring是基于对象的属性进行依赖注入的,类在应用启动时静态变量就被初始化,此时 Bean还未被实例化,因此不可能通过 @Value 注入属性值。
@Slf4j
@SpringBootTest
public class EnvVariablesTest {@Value("${env101.var1}")private static String var1;@Testpublic void var1Test(){log.info("配置文件属性: {}",var1);}
}
即使 @Value 注解无法直接用在静态变量上,我们仍然可以通过获取已有 Bean实例化后的属性值,再将其赋值给静态变量来实现给静态变量赋值。
我们可以先通过 @Value 注解将属性值注入到普通 Bean中,然后在获取该 Bean对应的属性值,并将其赋值给静态变量。这样,就可以在静态变量中使用该属性值了。
@Slf4j
@SpringBootTest
public class EnvVariablesTest {private static String var3;private static String var4;@Value("${env101.var3}")public void setVar3(String var3) {var3 = var3;}EnvVariablesTest(@Value("${env101.var4}") String var4){var4 = var4;}public static String getVar4() {return var4;}public static String getVar3() {return var3;}
}
3、常量(final)赋值
@Value 注解加到final关键字上同样也无法获取属性值,因为 final 变量必须在构造方法中进行初始化,并且一旦被赋值便不能再次更改。而 @Value 注解是在 bean 实例化之后才进行属性注入的,因此无法在构造方法中初始化 final 变量。
@Slf4j
@SpringBootTest
public class EnvVariables2Test {private final String var6;@AutowiredEnvVariables2Test( @Value("${env101.var6}")  String var6) {this.var6 = var6;}/*** @value注解 final 获取*/@Testpublic void var1Test() {log.info("final 注入: {}", var6);}
}
4、非注册的类中使用
只有标注了@Component、@Service、@Controller、@Repository 或 @Configuration 等容器管理注解的类,由 Spring 管理的 bean 中使用 @Value注解才会生效。而对于普通的POJO类,则无法使用 @Value注解进行属性注入。
/*** @value注解 非注册的类中使用* `@Component`、`@Service`、`@Controller`、`@Repository` 或 `@Configuration` 等* 容器管理注解的类中使用 @Value注解才会生效*/
@Data
@Slf4j
@Component
public class TestService {@Value("${env101.var7}")private String var7;public String getVar7(){return this.var7;}
}
5、引用方式不对
如果我们想要获取 TestService 类中的某个变量的属性值,需要使用依赖注入的方式,而不能使用 new 的方式。通过依赖注入的方式创建 TestService 对象,Spring 会在创建对象时将对象所需的属性值注入到其中。
/*** @value注解 引用方式不对*/@Testpublic void var7_1Test() {TestService testService = new TestService();log.info("引用方式不对 注入: {}", testService.getVar7());}
最后总结一下 @Value注解要在 Bean的生命周期内使用才能生效。
三、@ConfigurationProperties 注解
@ConfigurationProperties注解是 SpringBoot 提供的一种更加便捷来处理配置文件中的属性值的方式,可以通过自动绑定和类型转换等机制,将指定前缀的属性集合自动绑定到一个Bean对象上。
加载原理
在 Springboot 启动流程加载配置的 prepareEnvironment() 方法中,有一个重要的步骤方法 bindToSpringApplication(environment),它的作用是将配置文件中的属性值绑定到被 @ConfigurationProperties 注解标记的 Bean对象中。但此时这些对象还没有被 Spring 容器管理,因此无法完成属性的自动注入。
那么这些Bean对象又是什么时候被注册到 Spring 容器中的呢?
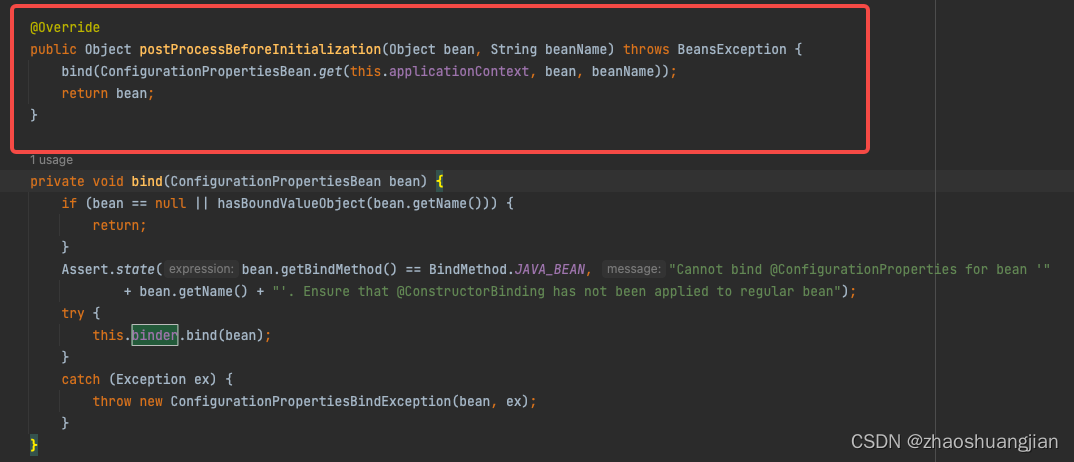
这就涉及到了 ConfigurationPropertiesBindingPostProcessor 类,它是 Bean后置处理器,负责扫描容器中所有被 @ConfigurationProperties 注解所标记的 Bean对象。如果找到了,则会使用 Binder 组件将外部属性的值绑定到它们身上,从而实现自动注入。

bindToSpringApplication 主要是将属性值绑定到 Bean 对象中;
ConfigurationPropertiesBindingPostProcessor 负责在 Spring 容器启动时将被注解标记的 Bean 对象注册到容器中,并完成后续的属性注入操作;
如何使用
演示使用 @ConfigurationProperties 注解,在 application.yml 配置文件中添加配置项:
env101:var1: var1-公众号:程序员小富var2: var2-公众号:程序员小富
创建一个 MyConf 类用于承载所有前缀为env101的配置属性。
@Data
@Configuration
@ConfigurationProperties(prefix = "env101")
public class MyConf {private String var1;private String var2;
}
在需要使用var1、var2属性值的地方,将 MyConf 对象注入到依赖对象中即可。
@Slf4j
@SpringBootTest
public class ConfTest {@Resourceprivate MyConf myConf;@Testpublic void myConfTest() {log.info("@ConfigurationProperties注解 配置获取 {}", JSON.toJSONString(myConf));}
}
四、@PropertySources 注解
除了系统默认的 application.yml 或者 application.properties 文件外,我们还可能需要使用自定义的配置文件来实现更加灵活和个性化的配置。与默认的配置文件不同的是,自定义的配置文件无法被应用自动加载,需要我们手动指定加载。
@PropertySources 注解的实现原理相对简单,应用程序启动时扫描所有被该注解标注的类,获取到注解中指定自定义配置文件的路径,将指定路径下的配置文件内容加载到 Environment 中,这样可以通过 @Value 注解或 Environment.getProperty() 方法来获取其中定义的属性值了。
如何使用
在 src/main/resources/ 目录下创建自定义配置文件 xiaofu.properties,增加两个属性。
env101.var9=var9-程序员小富
env101.var10=var10-程序员小富
在需要使用自定义配置文件的类上添加 @PropertySources 注解,注解 value属性中指定自定义配置文件的路径,可以指定多个路径,用逗号隔开。
@Data
@Configuration
@PropertySources({@PropertySource(value = "classpath:xiaofu.properties",encoding = "utf-8"),@PropertySource(value = "classpath:xiaofu.properties",encoding = "utf-8")
})
public class PropertySourcesConf {@Value("${env101.var10}")private String var10;@Value("${env101.var9}")private String var9;
}
成功获取配置了

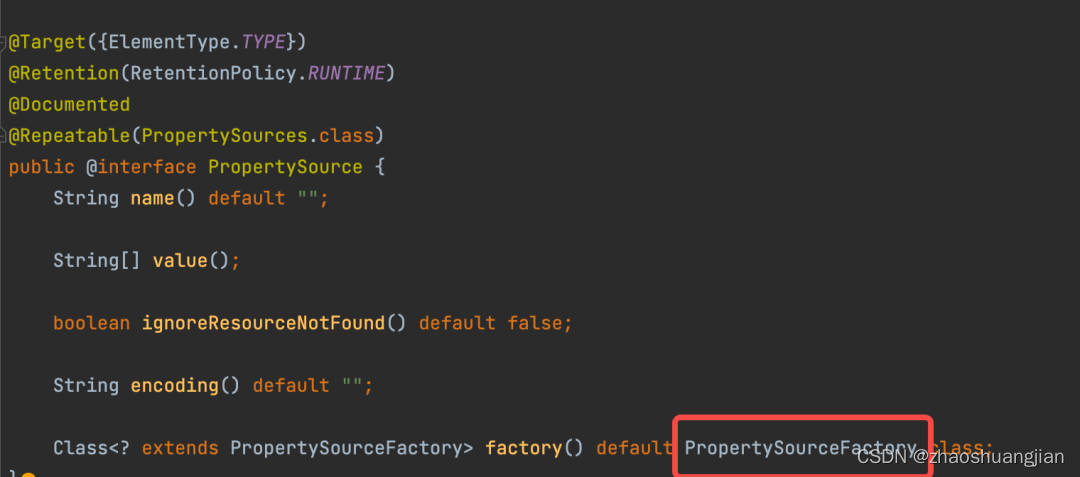
但是当我试图加载.yaml文件时,启动项目居然报错了,经过一番摸索我发现,@PropertySources 注解只内置了PropertySourceFactory适配器。也就是说它只能加载.properties文件。

那如果我想要加载一个.yaml类型文件,则需要自行实现yaml的适配器YamlPropertySourceFactory。
public class YamlPropertySourceFactory implements PropertySourceFactory {@Overridepublic PropertySource<?> createPropertySource(String name, EncodedResource encodedResource) throws IOException {YamlPropertiesFactoryBean factory = new YamlPropertiesFactoryBean();factory.setResources(encodedResource.getResource());Properties properties = factory.getObject();return new PropertiesPropertySource(encodedResource.getResource().getFilename(), properties);}
}
而在加载配置时要显示的指定使用 YamlPropertySourceFactory适配器,这样就完成了@PropertySource注解加载 yaml 文件。
@Data
@Configuration
@PropertySources({@PropertySource(value = "classpath:xiaofu.yaml", encoding = "utf-8", factory = YamlPropertySourceFactory.class)
})
public class PropertySourcesConf2 {@Value("${env101.var10}")private String var10;@Value("${env101.var9}")private String var9;
}
五、YamlPropertiesFactoryBean 加载 YAML 文件
我们可以使用 YamlPropertiesFactoryBean 类将 YAML 配置文件中的属性值注入到 Bean 中。
@Configuration
public class MyYamlConfig {@Beanpublic static PropertySourcesPlaceholderConfigurer yamlConfigurer() {PropertySourcesPlaceholderConfigurer configurer = new PropertySourcesPlaceholderConfigurer();YamlPropertiesFactoryBean yaml = new YamlPropertiesFactoryBean();yaml.setResources(new ClassPathResource("xiaofu.yml"));configurer.setProperties(Objects.requireNonNull(yaml.getObject()));return configurer;}
}
可以通过 @Value 注解或 Environment.getProperty() 方法来获取其中定义的属性值。
@Slf4j
@SpringBootTest
public class YamlTest {@Value("${env101.var11}")private String var11;@Testpublic void  myYamlTest() {log.info("Yaml 配置获取 {}", var11);}
}
六、自定义读取
如果上边的几种读取配置的方式你都不喜欢,就想自己写个更流批的轮子,那也很好办。我们直接注入PropertySources获取所有属性的配置队列,你是想用注解实现还是其他什么方式,就可以为所欲为了。
@Slf4j
@SpringBootTest
public class CustomTest {@Autowiredprivate PropertySources propertySources;@Testpublic void customTest() {for (PropertySource<?> propertySource : propertySources) {log.info("自定义获取 配置获取 name {} ,{}", propertySource.getName(), propertySource.getSource());}}
}
总结
我们可以通过 @Value 注解、Environment 类、@ConfigurationProperties 注解、@PropertySource 注解等方式来获取配置信息。
其中,@Value 注解适用于单个值的注入,而其他几种方式适用于批量配置的注入。不同的方式在效率、灵活性、易用性等方面存在差异,在选择配置获取方式时,还需要考虑个人编程习惯和业务需求。
如果重视代码的可读性和可维护性,则可以选择使用 @ConfigurationProperties 注解;如果更注重运行效率,则可以选择使用 Environment 类。总之,不同的场景需要选择不同的方式,以达到最优的效果。


![台服lol手游服务器正在维护,lol手游台服正在取得版本资料怎么办?正在取得版本解决方法[多图]...](https://img-blog.csdnimg.cn/img_convert/2a74b319e9caeb8840383bf6083d5696.png)


