目录
- 前言
- 总体设计
- 系统整体结构图
- 系统流程图
- 运行环境
- Python 环境
- 安装pytesseract
- 注册百度云账号
- 模块实现
- 1. 数据模块
- 2. 模型构建
- 3. 附加功能
- 系统测试
- 1. 文字邮件测试准确率
- 2. 网页测试结果
- 工程源代码下载
- 其它资料下载

前言
本项目采用朴素贝叶斯和支持向量机(SVM)分类模型作为基础,通过对垃圾邮件和正常邮件的数据进行训练,旨在实现垃圾邮件的自动识别功能。
通过训练这两个分类模型,我们的目标是建立一个高效准确的垃圾邮件识别系统。当接收到新的邮件时,系统将对邮件文本进行预处理,并利用训练好的模型进行分类。根据模型的预测结果,我们可以准确地判断邮件是否为垃圾邮件,从而进行相应的处理。
垃圾邮件识别技术在邮件过滤和信息安全领域具有重要意义,可以帮助用户过滤掉大量的垃圾邮件,提高工作效率和信息安全性。
总体设计
本部分包括系统整体结构图和系统流程图。
系统整体结构图
系统整体结构如图所示。
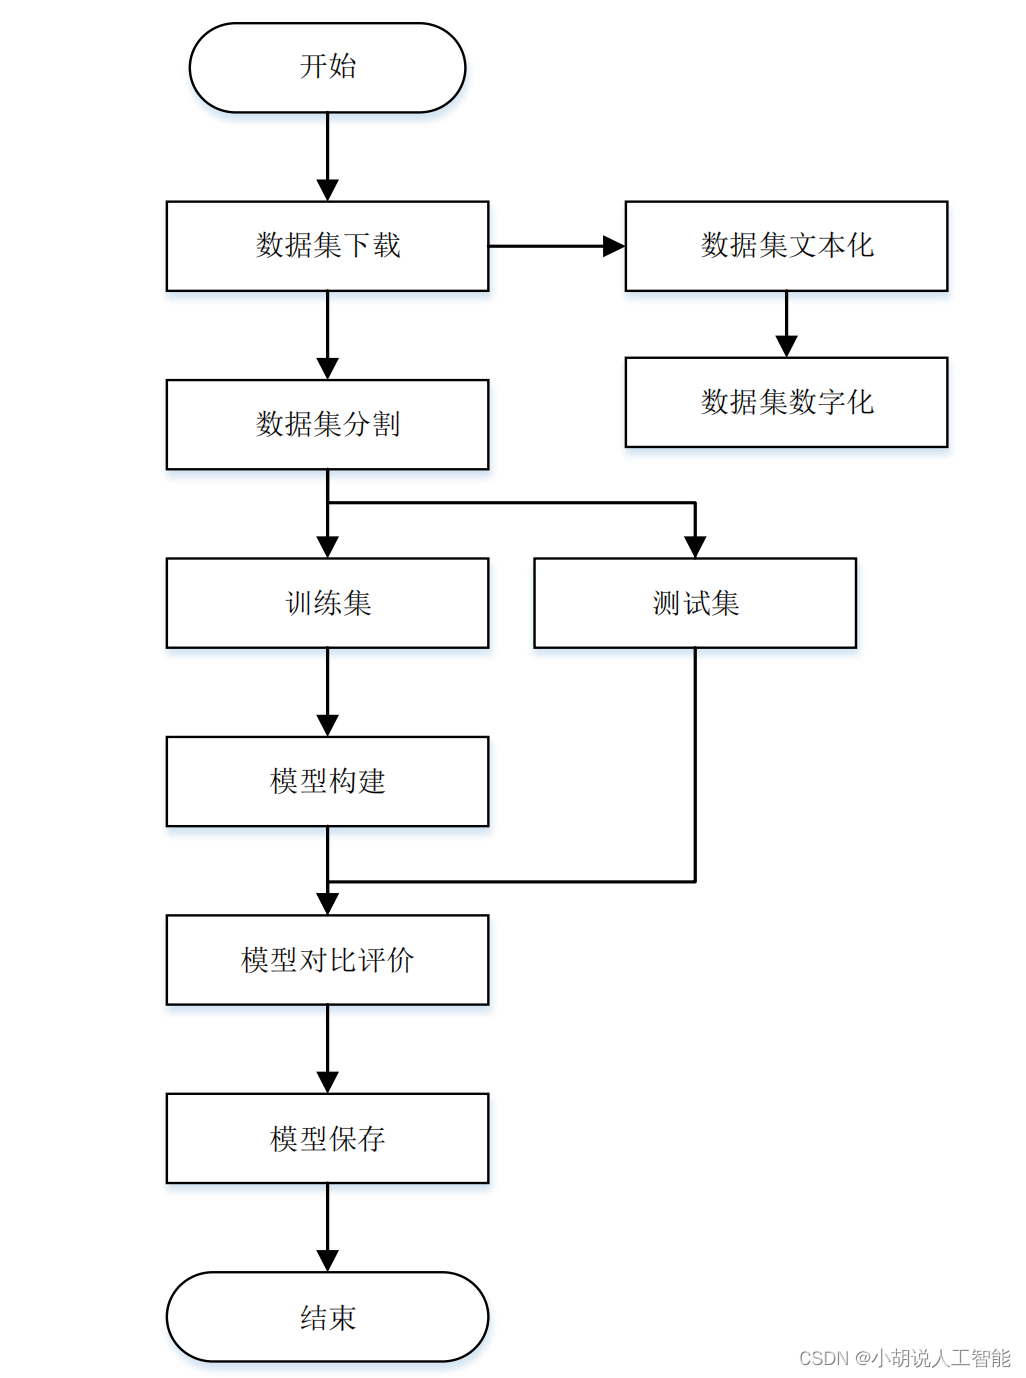
系统流程图
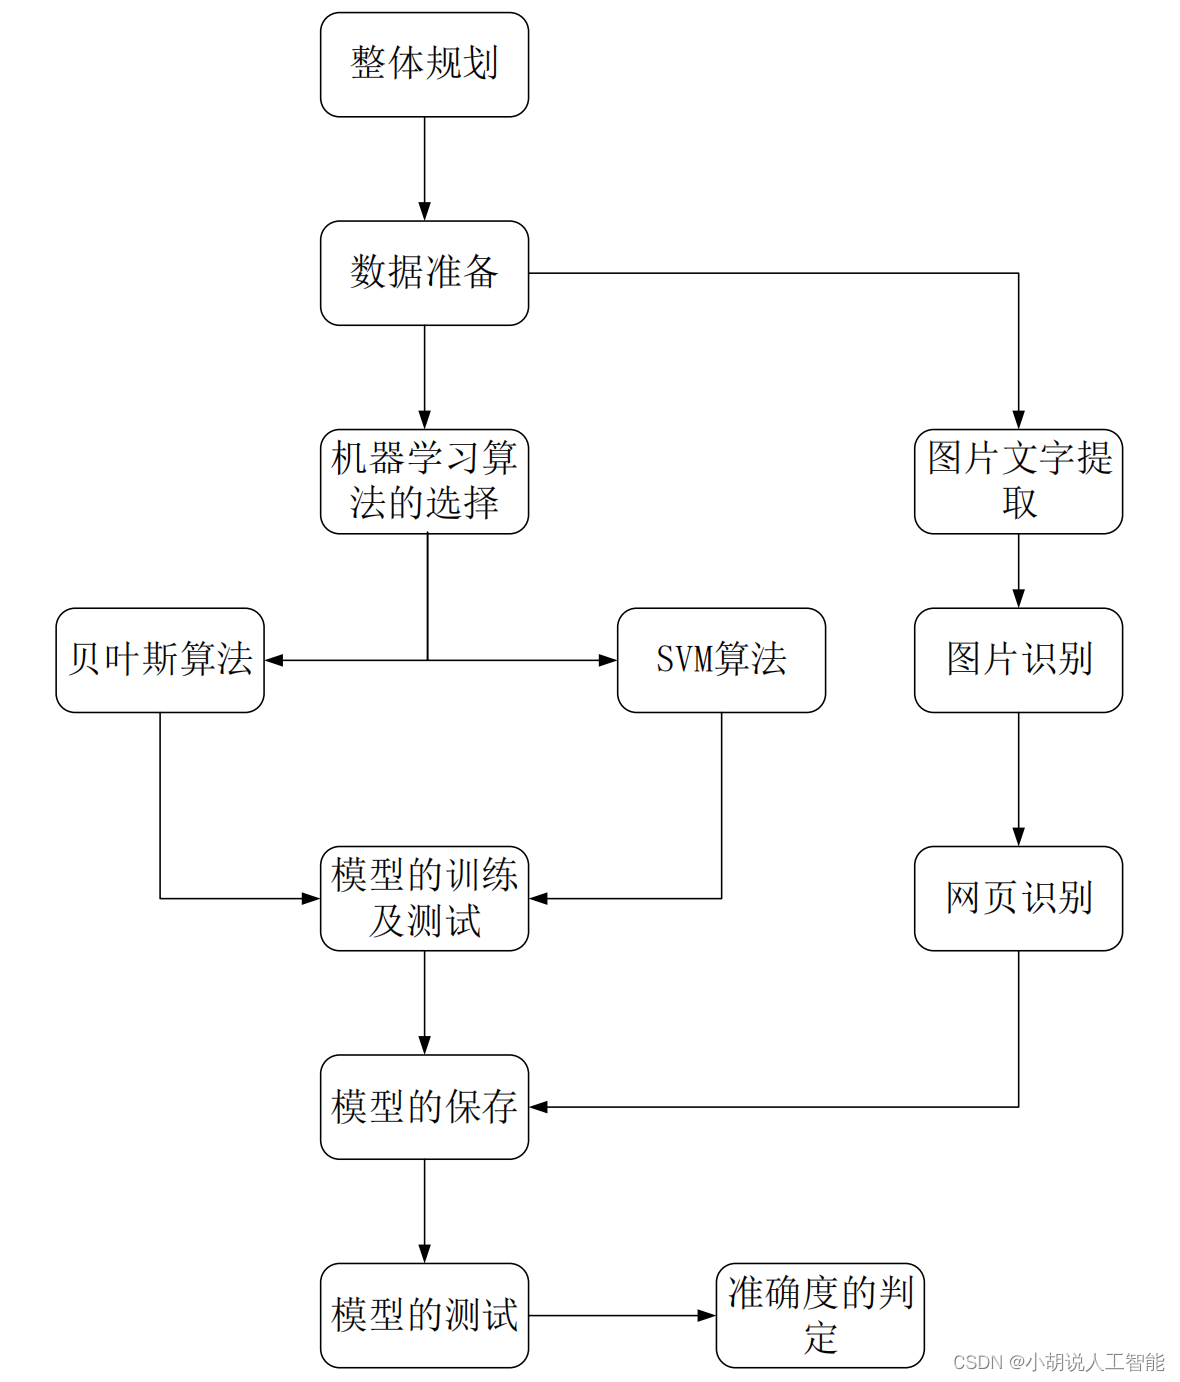
系统流程如图所示。
运行环境
本部分包括 Python 环境、Pycharm 环境和 ChatterBot 环境。
Python 环境
需要 Python 3.6 及以上配置,在 Windows 环境下载 Anaconda 完成 Python 所需的配置,下载地址:https://www.anaconda.com/,也可以下载虚拟机在 Linux 环境下运行代码。
安装pytesseract
从 github 网站下载与 python PIL 库配搭使用的文字引擎 pytesseract。同时注意安装好PIL库。
pip install Pillow
注册百度云账号
注册百度云账号,分别建立图像文字识别和图像识别的小程序。
模块实现
本项目包括 3 个模块:数据模块、模型构建、附加功能,下面分别给出各模块的功能介绍及相关代码。
1. 数据模块
数据下载地址:https://pan.baidu.com/s/1nZsCT1nDq-265-ZOWapjpw,提取码:xw25,训练数据集为 7063 封正常邮件(data/normal 文件夹下),7775 封垃圾邮件(data/spam 文件夹下)。测试数据集:共 392 封邮件(data/test 文件夹下)。
首先,用正则表达式过滤掉非中文字符;其次,用 jieba 分词库对语句进行分词,并清除一些停用词,最后,用上述结果创建词典,格式为:{“词 1”: 词 1 词频, “词 2”:词 2 词频…},相关代码如下:
stopWords = getStopWords(txt_path='./data/stopWords.txt')wordsDict = wordsCount(filepath='./data/normal', stopWords=stopWords)wordsDict = wordsCount(filepath='./data/spam', stopWords=stopWords, wordsDict=wordsDict)
准备词典,把每封信的内容转换为词向量,其维度为4000,每一维代表一个高频词在该封信中出现的频率,将这些词向量合并为一个特征向量矩阵,大小为:(7063+7775)*4000,前7063行是正常邮件的特征向量,其余为垃圾邮件的特征向量。相关代码如下:
normal_path = './data/normal'spam_path = './data/spam'wordsDict = readDict(filepath='./wordsDict.pkl')normals = getFilesList(filepath=normal_path)spams = getFilesList(filepath=spam_path)fvs = []for normal in normals:fv = extractFeatures(filepath=os.path.join(normal_path, normal), wordsDict=wordsDict, fv_len=4000)fvs.append(fv)normal_len = len(fvs)for spam in spams:fv = extractFeatures(filepath=os.path.join(spam_path, spam), wordsDict=wordsDict, fv_len=4000)fvs.append(fv)spam_len = len(fvs) - normal_lenprint('[INFO]: Noraml-%d, Spam-%d' % (normal_len, spam_len))fvs = mergeFv(fvs)saveNparray(np_array=fvs, savepath='./fvs_%d_%d.npy' % (normal_len, spam_len))
2. 模型构建
使用 scikit-learn 机器学习库训练分类器,模型选择朴素贝叶斯分类器和 SVM(支持向量机)。
-
朴素贝叶斯算法
(1) 当收到一封未知邮件时,假定它是垃圾邮件和正常邮件的概率各为 50%。
(2) 解析该邮件,提取每个词,计算该词的概率,也就是垃圾邮件的概率。
(3) 提取该邮件中 p(s|w)最高的 15 个词,计算联合概率。
(4) 设定阈值判断。 -
SVM(支持向量机)
一个线性分类器的学习目标要在n维的数据空间中找到一个超平面,把空间切割开,超平面的方程表示相关代码如下:
def train(normal_len, spam_len, fvs):train_labels = np.zeros(normal_len+spam_len)train_labels[normal_len:] = 1#SVMmodel1 = LinearSVC()model1.fit(fvs, train_labels)joblib.dump(model1, 'LinearSVC.m')#贝叶斯model2 = MultinomialNB()model2.fit(fvs, train_labels)joblib.dump(model2, 'MultinomialNB.m')
- 实现代码
#Utils模块
import re
import os
import jieba
import pickle
import numpy as np
#获取停用词列表
def getStopWords(txt_path='./data/stopWords.txt'):stopWords = []with open(txt_path, 'r') as f:for line in f.readlines():stopWords.append(line[:-1])return stopWords
#把list统计进dict
def list2Dict(wordsList, wordsDict):for word in wordsList:if word in wordsDict.keys():wordsDict[word] += 1else:wordsDict[word] = 1return wordsDict
#获取文件夹下所有文件名
def getFilesList(filepath):return os.listdir(filepath)
#统计某文件夹下所有邮件的词频
def wordsCount(filepath, stopWords, wordsDict=None):if wordsDict is None:wordsDict = {}wordsList = []filenames = getFilesList(filepath)for filename in filenames:with open(os.path.join(filepath, filename), 'r') as f:for line in f.readlines():#过滤非中文字符pattern = re.compile('[^\u4e00-\u9fa5]')line = pattern.sub("", line)words_jieba = list(jieba.cut(line))for word in words_jieba:if word not in stopWords and word.strip != '' and word != None:wordsList.append(word)wordsDict = list2Dict(wordsList, wordsDict)return wordsDict
#保存字典类型数据
def saveDict(dict_data, savepath='./results.pkl'):with open(savepath, 'wb') as f:pickle.dump(dict_data, f)
#读取字典类型数据
def readDict(filepath):with open(filepath, 'rb') as f:dict_data = pickle.load(f)return dict_data
#对输入的字典按键值排序(降序)后返回前topk组数据
def getDictTopk(dict_data, topk=4000):
data_list=sorted(dict_data.items(),key=lambda dict_data:-dict_data[1])data_list = data_list[:topk]return dict(data_list)
#提取文本特征向量
def extractFeatures(filepath, wordsDict, fv_len=4000):fv = np.zeros((1, fv_len))words = []with open(filepath) as f:for line in f.readlines():pattern = re.compile('[^\u4e00-\u9fa5]')line = pattern.sub("", line)words_jieba = list(jieba.cut(line))words += words_jiebafor word in set(words):for i, d in enumerate(wordsDict):if d[0] == word:fv[0, i] = words.count(word)return fv
#合并特征向量
def mergeFv(fvs):return np.concatenate(tuple(fvs), axis=0)
#保存np.array()数据
def saveNparray(np_array, savepath):np.save(savepath, np_array)
#读取np.array()数据
def readNparray(filepath):return np.load(filepath)
#Train模块
#模型训练
import os
import numpy as np
from utils import *
from sklearn.externals import joblib
from sklearn.metrics import confusion_matrix
from sklearn.svm import SVC, NuSVC, LinearSVC
from sklearn.naive_bayes import MultinomialNB, GaussianNB, BernoulliNB
def train(normal_len, spam_len, fvs):train_labels = np.zeros(normal_len+spam_len)train_labels[normal_len:] = 1#SVMmodel1 = LinearSVC()model1.fit(fvs, train_labels)joblib.dump(model1, 'LinearSVC.m')#贝叶斯model2 = MultinomialNB()model2.fit(fvs, train_labels)joblib.dump(model2, 'MultinomialNB.m')
#测试
def test(model_path, fvs, labels):model = joblib.load(model_path)result = model.predict(fvs)print(confusion_matrix(labels, result))
if __name__ == '__main__':#第一部分,可选'''stopWords = getStopWords(txt_path='./data/stopWords.txt')wordsDict = wordsCount(filepath='./data/normal', stopWords=stopWords)wordsDict = wordsCount(filepath='./data/spam', stopWords=stopWords, wordsDict=wordsDict)saveDict(dict_data=wordsDict, savepath='./results.pkl')'''#第二部分,可选'''wordsDict = readDict(filepath='./results.pkl')wordsDict = getDictTopk(dict_data=wordsDict, topk=4000)saveDict(dict_data=wordsDict, savepath='./wordsDict.pkl')'''#第三部分,可选'''normal_path = './data/normal'spam_path = './data/spam'wordsDict = readDict(filepath='./wordsDict.pkl')normals = getFilesList(filepath=normal_path)spams = getFilesList(filepath=spam_path)fvs = []for normal in normals:fv = extractFeatures(filepath=os.path.join(normal_path, normal), wordsDict=wordsDict, fv_len=4000)fvs.append(fv)normal_len = len(fvs)for spam in spams:fv=extractFeatures(filepath=os.path.join(spam_path,spam), wordsDict=wordsDict, fv_len=4000)fvs.append(fv)spam_len = len(fvs) - normal_lenprint('[INFO]: Noraml-%d, Spam-%d' % (normal_len, spam_len))fvs = mergeFv(fvs)saveNparray(np_array=fvs, savepath='./fvs_%d_%d.npy' % (normal_len, spam_len))'''#第四部分,可选'''fvs = readNparray(filepath='fvs_7063_7775.npy')normal_len = 7063spam_len = 7775train(normal_len, spam_len, fvs)'''#第五部分wordsDict = readDict(filepath='./wordsDict.pkl')test_normalpath = './data/test/normal'test_spampath = './data/test/spam'test_normals = getFilesList(filepath=test_normalpath)test_spams = getFilesList(filepath=test_spampath)normal_len = len(test_normals)spam_len = len(test_spams)fvs = []for test_normal in test_normals:		fv=extractFeatures(filepath=os.path.join(test_normalpath,test_normal), wordsDict=wordsDict, fv_len=4000)fvs.append(fv)for test_spam in test_spams:fv = extractFeatures(filepath=os.path.join(test_spampath, test_spam), wordsDict=wordsDict, fv_len=4000)fvs.append(fv)fvs = mergeFv(fvs)labels = np.zeros(normal_len+spam_len)labels[normal_len:] = 1test(model_path='LinearSVC.m', fvs=fvs, labels=labels)test(model_path='MultinomialNB.m', fvs=fvs, labels=labels)
3. 附加功能
训练数据后,得到词频统计和对应向量集,而附加功能主要实现图片的文字提取、类型识别和网页文字爬取的功能。针对一封带图片的邮件,先后经过文字识别和图像识别处理,将结果写入同一个文件,得到测试集,训练集采用文字邮件的训练数据,测试集从百度图片官网提取,网址:https://image.baidu.com/。
图片文字识别可以使用两种方法调用,小伙伴们可以根据实际情况来选择,具体如下:
1. 图片文字识别(搜索引擎)
使用Python自带的PIL库和配套的pytesseract引擎,实现图片文字识别,在调试时发现,图片颜色如果过于复杂,将会影响文字识别的准确性,因此,将图片进行二值化处理,提高文字识别准确性。当然选择这种方法的话,是完全开源免费的。
from PIL import Image #导入PIL库
import pytesseract#对应文字引擎
def getMessage(path_name):text = pytesseract.image_to_string(r'D:\学习\大三下学期\信息系统设计\图片\hh.jpg',lang='chi_sim')#图片的路径
def get_bin_table(threshold = 230):#获取灰度转二值的映射tabletable = []for i in range(256):#将图片二值化if i < threshold:table.append(0)else:table.append(1)return table
image = Image.open(r'D:\学习\大三下学期\信息系统设计\图片\hh.jpg')
imgry = image.convert('L')  #转化为灰度图
table = get_bin_table()
out = imgry.point(table, '1')
getMessage(out)
print(text)#输出结果

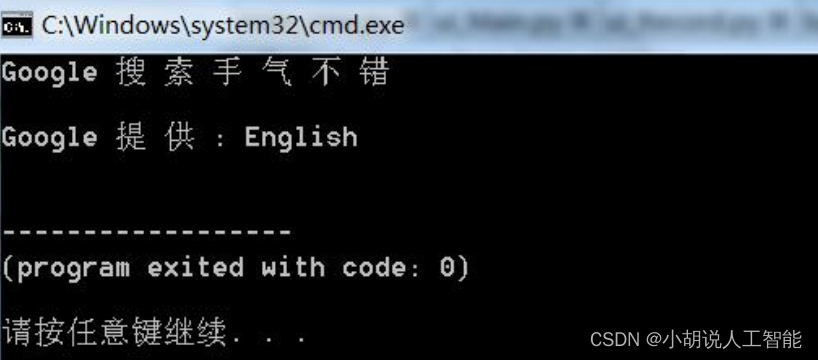
通过多次实验,通过文字搜索引擎实现图片文字识别准确度不高,一旦有复杂的文字会直接影响效果,因此,改为调用百度 API 实现图片文字识别。
2. 图片文字识别(调用API)
1)获取 access_token
#编码:utf-8
import requests
#client_id 为官网获取的AK, client_secret 为官网获取的SK
host='https://aip.baidubce.com/oauth/2.0/token?grant_type=client_credentials&client_id=hr9lw2FxcviEMa7yyNg4pZB6&client_secret=Q3aEXILXYOWGZsmvoeGhfPk0mdTgQeXN'
response = requests.get(host)
print(response.json())
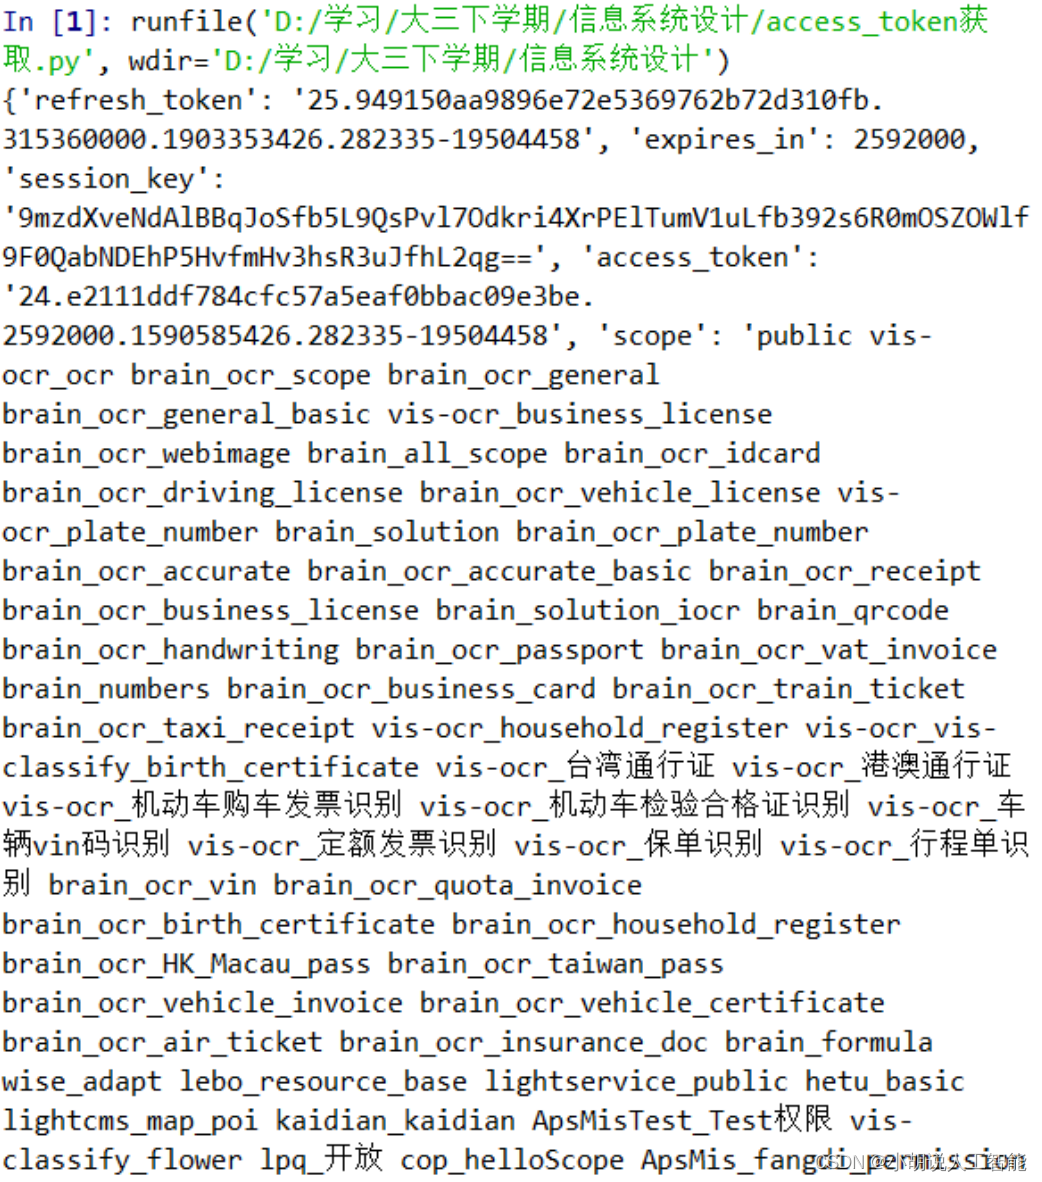
效果演示如下图:
2)识别文件夹内图片的文字
获取access_token复制到如下代码中:
import requests
import base64
import os
class Orc_main():def orc_look(self, path):access_token = "24.1c62a660cc5efe228e228f22a7ccc03d.2592000.1589900797.
282335-19504458"  #采用上一段代码的access_tokenwith open(path, 'rb') as f:image_data = f.read()#读取图片base64_ima = base64.b64encode(image_data)data = {'image': base64_ima}headers = {'Content-Type': 'application/x-www-form-urlencoded'}url = "https://aip.baidubce.com/rest/2.0/ocr/v1/general_basic?access_token=" + str(access_token)#通过百度API调用r = requests.post(url, params=headers, data=data).json()for word in r['words_result']:yield word['words']# 返回一个生成器
if __name__ == '__main__':om = Orc_main()for i in range (1,41):#采用40张图片作为训练数据集path = "D:\\学习\\大三下学期\\信息系统设计\\图片\\normal\\"+str(i)+".jpg"
#图片文件路径f=open('D:\\学习\\大三下学期\\信息系统设计\\垃圾邮件识别\\data\\picture\\normal\\'+str(i),'w+')
#输出文件无后缀名,与测试的文字邮件统一格式,且读写方式为w+代表没有可创建,并且写入内容会覆盖words = om.orc_look(path)
#输出文字(返回结果)for word in words:print(word)#输出检查f.write(word+'\n')#写入文件,每次回车,方便查阅
f.close()#关闭文件,否则会出现问题
3)图片识别(调用API)
相关代码如下:
from urllib import request
import ssl
import json
import os
import re
#官网获取到的apiid和apisecret
apiId='W4sDdigCM9jHDycQGkcSd41X'  # 替换成你注册的apiid
apiSecret='1E4hiZp9i1EGiG38NbnoGk0ZoiECjUhq'  # 替换成你注册的apiSecret
if __name__ == '__main__':import requestsimport base64gcontext = ssl.SSLContext(ssl.PROTOCOL_TLSv1)#client_id 为官网获取的AK, client_secret 为官网获取的SKhost = 'https://aip.baidubce.com/oauth/2.0/token?grant_'\'type=client_credentials&client_id='+apiId+'&client_secret='+ apiSecretreq = request.Request(host)response=request.urlopen(req, context=gcontext).read().decode('UTF-8')result = json.loads(response)
host='https://aip.baidubce.com/rest/2.0/image-classify/v2/advanced_general'headers={'Content-Type':'application/x-www-form-urlencoded'}access_token= result['access_token']host=host+'?access_token='+access_tokendata={}data['access_token']=access_tokenfor i in range(1,41):pic= "D:\\学习\\大三下学期\\信息系统设计\\图片\\spam\\"+str(i)+".jpg" ff = open(pic, 'rb')#打开图片img = base64.b64encode(ff.read())data['image'] =img#统一图片格式res = requests.post(url=host,headers=headers,data=data)req=res.json()f=open('D:\\学习\\大三下学期\\信息系统设计\\垃圾邮件识别\\data\\picture\\spam\\'+str(i),'a+')
#由于已经存在了写入的文本,所以读写方式为a,继续写入并不会覆盖文本q=req['result']#得到的是各种分类器识别的结果和打分qq=re.sub("[A-Za-z0-9\!\%\[\]\,\。]", "", str(q))qqq=str(qq).replace('\'', '').replace('.','').replace(':','').replace('{','').replace('}','')
#通过正则表达式 replace函数去掉标点和多余英文,保留分类器名称和分类结果f.write(str(qqq)+'\n')print(req['result'][0]['keyword'])print(req['result'])print(qqq) #输出结果作为进度检查f.close()#关闭文件
注意:通过所有类型的识别器识别,得到的结果为列表,再用正则表达式处理后写入文本,在文字提取结果之后写入文件即图片先后经过文字识别和图像识别得到的文字结果。
下图为测试图片:

识别结果如下图:

4)网页文本提取
主要针对网址的电子邮件,通过 request 库爬取其网页源码内容,正则表达式处理后得到文本,处理方式和文本邮件相同。
相关代码如下:
import requests
from bs4 import BeautifulSoup
def get_html(url):
headers = { 'User-Agent':'Mozilla/5.0(Macintosh; Intel Mac OS X 10_11_4) AppleWebKit/537.36(KHTML, like Gecko) Chrome/52 .0.2743. 116 Safari/537.36'    }  #模拟浏览器访问   response = requests.get(url,headers = headers)  #请求访问网站  html = response.text                                  #获取网页源码 return html                                             #返回网页源码
soup = BeautifulSoup(get_html('https://www.baidu.com/'), 'html.parser') #初始化BeautifulSoup库,并设置解析器
print(get_html('https://www.baidu.com/'))
a=get_html('https://www.baidu.com/')
for li in soup.find_all(name='li'):         #遍历父节点      for a in li.find_all(name='a'):          #遍历子节点           if a.string==None:           pass          else:             print(a.string)
#输出结果是纯文本,同样,只要是纯文本的内容都可以由主程序处理
系统测试
本部分包括准确率和测试结果。
1. 文字邮件测试准确率
SVM 测试准确率 93%+,如表2-1 所示,朴素贝叶斯测试准确率 87%+,如表 2-2 所示,预测模型训练比较成功。

2. 网页测试结果
网页测试和图片邮件测试是同样的训练集,如表 2-3 所示。

工程源代码下载
详见本人博客资源下载页
其它资料下载
如果大家想继续了解人工智能相关学习路线和知识体系,欢迎大家翻阅我的另外一篇博客《重磅 | 完备的人工智能AI 学习——基础知识学习路线,所有资料免关注免套路直接网盘下载》
这篇博客参考了Github知名开源平台,AI技术平台以及相关领域专家:Datawhale,ApacheCN,AI有道和黄海广博士等约有近100G相关资料,希望能帮助到所有小伙伴们。

