简介
Apache Cassandra是一个高度可扩展的高性能分布式数据库,旨在处理许多商用服务器上的大量数据,提供高可用性而没有单点故障。它是NoSQL数据库的一种。首先让我们了解一下NoSQL数据库的作用。
NoSQL 数据库
NoSQL数据库(有时称为“Not Only SQL”)是一种数据库,它提供了一种存储和检索关系数据库中使用的表格关系以外的数据的机制。这些数据库是无模式的,支持简单的复制,具有简单的API,最终是一致的,并且可以处理大量数据。
什么是Apache Cassandra?
Apache Cassandra是一个开源,分布式和分散/分布式存储系统(数据库),用于管理分布在世界各地的大量结构化数据。它提供高可用性服务,没有单点故障。
以下列出了Apache Cassandra的一些值得注意的地方-
- 它具有可伸缩性,容错性和一致性。
- 它是一个面向列的数据库。
- 其分发设计基于亚马逊的Dynamo及其在Google的Bigtable上的数据模型。
- 它创建于Facebook,与关系数据库管理系统截然不同。
- Cassandra实现了Dynamo风格的复制模型,没有单点故障,但是添加了更强大的“column family”数据模型。
- 一些大型公司(例如Facebook,Twitter,Cisco,Rackspace,ebay,Twitter,Netflix等)正在使用Cassandra。
特性:
弹性可扩展性 - Cassandra是高度可扩展的; 它允许添加更多的硬件以适应更多的客户和更多的数据根据要求。
始终基于架构 - Cassandra没有单点故障,它可以连续用于不能承担故障的关键业务应用程序。
快速线性性能 - Cassandra是线性可扩展性的,即它为你增加集群中的节点数量增加你的吞吐量。因此,保持一个快速的响应时间。
灵活的数据存储 - Cassandra适应所有可能的数据格式,包括:结构化,半结构化和非结构化。它可以根据您的需要动态地适应变化的数据结构。
便捷的数据分发 - 可以在多个数据中心之间复制数据,可以灵活地在需要时分发数据。
事务支持 - Cassandra支持属性,如原子性,一致性,隔离和持久性(ACID)。
快速写入 - Cassandra被设计为在廉价的商品硬件上运行。 它执行快速写入,并可以存储数百TB的数据,而不牺牲读取效率。
Cassandra特点
Cassandra由于其出色的技术特性而变得如此受欢迎。以下是Cassandra的一些功能:
- 弹性可扩展性– Cassandra具有高度可扩展性;它允许添加更多硬件,以根据需求容纳更多客户和更多数据。
- 始终在线-Cassandra没有单点故障,并且可以连续用于无法承受故障的关键业务应用程序。
- 快速的线性规模性能-Cassandra具有线性可扩展性,即,随着集群中节点数量的增加,它可以提高吞吐量。因此,它保持了快速的响应时间。
- 灵活的数据存储-Cassandra可容纳所有可能的数据格式,包括:结构化,半结构化和非结构化。它可以根据需要动态适应对数据结构的更改。
- 轻松进行数据分发-Cassandra通过在多个数据中心之间复制数据,提供了在所需位置分发数据的灵活性。
- 事务支持-Cassandra支持原子性,一致性,隔离性和持久性(ACID)等属性。
- 快速写入-Cassandra旨在在廉价的商品硬件上运行。它执行快速的写入,并且可以存储数百TB的数据,而不会牺牲读取效率。
架构
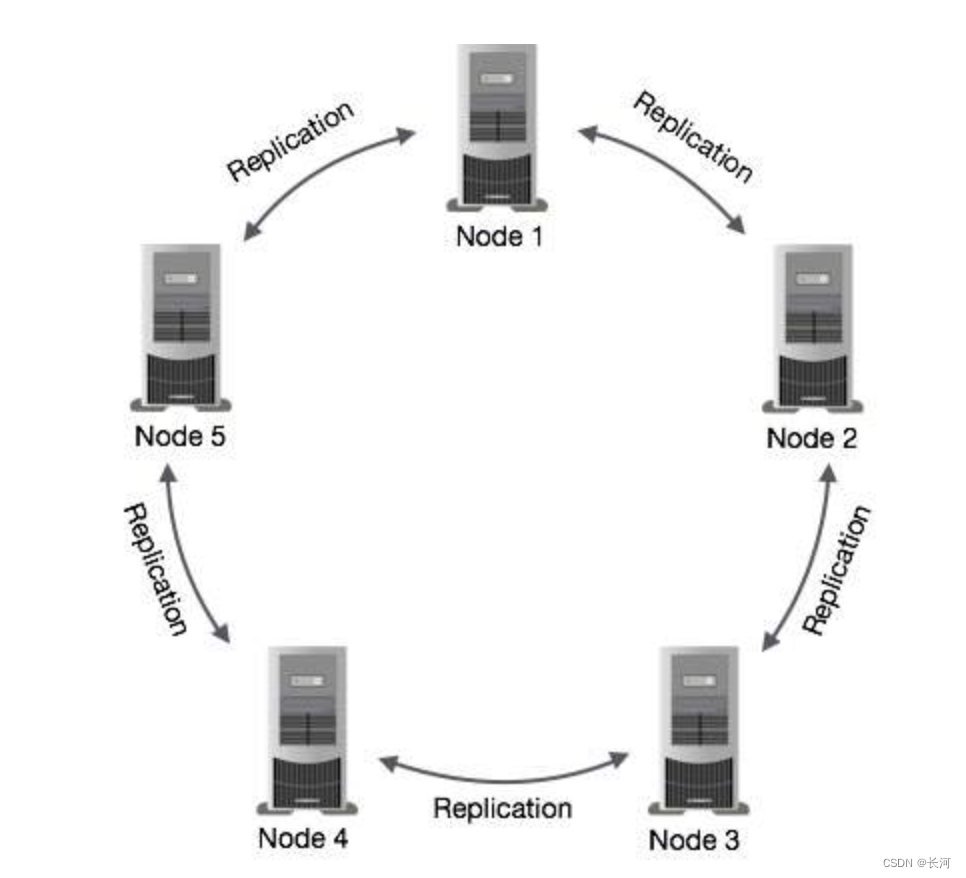
Cassandra的设计目标是在多个节点上处理大数据工作负载而不会出现任何单点故障。 Cassandra在其节点之间具有对等分布式系统,并且数据分布在集群中的所有节点之间。
- 集群中的所有节点都扮演相同的角色。每个节点都是独立的,并同时互连到其他节点。
- 集群中的每个节点都可以接受读写请求,而不管数据实际位于集群中的何处。
- 当某个节点发生故障时,可以从网络中的其他节点处理读/写请求。
Cassandra中的数据复制
在Cassandra中,集群中的一个或多个节点充当给定数据段的副本。如果检测到某些节点响应的值过时,则Cassandra会将最新值返回给客户端。返回最新值后,Cassandra在后台执行读取修复以更新过时的值。
下图显示了Cassandra如何在集群中的节点之间使用数据复制以确保没有单点故障的示意图。

Cassandra使用Gossip协议,以允许节点彼此通信并检测集群中的任何故障节点。
入门安装:使用docker-compose 安装
docker-compose.yaml
version: "3.8"
services:cassandra:image: cassandra:4.1container_name: cassandraports:- 9042:9042volumes:- $PWD/commitlog:/var/lib/cassandra/commitlog- $PWD/hints:/var/lib/cassandra/hints- $PWD/data:/var/lib/cassandra/data- $PWD/saved_caches:/var/lib/cassandra/saved_caches- $PWD/logs:/var/log/cassandra
启动容器
使用如下指令启动容器:
docker-compose up -d注意:如果如果没有在docker-compose.yaml文件所在目录或者文件名不是docker-compose.yaml,需要通过-f指定文件所在位置。即如:
docker-compose -f cassandra-start-up.yaml up -d启动好之后,可以进入到容器之中:
➜  cassandra docker-compose up -d
Creating network "cassandra_default" with the default driver
Pulling cassandra (cassandra:4.1)...
4.1: Pulling from library/cassandra
eaead16dc43b: Pull complete
46e1869246ce: Pull complete
bbd45db92608: Pull complete
6fcfd0f47989: Pull complete
996685dfbe33: Pull complete
4927828dcc1b: Pull complete
7f67cde8352d: Pull complete
09bb07e15655: Pull complete
b8d7c6610af3: Pull complete
Status: Downloaded newer image for cassandra:4.1
Creating cassandra ... done
➜  cassandra docker ps
CONTAINER ID   IMAGE           COMMAND                  CREATED          STATUS          PORTS                                                       NAMES
cdf4f5b56a88   cassandra:4.1   "docker-entrypoint.s…"   10 minutes ago   Up 10 minutes   7000-7001/tcp, 7199/tcp, 9160/tcp, 0.0.0.0:9042->9042/tcp   cassandra
➜  cassandra docker exec -it cdf4f5b56a88 bash
root@cdf4f5b56a88:/# cqlsh
Connected to Test Cluster at 127.0.0.1:9042
[cqlsh 6.1.0 | Cassandra 4.1-beta1 | CQL spec 3.4.6 | Native protocol v5]
Use HELP for help.
cqlsh> desc keyspaces;system       system_distributed  system_traces  system_virtual_schema
system_auth  system_schema       system_views
可以看到,我们已经通过cqlsh命令,登录到了当前的Cassandra数据库。
但是这里会有疑惑产生:
登录数据库的指令太过简单了吧?!如果需要登录指定主机地址的数据库,应该怎么设置主机地址?
登录数据库的指令不需要用户名和密码嘛?
需要的话,我的用户名和密码是什么?就目前而言,我并没有做任何设置。
如何设置用户名和密码?
cqlsh的基本命令
选项 使用/作用
help 此命令用于显示有关CQLsh命令选项的帮助主题。
version 它用于查看您正在使用的CQLsh的版本。
color 它用于彩色输出。
debug 它显示其他调试信息。
execute 它用于引导shell接受并执行CQL命令。
show 显示当前会话详情
这里的options包括哪些呢? 官网写的很详细,我就不抄了,看这里 cqlsh: the CQL shell
我就挑几个最关心的看一下:
-u USERNAME --username=USERNAME
Authenticate as user.
-p PASSWORD --password=PASSWORD
Authenticate using password.
-k KEYSPACE --keyspace=KEYSPACE
Authenticate to the given keyspace.
这三个是用来指定用户名和密码以及keySpace的。
–credentials=CREDENTIALS
Specify an alternative credentials file location.
这个是用来指定credentials的。
为什么没有输入用户名和密码就直接登录了?
这里是由于没有做任何个性化配置,我们使用的相关配置是默认配置文件cassandra.yaml文件里的配置,这个配置文件在容器里的/opt/cassandra/conf目录下。这里的配置内容是
#AllowAllAuthenticator performs no checks - set it to disable authentication.
authenticator: AllowAllAuthenticator
当这里配置为AllowAllAuthenticator的时候,将不做任何的检查。是设置为关闭认证。
要想启用用户名密码登录,就需要将其设置为PasswordAuthenticator:
authenticator: PasswordAuthenticator
不过这个时候会发现,容器中没有vim,也没有vi,那就只能把容器里的文件copy出来,修改完再copy回去了。
docker cp cdf4f5b56a88:/opt/cassandra/conf/cassandra.yaml .我这是把文件从容器中copy当当前位置,修改完之后再copy回去,source和destination位置互换,即:
docker cp cassandra.yaml cdf4f5b56a88:/opt/cassandra/conf/替换完成之后,再重新启动容器:
docker restart cdf4f5b56a88重启完之后再进入容器,再使用cqlsh指令登录,发得到如下错误:
➜  cassandra docker exec -it cdf4f5b56a88 bash
root@cdf4f5b56a88:/# cqlsh
Connection error: ('Unable to connect to any servers', {'127.0.0.1:9042': ConnectionRefusedError(111, "Tried connecting to [('127.0.0.1', 9042)]. Last error: Connection refused")})
root@cdf4f5b56a88:/#
看上面的提示,似乎也看不出来什么错误,只是connection refused。那就想着用用户名和密码尝试一下吧?由于我们没有设置用户名和密码,这个时候就只能使用系统默认设置的用户名和密码都是cassandra的账户进行登录。
root@cdf4f5b56a88:/# cqlsh -u cassandra -p cassandraWarning: Using a password on the command line interface can be insecure.
Recommendation: use the credentials file to securely provide the password.Connected to Test Cluster at 127.0.0.1:9042
[cqlsh 6.1.0 | Cassandra 4.1-beta1 | CQL spec 3.4.6 | Native protocol v5]
Use HELP for help.
cassandra@cqlsh>
创建新用户
cassnadra划分了三种角色类型:
xxopr: 应用账号,只能进行对表的查询、数据插入、数据删除等DML操作
xxdata: 相当于数据OWNER用户,对表空间内的对象拥有增删改查等DDL操作
cassandra: 超级用户,用于创建表空间的,DBA权限管理
这里先创建一个superuser:
create user root_cassandra with password '123456' superuser;
然后使用这个用户进行登录:
root@cdf4f5b56a88:/# cqlsh -u root_cassandra -p 123456Warning: Using a password on the command line interface can be insecure.
Recommendation: use the credentials file to securely provide the password.Connected to Test Cluster at 127.0.0.1:9042
[cqlsh 6.1.0 | Cassandra 4.1-beta1 | CQL spec 3.4.6 | Native protocol v5]
Use HELP for help.
root_cassandra@cqlsh> list users;name           | super | datacenters
----------------+-------+-------------cassandra |  True |         ALLroot_cassandra |  True |         ALL(2 rows)
root_cassandra@cqlsh>
可以看到,这里已经有两个超级用户了,不想保留cassandra这个用户的可以直接drop掉。
drop user cassandra简单操作
既然已经到这里了,那就创建一个用户,试试简单操作先:
root_cassandra@cqlsh> create user test_data with password '123456' nosuperuser;
root_cassandra@cqlsh> exit;
root@cdf4f5b56a88:/# cqlsh -u test_data -p 123456Warning: Using a password on the command line interface can be insecure.
Recommendation: use the credentials file to securely provide the password.Connected to Test Cluster at 127.0.0.1:9042
[cqlsh 6.1.0 | Cassandra 4.1-beta1 | CQL spec 3.4.6 | Native protocol v5]
Use HELP for help.
test_data@cqlsh> CREATE KEYSPACE IF NOT EXISTS store WITH REPLICATION = { 'class' : 'SimpleStrategy', 'replication_factor' : '1' };
test_data@cqlsh> desc keyspaces;store   system_auth         system_schema  system_views
system  system_distributed  system_traces  system_virtual_schematest_data@cqlsh> desc keyspace storeCREATE KEYSPACE store WITH replication = {'class': 'SimpleStrategy', 'replication_factor': '1'}  AND durable_writes = true;
test_data@cqlsh> CREATE TABLE IF NOT EXISTS store.shopping_cart (... userid text PRIMARY KEY,... item_count int,... last_update_timestamp timestamp... );
test_data@cqlsh> INSERT INTO store.shopping_cart... (userid, item_count, last_update_timestamp)... VALUES ('9876', 2, toTimeStamp(now()));
test_data@cqlsh> INSERT INTO store.shopping_cart... (userid, item_count, last_update_timestamp)... VALUES ('1234', 5, toTimeStamp(now()));
可以看到已经创建了一个keyspace为store的库,创建了一个表shopping_cart,并插入了一些数据。查看一下表结构以及数据:
test_data@cqlsh:store> select * from store.shopping_cart;userid | item_count | last_update_timestamp
--------+------------+---------------------------------1234 |          5 | 2022-11-05 08:39:47.077000+00009876 |          2 | 2022-11-05 08:39:46.226000+0000(2 rows)
test_data@cqlsh:store> desc table shopping_cart;CREATE TABLE store.shopping_cart (userid text PRIMARY KEY,item_count int,last_update_timestamp timestamp
) WITH additional_write_policy = '99p'AND bloom_filter_fp_chance = 0.01AND caching = {'keys': 'ALL', 'rows_per_partition': 'NONE'}AND cdc = falseAND comment = ''AND compaction = {'class': 'org.apache.cassandra.db.compaction.SizeTieredCompactionStrategy', 'max_threshold': '32', 'min_threshold': '4'}AND compression = {'chunk_length_in_kb': '16', 'class': 'org.apache.cassandra.io.compress.LZ4Compressor'}AND memtable = 'default'AND crc_check_chance = 1.0AND default_time_to_live = 0AND extensions = {}AND gc_grace_seconds = 864000AND max_index_interval = 2048AND memtable_flush_period_in_ms = 0AND min_index_interval = 128AND read_repair = 'BLOCKING'AND speculative_retry = '99p';
test_data@cqlsh:store>
到此完成了Cassandra的启动。
在SpringBoot中连接Cassandra
1.添加依赖:
<?xml version="1.0" encoding="UTF-8"?>
<project xmlns="http://maven.apache.org/POM/4.0.0" xmlns:xsi="http://www.w3.org/2001/XMLSchema-instance"xsi:schemaLocation="http://maven.apache.org/POM/4.0.0 https://maven.apache.org/xsd/maven-4.0.0.xsd"><modelVersion>4.0.0</modelVersion><parent><groupId>org.springframework.boot</groupId><artifactId>spring-boot-starter-parent</artifactId><version>2.5.14</version><relativePath/></parent><groupId>com.example</groupId><artifactId>demo</artifactId><version>0.0.1-SNAPSHOT</version><name>demo</name><description>Demo project for Spring Boot</description><properties><java.version>1.8</java.version></properties><dependencies><dependency><groupId>org.springframework.boot</groupId><artifactId>spring-boot-starter-data-cassandra</artifactId></dependency><dependency><groupId>org.springframework.boot</groupId><artifactId>spring-boot-starter-web</artifactId></dependency><dependency><groupId>org.springframework.boot</groupId><artifactId>spring-boot-starter-test</artifactId><scope>test</scope></dependency></dependencies><build><plugins><plugin><groupId>org.springframework.boot</groupId><artifactId>spring-boot-maven-plugin</artifactId></plugin></plugins></build></project>
2.添加配置:
spring:data:cassandra:contact-points: localhostport: 9042keyspace-name: storeusername: root_cassandrapassword: 1234563.添加配置类
package com.example.demo;import org.springframework.boot.context.properties.ConfigurationProperties;
import org.springframework.stereotype.Component;@Component
@ConfigurationProperties(prefix = "spring.data.cassandra",ignoreInvalidFields = true)
public class CassandraConfigurationProperties {private String contactPoints;private int port = 9042;private String username;private String password;private String keyspaceName;public String getContactPoints() {return contactPoints;}public void setContactPoints(String contactPoints) {this.contactPoints = contactPoints;}public int getPort() {return port;}public void setPort(int port) {this.port = port;}public String getUsername() {return username;}public void setUsername(String username) {this.username = username;}public String getPassword() {return password;}public void setPassword(String password) {this.password = password;}public String getKeyspaceName() {return keyspaceName;}public void setKeyspaceName(String keyspaceName) {this.keyspaceName = keyspaceName;}
}
package com.example.demo;import org.springframework.beans.factory.annotation.Autowired;
import org.springframework.boot.context.properties.EnableConfigurationProperties;
import org.springframework.context.annotation.Configuration;
import org.springframework.data.cassandra.config.AbstractCassandraConfiguration;
import org.springframework.data.cassandra.config.CqlSessionFactoryBean;@Configuration
@EnableConfigurationProperties(CassandraConfigurationProperties.class)
public class CassandraConfiguration extends AbstractCassandraConfiguration {@Autowiredprivate CassandraConfigurationProperties cassandraConfigurationProperties;@Overrideprotected String getKeyspaceName() {return cassandraConfigurationProperties.getKeyspaceName();}@Overrideprotected String getContactPoints() {return cassandraConfigurationProperties.getContactPoints();}@Overrideprotected int getPort() {return cassandraConfigurationProperties.getPort();}@Overridepublic CqlSessionFactoryBean cassandraSession() {CqlSessionFactoryBean cqlSessionFactoryBean = super.cassandraSession();cqlSessionFactoryBean.setPassword(cassandraConfigurationProperties.getPassword());cqlSessionFactoryBean.setUsername(cassandraConfigurationProperties.getUsername());return cqlSessionFactoryBean;}}
设置对应的实体类:
package com.example.demo;import org.springframework.data.cassandra.core.cql.PrimaryKeyType;
import org.springframework.data.cassandra.core.mapping.Column;
import org.springframework.data.cassandra.core.mapping.PrimaryKeyColumn;
import org.springframework.data.cassandra.core.mapping.Table;import java.util.Date;@Table("shopping_cart")
public class ShoppingCart {@PrimaryKeyColumn(type = PrimaryKeyType.PARTITIONED)private String userid;@Columnprivate int item_count;@Columnprivate Date last_update_timestamp;public String getUserid() {return userid;}public void setUserid(String userid) {this.userid = userid;}public int getItem_count() {return item_count;}public void setItem_count(int item_count) {this.item_count = item_count;}public Date getLast_update_timestamp() {return last_update_timestamp;}public void setLast_update_timestamp(Date last_update_timestamp) {this.last_update_timestamp = last_update_timestamp;}@Overridepublic String toString() {return "ShoppingCart{" +"userid='" + userid + '\'' +", item_count=" + item_count +", last_update_timestamp=" + last_update_timestamp +'}';}
}
设置接口类:
package com.example.demo;import org.springframework.data.cassandra.repository.CassandraRepository;public interface ShoppingCartRepo extends CassandraRepository<ShoppingCart, String> {
}
设置SpringBoot启动类:
package com.example.demo;import org.springframework.boot.SpringApplication;
import org.springframework.boot.autoconfigure.SpringBootApplication;@SpringBootApplication
public class DemoApplication {public static void main(String[] args) {SpringApplication.run(DemoApplication.class, args);}}
编写测试代码:
package com.example.demo;import org.junit.jupiter.api.Test;
import org.springframework.beans.factory.annotation.Autowired;
import org.springframework.boot.test.context.SpringBootTest;
import org.springframework.data.cassandra.core.CassandraTemplate;import java.util.List;@SpringBootTest
class DemoApplicationTests {@Autowiredprivate CassandraTemplate cassandraTemplate;@Testvoid query() {ShoppingCart cart = cassandraTemplate.selectOne("select * from store.shopping_cart", ShoppingCart.class);System.out.println(cart);}@Autowiredprivate ShoppingCartRepo shoppingCartRepo;@Testvoid query2(){List<ShoppingCart> all = shoppingCartRepo.findAll();System.out.println(all);}}


