本文记录常见的基于采样的RRT算法及相关改进算法(RRT*,RRT_connect)的原理和代码实现效果。与上一章介绍A*算法的文章不同,本文会先给出几种算法之间的效果对比,先有个直观的感受,再介绍其内在算法差异。
1. RRT/RRT*/RRT_connect算法效果对比
表1.1 简单地图路径搜索对比
| 算法 | 采样次数 | 实现效果 |
|---|---|---|
| RRT | 3198 | 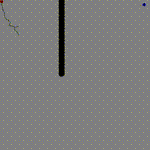 |
| RRT* | 3570 | 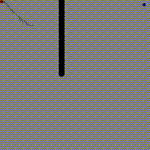 |
| RRT_connect | 214 | 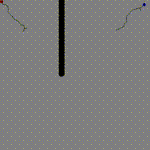 |
| RRT*_connect | 195 | 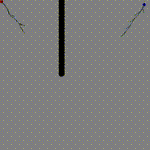 |
表1.2 复杂地图路径搜索对比(最大采样次数设置为10000)
| 算法 | 采样次数 | 实现效果 |
|---|---|---|
| RRT | 10000 | 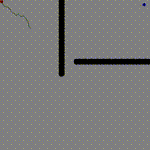 |
| RRT* | 10000 | 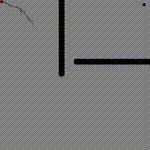 |
| RRT_connect | 1650 | 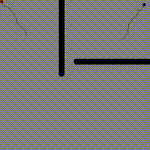 |
| RRT*_connect | 3960 | 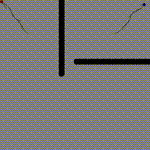 |
通过对比上述结果可以得出以下结论:
1)若路径存在,则通过RRT采样方法终究能找到1条路径,RRT算法是概率完备的
2)随机采样的缘故,RRT算法找到的路径通常情况下都不是最优的
3)相比于RRT算法,RRT*算法能对搜索树进行“剪枝”操作,优化路径使之更接近于真实的最优路径
4)传统的RRT算法是从起始点向终点进行搜索寻找路径,而RRT_connect是从起点和终点同时开始向中间搜索路径,能够显著提高路径搜索效率,减少采样次数
5)对于狭小通道(narrow passage)工况,传统的RRT可能需要很长时间才能通过随机采样通过狭小通道,而RRT_connect由于是从两头同时往中间搜索,在遇到狭小通道时,比RRT更能快速高效地寻找到路径
RRT算法就是在空间中随机撒点,通过点之间的连线确定1条起点到终点的路径。在直观上感受到RRT系列算法的路径搜索过程及效果对比之后,接下来介绍其内在的算法原理。
2. RRT/RRT*/RRT_connect算法流程
便于理解,先上基础RRT算法伪代码流程,针对流程逐一介绍
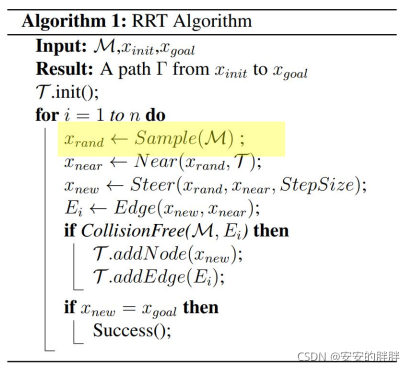
输入:带障碍物的地图,起点,终点位置
输入:从起点到终点的位置
维护1个节点集T用于存放已经搜索过且可到达的节点,初始化T放入起始节点
进入循环,进行路径搜索:
(1)在地图M中随机采集节点Xrand;
(2)从节点集T中找到离Xrand最近的节点Xnear;
(3)从Xnear出发,沿着指向Xrand的方向走指定步长StepSize,得到节点Xnew;
(4)连接Xnear和Xnew点,得到边Ei;
(5)对Ei进行碰撞检测,若是collision free的,则将Xnew放入T中,并设置Xnew的父节点为Xnear;若与障碍物有碰撞,进入下1轮循环,继续随机采样节点;
(6)如果Xnew等于Xgoal或者Xnew距离Xgoal小于某一设定阈值,则路径寻找成功,退出循环。
通过算法流程可以看出,RRT算法旨在找到起点到终点的1条路径,从起点出发,向终点不断搜索。但是也存在一些缺点:搜索出的路径不是最优的;在整个空间采样,效率低下。特别是对于文中示例的复杂路况,存在“狭窄通道”情况,一般的RRT算法可能需要经历很多次采样才能穿过通道,比如文中复杂工况,RRT算法经过10000次采样,仍然未找到1条路径,尽管从直观上看可行的路径是肯定存在的。
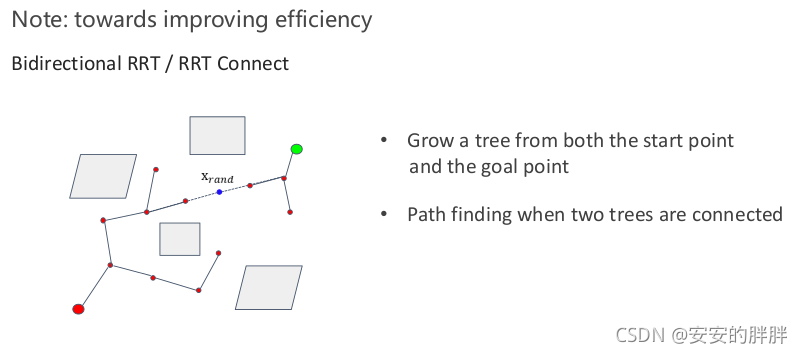
基本的RRT每次搜索都只有从初始状态点生长的快速扩展随机树来搜索整个状态空间,如果从初始状态点和目标状态点同时生长两棵快速扩展随机树来搜索状态空间,效率会更高。为此,基于双向扩展平衡的连结型双树RRT算法,即RRT_connect算法
而RRT*算法是在RRT算法的基础上加了"剪枝”操作,使路径更趋向于最优路径。算法流程如下
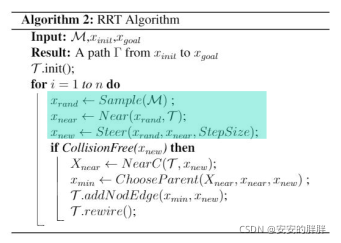
可以看出,相对于RRT算法,主要区别在于,在循环中多了ChooseParent和rewire两步。其中ChooseParent是指得到Xnew点之后,不直接将Xnear和Xnew连接,而是将Xnew周围给定半径(要比stepsize大)区域内的点加入一个节点集中,依次比较以这个节点集中节点作为Xnew的父节点的cost,选取cost最小的节点作为Xnew的父节点。而rewire是指依次比较节点集中的节点当前cost1和若以Xnew节点作为父节点的cost2,若cost2<cost1,则将当前节点的父节点更新为Xnew。
3. C++代码实现
在上一篇A*算法代码框架基础上,重新写了二维平面内的RRT/RRT*/RRT_connect算法,并通过调用opencv库展示路径搜索效果。具体代码见:
https://github.com/immune1993/path_planning_algorithm/tree/master/Sample_based
下面仅贴出核心的搜索部分代码
//RRT/RRT*搜索算法
bool RRTPathFinder::RRTGraphSearch(Eigen::Vector2d start_pt, Eigen::Vector2d end_pt) {//初始化起始和目标点GridNodePtr startNode=new GridNode(start_pt);startNode->r=5;GridNodePtr endNode= new GridNode(end_pt);endNode->r=5;//起始和目标点绘制startNode->drawNode(picture,Eigen::Vector3i(0,0,255));endNode->drawNode(picture,Eigen::Vector3i(255,0,0));GridNodeSet.clear();//将开始点放入搜索树中GridNodeSet.push_back(startNode);int count=0;srand((unsigned)time(NULL));//for(int i=0;i<5000;i++){while (1){//生成随机点count++;int x=(rand()%100+1)*5;int y=(rand()%100+1)*5;
//        int x=goal_dis(goal_gen)*5;
//        int y=goal_dis(goal_gen)*5;Eigen::Vector2d randcoo((double)x,(double)y);GridNodePtr randNode =new GridNode(randcoo);//获取最近节点GridNodePtr nearNode= getNearestNode(randNode);//获取next节点GridNodePtr nextNode= getNextNode(nearNode,randNode,10);//碰撞检测if(!collisioncheck(nextNode,nearNode)){continue;}nextNode->father=nearNode;//RRT*nextNode->cost=nearNode->cost+10;//获取next节点周围半径R内的节点集合std::vector<GridNodePtr> neighborsNode= getNeighbors(nextNode,25);//为next确定父节点for(auto n:neighborsNode){if(n->cost+getCost(n,nextNode)<nextNode->cost&& collisioncheck(nextNode,n)){nextNode->father=n;nextNode->cost=n->cost+ getCost(n,nextNode);}}//为周围节点更新父节点是否为nextnodefor(auto n:neighborsNode){if(nextNode->cost+ getCost(nextNode,n)<n->cost&& collisioncheck(n,nextNode)){//去除原来连线cv::line(picture,cv::Point(n->father->coord(0),n->father->coord(1)),cv::Point(n->coord(0),n->coord(1)),cv::Scalar(255,255,255));n->father=nextNode;n->cost=nextNode->cost+ getCost(nextNode,n);//重新连线cv::line(picture,cv::Point(n->father->coord(0),n->father->coord(1)),cv::Point(n->coord(0),n->coord(1)),cv::Scalar(0,0,0));}}//nextNode->drawNode(picture,Eigen::Vector3i(0,255,0));cv::line(picture,cv::Point(nextNode->father->coord(0),nextNode->father->coord(1)),cv::Point(nextNode->coord(0),nextNode->coord(1)),cv::Scalar(0,0,0));GridNodeSet.push_back(nextNode);cv::imshow("RRT",picture);if(count%15==0) {write.write(picture);std::cout<<count<<std::endl;}cv::waitKey(1);if(getCost(endNode,nextNode)<5){goalNode=nextNode;std::cout<<"Path has been found after " + std::to_string(count) +" times search"<<std::endl;return true;}}std::cout<<"Path has been not found!"<<std::endl;return false;
}
//RRT_connect搜索函数
bool RRTPathFinder::RRTGraphSearch(Eigen::Vector2d start_pt, Eigen::Vector2d end_pt) {//初始化起始和目标点GridNodePtr startNode=new GridNode(start_pt);startNode->r=5;GridNodePtr endNode= new GridNode(end_pt);endNode->r=5;//起始和目标点绘制startNode->drawNode(picture,Eigen::Vector3i(0,0,255));endNode->drawNode(picture,Eigen::Vector3i(255,0,0));FromStartNodeSet.clear();FromEndNodeSet.clear();//将开始点放入搜索树中FromStartNodeSet.push_back(startNode);FromEndNodeSet.push_back(endNode);int count=0;srand((unsigned)time(NULL));//for(int i=0;i<5000;i++){while (1){//生成随机点count++;int x=(rand()%100+1)*5;int y=(rand()%100+1)*5;
//        int x=goal_dis(goal_gen)*5;
//        int y=goal_dis(goal_gen)*5;Eigen::Vector2d randcoo((double)x,(double)y);GridNodePtr randNode =new GridNode(randcoo);//获取最近节点GridNodePtr nearNode_s= getNearestNode(randNode,FromStartNodeSet);GridNodePtr nearNode_e= getNearestNode(randNode,FromEndNodeSet);//获取next节点GridNodePtr nextNode_s= getNextNode(nearNode_s,randNode,10);GridNodePtr nextNode_e= getNextNode(nearNode_e,randNode,10);//碰撞检测bool collcheck_s=collisioncheck(nextNode_s,nearNode_s);bool collcheck_e=collisioncheck(nextNode_e,nearNode_e);if(collcheck_s){nextNode_s->father=nearNode_s;//RRT*nextNode_s->cost=nearNode_s->cost+10;//获取next节点周围半径R内的节点集合std::vector<GridNodePtr> neighborsNode= getNeighbors(nextNode_s,FromStartNodeSet,25);//为next确定父节点for(auto n:neighborsNode){if(n->cost+getCost(n,nextNode_s)<nextNode_s->cost&& collisioncheck(nextNode_s,n)){nextNode_s->father=n;nextNode_s->cost=n->cost+ getCost(n,nextNode_s);}}//为周围节点更新父节点是否为nextnodefor(auto n:neighborsNode){if(nextNode_s->cost+ getCost(nextNode_s,n)<n->cost&& collisioncheck(n,nextNode_s)){//去除原来连线cv::line(picture,cv::Point(n->father->coord(0),n->father->coord(1)),cv::Point(n->coord(0),n->coord(1)),cv::Scalar(255,255,255));n->father=nextNode_s;n->cost=nextNode_s->cost+ getCost(nextNode_s,n);//重新连线cv::line(picture,cv::Point(n->father->coord(0),n->father->coord(1)),cv::Point(n->coord(0),n->coord(1)),cv::Scalar(0,0,0));}}//nextNode_s->drawNode(picture,Eigen::Vector3i(0,255,0));cv::line(picture,cv::Point(nextNode_s->father->coord(0),nextNode_s->father->coord(1)),cv::Point(nextNode_s->coord(0),nextNode_s->coord(1)),cv::Scalar(0,0,0));FromStartNodeSet.push_back(nextNode_s);}if(collcheck_e){nextNode_e->father=nearNode_e;//RRT*nextNode_e->cost=nearNode_e->cost+10;//获取next节点周围半径R内的节点集合std::vector<GridNodePtr> neighborsNode= getNeighbors(nextNode_e,FromEndNodeSet,25);//为next确定父节点for(auto n:neighborsNode){if(n->cost+getCost(n,nextNode_e)<nextNode_e->cost&& collisioncheck(nextNode_e,n)){nextNode_e->father=n;nextNode_e->cost=n->cost+ getCost(n,nextNode_e);}}//为周围节点更新父节点是否为nextnodefor(auto n:neighborsNode){if(nextNode_e->cost+ getCost(nextNode_e,n)<n->cost&& collisioncheck(n,nextNode_e)){//去除原来连线cv::line(picture,cv::Point(n->father->coord(0),n->father->coord(1)),cv::Point(n->coord(0),n->coord(1)),cv::Scalar(255,255,255));n->father=nextNode_e;n->cost=nextNode_e->cost+ getCost(nextNode_e,n);//重新连线cv::line(picture,cv::Point(n->father->coord(0),n->father->coord(1)),cv::Point(n->coord(0),n->coord(1)),cv::Scalar(0,0,0));}}//nextNode_e->drawNode(picture,Eigen::Vector3i(0,255,0));cv::line(picture,cv::Point(nextNode_e->father->coord(0),nextNode_e->father->coord(1)),cv::Point(nextNode_e->coord(0),nextNode_e->coord(1)),cv::Scalar(0,0,0));FromEndNodeSet.push_back(nextNode_e);}cv::imshow("RRT_Connect",picture);if(count%15==0) {write.write(picture);std::cout<<count<<std::endl;}cv::waitKey(1);if(collcheck_s&&collcheck_e&&getCost(nextNode_s,nextNode_e)<10&& collisioncheck(nextNode_s,nextNode_e)){Mid_s_Node=nextNode_s;Mid_e_Node=nextNode_e;std::cout<<"Path has been found after " + std::to_string(count) +" times search"<<std::endl;return true;}}std::cout<<"Path has been not found!"<<std::endl;return false;
}
4. 参考
[1] 深蓝学院课程:移动机器人路径规划
[2] https://blog.csdn.net/qq_14977553/article/details/107494695


