目录
- 前言
- 总体设计
- 系统整体结构图
- 系统流程图
- 运行环境
- 1. Python 环境
- 2. Tensorflow 环境
- 3. wxPython 环境
- 4. PIL 环境
- 模块实现
- 1. 数据预处理
- 2. 模型简化处理
- 3. 用户界面设计
- 4. 翻译模块调用
- 系统测试
- 1.模型训练效果
- 2. 模型测试效果
- 代码实现
- 1. 用户界面设计及模型调用
- 2. 模型搭建及训练
- 3. 模型测试
- 4. 模型激活及应用
- 程序运行结果
- 工程源代码下载
- 其它资料下载

前言
在当今数字化时代,图像识别技术正逐渐成为各个领域中的重要组成部分。本文将介绍一个使用Tensorflow框架搭建深度学习的图像识别应用项目,该项目基于VGGNet和深度置信网络(DBN),实现本地化批量图像识别的突破。
本文将详细介绍相关方法和实验结果。通过结合这两种强大的算法,成功地提高了图像识别的准确率,并对识别结果进行标签化,从而实现了对多样化场景的准确识别。
通过使用这种类似的图像识别技术,您可以在各种应用场景中进行二次开发,来获得更好的图像识别应用。例如,在智能安防领域,我们可以帮助您快速准确地识别嫌疑人或违规行为;在医疗领域,我们可以帮助医生快速准确地诊断疾病。无论您的应用场景是什么,希望可以帮助到小伙伴们实现更高效、更智能的图像识别。
总体设计
本部分包括系统整体结构图和系统流程图。
系统整体结构图
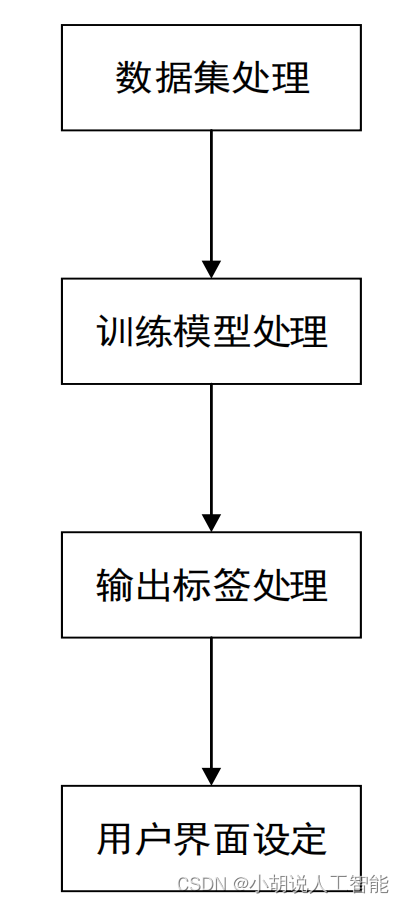
系统整体结构如图所示。
系统流程图
系统流程如图所示。

运行环境
本部分包括 Python 环境、Tensorflow 环境、wxPython 环境和 PIL 环境。
1. Python 环境
需要 Python 3.6 及以上配置,在 Windows 环境下推荐下载 Anaconda,即可完成 Python所需环境的配置,下载地址:https://www.anaconda.com/,也可以下载虚拟机在 Linux 环境下运行 python 代码。
2. Tensorflow 环境
在已经安装 Anaconda 的前提下搭建深度神经网络运行 TensorFlow 环境的具体步骤如下:
(1)查看已安装的所有环境。
(2)查看安装的 Python 版本
python --version
(3)安装不同版本的 python:
conda create --name tensorflow python=3.7
(4)激活 TensorFlow 环境:
activate tensorflow
(5)安装 tensorflow 及相关库:
pip install tensorflow
3. wxPython 环境
安装 wxPython 环境有多种方式,可以在 anaconda 中相关环境(如已安装好的 tensorflow 环境或 base 环境)下的 environments 选项中直接搜索安装相关库,或者在官网选择与自己计算机和 python 版本相匹配的 whl 文件并下载到 python 安装目录下的scripts 文件夹中,在 CMD 命令窗口进入 scripts 目录下,输入下面命令来完成安装。
pip install XX-XXX-XXX.whl
4. PIL 环境
PIL(Python Image Library)是 python 的第三方图像处理库,官方网址: http://pythonware.com/products/pil/。
模块实现
本项目包括 4 个模块:数据预处理、模型简化处理、用户界面设计、翻译模块调用,下面分别给出各模块的功能介绍及相关代码。
1. 数据预处理
本项目选择 ImageNet 数据集中的一部分作为训练集,对数据集进行裁剪时,选择的图片类型都属于生活中常见的,包括:动物、植物、生活用品、建筑以及交通工具。测试集的选取则主要来自百度图库,为了测试模型的泛化能力,随机选择了属于不同类型、不同大小和文件类型的图片,如图所示。数据集的下载地址:http://www.image-net.org/

无论是在训练或是测试时均要对图像数据进行预处理,主要步骤有:根据数据集的统计特性计算 RGB 均值、对图像分别进行 RGB 均值处理、将图像裁剪为 224*224 分辨率。
2. 模型简化处理
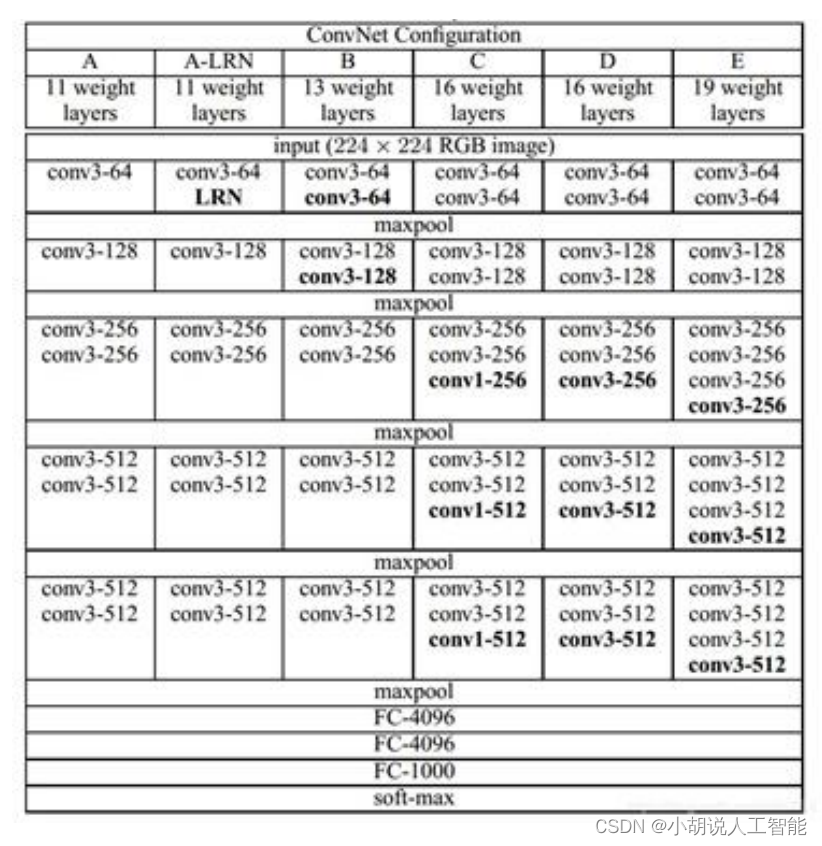
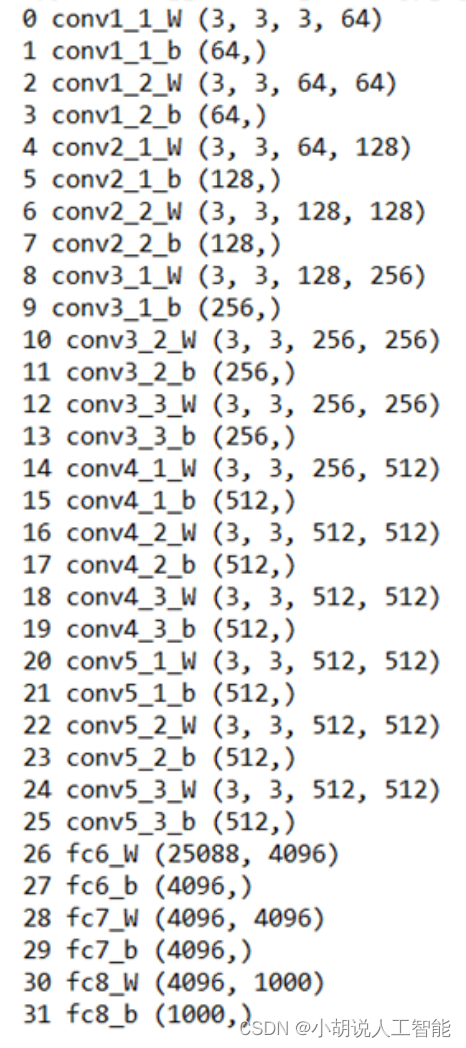
传统的 VGGNet 一般有 16~19 层,具有较大的网络复杂度。本项目对 VGGNet 做了一定的简化,在保证网络仍然具有其原本特点的情况下,适当减少了网络层数以及训练所需的参数数量,使其更加易于训练和搭建。简化之后的模型具有 13 个卷积池化层以及后续的全连接层,参数总量约为 500Mb,分别如下图所示。
3. 用户界面设计
本项目任务主体可以概括为输入/输出型,对用户界面的主要要求体现在批量文件的选择和处理上,所以整体用户界面的设计比较简洁,主要分为主程序模块和结果输出模块。

4. 翻译模块调用
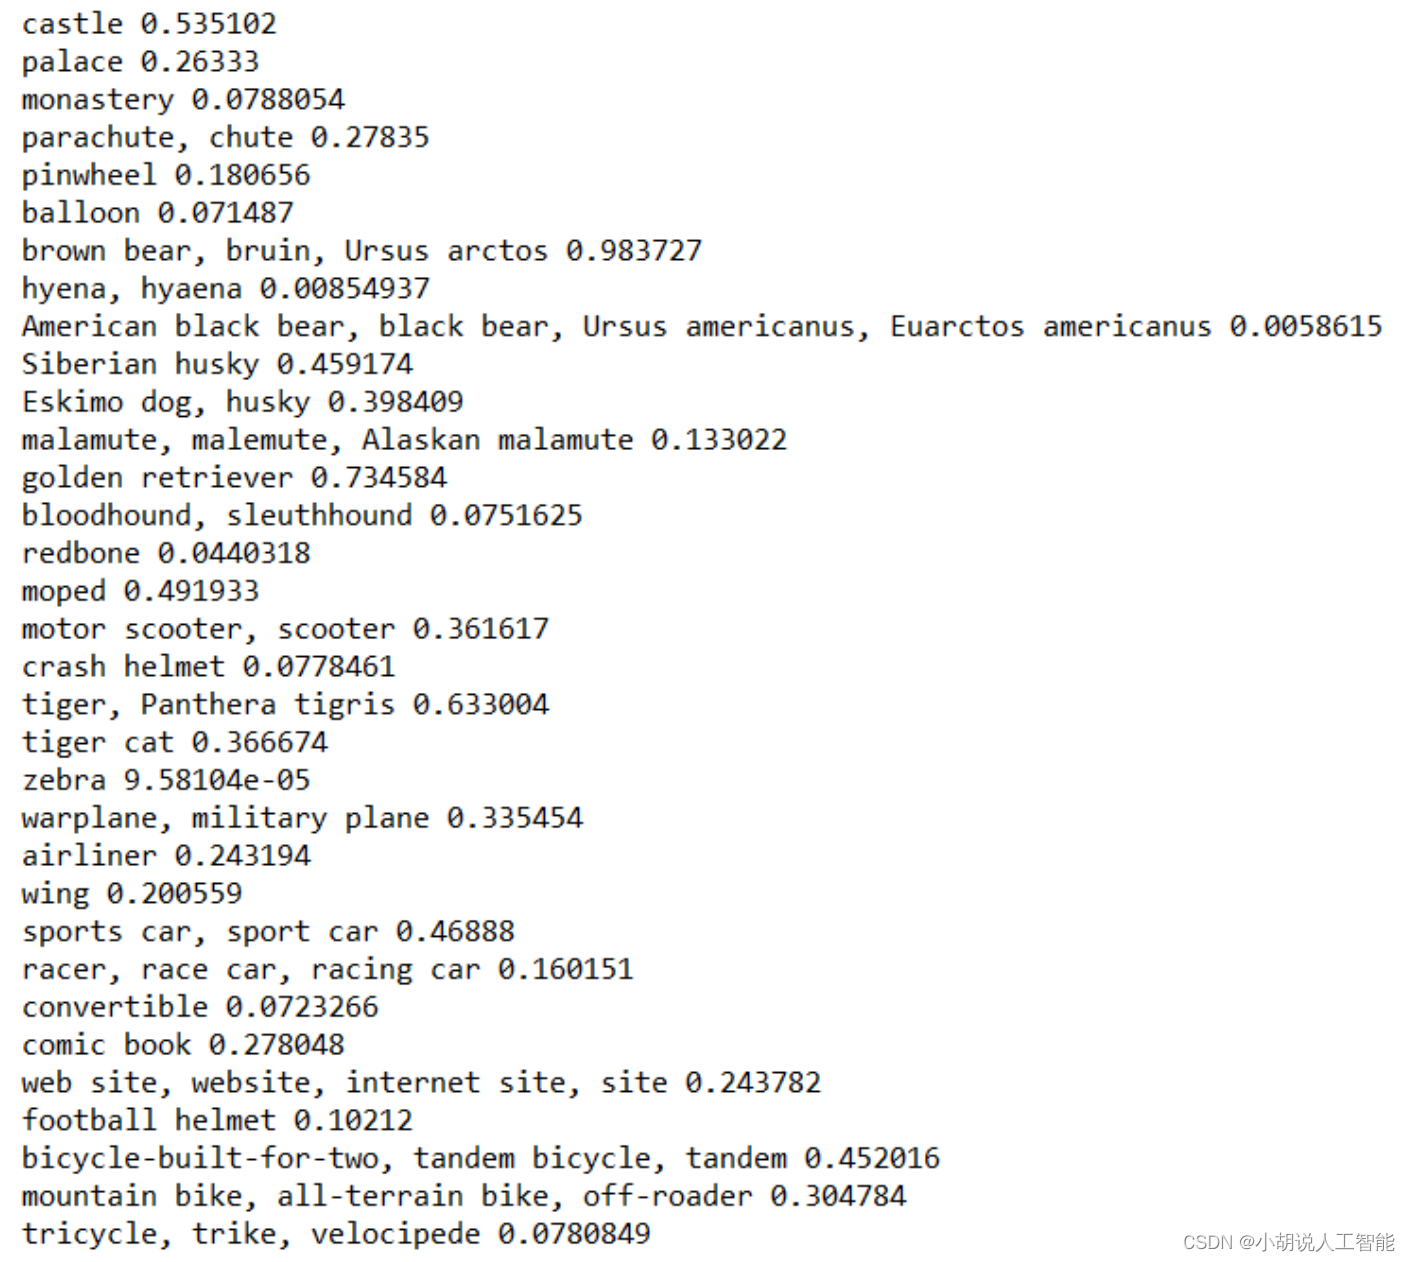
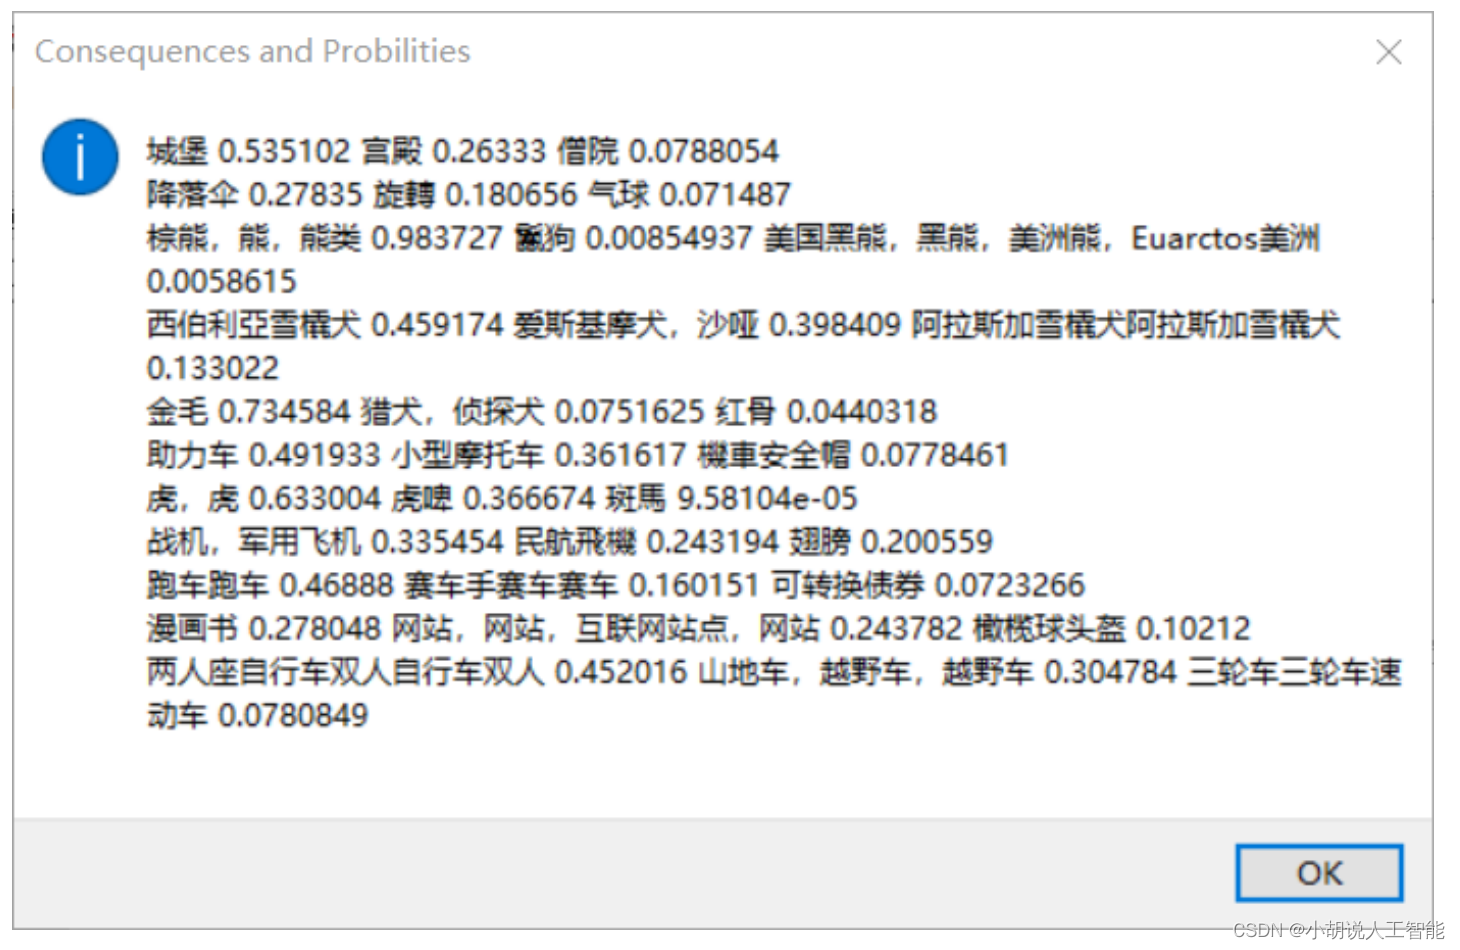
由于 ImageNet 数据集的标签均为英文形式,通过调用翻译模块实现英文标签与中文标签的转换。其主要方法是用微软官方 Translation 库来实现翻译功能,除了英文标签与中文标签的转换之外,还可以实现输出其他语言的标签,如图 16-7 和图 16-8 所示。
系统测试
本部分包括模型训练效果及模型测试效果。
1.模型训练效果
该模型在验证集上的准确率达到 95%以上,主要是验证集从训练集随机划分出来的,二者具有很高的相似性,对于模型的泛化性能并没有很高的要求,同时,ImageNet 数据集较为准确的标注信息,使得准确率有了相应的提高。
2. 模型测试效果
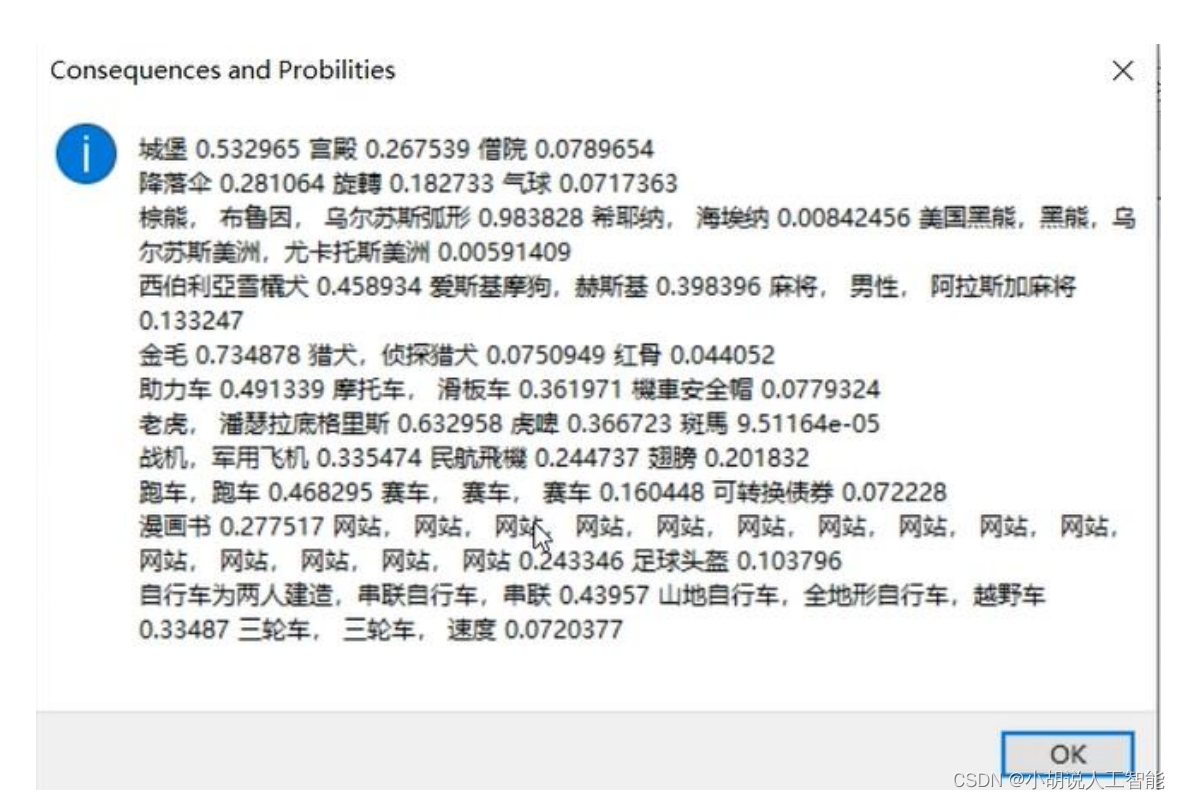
选取来自于百度图库中与训练集相差较大的图像作为测试集,测试模型的泛化性能。本项目随机选择了属于不同类型、不同大小的图片。将如图5所示的训练集作为图像识别的对象进入模型,通过模型的激活、调用和识别的其他过程之后可以得到如图6所示的输出标签。通过对比可以看到,基本实现了图像识别和标签化输出的功能,并且具有较高的准确率。

代码实现
本项目代码实现内容主要包括:用户界面设计及模型调用、模型搭建及训练、模型测试、模型激活及应用。
1. 用户界面设计及模型调用
import wx
import tensorflow as tf
import numpy as np
from scipy.misc import imread, imresize
from imagenet_classes import class_names
import os
from vgg16 import vgg16
from PIL import Image
from translate import Translatorapp_title=u'Lemon'class my_frame(wx.Frame):def __init__(self,parent, title):wx.Frame.__init__(self, parent, title=app_title,size=(500,150))self.icon = wx.Icon('Lemon.ico', wx.BITMAP_TYPE_ICO)self.SetIcon(self.icon)  button1=wx.Button(self, -1, u'选择图片', pos=(350, 50), size=(75, 25))button1.Bind(wx.EVT_LEFT_DOWN, self.on_open)button2=wx.Button(self, -1, u'开始识别', pos=(150, 50), size=(75, 25))button2.Bind(wx.EVT_LEFT_DOWN, self.on_recognize)self.Show(True)def on_open(self,e):"""open a file"""self.dirname = 'E:\\code\\python\\vgg16\\image'filename=''dlg=wx.FileDialog(self, message="Choose a file", defaultDir="", defaultFile="", wildcard="*.*", style=wx.FD_OPEN | wx.FD_MULTIPLE, pos=wx.DefaultPosition)#调用一个函数打开对话框if dlg.ShowModal() == wx.ID_OK:#self.filename = dlg.GetFilename()#self.dirname = dlg.GetDirectory()#path=os.path.join(self.dirname,self.filename)paths = dlg.GetPaths()print(paths)for path in paths:img = Image.open(path)filename=os.path.basename(path)path=os.path.join(self.dirname,filename)img.save(path)dlg.Destroy()def on_recognize(self,e):sess = tf.Session()imgs = tf.placeholder(tf.float32, [None, 224, 224, 3])vgg = vgg16(imgs, 'vgg16_weights.npz', sess)  # 载入预训练好的模型权重filenames=os.listdir(self.dirname)answers=[]translator=Translator(from_lang="english",to_lang="chinese")for filename in filenames:path=os.path.join(self.dirname,filename)img = imread(path, mode='RGB')    #载入需要判别的图片img = imresize(img, (224, 224))#计算VGG16的softmax层输出(返回是列表,每个元素代表一个判别类型的数组)prob = sess.run(vgg.probs, feed_dict={vgg.imgs: [img]})  for pro in prob:# 源代码使用(np.argsort(prob)[::-1])[0:5]     # np.argsort(x)返回的数组值从小到大的索引值  #argsort(-x)从大到小排序返回索引值   [::-1]是使用切片将数组从大到小排序  #preds = (np.argsort(prob)[::-1])[0:5]  preds = (np.argsort(-pro))[0:3]  #取出top5的索引for p in preds:print(class_names[p], pro[p])answers.append(translator.translate(str(class_names[p])))answers.append(' ')answers.append(str(pro[p]))answers.append(' ')   answers.append('\n')consequence=''.join(answers)   dlg = wx.MessageDialog(self,consequence,'Consequences and Probilities',wx.OK)#创建一个对话框,有一个ok的按钮dlg.ShowModal()#显示对话框dlg.Destroy()#完成后,销毁它。   app = wx.App(False)
frame = my_frame(None,app_title)
app.MainLoop()
2. 模型搭建及训练
import inspect
import osimport numpy as np
import tensorflow as tf
import timeVGG_MEAN = [103.939, 116.779, 123.68]class Vgg16:def __init__(self, vgg16_npy_path=None):if vgg16_npy_path is None:path = inspect.getfile(Vgg16)path = os.path.abspath(os.path.join(path, os.pardir))path = os.path.join(path, "vgg16.npy")vgg16_npy_path = pathprint(path)self.data_dict = np.load(vgg16_npy_path, encoding='latin1').item()print("npy file loaded")def build(self, rgb):"""load variable from npy to build the VGG:param rgb: rgb image [batch, height, width, 3] values scaled [0, 1]"""start_time = time.time()print("build model started")rgb_scaled = rgb * 255.0# Convert RGB to BGRred, green, blue = tf.split(axis=3, num_or_size_splits=3, value=rgb_scaled)assert red.get_shape().as_list()[1:] == [224, 224, 1]assert green.get_shape().as_list()[1:] == [224, 224, 1]assert blue.get_shape().as_list()[1:] == [224, 224, 1]bgr = tf.concat(axis=3, values=[blue - VGG_MEAN[0],green - VGG_MEAN[1],red - VGG_MEAN[2],])assert bgr.get_shape().as_list()[1:] == [224, 224, 3]self.conv1_1 = self.conv_layer(bgr, "conv1_1")self.conv1_2 = self.conv_layer(self.conv1_1, "conv1_2")self.pool1 = self.max_pool(self.conv1_2, 'pool1')self.conv2_1 = self.conv_layer(self.pool1, "conv2_1")self.conv2_2 = self.conv_layer(self.conv2_1, "conv2_2")self.pool2 = self.max_pool(self.conv2_2, 'pool2')self.conv3_1 = self.conv_layer(self.pool2, "conv3_1")self.conv3_2 = self.conv_layer(self.conv3_1, "conv3_2")self.conv3_3 = self.conv_layer(self.conv3_2, "conv3_3")self.pool3 = self.max_pool(self.conv3_3, 'pool3')self.conv4_1 = self.conv_layer(self.pool3, "conv4_1")self.conv4_2 = self.conv_layer(self.conv4_1, "conv4_2")self.conv4_3 = self.conv_layer(self.conv4_2, "conv4_3")self.pool4 = self.max_pool(self.conv4_3, 'pool4')self.conv5_1 = self.conv_layer(self.pool4, "conv5_1")self.conv5_2 = self.conv_layer(self.conv5_1, "conv5_2")self.conv5_3 = self.conv_layer(self.conv5_2, "conv5_3")self.pool5 = self.max_pool(self.conv5_3, 'pool5')self.fc6 = self.fc_layer(self.pool5, "fc6")assert self.fc6.get_shape().as_list()[1:] == [4096]self.relu6 = tf.nn.relu(self.fc6)self.fc7 = self.fc_layer(self.relu6, "fc7")self.relu7 = tf.nn.relu(self.fc7)self.fc8 = self.fc_layer(self.relu7, "fc8")self.prob = tf.nn.softmax(self.fc8, name="prob")self.data_dict = Noneprint(("build model finished: %ds" % (time.time() - start_time)))def avg_pool(self, bottom, name):return tf.nn.avg_pool(bottom, ksize=[1, 2, 2, 1], strides=[1, 2, 2, 1], padding='SAME', name=name)def max_pool(self, bottom, name):return tf.nn.max_pool(bottom, ksize=[1, 2, 2, 1], strides=[1, 2, 2, 1], padding='SAME', name=name)def conv_layer(self, bottom, name):with tf.variable_scope(name):filt = self.get_conv_filter(name)conv = tf.nn.conv2d(bottom, filt, [1, 1, 1, 1], padding='SAME')conv_biases = self.get_bias(name)bias = tf.nn.bias_add(conv, conv_biases)relu = tf.nn.relu(bias)return reludef fc_layer(self, bottom, name):with tf.variable_scope(name):shape = bottom.get_shape().as_list()dim = 1for d in shape[1:]:dim *= dx = tf.reshape(bottom, [-1, dim])weights = self.get_fc_weight(name)biases = self.get_bias(name)# Fully connected layer. Note that the '+' operation automatically# broadcasts the biases.fc = tf.nn.bias_add(tf.matmul(x, weights), biases)return fcdef get_conv_filter(self, name):return tf.constant(self.data_dict[name][0], name="filter")def get_bias(self, name):return tf.constant(self.data_dict[name][1], name="biases")def get_fc_weight(self, name):return tf.constant(self.data_dict[name][0], name="weights")
3. 模型测试
import numpy as np
import tensorflow as tfimport vgg16
import utilsimg1 = utils.load_image("./test_data/tiger.jpeg")
img2 = utils.load_image("./test_data/puzzle.jpeg")batch1 = img1.reshape((1, 224, 224, 3))
batch2 = img2.reshape((1, 224, 224, 3))batch = np.concatenate((batch1, batch2), 0)# with tf.Session(config=tf.ConfigProto(gpu_options=(tf.GPUOptions(per_process_gpu_memory_fraction=0.7)))) as sess:
with tf.device('/cpu:0'):with tf.Session() as sess:images = tf.placeholder("float", [2, 224, 224, 3])feed_dict = {images: batch}vgg = vgg16.Vgg16()with tf.name_scope("content_vgg"):vgg.build(images)prob = sess.run(vgg.prob, feed_dict=feed_dict)print(prob)utils.print_prob(prob[0], './synset.txt')utils.print_prob(prob[1], './synset.txt')
# -*- coding: utf-8 -*-
#-*- coding: utf-8 -*-import wx
import tensorflow as tf
import numpy as np
from scipy.misc import imread, imresize
from imagenet_classes import class_names
import os
from vgg16 import vgg16
from PIL import Imageapp_title=u'图像识别'class my_frame(wx.Frame):def __init__(self,parent, title):wx.Frame.__init__(self, parent, title=app_title,size=(500,150))button1=wx.Button(self, -1, u'选择图片', pos=(350, 50), size=(75, 25))button1.Bind(wx.EVT_LEFT_DOWN, self.on_open)button2=wx.Button(self, -1, u'开始识别', pos=(150, 50), size=(75, 25))button2.Bind(wx.EVT_LEFT_DOWN, self.on_recognize)self.Show(True)def on_open(self,e):"""open a file"""self.dirname = ''dlg=wx.FileDialog(self, message="Choose a file", defaultDir="", defaultFile="", wildcard="*.*", style=0, pos=wx.DefaultPosition)#调用一个函数打开对话框if dlg.ShowModal() == wx.ID_OK:self.filename = dlg.GetFilename()self.dirname = dlg.GetDirectory()path=os.path.join(self.dirname,self.filename)print(path)img = Image.open(path)img.save('E:\\code\\python\\vgg16\\image.jpg')dlg.Destroy()def on_recognize(self,e):sess = tf.Session()imgs = tf.placeholder(tf.float32, [None, 224, 224, 3])vgg = vgg16(imgs, 'vgg16_weights.npz', sess) # 载入预训练好的模型权重img = imread('image.jpg', mode='RGB') #载入需要判别的图片img = imresize(img, (224, 224))#计算VGG16的softmax层输出(返回是列表,每个元素代表一个判别类型的数组)prob = sess.run(vgg.probs, feed_dict={vgg.imgs: [img]}) answers=[]for pro in prob:# 源代码使用(np.argsort(prob)[::-1])[0:5] # np.argsort(x)返回的数组值从小到大的索引值 #argsort(-x)从大到小排序返回索引值 [::-1]是使用切片将数组从大到小排序 #preds = (np.argsort(prob)[::-1])[0:5] preds = (np.argsort(-pro))[0:5] #取出top5的索引for p in preds:print(class_names[p], pro[p])answers.append(str(class_names[p]))answers.append(' ')answers.append(str(pro[p]))answers.append(' ')consequence=''.join(answers) dlg = wx.MessageDialog(self,consequence,'Consequences and Probilities',wx.OK)#创建一个对话框,有一个ok的按钮dlg.ShowModal()#显示对话框dlg.Destroy()#完成后,销毁它。
app = wx.App(False)
frame = my_frame(None,app_title)
app.MainLoop()4. 模型激活及应用
import tensorflow as tf
import numpy as np
from scipy.misc import imread, imresize
from imagenet_classes import class_namesclass vgg16:def __init__(self, imgs, weights=None, sess=None):self.imgs = imgsself.convlayers()self.fc_layers()self.probs = tf.nn.softmax(self.fc3l)  #计算softmax层输出if weights is not None and sess is not None:  #载入pre-training的权重self.load_weights(weights, sess)def convlayers(self):self.parameters = []# zero-mean input# 去RGB均值操作(这里RGB均值为原数据集的均值)with tf.name_scope('preprocess') as scope:mean = tf.constant([123.68, 116.779, 103.939], dtype=tf.float32, shape=[1, 1, 1, 3], name='img_mean')images = self.imgs-mean# conv1_1with tf.name_scope('conv1_1') as scope:kernel = tf.Variable(tf.truncated_normal([3, 3, 3, 64], dtype=tf.float32,stddev=1e-1), name='weights')conv = tf.nn.conv2d(images, kernel, [1, 1, 1, 1], padding='SAME')biases = tf.Variable(tf.constant(0.0, shape=[64], dtype=tf.float32),trainable=True, name='biases')out = tf.nn.bias_add(conv, biases)self.conv1_1 = tf.nn.relu(out, name=scope)self.parameters += [kernel, biases]# conv1_2with tf.name_scope('conv1_2') as scope:kernel = tf.Variable(tf.truncated_normal([3, 3, 64, 64], dtype=tf.float32,stddev=1e-1), name='weights')conv = tf.nn.conv2d(self.conv1_1, kernel, [1, 1, 1, 1], padding='SAME')biases = tf.Variable(tf.constant(0.0, shape=[64], dtype=tf.float32),trainable=True, name='biases')out = tf.nn.bias_add(conv, biases)self.conv1_2 = tf.nn.relu(out, name=scope)self.parameters += [kernel, biases]# pool1self.pool1 = tf.nn.max_pool(self.conv1_2,ksize=[1, 2, 2, 1],strides=[1, 2, 2, 1],padding='SAME',name='pool1')# conv2_1with tf.name_scope('conv2_1') as scope:kernel = tf.Variable(tf.truncated_normal([3, 3, 64, 128], dtype=tf.float32,stddev=1e-1), name='weights')conv = tf.nn.conv2d(self.pool1, kernel, [1, 1, 1, 1], padding='SAME')biases = tf.Variable(tf.constant(0.0, shape=[128], dtype=tf.float32),trainable=True, name='biases')out = tf.nn.bias_add(conv, biases)self.conv2_1 = tf.nn.relu(out, name=scope)self.parameters += [kernel, biases]# conv2_2with tf.name_scope('conv2_2') as scope:kernel = tf.Variable(tf.truncated_normal([3, 3, 128, 128], dtype=tf.float32,stddev=1e-1), name='weights')conv = tf.nn.conv2d(self.conv2_1, kernel, [1, 1, 1, 1], padding='SAME')biases = tf.Variable(tf.constant(0.0, shape=[128], dtype=tf.float32),trainable=True, name='biases')out = tf.nn.bias_add(conv, biases)self.conv2_2 = tf.nn.relu(out, name=scope)self.parameters += [kernel, biases]# pool2self.pool2 = tf.nn.max_pool(self.conv2_2,ksize=[1, 2, 2, 1],strides=[1, 2, 2, 1],padding='SAME',name='pool2')# conv3_1with tf.name_scope('conv3_1') as scope:kernel = tf.Variable(tf.truncated_normal([3, 3, 128, 256], dtype=tf.float32,stddev=1e-1), name='weights')conv = tf.nn.conv2d(self.pool2, kernel, [1, 1, 1, 1], padding='SAME')biases = tf.Variable(tf.constant(0.0, shape=[256], dtype=tf.float32),trainable=True, name='biases')out = tf.nn.bias_add(conv, biases)self.conv3_1 = tf.nn.relu(out, name=scope)self.parameters += [kernel, biases]# conv3_2with tf.name_scope('conv3_2') as scope:kernel = tf.Variable(tf.truncated_normal([3, 3, 256, 256], dtype=tf.float32,stddev=1e-1), name='weights')conv = tf.nn.conv2d(self.conv3_1, kernel, [1, 1, 1, 1], padding='SAME')biases = tf.Variable(tf.constant(0.0, shape=[256], dtype=tf.float32),trainable=True, name='biases')out = tf.nn.bias_add(conv, biases)self.conv3_2 = tf.nn.relu(out, name=scope)self.parameters += [kernel, biases]# conv3_3with tf.name_scope('conv3_3') as scope:kernel = tf.Variable(tf.truncated_normal([3, 3, 256, 256], dtype=tf.float32,stddev=1e-1), name='weights')conv = tf.nn.conv2d(self.conv3_2, kernel, [1, 1, 1, 1], padding='SAME')biases = tf.Variable(tf.constant(0.0, shape=[256], dtype=tf.float32),trainable=True, name='biases')out = tf.nn.bias_add(conv, biases)self.conv3_3 = tf.nn.relu(out, name=scope)self.parameters += [kernel, biases]# pool3self.pool3 = tf.nn.max_pool(self.conv3_3,ksize=[1, 2, 2, 1],strides=[1, 2, 2, 1],padding='SAME',name='pool3')# conv4_1with tf.name_scope('conv4_1') as scope:kernel = tf.Variable(tf.truncated_normal([3, 3, 256, 512], dtype=tf.float32,stddev=1e-1), name='weights')conv = tf.nn.conv2d(self.pool3, kernel, [1, 1, 1, 1], padding='SAME')biases = tf.Variable(tf.constant(0.0, shape=[512], dtype=tf.float32),trainable=True, name='biases')out = tf.nn.bias_add(conv, biases)self.conv4_1 = tf.nn.relu(out, name=scope)self.parameters += [kernel, biases]# conv4_2with tf.name_scope('conv4_2') as scope:kernel = tf.Variable(tf.truncated_normal([3, 3, 512, 512], dtype=tf.float32,stddev=1e-1), name='weights')conv = tf.nn.conv2d(self.conv4_1, kernel, [1, 1, 1, 1], padding='SAME')biases = tf.Variable(tf.constant(0.0, shape=[512], dtype=tf.float32),trainable=True, name='biases')out = tf.nn.bias_add(conv, biases)self.conv4_2 = tf.nn.relu(out, name=scope)self.parameters += [kernel, biases]# conv4_3with tf.name_scope('conv4_3') as scope:kernel = tf.Variable(tf.truncated_normal([3, 3, 512, 512], dtype=tf.float32,stddev=1e-1), name='weights')conv = tf.nn.conv2d(self.conv4_2, kernel, [1, 1, 1, 1], padding='SAME')biases = tf.Variable(tf.constant(0.0, shape=[512], dtype=tf.float32),trainable=True, name='biases')out = tf.nn.bias_add(conv, biases)self.conv4_3 = tf.nn.relu(out, name=scope)self.parameters += [kernel, biases]# pool4self.pool4 = tf.nn.max_pool(self.conv4_3,ksize=[1, 2, 2, 1],strides=[1, 2, 2, 1],padding='SAME',name='pool4')# conv5_1with tf.name_scope('conv5_1') as scope:kernel = tf.Variable(tf.truncated_normal([3, 3, 512, 512], dtype=tf.float32,stddev=1e-1), name='weights')conv = tf.nn.conv2d(self.pool4, kernel, [1, 1, 1, 1], padding='SAME')biases = tf.Variable(tf.constant(0.0, shape=[512], dtype=tf.float32),trainable=True, name='biases')out = tf.nn.bias_add(conv, biases)self.conv5_1 = tf.nn.relu(out, name=scope)self.parameters += [kernel, biases]# conv5_2with tf.name_scope('conv5_2') as scope:kernel = tf.Variable(tf.truncated_normal([3, 3, 512, 512], dtype=tf.float32,stddev=1e-1), name='weights')conv = tf.nn.conv2d(self.conv5_1, kernel, [1, 1, 1, 1], padding='SAME')biases = tf.Variable(tf.constant(0.0, shape=[512], dtype=tf.float32),trainable=True, name='biases')out = tf.nn.bias_add(conv, biases)self.conv5_2 = tf.nn.relu(out, name=scope)self.parameters += [kernel, biases]# conv5_3with tf.name_scope('conv5_3') as scope:kernel = tf.Variable(tf.truncated_normal([3, 3, 512, 512], dtype=tf.float32,stddev=1e-1), name='weights')conv = tf.nn.conv2d(self.conv5_2, kernel, [1, 1, 1, 1], padding='SAME')biases = tf.Variable(tf.constant(0.0, shape=[512], dtype=tf.float32),trainable=True, name='biases')out = tf.nn.bias_add(conv, biases)self.conv5_3 = tf.nn.relu(out, name=scope)self.parameters += [kernel, biases]# pool5self.pool5 = tf.nn.max_pool(self.conv5_3,ksize=[1, 2, 2, 1],strides=[1, 2, 2, 1],padding='SAME',name='pool4')def fc_layers(self):# fc1with tf.name_scope('fc1') as scope:# 取出shape中第一个元素后的元素  例如x=[1,2,3] -->x[1:]=[2,3]  # np.prod是计算数组的元素乘积 x=[2,3] np.prod(x) = 2*3 = 6  # 这里代码可以使用 shape = self.pool5.get_shape()     #shape = shape[1].value * shape[2].value * shape[3].value 代替shape = int(np.prod(self.pool5.get_shape()[1:]))  fc1w = tf.Variable(tf.truncated_normal([shape, 4096],dtype=tf.float32,stddev=1e-1), name='weights')fc1b = tf.Variable(tf.constant(1.0, shape=[4096], dtype=tf.float32),trainable=True, name='biases')pool5_flat = tf.reshape(self.pool5, [-1, shape])fc1l = tf.nn.bias_add(tf.matmul(pool5_flat, fc1w), fc1b)self.fc1 = tf.nn.relu(fc1l)self.parameters += [fc1w, fc1b]# fc2with tf.name_scope('fc2') as scope:fc2w = tf.Variable(tf.truncated_normal([4096, 4096],dtype=tf.float32,stddev=1e-1), name='weights')fc2b = tf.Variable(tf.constant(1.0, shape=[4096], dtype=tf.float32),trainable=True, name='biases')fc2l = tf.nn.bias_add(tf.matmul(self.fc1, fc2w), fc2b)self.fc2 = tf.nn.relu(fc2l)self.parameters += [fc2w, fc2b]# fc3with tf.name_scope('fc3') as scope:fc3w = tf.Variable(tf.truncated_normal([4096, 1000],dtype=tf.float32,stddev=1e-1), name='weights')fc3b = tf.Variable(tf.constant(1.0, shape=[1000], dtype=tf.float32),trainable=True, name='biases')self.fc3l = tf.nn.bias_add(tf.matmul(self.fc2, fc3w), fc3b)self.parameters += [fc3w, fc3b]def load_weights(self, weight_file, sess):weights = np.load(weight_file)keys = sorted(weights.keys())for i, k in enumerate(keys):print(i, k, np.shape(weights[k]))sess.run(self.parameters[i].assign(weights[k]))if __name__ == '__main__':sess = tf.Session()imgs = tf.placeholder(tf.float32, [None, 224, 224, 3])vgg = vgg16(imgs, 'vgg16_weights.npz', sess)  # 载入预训练好的模型权重img = imread('image.jpg', mode='RGB')    #载入需要判别的图片img = imresize(img, (224, 224))#计算VGG16的softmax层输出(返回是列表,每个元素代表一个判别类型的数组)prob = sess.run(vgg.probs, feed_dict={vgg.imgs: [img]})  file_object=open('data.txt','w+')for pro in prob:# 源代码使用(np.argsort(prob)[::-1])[0:5]     # np.argsort(x)返回的数组值从小到大的索引值  #argsort(-x)从大到小排序返回索引值   [::-1]是使用切片将数组从大到小排序  #preds = (np.argsort(prob)[::-1])[0:5]  preds = (np.argsort(-pro))[0:5]  #取出top5的索引for p in preds:print(class_names[p], pro[p])file_object.write(class_names[p])file_object.write('\n')print('\n')file_object.write('\n')file_object.close( )
程序运行结果
castle 0.532965
palace 0.267539parachute, chute 0.281064
pinwheel 0.182733
balloon 0.0717363
brown bear, bruin, Ursus arctos 0.983828
hyena, hyaena 0.00842456
American black bear, black bear, Ursus americanus, Euarctos americanus 0.00591409
Siberian husky 0.458934
Eskimo dog, husky 0.398396
malamute, malemute, Alaskan malamute 0.133247
golden retriever 0.734878
bloodhound, sleuthhound 0.0750949
redbone 0.044052
moped 0.491339
motor scooter, scooter 0.361971
crash helmet 0.0779324
tiger, Panthera tigris 0.632958
tiger cat 0.366723
zebra 9.51164e-05
warplane, military plane 0.335474
airliner 0.244737
wing 0.201832
sports car, sport car 0.468295
racer, race car, racing car 0.160448
convertible 0.072228
comic book 0.277517
web site, website, internet site, site 0.243346
football helmet 0.103796
bicycle-built-for-two, tandem bicycle, tandem 0.43957
mountain bike, all-terrain bike, off-roader 0.33487
tricycle, trike, velocipede 0.0720377
monastery 0.0789654
工程源代码下载
详见本人博客资源下载页
其它资料下载
如果大家想继续了解人工智能相关学习路线和知识体系,欢迎大家翻阅我的另外一篇博客《重磅 | 完备的人工智能AI 学习——基础知识学习路线,所有资料免关注免套路直接网盘下载》
这篇博客参考了Github知名开源平台,AI技术平台以及相关领域专家:Datawhale,ApacheCN,AI有道和黄海广博士等约有近100G相关资料,希望能帮助到所有小伙伴们。
