1. GraalVM 原生镜像的介绍
GraalVM原生镜像为部署和运行Java应用程序提供了一种新的方式。与Java虚拟机相比,原生镜像可以以更小的内存占用和更快的启动时间运行。
它们非常适用于使用容器镜像部署的应用程序,当与 "功能即服务"(FaaS)平台结合时,尤其令人感兴趣。
与为JVM编写的传统应用程序不同,GraalVM Native Image 应用程序需要提前处理,以创建可执行文件。这种超前处理包括从主入口点静态地分析你的应用程序代码。
GraalVM本地镜像是一个完整的、针对平台的可执行文件。你不需要为了运行一个本地镜像而去运行一个Java虚拟机。
1.1. 与JVM部署的主要区别
GraalVM原生镜像是提前制作的,这意味着原生和基于JVM的应用程序之间存在一些关键的差异。 主要的区别是。
- 对应用程序的静态分析是在构建时从
main入口点进行的。 - 在创建本地镜像时无法到达的代码将被删除,不会成为可执行文件的一部分。
- GraalVM不能直接知道你的代码中的动态元素,必须被告知反射、资源、序列化和动态代理的情况。
- 应用程序的classpath在构建时是固定的,不能改变。
- 没有类的延迟加载,可执行文件中的所有内容都将在启动时加载到内存中。
- 围绕Java应用程序的某些方面有一些限制,不完全支持。
2.安装 Liberica NIK
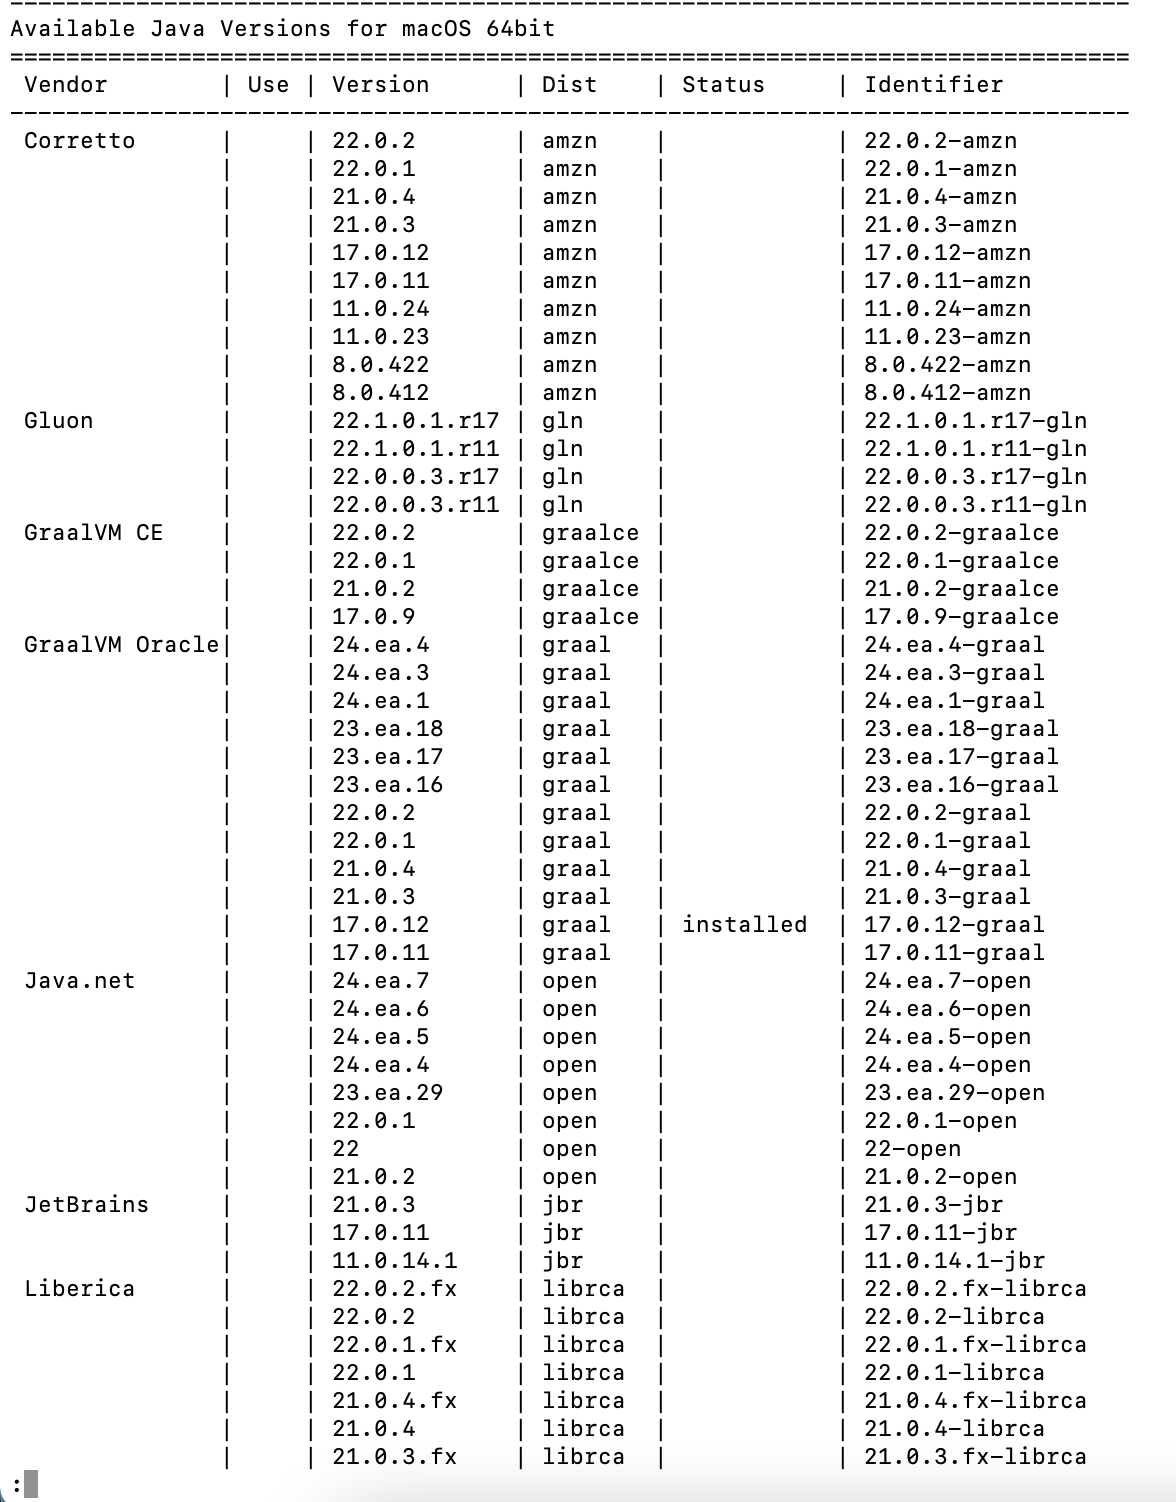
Liberica Native Image Kit是bellsoft出品的旨在创建高性能原生二进制(Native Binaries)基于JVM编写的应用的工具包,简称为Liberica NIK。Liberica NIK本质就是把OpenJDK和多种其他工具包一起封装起来的JDK发行版,在Native Image功能应用过程,可以简单把它视为OpenJDK + GraalVM的结合体。可以通过sdk list java查看相应的JDK版本:

关于sdkman如何使用,可以参考上篇文章jdk版本管理利器-sdkman | Harries Blog™ 。 这里选择JDK-17的版本进行安装:
sdk install java 23.0.1.r17-nik
# 这里最好把此JDK设置为当前系统的默认JDK,否则后面编译镜像时候会提示找不到GraalVM
sdk default java 23.0.1.r17-nik
安装完成后,通过java -version验证一下:
(base) liuhaihua@bogon ~ % java -version
openjdk version "17.0.8" 2023-07-18 LTS
OpenJDK Runtime Environment Liberica-NIK-23.0.1-1 (build 17.0.8+7-LTS)
OpenJDK 64-Bit Server VM Liberica-NIK-23.0.1-1 (build 17.0.8+7-LTS, mixed mode, sharing)
3.代码工程
实验目标
创建高性能原生二进制执行包
pom.xml
<?xml version="1.0" encoding="UTF-8"?>
<project xmlns="http://maven.apache.org/POM/4.0.0"xmlns:xsi="http://www.w3.org/2001/XMLSchema-instance"xsi:schemaLocation="http://maven.apache.org/POM/4.0.0 http://maven.apache.org/xsd/maven-4.0.0.xsd"><parent><groupId>org.springframework.boot</groupId><artifactId>spring-boot-starter-parent</artifactId><version>3.2.1</version></parent><modelVersion>4.0.0</modelVersion><artifactId>springnative</artifactId><properties><maven.compiler.source>17</maven.compiler.source><maven.compiler.target>17</maven.compiler.target><project.build.sourceEncoding>UTF-8</project.build.sourceEncoding><maven.compiler.version>3.11.0</maven.compiler.version><maven.install.version>3.1.1</maven.install.version></properties><dependencies><dependency><groupId>org.springframework.boot</groupId><artifactId>spring-boot-starter-web</artifactId></dependency><dependency><groupId>org.springframework.boot</groupId><artifactId>spring-boot-autoconfigure</artifactId></dependency><dependency><groupId>org.springframework.boot</groupId><artifactId>spring-boot-starter-test</artifactId><scope>test</scope></dependency></dependencies><build><plugins><plugin><artifactId>maven-compiler-plugin</artifactId><groupId>org.apache.maven.plugins</groupId><version>${maven.compiler.version}</version><configuration><source>${maven.compiler.source}</source><target>${maven.compiler.target}</target><encoding>${project.build.sourceEncoding}</encoding></configuration></plugin><plugin><groupId>org.apache.maven.plugins</groupId><artifactId>maven-install-plugin</artifactId><version>${maven.install.version}</version></plugin><plugin><groupId>org.graalvm.buildtools</groupId><artifactId>native-maven-plugin</artifactId></plugin><plugin><groupId>org.springframework.boot</groupId><artifactId>spring-boot-maven-plugin</artifactId><executions><execution><goals><goal>repackage</goal></goals></execution></executions><configuration><mainClass>com.et.springnative.DemoApplication</mainClass></configuration></plugin></plugins></build>
</project>
controller
package com.et.springnative.controller;import org.springframework.web.bind.annotation.RequestMapping;
import org.springframework.web.bind.annotation.RestController;import java.util.HashMap;
import java.util.Map;@RestController
public class HelloWorldController {@RequestMapping("/hello")public Map<String, Object> showHelloWorld(){Map<String, Object> map = new HashMap<>();map.put("msg", "HelloWorld");return map;}
}DemoApplication.java
package com.et.springnative;import org.springframework.boot.SpringApplication;
import org.springframework.boot.autoconfigure.SpringBootApplication;@SpringBootApplication
public class DemoApplication {public static void main(String[] args) {SpringApplication.run(DemoApplication.class, args);}
}
application.yaml
server:port: 8088以上只是一些关键代码,所有代码请参见下面代码仓库
代码仓库
- GitHub - Harries/springboot-demo: a simple springboot demo with some components for example: redis,solr,rockmq and so on.
4.测试
构建
mvn -Pnative native:compile -Dmaven.test.skip=true

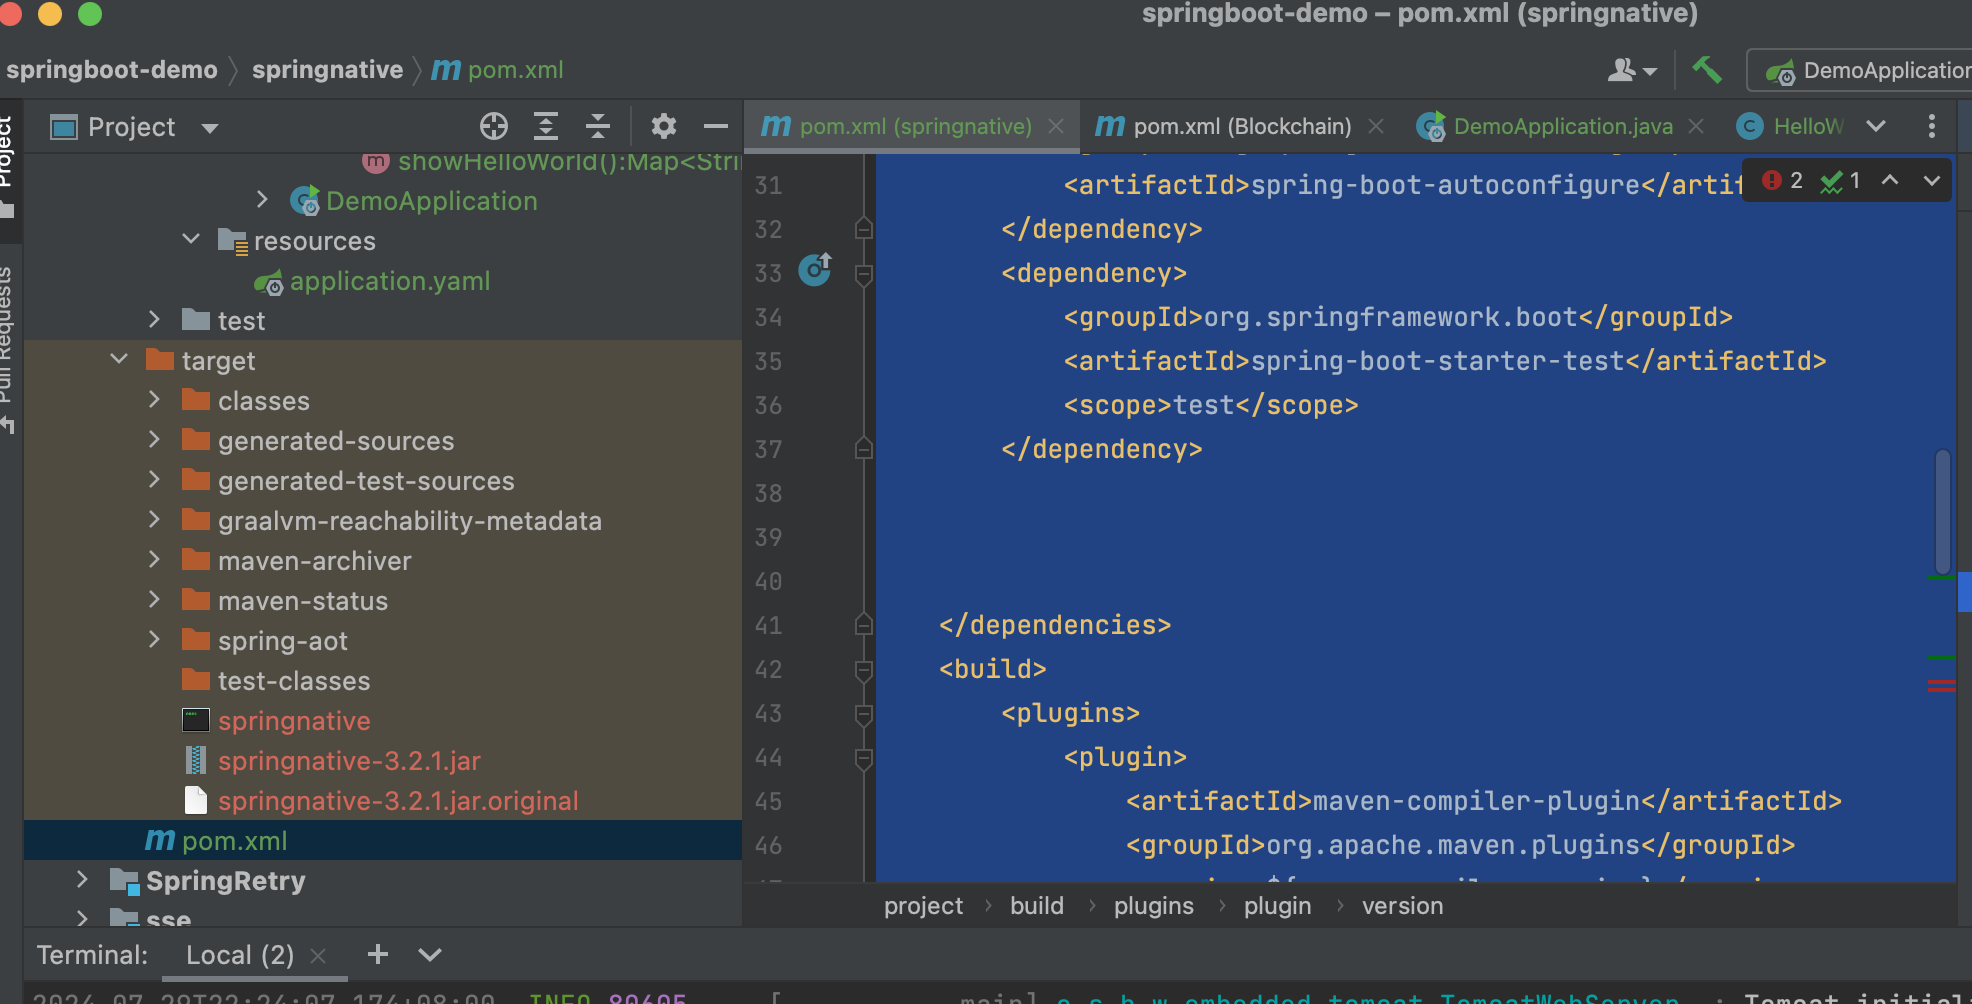
其中这个不带.jar后缀的就是最终的原生镜像,并且Native Image是不支持跨平台的,它只能在ARM架构的macOS中运行(受限于笔者的编译环境)。可以发现它(见上图中的target/springnative,它是一个二进制执行文件)的体积比executable jar大好几倍。参照SpringBoot的官方文档,经过AOT编译的SpringBoot应用会生成下面的文件:
Java源代码- 字节码(例如动态代理编译后的产物等)
GraalVM识别的提示文件:- 资源提示文件(
resource-config.json) - 反射提示文件(
reflect-config.json) - 序列化提示文件(
serialization-config.json) Java(动态)代理提示文件(proxy-config.json)JNI提示文件(jni-config.json)
- 资源提示文件(
这里的输出非执行包产物基本都在target/spring-aot目录下,其他非Spring或者项目源代码相关的产物输出到graalvm-reachability-metadata目录中。最后可以验证一下产出的Native Image:
执行
./springnative可以看到启动速度非常快,如果应用在生产中应该可以全天候近乎无损发布。当然,理论上Native Image性能也会大幅度提升
( ( )\___ | '_ | '_| | '_ \/ _` | \ \ \ \\\/ ___)| |_)| | | | | || (_| | ) ) ) )' |____| .__|_| |_|_| |_\__, | / / / /=========|_|==============|___/=/_/_/_/:: Spring Boot :: (v3.2.1)2024-07-29T22:24:07.136+08:00 INFO 80605 --- [ main] com.et.springnative.DemoApplication : Starting AOT-processed DemoApplication using Java 17.0.8 with PID 80605 (/Users/liuhaihua/IdeaProjects/springboot-demo/springnative/target/springnative started by liuhaihua in /Users/liuhaihua/IdeaProjects/springboot-demo/springnative/target)
2024-07-29T22:24:07.137+08:00 INFO 80605 --- [ main] com.et.springnative.DemoApplication : No active profile set, falling back to 1 default profile: "default"
2024-07-29T22:24:07.174+08:00 INFO 80605 --- [ main] o.s.b.w.embedded.tomcat.TomcatWebServer : Tomcat initialized with port 8088 (http)
2024-07-29T22:24:07.176+08:00 INFO 80605 --- [ main] o.apache.catalina.core.StandardService : Starting service [Tomcat]
2024-07-29T22:24:07.176+08:00 INFO 80605 --- [ main] o.apache.catalina.core.StandardEngine : Starting Servlet engine: [Apache Tomcat/10.1.17]
2024-07-29T22:24:07.242+08:00 INFO 80605 --- [ main] o.a.c.c.C.[Tomcat].[localhost].[/] : Initializing Spring embedded WebApplicationContext
2024-07-29T22:24:07.242+08:00 INFO 80605 --- [ main] w.s.c.ServletWebServerApplicationContext : Root WebApplicationContext: initialization completed in 105 ms
2024-07-29T22:24:07.331+08:00 INFO 80605 --- [ main] o.s.b.w.embedded.tomcat.TomcatWebServer : Tomcat started on port 8088 (http) with context path ''
2024-07-29T22:24:07.333+08:00 INFO 80605 --- [ main] com.et.springnative.DemoApplication : Started DemoApplication in 0.224 seconds (process running for 0.247)
访问http://127.0.0.1:8088/hello,能正常返回预期结果


