Transcribe简介
语音识别技术,也被称为自动语音识别(Automatic Speech Recognition,简称ASR),其目标是将人类的语音中的词汇内容转换为计算机可读的输入,例如按键、二进制编码或者字符序列。语音识别技术已经发展了几十年,直到2009年,Hinton把人工智能深度学习解决方案引入语音识别中,语音识别才取得了巨大突破。
Amazon Transcribe 是一项自动语音识别 (ASR) 服务,使开发人员能够轻松地为其应用程序添加语音转文本功能。自从在 re:Invent 2017 发布以来,越来越多的用户将语音识别功能添加到其应用程序和设备中。2019年8月,Amazon Transcribe推出对中文普通话的支持。更加另用户兴奋的是,在中国的北京区域(BJS)和宁夏区域(ZHY)也已支持该项服务。
在日常工作学习中,我们往往需要对一个视频文件增加字幕。传统的方法需要将视频中的对话用文字记录下来,通常采用记事本等工具保存文字记录,然后借助一些工具软件为文字加上时间轴,然后进行人工校对,整个过程需要耗费大量的时间和精力。是否有更快捷的方法呢?下面我们分享一个使用Amazon Transcribe为视频自动增加字幕的示例。
AWS Transcribe 服务于利用机器学习来识别语音文件中的声音,然后将其转化为文本。目前支持英语和西班牙文语音。必须将语音文件保存在S3中,输出结果也会被保存在S3中。
-
输入声音文件,支持 flac、mp3、mp4 和 wav 文件格式。长度不能超过2小时。
-
指定语言。
几个特色功能:
-
发音者识别(speaker identification):Transcribe 能区别一个语音文件中的多个说话者。支持2到10个发音者
-
支持多声道(channel identification): 如果声音文件中有多声道
-
支持字典(vocabulary):比如不能识别的单词,特定领域不常用的单词
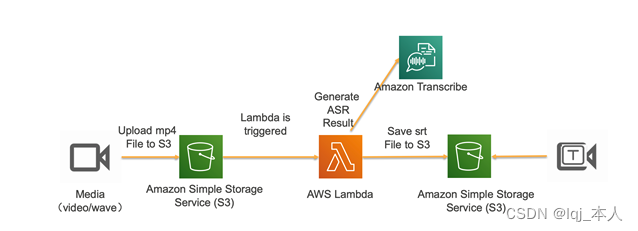
体系架构
-
监测到S3存储桶中的文件变化,触发lambda函数;
-
lambda函数调用Transcribe服务,生成视频对应的文本(json格式);
-
对文本进行格式转换,生成字幕文件格式(srt);
-
上传字幕文件到存储桶。
控制台操作展示
-
登录自己的AWS账号进入到aws控制管理台, 然后搜索 Transcribe 进入到这个管理后台


-
点击 Create job 按钮就可以使用AWS的语音转文本服务,根据提示添加必备的参数设置

api接口
-
StartTranscriptionJob:开始一个转换任务
-
ListTranscriptionJobs:获取任务列表
-
GetTranscriptionJob:获取任务
-
CreateVocabulary:创建字典
-
DeleteVocabulary:删除字典
-
GetVocabulary:获取字典
-
ListVocabularies:获取字典列表
-
UpdateVocabulary:上传字典
python使用Transcribe演示实例
类型1
import time
import boto3
transcribe = boto3.client(('transcribe'))
job_name = "testTranscribeJob100"
job_uri = "https://s3.dualstack.us-east-1.amazonaws.com/*****/hellosammy.mp3"
transcribe.start_transcription_job(TranscriptionJobName=job_name, Media={'MediaFileUri': job_uri}, MediaFormat='mp3', LanguageCode='en-US')
while True:status = transcribe.get_transcription_job(TranscriptionJobName = job_name)if status['TranscriptionJob']['TranscriptionJobStatus'] in ['COMPLETED', "FAILED"]:break
print("Job not ready yet...")time.sleep(5)
print(status)类型2
-
安装 Python 的程序包
pip3 install boto3
pip3 install amazon_transcribe
pip3 install websocket-client-
import 部分
import hashlib
import hmac
import urllib.parse
from datetime import datetime
import time
import ssl
import json
import websocket
import _thread
from amazon_transcribe.eventstream import EventStreamMessageSerializer
from amazon_transcribe.eventstream import EventStreamBuffer
from boto3.session import Session-
创建URL 函数
def sign(key, msg):return hmac.new(key, msg.encode("utf-8"), hashlib.sha256).digest()def getSignatureKey(key, dateStamp, region, serviceName):kDate = sign(("AWS4" + key).encode("utf-8"), dateStamp)kRegion = sign(kDate, region)kService = sign(kRegion, serviceName)kSigning = sign(kService, "aws4_request")return kSigningdef create_pre_signed_url(region, language_code, media_encoding, sample_rate):# 获得access key和secret keycredentials = Session().get_credentials()access_key_id = credentials.access_keysecret_access_key = credentials.secret_keymethod = "GET"service = "transcribe"endpoint = "wss://transcribestreaming." + region + ".amazonaws.com:8443"host = "transcribestreaming." + region + ".amazonaws.com:8443"algorithm = "AWS4-HMAC-SHA256"t = datetime.utcnow()amz_date =t.strftime('%Y%m%dT%H%M%SZ')datestamp =t.strftime('%Y%m%d')canonical_uri = "/stream-transcription-websocket"canonical_headers = "host:" + host + "\n"signed_headers = "host"credential_scope = datestamp + "/" + region + "/" + service + "/" + "aws4_request"canonical_querystring = "X-Amz-Algorithm=" + algorithmcanonical_querystring += "&X-Amz-Credential=" + urllib.parse.quote_plus(access_key_id + "/" + credential_scope)canonical_querystring += "&X-Amz-Date=" + amz_datecanonical_querystring += "&X-Amz-Expires=300"canonical_querystring += "&X-Amz-SignedHeaders=" + signed_headerscanonical_querystring += "&language-code="+ language_code +"&media-encoding=" + media_encoding +"&sample-rate=" + sample_rate# Zero length string for connectingpayload_hash = hashlib.sha256(("").encode('utf-8')).hexdigest()canonical_request = method + '\n' \+ canonical_uri + '\n' \+ canonical_querystring + '\n' \+ canonical_headers + '\n' \+ signed_headers + '\n' \+ payload_hashstring_to_sign = algorithm + "\n" \+ amz_date + "\n" \+ credential_scope + "\n" \+ hashlib.sha256(canonical_request.encode("utf-8")).hexdigest()signing_key = getSignatureKey(secret_access_key, datestamp, region, service)signature = hmac.new(signing_key, string_to_sign.encode("utf-8"),hashlib.sha256).hexdigest()canonical_querystring += "&X-Amz-Signature=" + signaturerequest_url = endpoint + canonical_uri + "?" + canonical_querystringreturn request_url-
main 函数
def main():url = create_pre_signed_url("us-east-1", "en-US", "pcm", "16000")ws = websocket.create_connection(url, sslopt={"cert_reqs": ssl.CERT_NONE})_thread.start_new_thread(loop_receiving, (ws,))print("Receiving...")send_data(ws)while True:time.sleep(1)
main()-
loop_receiving 函数
该函数位于 main 函数上方。它将接收 Amazon Transcribe Streaming Service 的返回数据,并且打印出来。
def loop_receiving(ws):try:while True:result = ws.recv()if result == '':continueeventStreamBuffer = EventStreamBuffer()eventStreamBuffer.add_data(result)eventStreamMessage = eventStreamBuffer.next()stream_payload = eventStreamMessage.payloadtranscript = json.loads(bytes.decode(stream_payload, "UTF-8"))print("response:",transcript)results = transcript['Transcript']['Results']if len(results)>0:for length in range(len(results)):if 'IsPartial' in results[length]:print('IsPartial:', results[length]['IsPartial'])if 'Alternatives' in results[length]:alternatives = results[length]['Alternatives']if len(alternatives)>0:for sublength in range(len(alternatives)):if 'Transcript' in alternatives[sublength]:print('Transcript:', alternatives[sublength]['Transcript'])except Exception as e:if 'WebSocketConnectionClosedException' == e.__class__.__name__:print("Error: websocket connection is closed")else:print(f"Exception Name: {e.__class__.__name__}")-
send_data 函数
该函数位于 main 函数上方。它将发送音频数据到 Amazon Transcribe Streaming Service。其中 testFile 变量是测试音频文件地址,测试音频为 pem 格式,英语,采样率为16000。
def send_data(ws):testFile = "xxx.pem"bufferSize = 1024*16stream_headers = {":message-type": "event",":event-type": "AudioEvent",":content-type": "application/octet-stream",}eventstream_serializer = EventStreamMessageSerializer()with open(testFile, "rb") as source:while True:audio_chunk = source.read(bufferSize)# 将音频数据进行编码event_bytes = eventstream_serializer.serialize(stream_headers, audio_chunk)ws.send(event_bytes, opcode = 0x2) # 0 x 2 send binary# end with b'' data bytesif len(audio_chunk) == 0:breakjava使用Transcribe演示实例
import com.amazonaws.AmazonServiceException;
import com.amazonaws.SdkClientException;
import com.amazonaws.auth.AWSCredentials;
import com.amazonaws.auth.AWSStaticCredentialsProvider;
import com.amazonaws.auth.BasicAWSCredentials;
import com.amazonaws.auth.profile.ProfileCredentialsProvider;
import com.amazonaws.regions.Regions;
import com.amazonaws.services.s3.AmazonS3;
import com.amazonaws.services.s3.AmazonS3Client;
import com.amazonaws.services.s3.AmazonS3ClientBuilder;
import com.amazonaws.services.s3.model.*;
import com.amazonaws.services.s3.transfer.TransferManager;
import com.amazonaws.services.s3.transfer.Upload;
import com.amazonaws.services.transcribe.AmazonTranscribe;
import com.amazonaws.services.transcribe.AmazonTranscribeClientBuilder;
import com.amazonaws.services.transcribe.model.*;
import org.omg.CosNaming.NamingContextExtPackage.StringNameHelper;import java.io.*;
import java.util.ArrayList;
import java.util.Arrays;
import java.util.List;/*** 代码注意: 生成job只保存到S3,所以要保存到本地的思路是先保存到S3,然后下载,* 但是期间需要时间,所以不断的查询是否存在在不断的遍历循环比较慢** @author DELL* @Desc 将本地MP3上传到S3, 然后再转文本,保存json 文件到本地* 基本步骤:* 1.建立S3客户端连接* 2.上传本地音频到S3库中,并返回一个S3地址* 3.上传MP3对应的备用单词词库* 3.在Amazon Transcribe 创建一个job,将生成的json 文件保存到MP3同级目录*/
public class Mp3ToJsonUtils {// 执行文件配置信息private static String FILE_TYPE = "mp3";// S3配置信息private static String AWS_ACCESS_KEY = "自己生成";private static String AWS_SECRET_KEY = "自己生成";private static final String BUCKET_NAME = "自己生成";private static final String JOB_BUCKET_NAME = "自己生成";// Aws对象信息private static AmazonS3 s3;private static TransferManager tx;private static AmazonTranscribe amazonTranscribe;private static BasicAWSCredentials awsCredentials;static {//1. 建立连接try {init_with_key();} catch (Exception e) {e.printStackTrace();}awsCredentials = new BasicAWSCredentials(AWS_ACCESS_KEY, AWS_SECRET_KEY);amazonTranscribe = AmazonTranscribeClientBuilder.standard().withCredentials(new AWSStaticCredentialsProvider(awsCredentials)).withRegion(Regions.US_EAST_2).build();}public static void main(String[] args) throws Exception {List<String> list = new ArrayList<>();mp3TOJosn("C:\\Users\\DELL\\Desktop\\BK测试数据\\A_Cinderella_Atlas_5.mp3", list);}public static void mp32Josn(String inPath, String savePath, List<String> list) throws Exception {String jsonPath = new File(inPath).getParent();String name = new File(inPath).getName().replaceAll(" ", "_").replaceAll("-", "_");File file = new File(savePath + "\\" + name + ".json");//确保上传一次if (file.exists()) {System.out.println(savePath + "--->已经处理完毕,跳过处理");return;}//2. 上传文件到S3库,得到上传文件对应的S3 URLString s3Path = uploadFileToBucket(inPath, BUCKET_NAME);String key = new File(s3Path).getName();key = key.replaceAll(" ", "_").replaceAll("-", "_");//3. 创建Transcription jobscreateJob(JOB_BUCKET_NAME, FILE_TYPE, key, s3Path);//4. 将json文件下载到本地和MP3 同目录// 在创建job 生成json 的时候需要一定的时间,先等待一段时间,然后判断存在不存在boolean flag = isObjectExit(BUCKET_NAME, key + ".json");while (!flag) {flag = isObjectExit(BUCKET_NAME, key + ".json");}amazonS3Downloading(s3, JOB_BUCKET_NAME, key + ".json", savePath + "\\" + key + ".json");}/*** 将 MP3 转成 Json文件保存到本地** @param inPath* @throws Exception*/public static void mp3TOJosn(String inPath, List<String> list) throws Exception {String jsonPath = new File(inPath).getParentFile().getParentFile().getParentFile().getAbsolutePath() + "\\json";File file1 = new File(jsonPath);if (!file1.exists()) {file1.mkdirs();}mp32Josn(inPath, jsonPath, list);}/*** 通过在代码中包含 access key id 和 secret access key 连接 aws** @throws Exception*/private static void init_with_key() throws Exception {AWSCredentials credentials = null;credentials = new BasicAWSCredentials(AWS_ACCESS_KEY, AWS_SECRET_KEY);s3 = new AmazonS3Client(credentials);//Region usWest2 = Region.getRegion(Regions.US_WEST_2);//s3.setRegion(usWest2);tx = new TransferManager(s3);}/*** 上传一个本地文件(对应位置为path)上传到名为bucketName的bucket** @param path       需要上传文件的路径* @param bucketName S3中存储文件的桶名称*                   return 返回对应上传文件的key*/private static String uploadFileToBucket(String path, String bucketName) {String keyName = new File(path).getName();File fileToUpload = new File(path);if (fileToUpload.exists() == false) {System.out.println(path + " not exists!");return null;}PutObjectRequest request = new PutObjectRequest(bucketName, fileToUpload.getName(), fileToUpload);Upload upload = tx.upload(request);while ((int) upload.getProgress().getPercentTransferred() < 100) {try {Thread.sleep(1000);} catch (InterruptedException e) {// TODO Auto-generated catch blocke.printStackTrace();}}System.out.println(path + " MP3上传成功!");String s3Path = "s3://" + BUCKET_NAME + "/" + keyName;return s3Path;}/*** 创建一个 Transcription jobs** @param bucketName     S3桶的名称* @param fileName       文件类型 eg: mp3, mp4* @param jobName        要创建的job的名称* @param S3Path         对应S3桶中的对应MP3 或其他路径的S3URL* @param vocabularyName Custom vocabulary 对应的名称*/protected static void createJob(String bucketName, String fileName, String jobName, String S3Path) {StartTranscriptionJobRequest startTranscriptionJobRequest = new StartTranscriptionJobRequest();Media media = new Media();media.setMediaFileUri(S3Path);// 设置JOb的相应参数  sampling rate 采(抽)样率;startTranscriptionJobRequest.withMedia(media).withLanguageCode(LanguageCode.EnUS).withMediaFormat(fileName).withOutputBucketName(bucketName).withSettings(settings).setTranscriptionJobName(jobName);amazonTranscribe.startTranscriptionJob(startTranscriptionJobRequest);GetTranscriptionJobRequest request;request = new GetTranscriptionJobRequest();request.withTranscriptionJobName(jobName);GetTranscriptionJobResult result = amazonTranscribe.getTranscriptionJob(request);String status = result.getTranscriptionJob().getTranscriptionJobStatus();while (!status.toUpperCase().equals("COMPLETED")) {try {Thread.sleep(2000);} catch (InterruptedException e) {e.printStackTrace();}//System.out.println(status);result = amazonTranscribe.getTranscriptionJob(request);status = result.getTranscriptionJob().getTranscriptionJobStatus();if (status.toUpperCase().equals("FAILED")) {System.out.println(result.getTranscriptionJob().getTranscriptionJobName() + "---> is failed");System.out.println(result.getTranscriptionJob().getTranscriptionJobName() + "--->" + result.getTranscriptionJob().getFailureReason());throw new RuntimeException("transcriobe 失败");}}System.out.println(jobName + "Mp3 Job 生成成功");}/*** 将S3上的文件下载到本地** @param s3Client s3客户端* @param bucketName 桶名称* @param key 文件名称* @param targetFilePath 本地路径*/public static void amazonS3Downloading(AmazonS3 s3Client, String bucketName, String key, String targetFilePath) {S3Object object = s3Client.getObject(new GetObjectRequest(bucketName, key));if (object != null) {System.out.println("Content-Type: " + object.getObjectMetadata().getContentType());InputStream input = null;FileOutputStream fileOutputStream = null;byte[] data = null;try {//获取文件流input = object.getObjectContent();data = new byte[input.available()];int len = 0;fileOutputStream = new FileOutputStream(targetFilePath);while ((len = input.read(data)) != -1) {fileOutputStream.write(data, 0, len);}System.out.println(targetFilePath + "json 文件下载文件成功");} catch (IOException e) {e.printStackTrace();} finally {if (fileOutputStream != null) {try {fileOutputStream.close();} catch (IOException e) {e.printStackTrace();}}if (input != null) {try {input.close();} catch (IOException e) {e.printStackTrace();}}}}}/*** 判断名为bucketName的bucket里面是否有一个名为key的object** @param bucketName* @param key* @return*/private static boolean isObjectExit(String bucketName, String key) {int len = key.length();ObjectListing objectListing = s3.listObjects(bucketName);String s = new String();for (S3ObjectSummary objectSummary : objectListing.getObjectSummaries()) {s = objectSummary.getKey();int slen = s.length();if (len == slen) {int i;for (i = 0; i < len; i++) {if (s.charAt(i) != key.charAt(i)) {break;}}if (i == len) {return true;}}}return false;}
}
效果演示