*免责声明:
1\此方法仅提供参考
2\搬了其他博主的操作方法,以贴上路径.
3*
场景一: 使用conda pack进行打包个人项目
场景二:
…
场景一: 使用conda pack进行打包个人项目
1.1 导出包列表

activate jiancepip list --format=freeze >requirements.txt
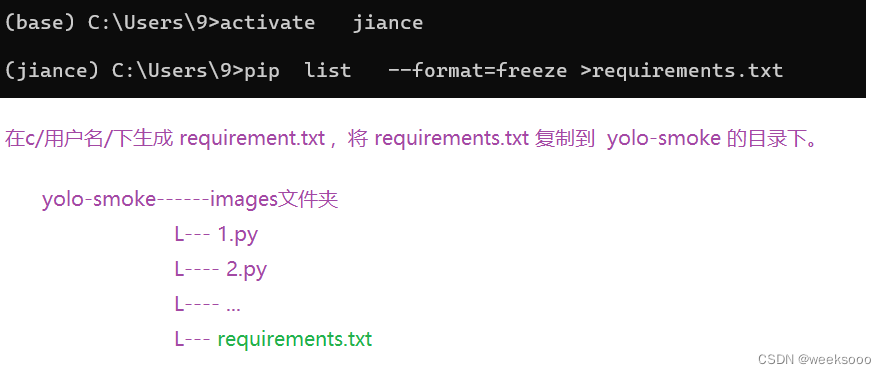
1.2 打包 yolo-smoke项目,支持pip install 的安装形式
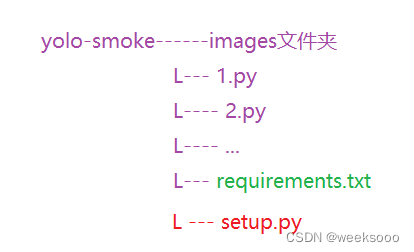
- 在 requirements.txt 的同级目录下创建 setup.py , 根据需求修改对应的值,内容大致如下:
#!/usr/bin/env python
# Copyright (c) OpenMMLab. All rights reserved.
import os
import os.path as osp
import platform
import shutil
import sys
import warnings
from setuptools import find_packages, setupimport torch
from torch.utils.cpp_extension import (BuildExtension, CppExtension,CUDAExtension)def readme():with open('README.md', encoding='utf-8') as f:content = f.read()return contentversion_file = 'yolo-smoke/version.py' # 可以参考 mmdetetction工程的下的version文件# 获取代码的版本号
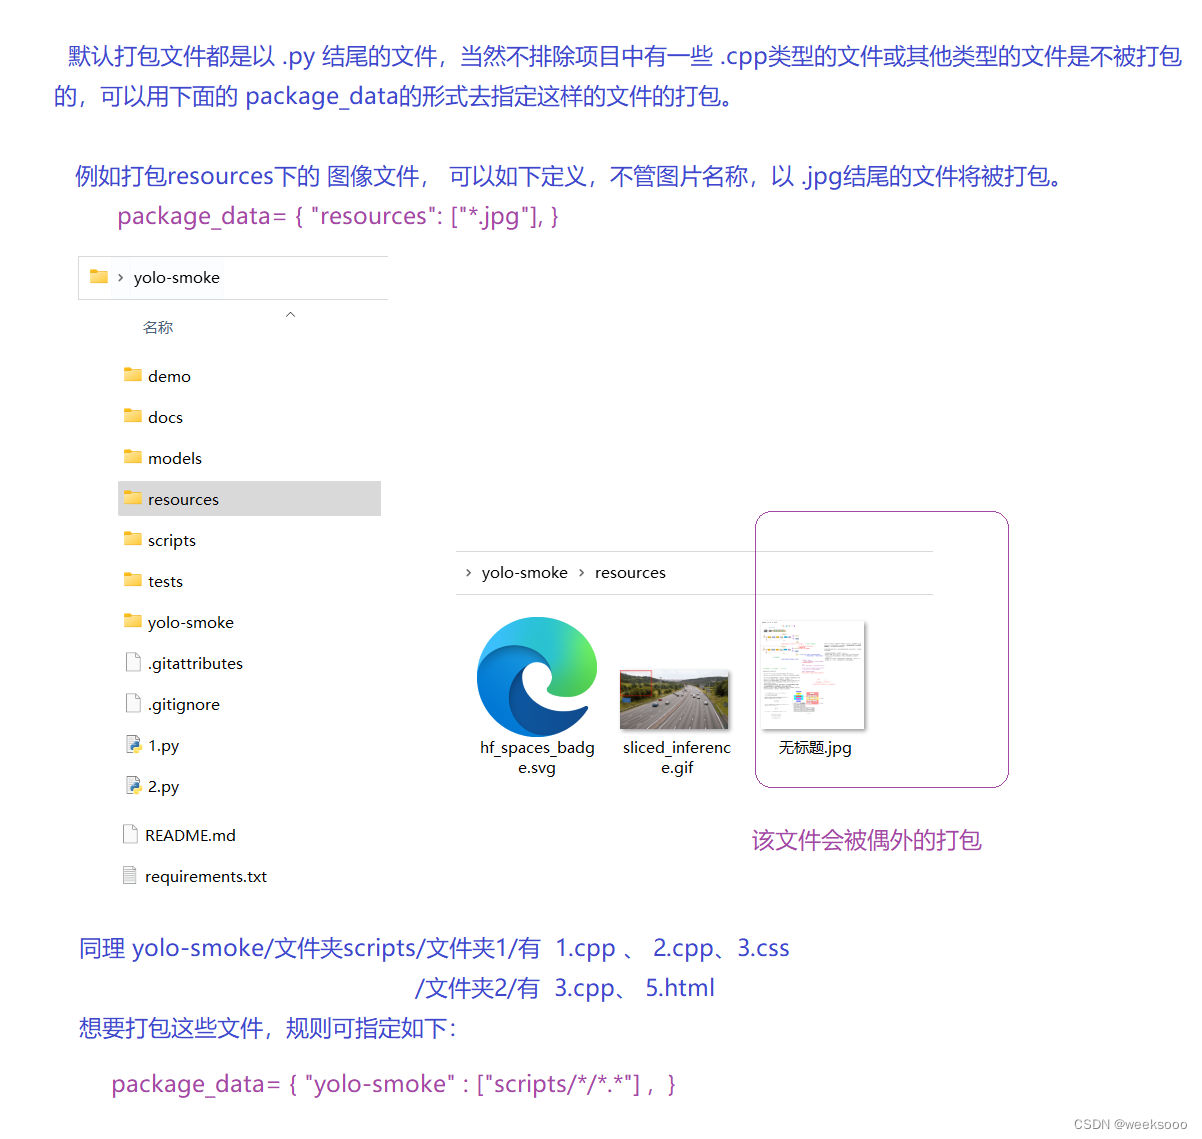
def get_version():with open(version_file, 'r') as f:exec(compile(f.read(), version_file, 'exec'))return locals()['__version__']def make_cuda_ext(name, module, sources, sources_cuda=[]):define_macros = []extra_compile_args = {'cxx': []}if torch.cuda.is_available() or os.getenv('FORCE_CUDA', '0') == '1':define_macros += [('WITH_CUDA', None)]extension = CUDAExtensionextra_compile_args['nvcc'] = ['-D__CUDA_NO_HALF_OPERATORS__','-D__CUDA_NO_HALF_CONVERSIONS__','-D__CUDA_NO_HALF2_OPERATORS__',]sources += sources_cudaelse:print(f'Compiling {name} without CUDA')extension = CppExtensionreturn extension(name=f'{module}.{name}',sources=[os.path.join(*module.split('.'), p) for p in sources],define_macros=define_macros,extra_compile_args=extra_compile_args)def parse_requirements(fname='requirements.txt', with_version=True):"""Parse the package dependencies listed in a requirements file but stripsspecific versioning information.Args:fname (str): path to requirements filewith_version (bool, default=False): if True include version specsReturns:List[str]: list of requirements itemsCommandLine:python -c "import setup; print(setup.parse_requirements())""""import reimport sysfrom os.path import existsrequire_fpath = fnamedef parse_line(line):"""Parse information from a line in a requirements text file."""if line.startswith('-r '):# Allow specifying requirements in other filestarget = line.split(' ')[1]for info in parse_require_file(target):yield infoelse:info = {'line': line}if line.startswith('-e '):info['package'] = line.split('#egg=')[1]elif '@git+' in line:info['package'] = lineelse:# Remove versioning from the packagepat = '(' + '|'.join(['>=', '==', '>']) + ')'parts = re.split(pat, line, maxsplit=1)parts = [p.strip() for p in parts]info['package'] = parts[0]if len(parts) > 1:op, rest = parts[1:]if ';' in rest:# Handle platform specific dependencies# http://setuptools.readthedocs.io/en/latest/setuptools.html#declaring-platform-specific-dependenciesversion, platform_deps = map(str.strip,rest.split(';'))info['platform_deps'] = platform_depselse:version = rest # NOQAinfo['version'] = (op, version)yield infodef parse_require_file(fpath):with open(fpath, 'r') as f:for line in f.readlines():line = line.strip()if line and not line.startswith('#'):for info in parse_line(line):yield infodef gen_packages_items():if exists(require_fpath):for info in parse_require_file(require_fpath):parts = [info['package']]if with_version and 'version' in info:parts.extend(info['version'])if not sys.version.startswith('3.4'):# apparently package_deps are broken in 3.4platform_deps = info.get('platform_deps')if platform_deps is not None:parts.append(';' + platform_deps)item = ''.join(parts)yield itempackages = list(gen_packages_items())return packagesdef add_mim_extension():"""Add extra files that are required to support MIM into the package.These files will be added by creating a symlink to the originals if thepackage is installed in `editable` mode (e.g. pip install -e .), or bycopying from the originals otherwise."""# parse installment modeif 'develop' in sys.argv:# installed by `pip install -e .`if platform.system() == 'Windows':# set `copy` mode here since symlink fails on Windows.mode = 'copy'else:mode = 'symlink'elif 'sdist' in sys.argv or 'bdist_wheel' in sys.argv:# installed by `pip install .`# or create source distribution by `python setup.py sdist`mode = 'copy'else:return# filenames = ['tools', 'configs', 'demo', 'model-index.yml']filenames = ['tests', 'model-index.yml']repo_path = osp.dirname(__file__)mim_path = osp.join(repo_path, 'mmdet', '.mim')os.makedirs(mim_path, exist_ok=True)for filename in filenames:if osp.exists(filename):src_path = osp.join(repo_path, filename)tar_path = osp.join(mim_path, filename)if osp.isfile(tar_path) or osp.islink(tar_path):os.remove(tar_path)elif osp.isdir(tar_path):shutil.rmtree(tar_path)if mode == 'symlink':src_relpath = osp.relpath(src_path, osp.dirname(tar_path))os.symlink(src_relpath, tar_path)elif mode == 'copy':if osp.isfile(src_path):shutil.copyfile(src_path, tar_path)elif osp.isdir(src_path):shutil.copytree(src_path, tar_path)else:warnings.warn(f'Cannot copy file {src_path}.')else:raise ValueError(f'Invalid mode {mode}')if __name__ == '__main__':add_mim_extension()setup(name='yolo-smoke', # 算法打包的名称version=get_version(), # 获取版本号description='OpenMMLab Detection Toolbox and Benchmark', # 算法的描述long_description=None, # long_description=readme(),long_description_content_type='text/markdown',author='yourname',author_email='yourname@gmail.com',keywords='computer vision, object detection, smoke , yolo',url='none' , # 项目地址 'https://github.com/open-mmlab/mmdetection',packages=find_packages(exclude=('docs', 'tests', 'demo')), # 打包需要略过的文件夹名称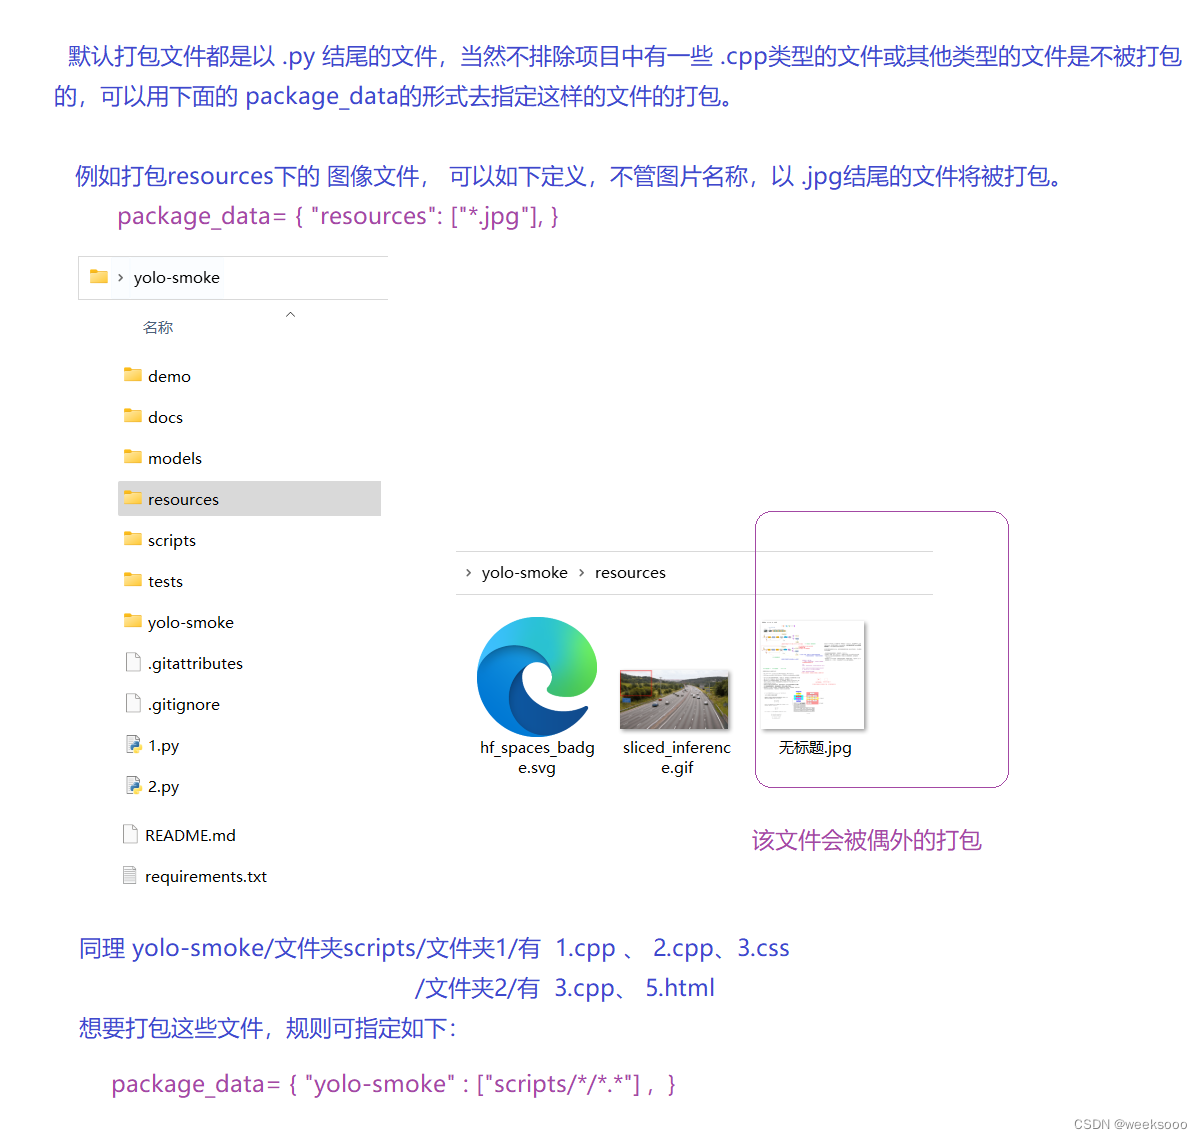include_package_data=True,classifiers=['Development Status :: 5 - Production/Stable','License :: OSI Approved :: Apache Software License','Operating System :: OS Independent','Programming Language :: Python :: 3','Programming Language :: Python :: 3.7','Programming Language :: Python :: 3.8','Programming Language :: Python :: 3.9',],license='Apache License 2.0',install_requires=parse_requirements('requirements/runtime.txt'),# extras_require={# 'all': parse_requirements('requirements.txt'),# 'tests': parse_requirements('requirements/tests.txt'),# 'build': parse_requirements('requirements/build.txt'),# 'optional': parse_requirements('requirements/optional.txt'),# 'mim': parse_requirements('requirements/mminstall.txt'),# },ext_modules=[],cmdclass={'build_ext': BuildExtension},zip_safe=False)
-
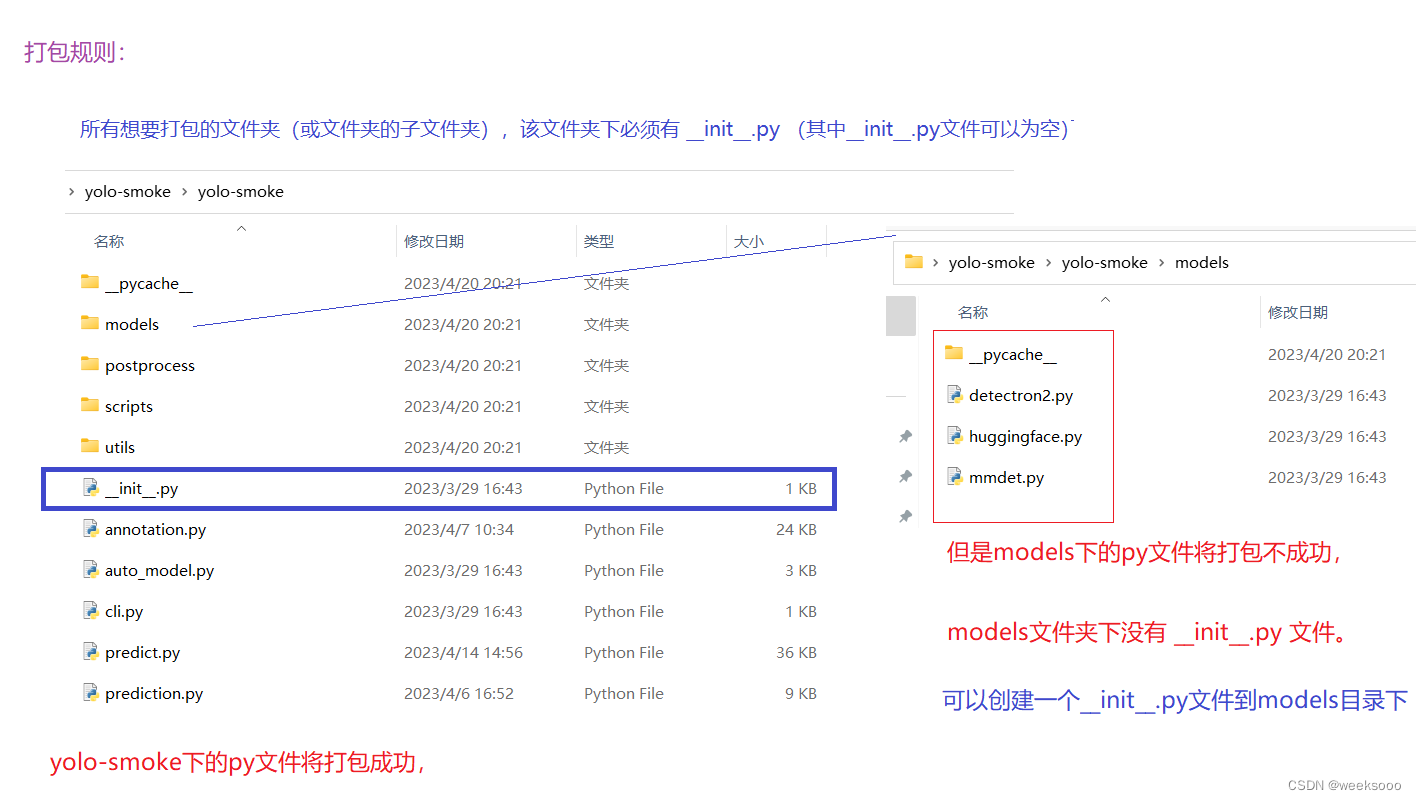
如果有的文件夹想要参与打包却没有 init.py, 手动的创建该文件。
-
运行 setup.py 文件
python setup.py bdist_wheel
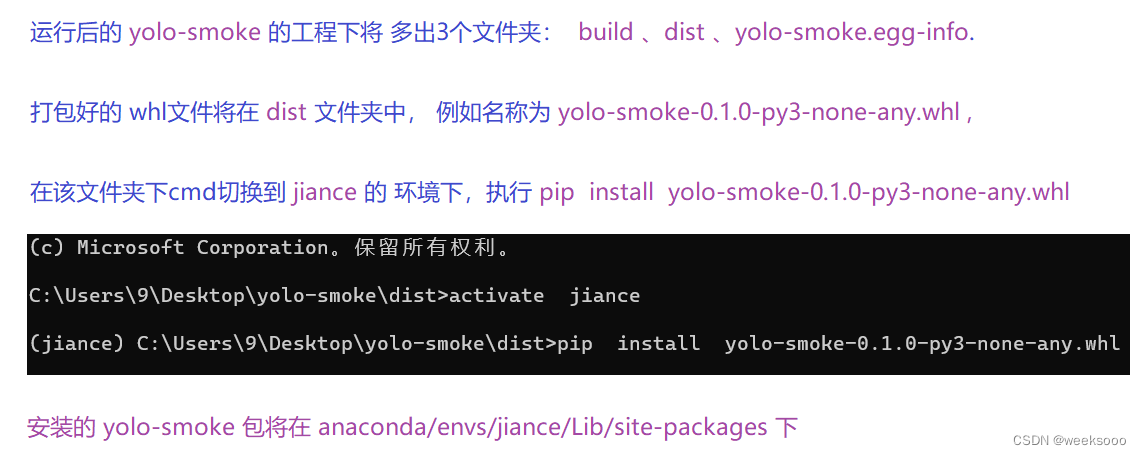
- yolo-smoke 打包测试,在 jiance 的环境下执行以下语句
pythonimport yolo-smoke
1.3 使用conda pack 打包整个 jiance 环境
- 打开jiance环境的物理位置,如 D:anaconda/envs/ jiance, 切换到上级目录,也就是D:anaconda/envs下 cmd 打开,安装 conda-pack包
D:\Anaconda\envs> pip install conda-pack
- 执行打包语句:
conda pack -n jiance -o yolo_smoke_algorithm.tar.gz --ignore-editable-packages
- 最中会在 anaconda/envs 下生成 yolo_smoke_algorithm.tar.gz 的压缩包。
1.4 项目移植到其他机器上(不想要安装conda/python环境)
- 用 cmd 切换到d盘,创建 yolo_smoke_algorithm 文件夹,将 yolo_smoke_algorithm.tar.gz 复制到 yolo_smoke_algorithm 文件夹下 ,使用命令行的方式解压。
tar -zxvf yolo_smoke_algorithm.tar.gz
方式一:pycharm中使用
- 在pycharm的 File/Settings/project:xxx/Python Interpreter 选择 Add Interpreter,添加到 System Interpreter里面 选择 D:\yolo-smoke_algorithm\python.exe
方式二:anaconda管理
- 命令行的方式解压 yolo_smoke_algorithm.tar.gz 包到 yolo_smoke_algorithm 文件夹下,将该 yolo_smoke_algorithm 文件夹拷贝到 anaconda/envs 下,作为anaconda的一个环境正常的
activate yolo_smoke_algorithm激活环境。
方式三:命令行指定解释器的方式
D:\yolo_smoke_algorithm\python.exe py文件路径D:\yolo_smoke_algorithm\python.exe D:\aa\1.py
方式四:
- 在 yolo_smoke_algorithm 文件夹下打开cmd窗口,激活环境
.\Scripts\activate.bat
# 激活环境
D:\yolo_smoke_algorithm> .\Scripts\activate.bat# 退出环境
(yolo_smoke_algorith)D:\yolo_smoke_algorithm> .\Scripts\deactivate.bat

