自从微信小程序官方更新隐私协议,用户必须同意之后,才能获取个人信息,这就导致在获取用户信息之前,需要有个隐私协议弹窗
大致如下图:

微信小程序官方提供的API和 uniapp 开发的稍微有点区别,这里只记录 uniapp 开发的,如果需要微信原生的,请自行官网查看。
首先创建一个弹窗组件privacyPopup.vue,代码如下:
<template><uni-popup ref="popup" type="center" :is-mask-click="false"><view class="popup-box"><view class="weui-half-screen-dialog__hd">{{title}}</view><view class="weui-half-screen-dialog__bd"><text class="weui-half-screen-dialog__tips">{{desc1}}</text><text class="weui-half-screen-dialog__tips color-8BC21F" @click="openPrivacyContract">{{urlTitle}}</text><text class="weui-half-screen-dialog__tips">{{desc2}}</text></view><view class="weui-half-screen-dialog__ft"><button class="weui-btn" @click="handleDisagree">拒绝</button><button id="agree-btn" type="default" open-type="agreePrivacyAuthorization" class="weui-btn agree"@agreeprivacyauthorization="handleAgreePrivacyAuthorization">同意</button></view></view></uni-popup>
</template><script>export default {data() {return {title: "用户隐私保护提示",desc1: "感谢您使用本产品,您使用本产品前应当仔细阅读并同意",urlTitle: "《小程序隐私保护指引》",desc2: "当您点击同意并开始使用产品服务时,即表示你已理解并同意该条款内容,该条款将对您产生法律约束力。如您拒绝,将无法更好的体验产品。",};},methods: {openPrivacyContract() {uni.openPrivacyContract({});},handleAgreePrivacyAuthorization() {getApp().globalData.showPrivacy = false;this.$emit('confirm');this.$refs.popup.close();},handleDisagree() {this.$refs.popup.close();}}}
</script><style lang="scss" scoped>.popup-box {width: 80vw;// height: 40vh;overflow: hidden;background: #ffffff;padding: 30rpx;border-radius: 24rpx;.weui-half-screen-dialog__hd {font-size: 48rpx;font-family: Source Han Sans CN-Bold, Source Han Sans CN;font-weight: bold;color: #000000;line-height: 56rpx;}.weui-half-screen-dialog__bd {margin-top: 48rpx;text-indent: 2em;.weui-half-screen-dialog__tips {font-size: 28rpx;font-family: Source Han Sans CN-Normal, Source Han Sans CN;font-weight: 400;color: #000000;line-height: 33rpx;}}.weui-half-screen-dialog__ft {display: flex;justify-content: space-evenly;align-items: center;margin-top: 48rpx;.weui-btn {padding: 0 60rpx;margin: 0;background: none;font-size: 32rpx;font-family: Source Han Sans CN-Normal, Source Han Sans CN;font-weight: 400;color: #000000;line-height: 80rpx;// border: 2rpx solid #8BC21F;}.agree {color: #ffffff;background: linear-gradient(90deg, #8BC21F 0%, #7AB30A 100%);}}.color-8BC21F {color: #8BC21F !important;}}
</style>
到这里有人可能会疑问,你也没有使用this.resolvePrivacyAuthorization({ buttonId: 'agree-btn', event: 'agree' })相关代码,微信那边如何知道用户同意了?其实在button按钮上有扩展事件open-type="agreePrivacyAuthorization" 点击后, 微信那边会有记录的。
然后在 App.vue 文件中添加全局变量,这里使用uni.getPrivacySetting(亲测有用),微信新增的几个隐私api,uniapp也是支持的,放心使用:
export default {globalData: {showPrivacy: false},onLaunch: function(options) {if (uni.getPrivacySetting) {uni.getPrivacySetting({success: res => {console.log("是否需要授权:", res.needAuthorization, "隐私协议的名称为:", res.privacyContractName)if (res.needAuthorization) {getApp().globalData.showPrivacy = true;} else {getApp().globalData.showPrivacy = false;}},fail: () => {},complete: () => {},})}},}使用阶段,因为我这里是获取手机号登录的,这个时候就会出现一个问题,隐私弹窗和获取手机号弹窗冲突,目前是通过判断,操作不同的按钮(如果有好的方案,欢迎评论区告知)。
<template><view class="page"><button v-if="showPrivacy" class="btn" @click="getPrivacy">手机号快捷登录</button><button v-else class="btn" open-type="getPhoneNumber" @getphonenumber="onGetPhoneNumber">手机号快捷登录</button><privacy-popup ref="privacyPopup" @confirm="confirm"></privacy-popup></view>
</template><script>import PrivacyPopup from "@/components/privacyPopup/index.vue";export default {components: {PrivacyPopup},data() {return {showPrivacy: getApp().globalData.showPrivacy,}},onLoad(options) {},methods: {confirm() {this.showPrivacy = false;},getPrivacy() {if (getApp().globalData.showPrivacy) {this.$refs.privacyPopup.$refs.popup.open();return;}},// 获取手机号onGetPhoneNumber(e) {// 用户拒绝授权if (e.detail.errMsg == "getPhoneNumber:fail:user deny") {uni.showToast({icon: 'none',title: '用户拒绝'});} else if (e.detail.code) { // 允许授权this.loginWeiXin(e.detail.code);}},}}
</script>
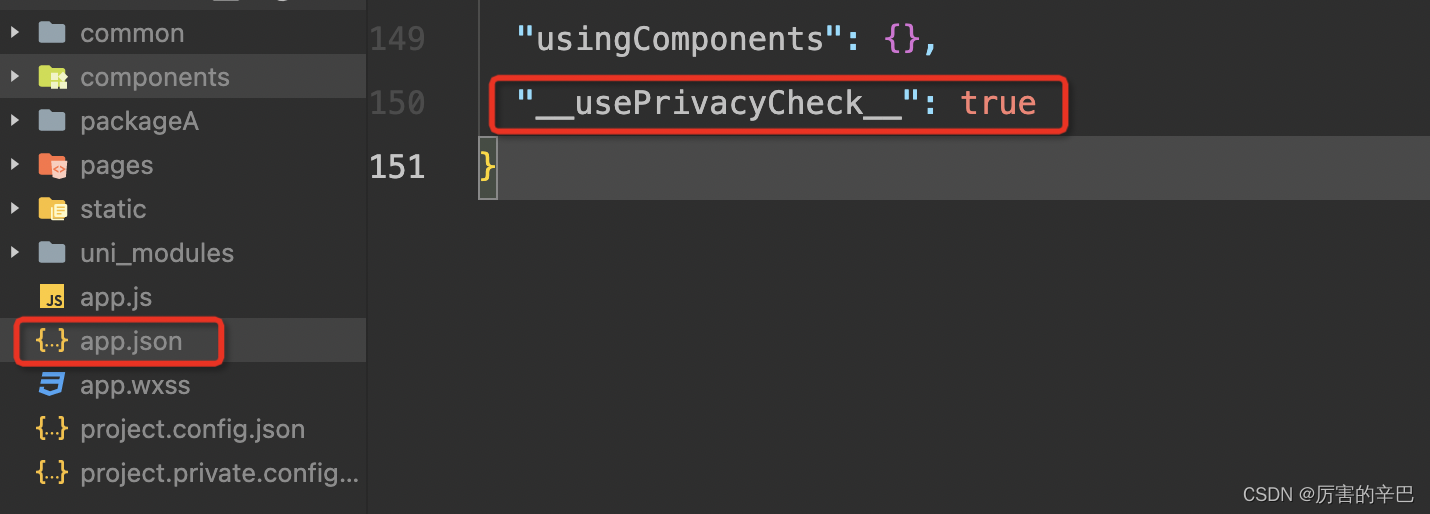
最后比较重要的一点,需要在app.json添加:"__usePrivacyCheck__": true,基础库:3.0.0


