简介:本篇文章主要是介绍了常用的异步通信原理,主要是RabbitMQ技术
目录
1、初始MQ(异步通讯)
1.1 同步通讯
1.2 异步通讯
1.3 MQ常见框架
2、RabbitMQ快速入门
2.1 RabbitMQ概述和安装
2.2 常见消息模型
2.3 快速入门
3、SpringAMQP
3.1 什么是SpringAMQP
3.2 SimpleQueue案例
3.3 SpringAMQP(发布、订阅模式)
3.3.1 广播模式
3.3.2 路由模式代码演示
3.3.3 话题模式
4、SpringAMQP-消息转换器
5、总结
1、初始MQ(异步通讯)
1.1 同步通讯
| 图 1.1-1 同步通讯存在的问题 |
|---|
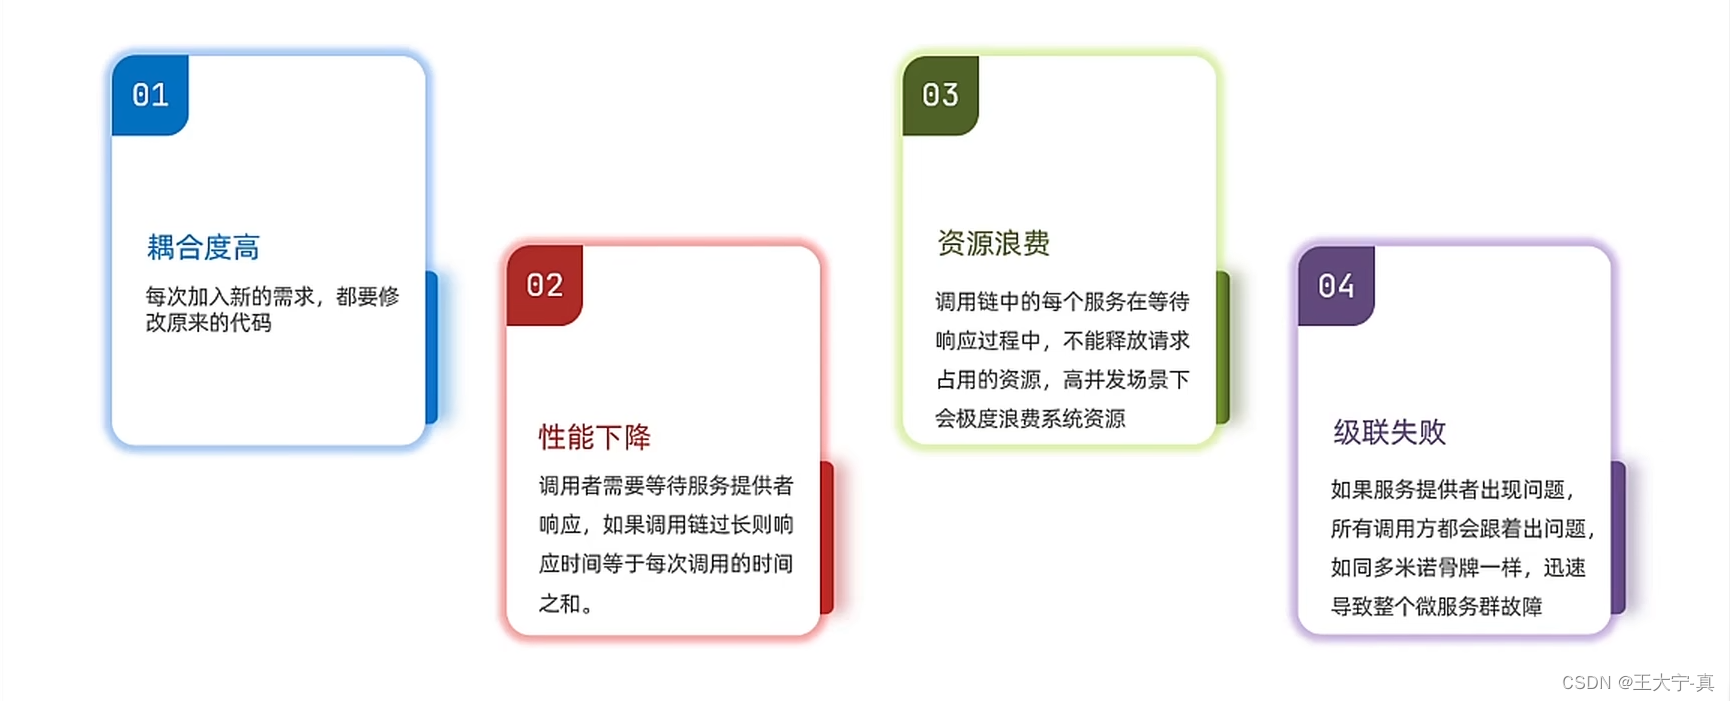 |
| 上图中展示的就是同步通讯的问题 |
1.2 异步通讯
| 图 1.2-1 异步通讯优缺点 |
|---|
| 异步通信的优点:
异步通信的缺点:
|
| 上图中展示的就是异步通信的优缺点 |
1.3 MQ常见框架
| 图 1.3-1 MQ产品 |
|---|
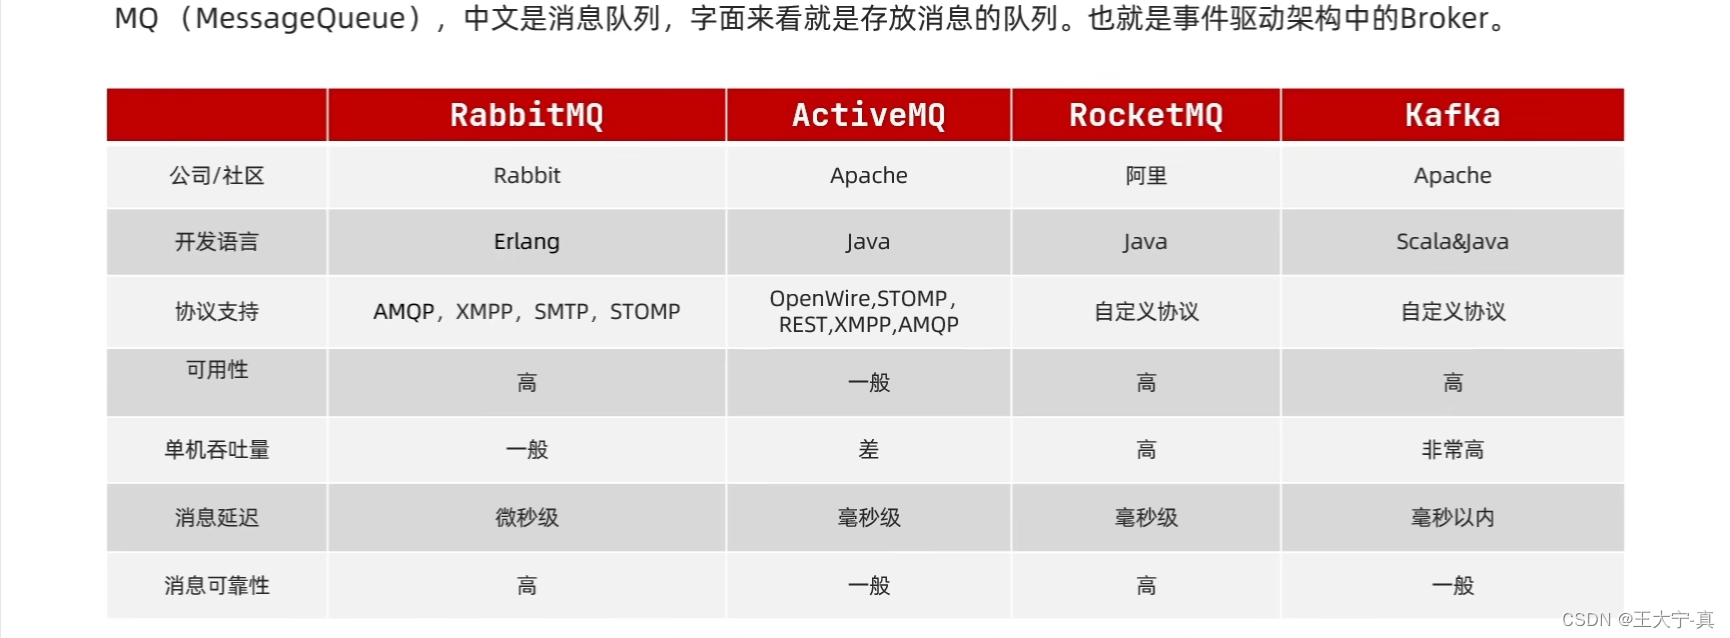 |
| 上图中展示的便是四款常见的MQ产品,他们之间的优势性能也有清晰地比对 |
2、RabbitMQ快速入门
2.1 RabbitMQ概述和安装
| 图 2.1-1 RabbitMQ安装 |
|---|
| 所需要的安装包、详细记录安装步骤的MD文件,因为内容过多,我放在网盘里面了 |
| 百度网盘地址:https://pan.baidu.com/s/1FZtWCWMl_QpZEIcGNnpwKA 提取码:6666 |
| 图 2.1-2 RabbitMQ概述 |
|---|
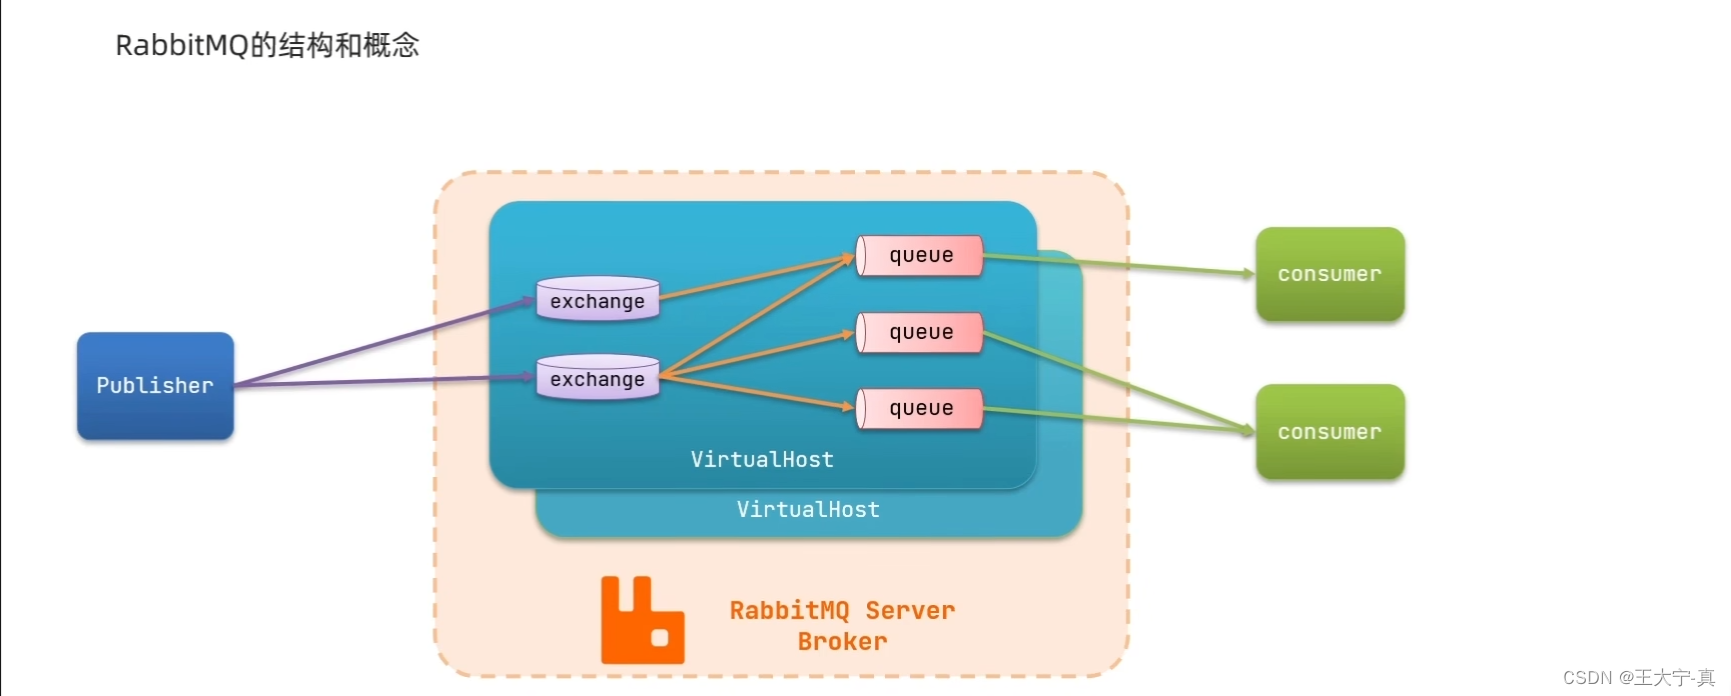 |
| 上图中展示的便是RabbitMQ的内部流程、逻辑,即消息发送者发送消息后传递给交换机,交换机将其消息存储到queue队列中,等待消息接受者获取 |
2.2 常见消息模型
| 图 2.2-1 五种消息模型 |
|---|
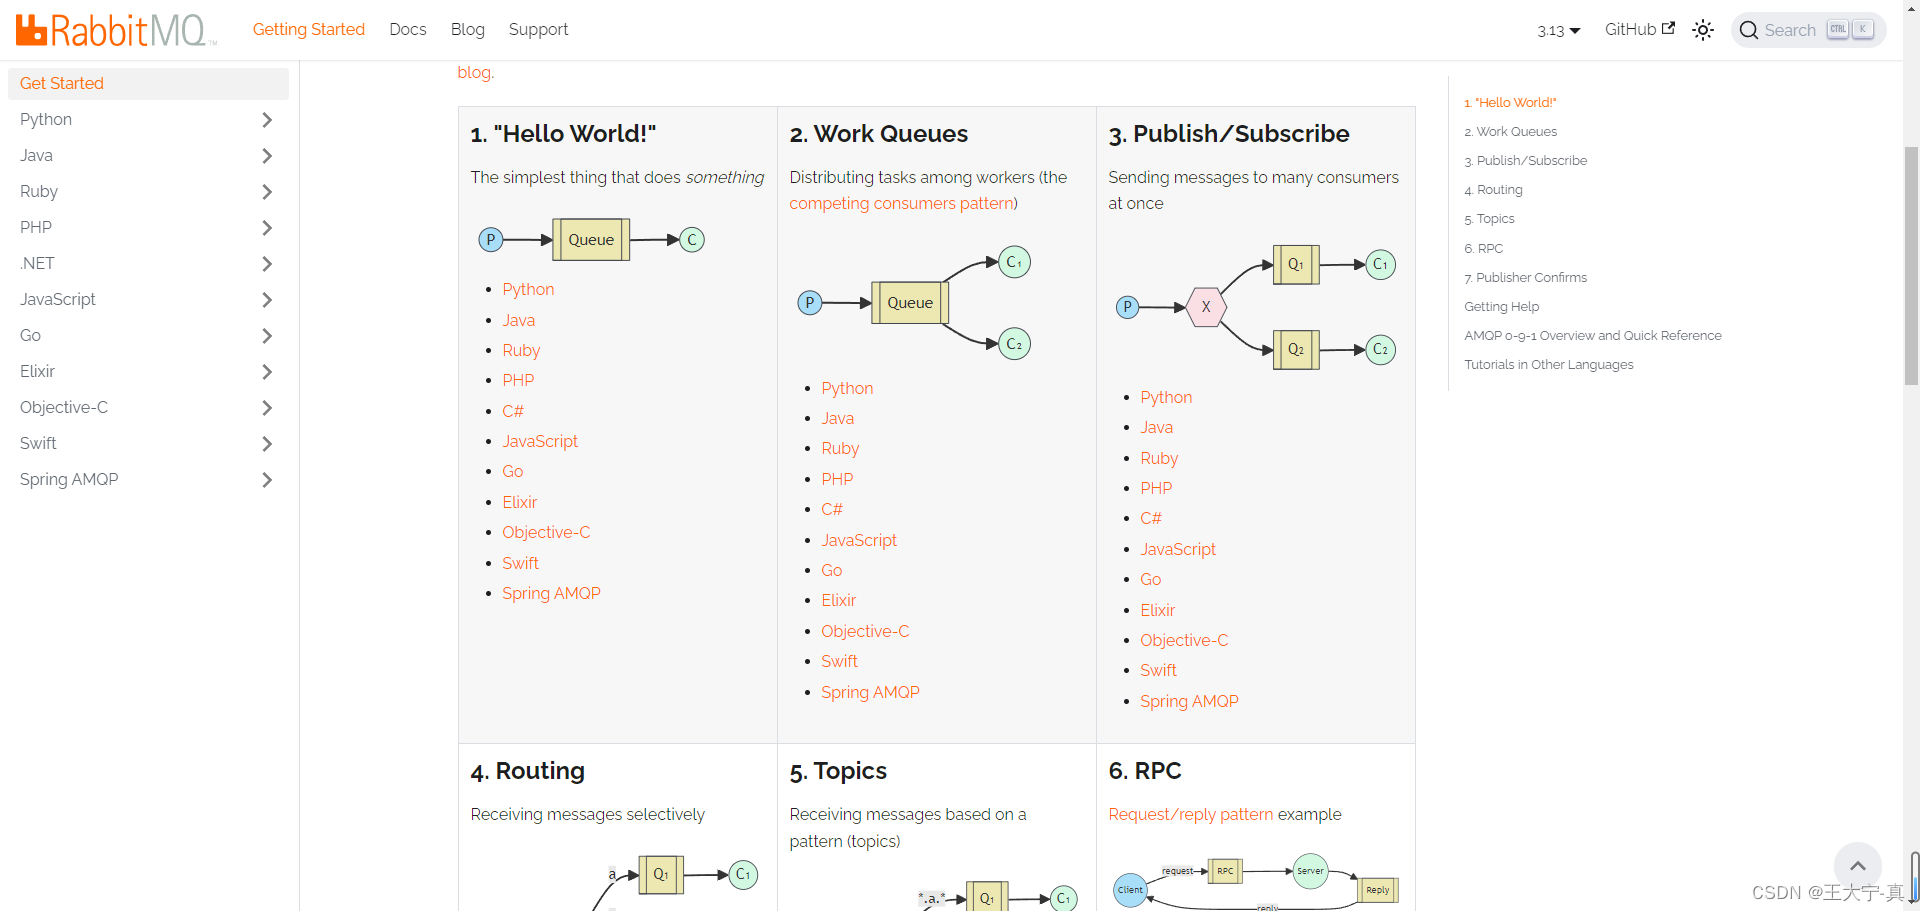 |
| 上图中展示的就是常用的五种消息队列模型,其官网地址:RabbitMQ Tutorials | RabbitMQ |
2.3 快速入门
java">package cn.itcast.mq.helloworld;import com.rabbitmq.client.Channel;
import com.rabbitmq.client.Connection;
import com.rabbitmq.client.ConnectionFactory;
import org.junit.Test;import java.io.IOException;
import java.util.concurrent.TimeoutException;public class PublisherTest {@Testpublic void testSendMessage() throws IOException, TimeoutException {// 1.建立连接ConnectionFactory factory = new ConnectionFactory();// 1.1.设置连接参数,分别是:主机名、端口号、vhost、用户名、密码factory.setHost("192.168.150.101");factory.setPort(5672);factory.setVirtualHost("/");factory.setUsername("itcast");factory.setPassword("123321");// 1.2.建立连接Connection connection = factory.newConnection();// 2.创建通道ChannelChannel channel = connection.createChannel();// 3.创建队列String queueName = "simple.queue";channel.queueDeclare(queueName, false, false, false, null);// 4.发送消息String message = "hello, rabbitmq!";channel.basicPublish("", queueName, null, message.getBytes());System.out.println("发送消息成功:【" + message + "】");// 5.关闭通道和连接channel.close();connection.close();}
}
java">package cn.itcast.mq.helloworld;import com.rabbitmq.client.*;import java.io.IOException;
import java.util.concurrent.TimeoutException;public class ConsumerTest {public static void main(String[] args) throws IOException, TimeoutException {// 1.建立连接ConnectionFactory factory = new ConnectionFactory();// 1.1.设置连接参数,分别是:主机名、端口号、vhost、用户名、密码factory.setHost("192.168.150.101");factory.setPort(5672);factory.setVirtualHost("/");factory.setUsername("itcast");factory.setPassword("123321");// 1.2.建立连接Connection connection = factory.newConnection();// 2.创建通道ChannelChannel channel = connection.createChannel();// 3.创建队列String queueName = "simple.queue";channel.queueDeclare(queueName, false, false, false, null);// 4.订阅消息channel.basicConsume(queueName, true, new DefaultConsumer(channel){@Overridepublic void handleDelivery(String consumerTag, Envelope envelope,AMQP.BasicProperties properties, byte[] body) throws IOException {// 5.处理消息String message = new String(body);System.out.println("接收到消息:【" + message + "】");}});System.out.println("等待接收消息。。。。");}
}
3、SpringAMQP
3.1 什么是SpringAMQP
| 图 3.1-1 SpringAMQP介绍 |
|---|
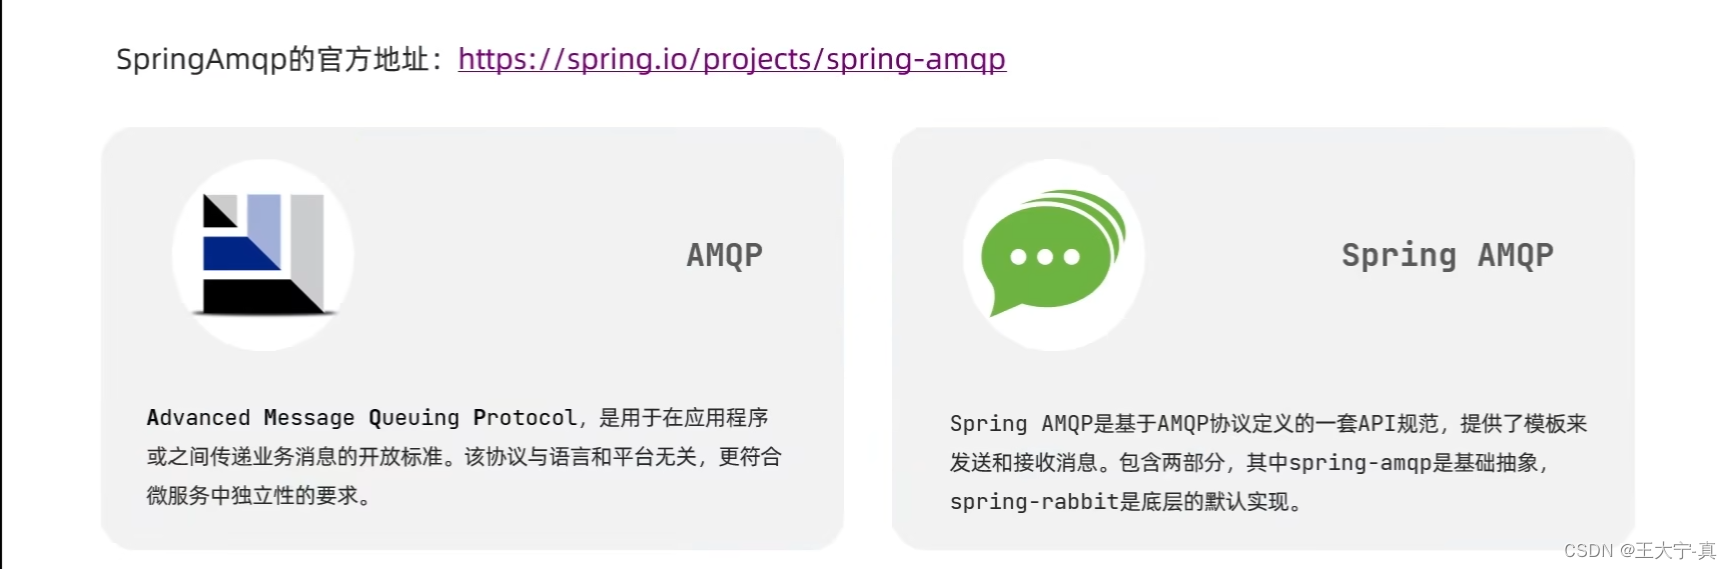 |
| 上图中展示的是关于SpringAMQP的消息发送和接收的标准 |
3.2 SimpleQueue案例
| 图 3.2-1 消息发送者 |
|---|
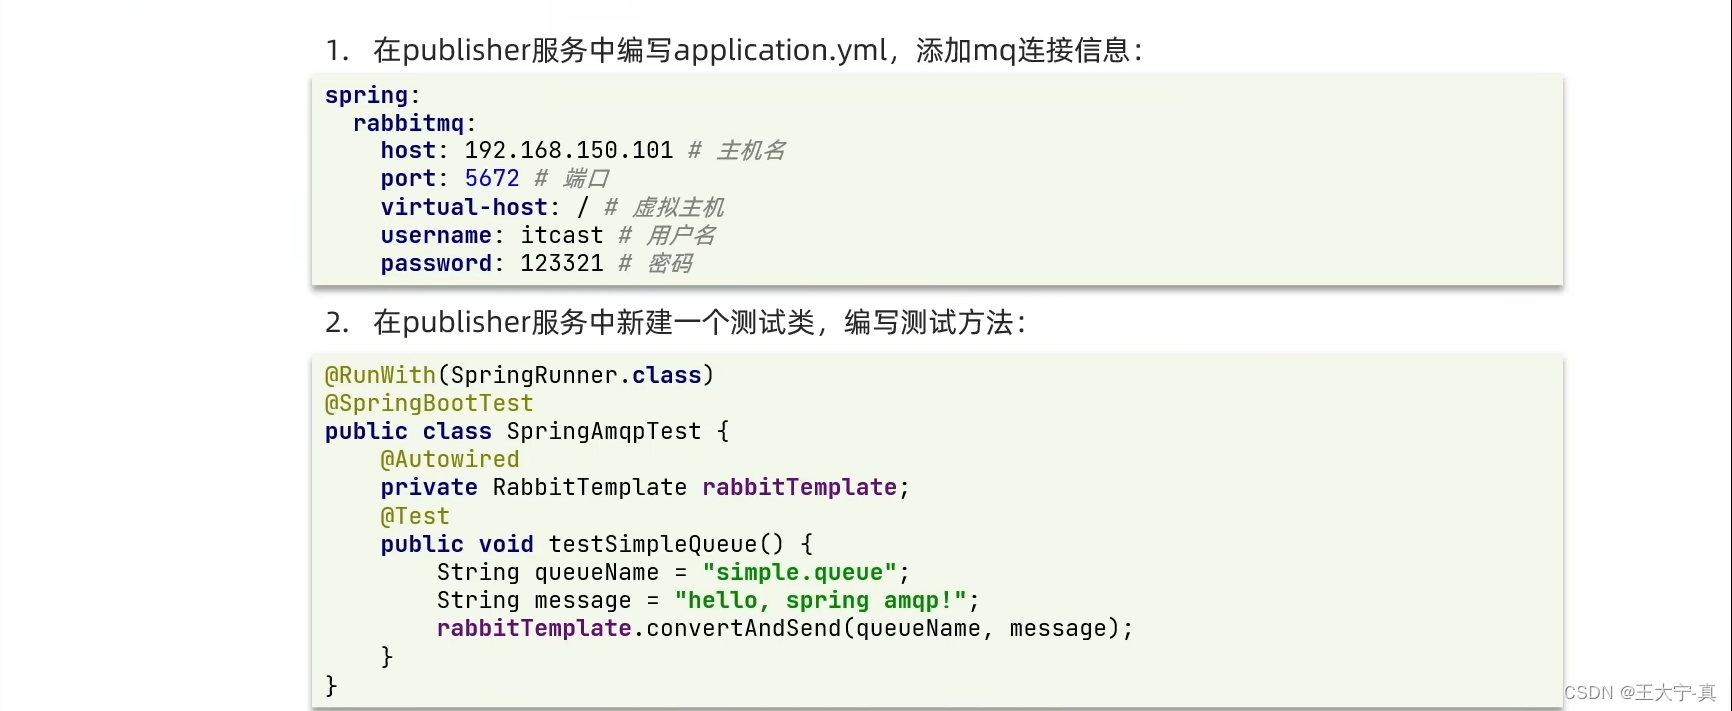 |
| 上图中展示的是消息发送者的代码案例:即配置连接信息、编写测试代码 |
3.3 SpringAMQP(发布、订阅模式)
| 图 3.3-1 发布、订阅模式 |
|---|
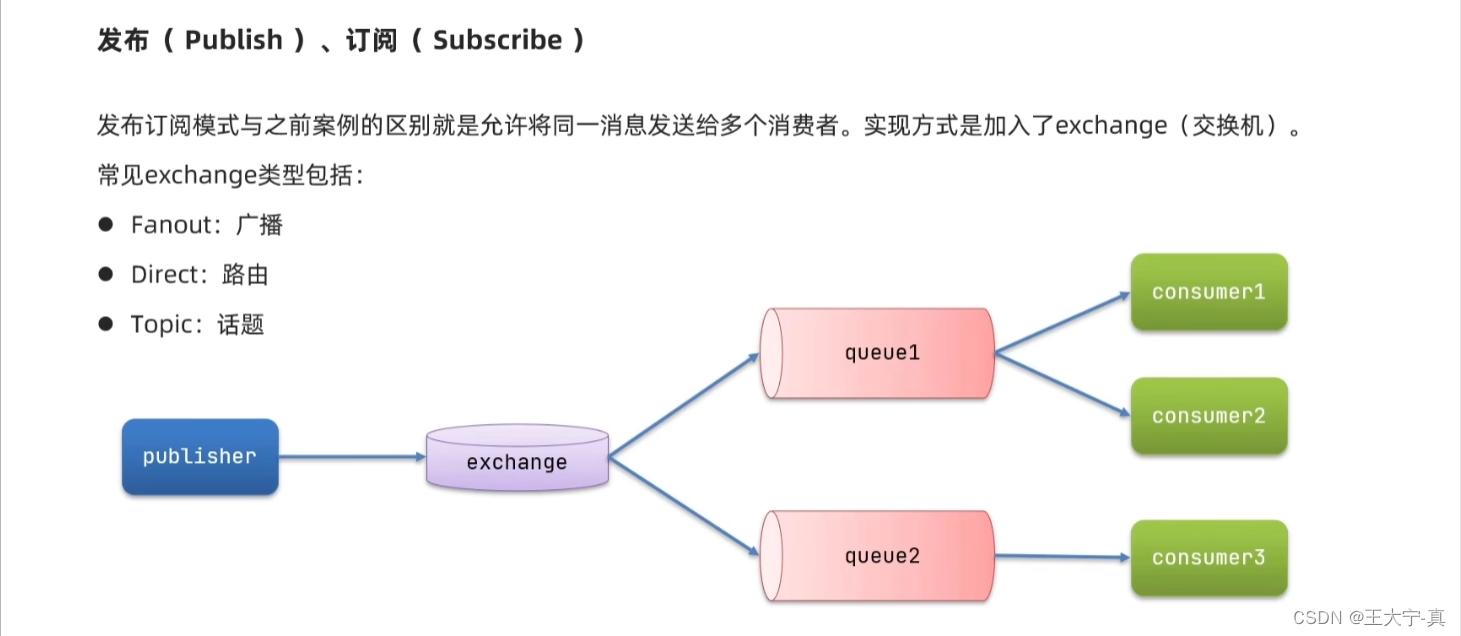 |
| 上图中展示的是三种通过路由器转发消息的模型,即广播模式、路由模式、话题模式 |
3.3.1 广播模式
1、消息发送者代码
java">package cn.itcast.mq.helloworld;import com.rabbitmq.client.Channel;
import com.rabbitmq.client.Connection;
import com.rabbitmq.client.ConnectionFactory;
import org.junit.Test;
import org.springframework.amqp.rabbit.core.RabbitTemplate;
import org.springframework.beans.factory.annotation.Autowired;import java.io.IOException;
import java.util.concurrent.TimeoutException;public class PublisherTest {@Autowiredprivate RabbitTemplate rabbitTemplate;@Testpublic void testFanoutExchange(){// 交换机名称String exchangeName = "itcast.fanout";// 消息String message = "hello,everyone!";// 发送消息rabbitTemplate.convertAndSend(exchangeName, "", message);}
}
2、交换机、队列配置类代码
java">package cn.itcast.mq.config;import org.springframework.amqp.core.Binding;
import org.springframework.amqp.core.BindingBuilder;
import org.springframework.amqp.core.FanoutExchange;
import org.springframework.amqp.core.Queue;
import org.springframework.context.annotation.Bean;
import org.springframework.context.annotation.Configuration;@Configuration
public class FanoutConfig {// 1.声明广播交换机@Beanpublic FanoutExchange fanoutExchange(){return new FanoutExchange("itcast.fanout");}@Beanpublic Queue fanoutQueue1(){return new Queue("fanout.queue1");}@Beanpublic Queue fanoutQueue2(){return new Queue("fanout.queue2");}// 2.交换机绑定队列一@Beanpublic Binding fanoutBinding1(Queue fanoutQueue1, FanoutExchange fanoutExchange){return BindingBuilder.bind(fanoutQueue1).to(fanoutExchange);}// 3.交换机绑定队列二@Beanpublic Binding fanoutBinding2(Queue fanoutQueue2, FanoutExchange fanoutExchange){return BindingBuilder.bind(fanoutQueue2).to(fanoutExchange);}
}
3、消息接受者代码
java">package cn.itcast.mq.listener;import org.springframework.amqp.rabbit.annotation.RabbitListener;
import org.springframework.stereotype.Component;import java.time.LocalTime;
@Component
public class SpringRabbitListener {/*    @RabbitListener(queues = "simple.queue")public void listenWorkQueue1(String msg) throws InterruptedException{System.out.println("消费者1接收到消息: 【" + msg + "】" + LocalTime.now());}*/@RabbitListener(queues = "fanout.queue1")public void listenFanoutQueue1(String msg){System.out.println("消费者1接收到消息: 【" + msg + "】" + LocalTime.now());}@RabbitListener(queues = "fanout.queue2")public void listenFanoutQueue2(String msg){System.out.println("消费者1接收到消息: 【" + msg + "】" + LocalTime.now());}
}
3.3.2 路由模式代码演示
1、消息发送者代码
java">package cn.itcast.mq.helloworld;import com.rabbitmq.client.Channel;
import com.rabbitmq.client.Connection;
import com.rabbitmq.client.ConnectionFactory;
import org.junit.Test;
import org.springframework.amqp.rabbit.core.RabbitTemplate;
import org.springframework.beans.factory.annotation.Autowired;import java.io.IOException;
import java.util.concurrent.TimeoutException;public class PublisherTest {@Autowiredprivate RabbitTemplate rabbitTemplate;@Testpublic void testFanoutExchange(){// 交换机名称String exchangeName = "itcast.direct";// 消息String message = "hello,everyone!";// 发送消息rabbitTemplate.convertAndSend(exchangeName, "red", message);}
}
2、消息接受者代码
java">package cn.itcast.mq.listener;
import org.springframework.amqp.core.ExchangeTypes;
import org.springframework.amqp.rabbit.annotation.Exchange;
import org.springframework.amqp.rabbit.annotation.Queue;
import org.springframework.amqp.rabbit.annotation.QueueBinding;
import org.springframework.amqp.rabbit.annotation.RabbitListener;
import org.springframework.stereotype.Component;
import java.time.LocalTime;@Component
public class SpringRabbitListener {@RabbitListener(bindings = @QueueBinding(value = @Queue(name = "direct.queue1"), exchange = @Exchange(name = "itcast.direct", type = ExchangeTypes.DIRECT), key = {"red", "blue"}))public void listenDirectQueue1(String msg){System.out.println("消费者接收到direct.queue1的消息: 【" + msg + "】");}@RabbitListener(bindings = @QueueBinding(value = @Queue(name = "direct.queue2"), exchange = @Exchange(name = "itcast.direct", type = ExchangeTypes.DIRECT), key = {"red", "yellow"}))public void listenDirectQueue2(String msg){System.out.println("消费者接收到direct.queue1的消息: 【" + msg + "】");}
}
3.3.3 话题模式
1、消息发送者代码
java">package cn.itcast.mq.helloworld;import com.rabbitmq.client.Channel;
import com.rabbitmq.client.Connection;
import com.rabbitmq.client.ConnectionFactory;
import org.junit.Test;
import org.springframework.amqp.rabbit.core.RabbitTemplate;
import org.springframework.beans.factory.annotation.Autowired;import java.io.IOException;
import java.util.concurrent.TimeoutException;public class PublisherTest {@Autowiredprivate RabbitTemplate rabbitTemplate;
/*@Testpublic void testFanoutExchange(){// 交换机名称String exchangeName = "itcast.direct";// 消息String message = "hello,everyone!";// 发送消息rabbitTemplate.convertAndSend(exchangeName, "red", message);}*/@Testpublic void testTopicExchange(){// 交换机名称String exchangeName = "itcast.topic";// 消息String message = "hello,everyone!";// 发送消息rabbitTemplate.convertAndSend(exchangeName, "china.news", message);}
}
2、消息接受者代码
java">package cn.itcast.mq.listener;
import org.springframework.amqp.core.ExchangeTypes;
import org.springframework.amqp.rabbit.annotation.Exchange;
import org.springframework.amqp.rabbit.annotation.Queue;
import org.springframework.amqp.rabbit.annotation.QueueBinding;
import org.springframework.amqp.rabbit.annotation.RabbitListener;
import org.springframework.stereotype.Component;
import java.time.LocalTime;@Component
public class SpringRabbitListener {/*** 话题路由器*/@RabbitListener(bindings = @QueueBinding(value = @Queue(name = "topic.queue1"),exchange = @Exchange(name = "itcast.topic", type = ExchangeTypes.TOPIC),key = "china.#"))public void listenTopicQueue1(String msg){System.out.println("消费者接收到direct.queue1的消息: 【" + msg + "】");}@RabbitListener(bindings = @QueueBinding(value = @Queue(name = "topic.queue2"),exchange = @Exchange(name = "itcast.topic", type = ExchangeTypes.TOPIC),key = "#.news"))public void listenTopicQueue2(String msg){System.out.println("消费者接收到direct.queue1的消息: 【" + msg + "】");}
/*    @RabbitListener(bindings = @QueueBinding(value = @Queue(name = "direct.queue1"), exchange = @Exchange(name = "itcast.direct", type = ExchangeTypes.DIRECT), key = {"red", "blue"}))public void listenDirectQueue1(String msg){System.out.println("消费者接收到direct.queue1的消息: 【" + msg + "】");}@RabbitListener(bindings = @QueueBinding(value = @Queue(name = "direct.queue2"), exchange = @Exchange(name = "itcast.direct", type = ExchangeTypes.DIRECT), key = {"red", "yellow"}))public void listenDirectQueue2(String msg){System.out.println("消费者接收到direct.queue1的消息: 【" + msg + "】");}*/
}
4、SpringAMQP-消息转换器
| 图 4-1 SpringAMQP的作用 |
|---|
| 我们知道 RabbitTemplate 传递的参数中,消息对象是以字节数组传递的,经过序列化(默认是通过JDK实现的)后显示为正常的数据,但是如果传递的是Map,List集合这种数据,SpringCloud自带的序列化就会出现异常,为了解决这一问题,我们需要引入SpringAMQP-消息转换器 |
| 图 4-1 项目的总pom文件 |
|---|
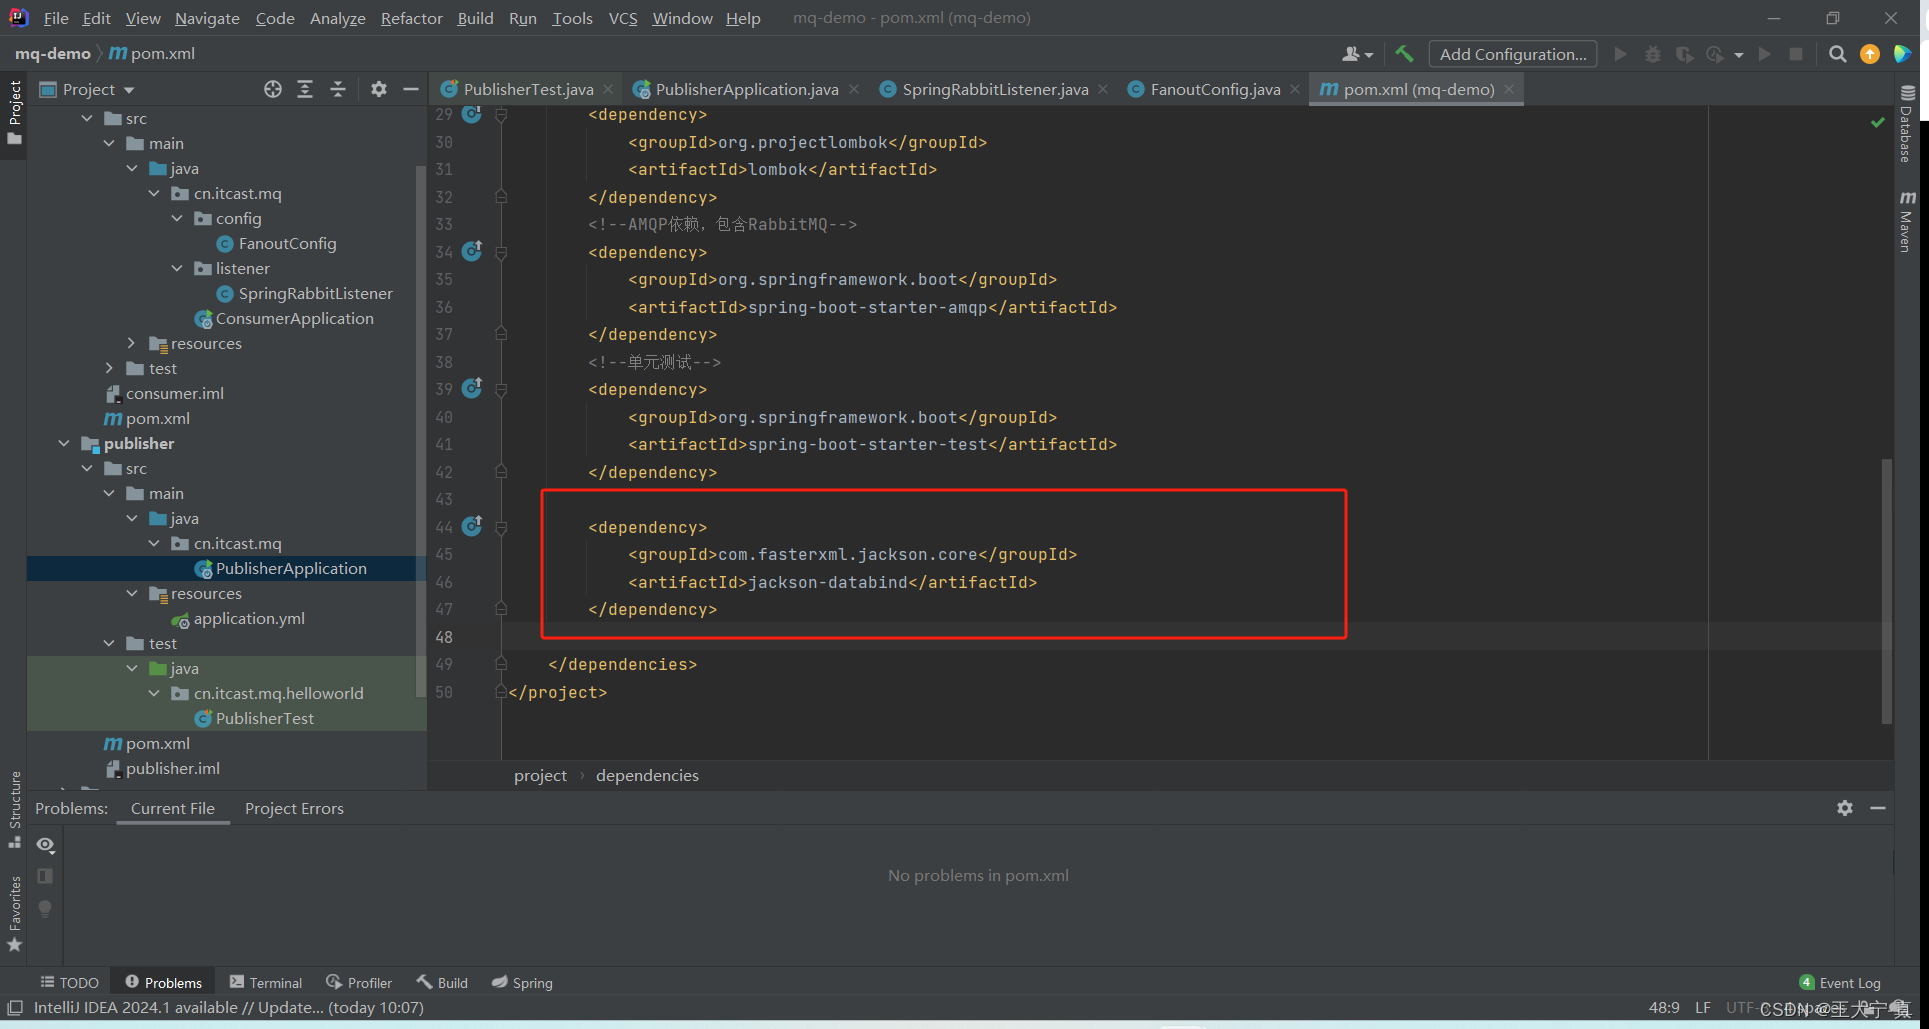 |
| 在项目的总pom文件中添加相对应的依赖 |
| 图 4-3 消息发送端、接收端 |
|---|
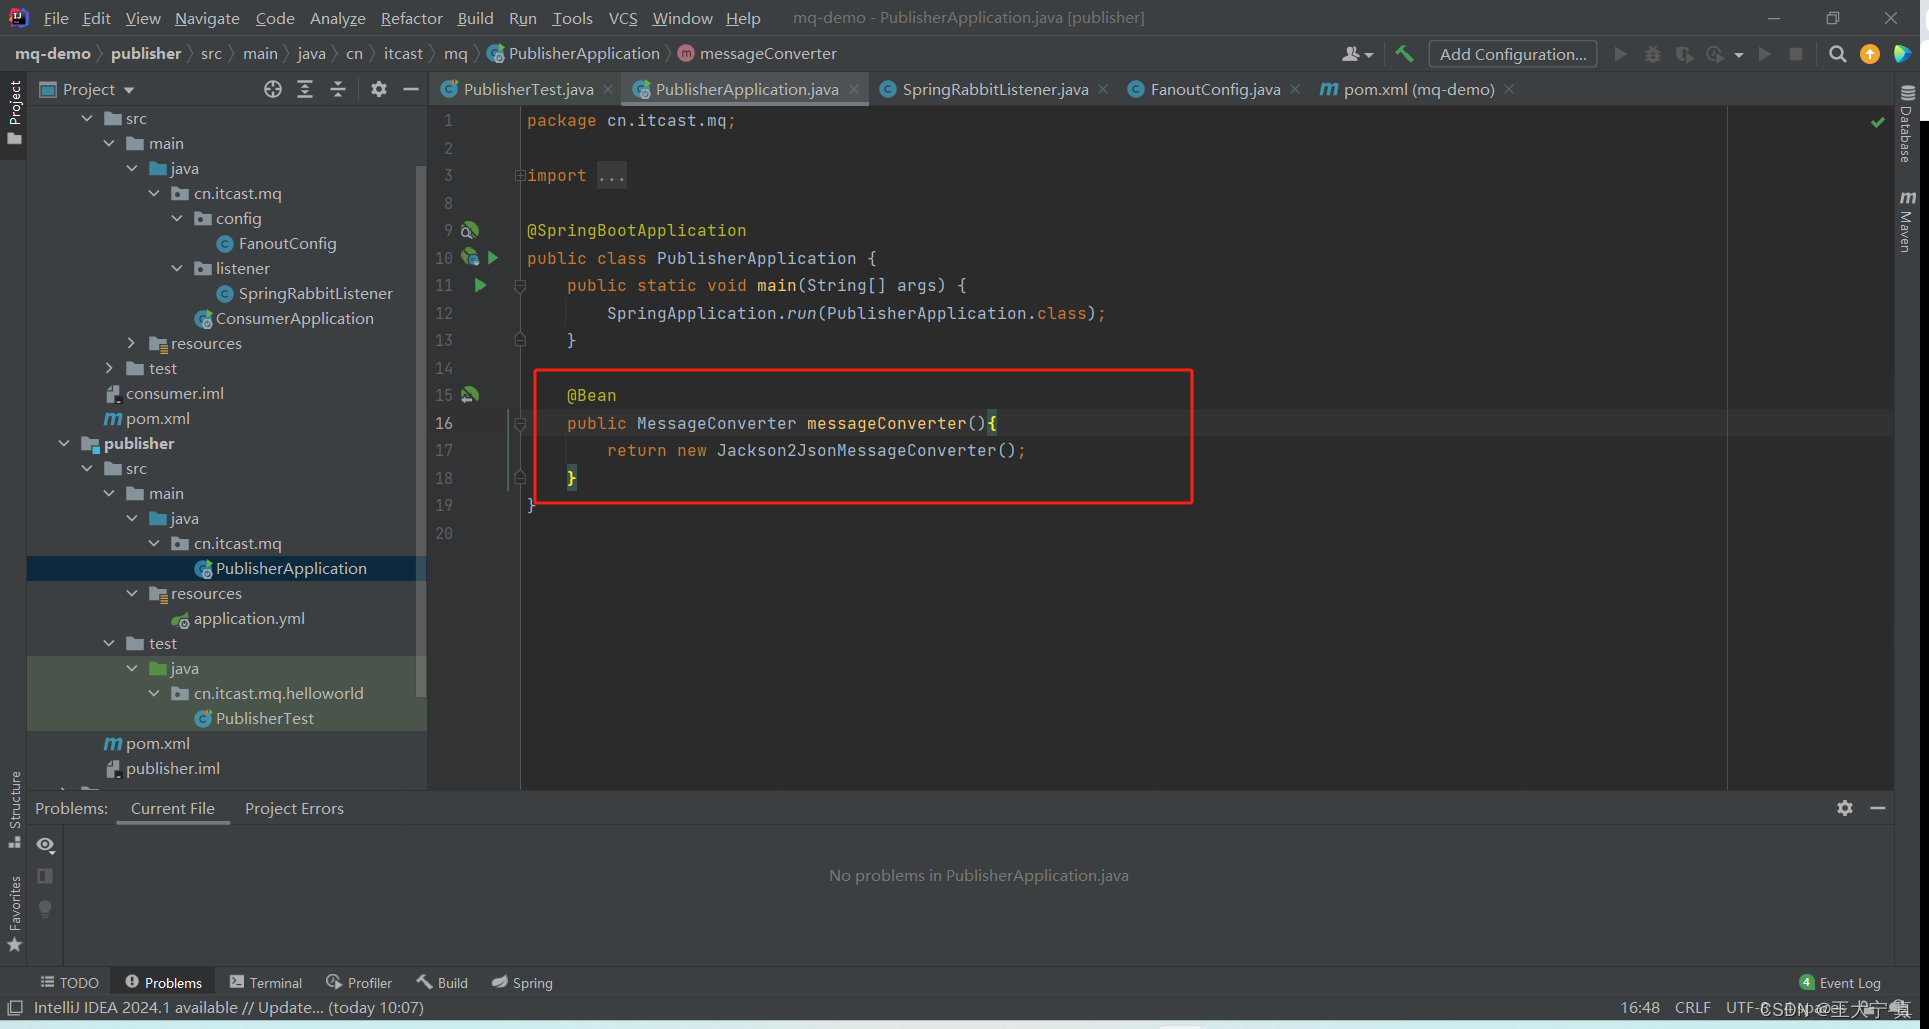 |
| 在项目的消息发送端、接收端的启动类中创建Bean对象 |