web集群-负载均衡
轮询算法
(1)概述
决定负载均衡如何把请求分发给后端节点,这种分发的方式就是轮询算法
(2)轮询算法
面试题:说说常见nginx轮询算法
rr,wrr,ip_hash,lc算法(最小连接数),wlc(加权最小连接数)
负载 说明
-
rr轮询:round robin 轮询,默认的循环访问
-
wrr : 加权轮询,在轮询的基础还是那个增加权重功能,server中weight就是加权轮询
-
ip_hash:ip哈希,只要客户端ip一样,就会一直访问同一个后端节点(用户请求与web服务器绑定)结局会话保持/会话共享,可能导致负载不均
-
xxx_hash:url_hash只要用户访问的url相同,uri相同,就会访问相同的web服务器;缓存服务器:静态资源缓存
-
least_conn:最小连接数,lc算法,也可以配合上权重weight,wlc权重最小连接数
-
一致性hash算法;
ip_hash轮询逻辑图

- ip_hash
upstream lb_pools {ip_hash;server 10.0.0.7:80 weight=1 max_fails=3 fail_timeout=30s;server 10.0.0.8:80 weight=1max_fails=3fail_timeout=30s;
}server {listen 80;server_name lb.wulinlinux.cn;error_log/var/log/nginx/lb-error.lognotice;access_log/var/log/nginx/lb-access.log main;location / {proxy_pass http://lb_pools;proxy_set_header Host $http_host;proxy_set_header X-Forwarded-For$proxy_add_x_forwarded_for;}
}
- url_hash
hash $request_uri;
FAQ
Hash算法一台机器宕机的情况下会报错吗?
- 切换
案例01:对负载均衡进行状态检查
-
负载均衡状态检查模块upstream check模块,web展示
-
默认ngx没有安装,是一个第三方的模块,需要编译安装ngx添加这个模块即可.生成ngx命令
-
步骤:
- 找一台db01(无ngx即可)
- 编译安装tengine,生成ngx命令,替代lb上ngx的命令即可.
-
下载tengine代码
#下载#解压
进入到解压后的目录
- 编译安装
在官网下载之后,传到linux中进行解压
[root~]#tar xf tengine-2.3.3.tar.gz
[root~]#ll
total 2788
-rw--------, 1 root root 1539 jan 9 09:07 anaconda-ks.cfg
drwxrwxr-x, 13 root root 328 Mar 29 2021 tengine-2.3.3
-rw-r--r-- 1 root root 2848144 Feb 17 09:34 tengine-2.3.3.tar.gz
[root~]#cd tengine-2.3.3/
[root ~/tengine-2.3.3]#ll安装依赖
./configure 配置(生成Makefile)指定各种位置,否则就会安装到/usr/local/
make 编译(根据Makefile进行编译--->生成对应的命令)
make install 创建目录,复制文件..#安装依赖
yum install -y pcre-devel openssl-devel#配置的步骤
./configue --prefix=/etc/nginx --sbin-path=/usr/sbin/nginx --modules-path=/usr/lib64/nginx/modules --conf-path=/etc/nginx/nginx.conf --error-log-path=/var/log/nginx/error.log -http-log-path=/var/log/nginx/access.log --pid-path=/var/run/nginx.pid --lock-path=/var/run/nginx.lock --http-client-body-temp-path=/var/cache/nginx/client_temp proxy-temp-path=/var/cache/nginx/proxy_temp --http-fastcgi-temp-path=/var/cache/nginx/fasctgi_temp --
user=nginx --group=nginx --with-compat --with-file-aio --with-threads --with-http_addition_module
with-http_auth_request_module --with-http_dav_module
--with-http_flv_module --with-http_gunzip_module --
with-http_gzip_static_module --with-http_mp4_module
-- with-http_random_index_module --with http_realip_module --with-http_secure_link_module --
with-http_slice_module -- with-http_ssl_module -- with-http_stub_status_module --with-http_sub_module --with-http_v2_module --with-mail --with -mail_ssl_module --with-stream --with-
stream_realip_module--with-stream_ssl_module --with-stream_ssl_preread_module --with-cc-opt='-O2 -g
-pipe -Wall -Wp,-D_FORTIFY_SOURCE=2 -fexceptions -fstack-protector-strong --param=ssp-buffer-size=4 -grecord-gcc-switches -m64 -mtune=generic -fPIC' --with-ld-opt='-Wl,-z,relro -Wl,-z,now -pie' --add-module=modules/ngx_http_upstream_check_module
--add-module=modules/ngx_http_upstream_session_sticky_module/#进行编译
make -j 1 #cpu核心总数决定,加速编译#最后的安装(略)
不需要执行make install
我们不需要在当前db01主机安装tengine检查编译后生成的命令即可
./objs/nginx -V
echo $?
0 执行成功
;~
[root ~/tengine-2.3.3]#scp ./jobs/nginx lb01:~[root ~]ll nginx
-rwxr-xr-x 1 root root 105432 Feb 17 nginx
[root ~] nginx -V

这个为新版本编译安装的nginx,旧版本的在/sbin/nginx -V目录下


[root ~]#cd /etc/nginx/conf.d/
[root /etc/nginx/conf.d]#vim admin.conf

检查语法并进行重启:

浏览器访问admin.wulinlinux.cn网站:

将nginx关闭之后,检查模块fall counts会从0逐渐增加数量为终止点,然后报红线提示!!
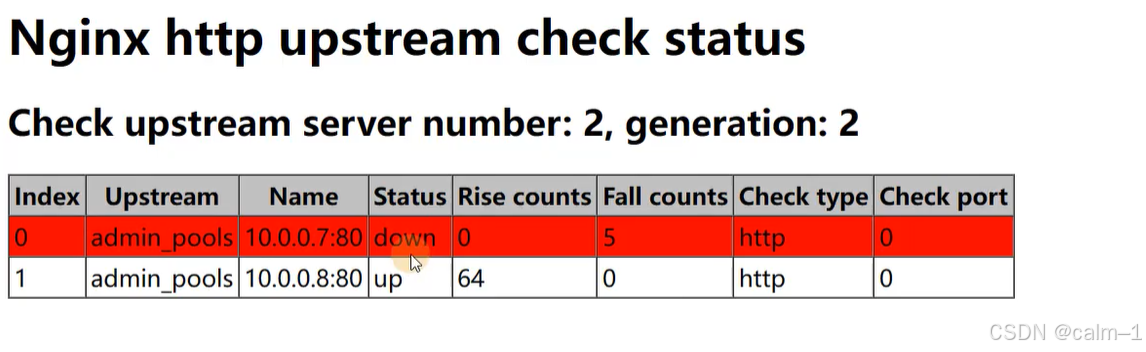
当重新打开nginx,两次之后显示打开;那能不能十次显示up(打开)状态,或者别的次数呢?- 可以设置想要的几次后状态显示
注意:如果后端web有多个虚拟主机.upstream check进行访问的时候默认使用的ip方式进行访问.在发出http请求的时候指定域名check_http_send "HEAD / HTTP/1.0\r\nHost: lb.oldboylinux.cn\r\n\r\n";

根据官方案例进行配置:
https://tengine.taobao.org/document_cn/http_upstream_check_cn.html
upstream cluster1 {# simple round-robinserver 192.168.0.1:80;server 192.168.0.2:80;check interval=3000 rise=2 fall=5 timeout=1000 type=http; #相当于curl命令访问curl -I#           检查间隔 ms 成功2次,存活  失败五次认为挂了  超时时间 ms 检查类型check_http_send "Head /HTTP/1.0\r\n\r\n";#           请求方法uri(uri最好反应业务是否正常,找开发写一个页面)check_http_expect_alive http_2xx http_3xx;#认为是成功的状态码 2xx  3xx}
server {listen 80;location /1 {proxy_pass http://cluster1;}location /2 {proxy_pass http://cluster2;}location /status {check_status;access_log   off;#allow 白名单#deny all;}
}
,
找开发写个页面
)check_http_expect_alive http_2xx http_3xx;#认为是成功的状态码
2xx 3xx
upstream_check模块指令

- 完整的配置:
upstream lb_pools {server 10.0.0.7:80 weight=1  max_fails=3 fail_timeout=30s;server 10.0.0.8:80 weight=1  max_fails=3 fail_timeout=30s; check interval=3000 rise=2 fall=5 timeout=1000 type=http;check_http_send "HEAD / HTTP/1.0\r\n\r\n";check_http_expect_alive http_2xx http_3xx;
}server {listen 80;server_name admin.wulinlinux.cnerror_log /var/log/nginx/admin.log notice;access_log /var/log/nginx/admin-access.log main;location / {proxy_pass http://admin_pools;proxy_set_header Host $http_host;proxy_set_header X-Forwarded-For $proxy_add_x_forwarded_for;}location /lb_status {check_status;access_log off;allow 10.0.0.1;allow 10.0.0.0/24;deny all;}
}
案例02:nginx平滑升级案例

- 找一个web服务器


现在已经准备好了环境:
完整配置
#检查的当前环境[root /etc/nginx/conf.d]# nginx -v
nginx version: nginx/1.22.0#启动ngx
[root /etc/nginx/conf.d]# systemctl start nginx
[root /etc/nginx/conf.d]# ps -ef |grep nginx
root 7404 1 0 15:32 ? 00:00:00
nginx: master process /usr/sbin/nginx -c
/etc/nginx/nginx.conf nginx 7405 7404 0 15:32 ? 00:00:00
nginx: worker process
root 7407 3011 0 15:32 pts/1 00:00:00 grep --color=auto nginx
#查看pid
[root /etc/nginx/conf.d]# ll /var/run/nginx.pid
-rw-r--r-- 1 root root 5 Sep 7 15:32
/var/run/nginx.pid
[root /etc/nginx/conf.d]# cat /var/run/nginx.pid*
7404#准备升级,备份ngx命令,替代ngx命令
mv /sbin/nginx /sbin/nginx-v1.22.0
mv nginx-tengine-2.3.3 /sbin/nginx
#检查替换后结果
nginx -V
Tengine version: Tengine/2.3.3
nginx version: nginx/1.18.0
built by gcc 4.8.5 20150623 (Red Hat 4.8.5-44) (GCC)
built with OpenSSL 1.0.2k-fips 26 Jan 2017
TLS SNI support enabledconfigure arguments: --prefix=/etc/nginx --sbin-
path=/usr/sbin/nginx --modules-
path=/usr/lib64/nginx/modules --conf-
path=/etc/nginx/nginx.conf --error-log-
path=/var/log/nginx/error.log --http-log-
path=/var/log/nginx/access.log --pid-
path=/var/run/nginx.pid --lock-
path=/var/run/nginx.lock --http-client-body-temp-
path=/var/cache/nginx/client_temp --http-proxy-temp-
path=/var/cache/nginx/proxy_temp --http-fastcgi-
temp-path=/var/cache/nginx/fastcgi_temp --http-
uwsgi-temp-path=/var/cache/nginx/uwsgi_temp --http-
scgi-temp-path=/var/cache/nginx/scgi_temp --
user=nginx --group=nginx --with-compat --with-file-
aio --with-threads --with-http_addition_module --
with-http_auth_request_module --with-http_dav_module
--with-http_flv_module --with-http_gunzip_module --
with-http_gzip_static_module --with-http_mp4_module
--with-http_random_index_module --with-
http_realip_module --with-http_secure_link_module --
with-http_slice_module --with-http_ssl_module --
with-http_stub_status_module --with-http_sub_module
--with-http_v2_module --with-mail --with-
mail_ssl_module --with-stream --with
stream_realip_module --with-stream_ssl_module --
with-stream_ssl_preread_module --with-cc-opt='-O2 -g
-pipe -Wall -Wp,-D_FORTIFY_SOURCE=2 -fexceptions -
fstack-protector-strong --param=ssp-buffer-size=4 -
grecord-gcc-switches -m64 -mtune=generic -fPIC' --
with-ld-opt='-Wl,-z,relro -Wl,-z,now -pie' --add-
module=modules/ngx_http_upstream_check_module --add-
module=modules/ngx_http_upstream_session_sticky_module/#准备新老交替
[root ~]# kill -USR2 `cat /var/run/nginx.pid`#生成1新的pid文件和重命名一个pid文件
[root ~]# ll /var/run/nginx.pid*
-rw-r--r-- 1 root root 5 Sep 7 15:34 /var/run/nginx.pid
-rw-r--r-- 1 root root 5 Sep 7 15:32 /var/run/nginx.pid.oldbin[root ~]# cat /var/run/nginx.pid.oldbin
7404[root ~]# ps -ef |grep nginx
root 7404 1 0 15:32 ? 00:00:00
nginx: master process /usr/sbin/nginx -c /etc/nginx/nginx.conf
nginx 7405 7404 0 15:32 ? 00:00:00 nginx: worker process
root 7442 7404 0 15:34 ? 00:00:00
nginx: master process /usr/sbin/nginx -c /etc/nginx/nginx.conf
nginx 7443 7442 0 15:34 ? 00:00:00 nginx: worker process
root 7463 3011 0 15:35 pts/1 00:00:00 grep --color=auto nginx[root ~]# kill 7404
[root ~]# ps -ef |grep nginx
root 7442 1 0 15:34 ? 00:00:00
nginx: master process /usr/sbin/nginx -c /etc/nginx/nginx.conf
nginx 7443 7442 0 15:34 ? 00:00:00 nginx: worker process
root 7483 3011 0 15:37 pts/1 00:00:00 grep --color=auto nginx[root ~]# ss -lntup |grep 80
tcp LISTEN 0 128 *:80 *:* users:
(("nginx",pid=7443,fd=10),("nginx",pid=7442,fd=10))

web集群-Nginx-rewrite功能
a) nginx重定向概述
-
重定向:也叫url重定向,也叫url改写
-
未来需求:
- 网站是http(80)—> https(443) URL重定向
用户http://www.baidu.com —> https:///www.baidu.com/
-
根据客户端访问类型进行跳转
希望根据用户客户端进行判断
-
新老域名跳转:www.360buy.com —> jd.com
-
需要我们调整URL格式:伪静态(搜索引擎收入)运营要求

www.wulinlinux.cn/index.php
b) 模块与指令
- rewrite模块

if判断,一般与nginx变量一起使用
return指令

案例03:如果用户访问/admin/页面返回403
[root ~]#cat /etc/nginx/conf.d/rewrite.wulinlinux.cn.conf
server {listen 80;server_name rewrite.wulinlinux.cn;root /app/code/rewrite;location / {index index.html;}location /admin/ {return 403;}
}

创建目录:
[root /etc/nginx/conf.d]# mkdir -p /app/code/rewrite/admin/
[root /etc/nginx/conf.d]# echo rewrite index > /app/code/rewrite/index.html
[root /etc/nginx/conf.d]# echo admin index >/app/code/rewrite/admin/index.html
[root /etc/nginx/conf.d]# curl -H Host:rewrite.wulinlinux.cn http://10.0.0.7/
rewrite index[root /etc/nginx/conf.d]# curl -H Host:rewrite.wulinlinux.cn http://10.0.0.7/admin/
<html>
<head><title>403 Forbidden</title></head>
<body>
<center><h1>403 Forbidden</h1></center>
<hr><center>nginx/1.22.1</center>
</body>
</html>
这里书写return 403;所有人禁止访问/admin/页面
案例04:域名间跳转
- 用户访问rewrite.wulinlinux.cn --> www.baidu.com
- 书写
server {listen 80;server_name rewrite.wulinlinux.cn;return 301 http://www.baidu.com;
}
- 调试
curl -vL rewrite.wulinlinux.cn
curl -Lv  -H Host:rewrite.wulinlinux.cn
http://10.0.0.7-L --location跟随跳转,响应是301,302跳转的时候使用.
systemctl reload nginx


推荐浏览器插件:
https://www.chromefk.com/redirect-path.html
https://share.learnfk.com/f/18605620-528446570-266096


小结
- return +状态码 与location 或 if
- 实现跳转
- 返回指定的状态码
- 域名跳转(新旧域名)
- http --> https跳转
if判断
linuxcn_GETPOSTHEADE_475">案例05 rewrite.wulinlinux.cn 网站只允许GET,POST,HEADE三种请求方法,其他禁止访问
- if用于进行判断,通过nginx中变量
- 可以比大小
- 可以进行等于,不等于
- 也可以进行匹配(过滤)
if指令在nginx中的格式
if (条件) {满足条件执行的内容
}
if指令,格式:
-
放置在server,location中
-
可以使用的符号
常用~,~*,!~*nginx取反,排除,只能用if
使用到的变量 : $request_method 取出请求
[root /etc/nginx/conf.d]#vim rewrite.conf
server {listen 80;server_name rewrite.wulinlinux.cn;root /app/code/rewrite;if ( $requerst_method !~ "GET|POST" ) {return 403;}location / {index index.html;}
}
- 测试:
#GET
请求正常
curl   -H Host:rewrite.oldboylinux.cn  http://10.0.0.7
rewrite index#HEAD请求失败
curl  -I  -H Host:rewrite.wulinlinux.cn
http://10.0.0.7
HTTP/1.1 403 Forbidden
Server: nginx/1.22.1Content-Type: text/html
Content-Length: 153
Connection: keep-alive
set
- 用于创建nginx变量
#shell写法
wulin=666
echo $wulin
#ngx中写法
set  $变量值;
set $wulin 999;
提示:nginx变量,进行赋值与进行使用都需要加上$符号
[root /etc/nginx/conf.d]# cat rewrite.wulinlinux.cn.conf
server {listen 80;server_name rewrite.wulinlinux.cn;set $wulin "wulin666";return 200 $wulin;
}
[root /etc/nginx/conf.d]# nginx -t
nginx: the configuration file /etc/nginx/nginx.conf
syntax is ok
nginx: configuration file /etc/nginx/nginx.conf test
is successful
[root /etc/nginx/conf.d]# systemctl reload
nginx
[root /etc/nginx/conf.d]# curl -H Host:rewrite.wulinlinux.cn 10.0.0.7
wulin666[root /etc/nginx/conf.d]#
[root /etc/nginx/conf.d]# cat rewrite.wulinlinux.cn.conf
server {listen 80;server_name rewrite.wulinlinux.cn;set $wulin $http_host$request_uri;return 200 $wulin;
}
[
root /etc/nginx/conf.d]# nginx -t
nginx: the configuration file /etc/nginx/nginx.conf
syntax is ok
nginx: configuration file /etc/nginx/nginx.conf test
is successful[root /etc/nginx/conf.d]# systemctl reload
nginx
[root /etc/nginx/conf.d]# curl -H Host:rewrite.wulinlinux.cn
10.0.0.7
rewrite.wulinlinux.cn/[root/etc/nginx/conf.d]#
[root /etc/nginx/conf.d]#
[root /etc/nginx/conf.d]# curl -H Host:rewrite.wulinlinux.cn
10.0.0.7/wulin.html
rewrite.wulinlinux.cn/wulin.html
案例06:设置网站是否为维护状态:如果维护状态:返回503状态码,否则正常访问
-
流程
- 设置标记$flag默认是0.
- 判断如果$flag的值是1则网站返回503
server {listen 80;server_name rewrite.wulinlinux.cn;root /app/code/rewrite; set  $flag 0;#include conf.d/rewrite-status.var; if ( $flag = 1) {return 503;}location / {index index.html;}
}
- 变量文件独立开
[root /etc/nginx/conf.d]# cat rewrite.wulinlinux.cn.conf
server {listen 80;server_name rewrite.wulinlinux.cn;root /app/code/rewrite;include conf.d/rewrite-status.flag;if ( $flag = 1 ) {return 503;}location / {
index index.html;}
}[root /etc/nginx/conf.d]# cat rewrite-status.flag
set $flag 0;
[root /etc/nginx/conf.d]# nginx -t
nginx: the configuration file /etc/nginx/nginx.conf
syntax is ok
nginx: configuration file /etc/nginx/nginx.conf test
is successful
[root /etc/nginx/conf.d]# systemctl reload nginx
[root /etc/nginx/conf.d]# curl -H Host:rewrite.wulinlinux.cn
10.0.0.7
rewrite.wulinlinux.cn
[root /etc/nginx/conf.d]# sed -i 's#0#1#g' rewrite-status.flag
[root /etc/nginx/conf.d]# cat rewrite-status.flag
set $flag 1;
[root /etc/nginx/conf.d]# systemctl reload nginx
[root /etc/nginx/conf.d]# curl -H Host:rewrite.wulinlinux.cn 10.0.0.7
<html>
<head><title>503 Service Temporarily
Unavailable</title></head>
<body>
<center><h1>503 Service Temporarily Unavailable</h1>
</center>
<hr><center>nginx/1.22.0</center>
</body>
</html>
set $flag 0;
if ( $flag ) {return 503;
}
if ( $flag = 1) 执行 return 503;if ( $flag = 1) 不会执行 503;
小结
一般很少单独使用,一般与if搭配使用
rewrite指令
rewrite指令
- rewrite正则用于匹配用户请求的uri.
- 命令的格式与sed 's###g’类似,实现替换功能,rewrite替换url内容.(改写)


案例07:域名跳转
[root /etc/nginx/conf.d]# vim rewrite.conf
server {listen 80;server_name rewrite.wulinlinux.cn;#return 301 http://www.baidu.com$request_uri;#http://rewrite.wulinlinux.cn/images/wulin.txt#http://rewrite.wulinlinux.cnrewrite ^(.*)$ http://www.baidu.com$1 permenant(永久);
}

浏览器访问http://rewrite.wulinlinux.cn/wulin.txt:


Rewrite各种标记

- 测试break与last的代码:
server {listen 80;server_name flag.wulinlinux.cn;root /app/code/flag;error_log /var/log/nginx/flag-error.log notice;rewrite_log on; #需要错误日志debug.... noticelocation / {rewrite /1.html /2.html ;rewrite /2.html /3.html ;}location /2.html {rewrite /2.html /3.html ;}location /3.html {rewrite /3.html /a.html ;}
}
echo 1.html url >/app/code/flag/1.html
echo 2.html url >/app/code/flag/2.html
echo 3.html url >/app/code/flag/3.html
echo a.html url >/app/code/flag/a.html
echo b.html url >/app/code/flag/b.html1.访问/1.html显示a.html内容
[root /etc/nginx/conf.d]# curl -H Host:flag.wulinlinux.cn 10.0.0.7/1.html
a.html url
2.访问 /2.html显示a.html内容
[root /etc/nginx/conf.d]# curl -H Host:flag.wulinlinux.cn 10.0.0.7/2.html
a.html url
3.在rewrite /1.html /2.html的时候加上标记break标记.rewrite /1.html /2.html break;执行完成rewrite后直接结束.
ver {listen 80;erver_name flag.wulinlinux.cn;root /app/code/flag;error_log /var/log/nginx/flag-error.log notice;rewrite_log on; #需要错误日志debug .... noticelocation / {rewrite /1.html /2.html break;rewrite /2.html /3.html ;}location /2.html {rewrite /2.html /3.html ;}location /3.html {rewrite /3.html /a.html ;}
}
[root /etc/nginx/conf.d]# nginx -t
nginx: the configuration file /etc/nginx/nginx.conf
syntax is ok
nginx: configuration file /etc/nginx/nginx.conf test is successful
[root /etc/nginx/conf.d]# systemctl reload nginx
[root /etc/nginx/conf.d]# curl -H Host:flag.wulinlinux.cn 10.0.0.7/1.html 2.html url4.在rewrite /1.html /2.html的时候加上标记last标记.注意这一步修改下配置文件,创建新的页面b.html.
[root /etc/nginx/conf.d]# cat flag.wulinlinux.cn.conf
server {listen 80;server_name flag.wulinlinux.cn;root /app/code/flag;error_log /var/log/nginx/flag-error.log notice;rewrite_log on; #需要错误日志debug ....noticelocation / {rewrite /1.html /2.html last;rewrite /2.html /3.html ;}location /2.html {rewrite /2.html /b.html ;}location /3.html {rewrite /3.html /a.html ;}
}
[root /etc/nginx/conf.d]# curl -H Host:flag.wulinlinux.cn
10.0.0.7/1.html
b.html url


