java">@SpringBootApplication
public class DistApplication {public static void main(String[] args) {// 启动入口SpringApplication.run()SpringApplication.run(DistApplication.class, args);}
}
1、服务构建
这里"服务"指的是SpringApplication对象,服务构建就是指创建SpringApplication对象。
创建对象肯定离不开构造器,SpringApplication类的构造器如下
java">// 一般都使用这个构造器
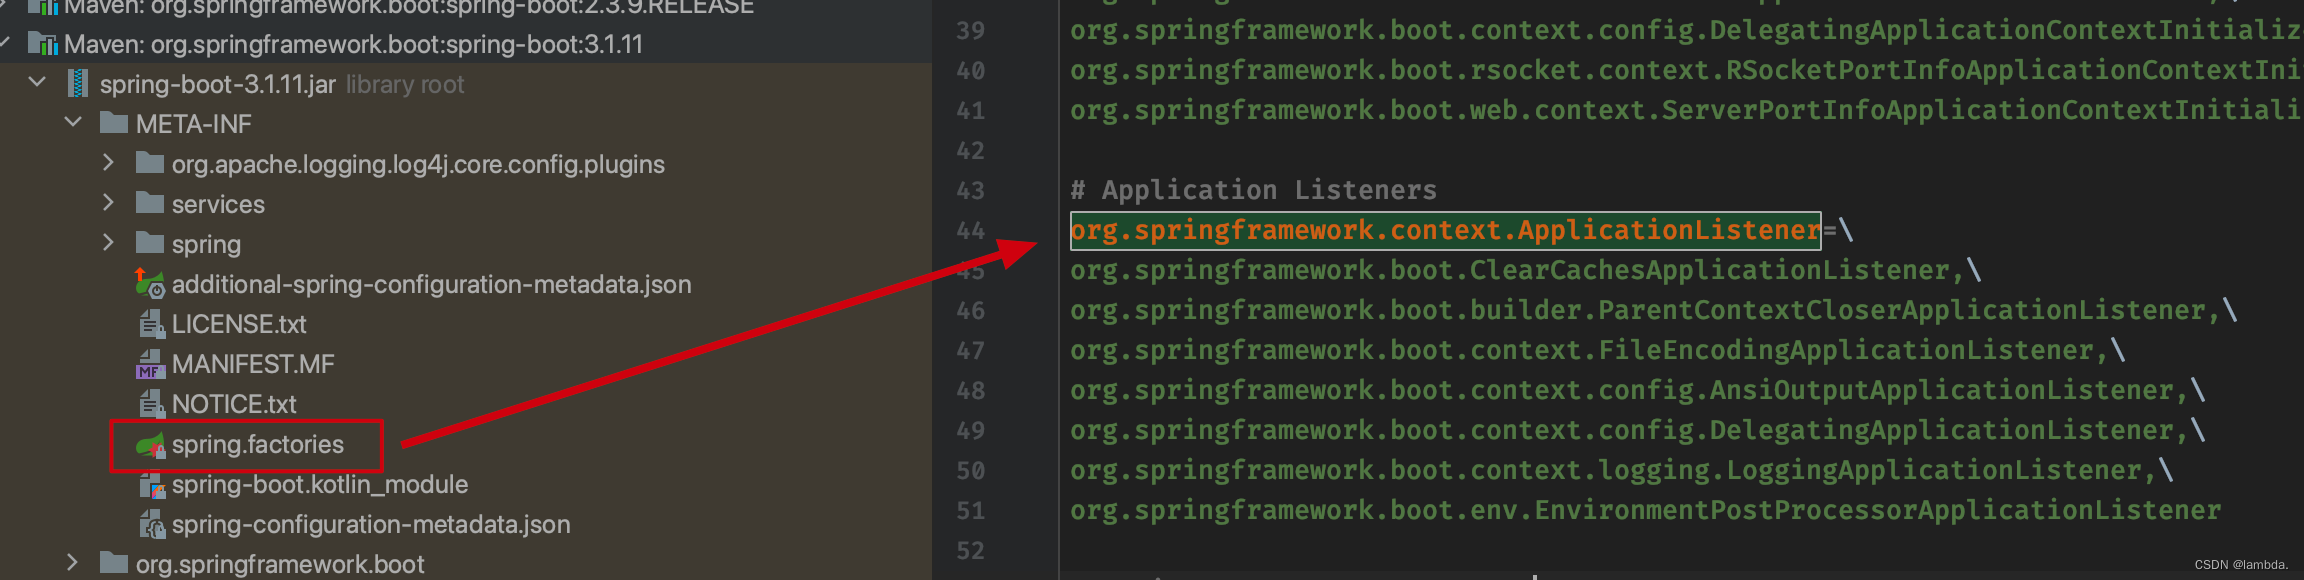
public SpringApplication(ResourceLoader resourceLoader, Class<?>... primarySources) {// 1.记录传入的资源加载器this.resourceLoader = resourceLoader;Assert.notNull(primarySources, "PrimarySources must not be null");// 2.记录主方法类(是一个set集合)this.primarySources = new LinkedHashSet<>(Arrays.asList(primarySources));// 3.确定Web服务类型(reactive / servlet / node)// 确定方式也很简单就是判断当前工程是否存在一些特殊的类如 org.springframework.web.reactive.DispatcherHandler 就是reactive类型// 默认是 servletthis.webApplicationType = WebApplicationType.deduceFromClasspath();// 4.加载初始化类 - 读取当前工程所有META-INF/spring.factories 文件(这个文件配置了上下问题初始化配置类、监听器类等)// BootstrapRegistryInitializer 启动注册初始化器,SpringBoot本身没有默认的"注册初始化"器所以这里是加载不到注册初始化器除非是有自定义的this.bootstrapRegistryInitializers = new ArrayList<>(getSpringFactoriesInstances(BootstrapRegistryInitializer.class));// ApplicationContextInitializer 上下文初始化器setInitializers((Collection) getSpringFactoriesInstances(ApplicationContextInitializer.class));// ApplicationListener 监听器setListeners((Collection) getSpringFactoriesInstances(ApplicationListener.class));// 5.通过运行栈 stackTrace 判断出 main 方法所在的类(就是启动类本身)// 后面发布启动事件要用this.mainApplicationClass = deduceMainApplicationClass();// 至此 SpringApplication 对象就构造完成了
}
以监听器为例
然后就是调用run()进入环境准备阶段,详见以下代码
java">public static ConfigurableApplicationContext run(Class<?>[] primarySources, String[] args) {// 创建完 SpringApplication 对象后调用run()方法return new SpringApplication(primarySources).run(args);
}
2、环境准备
这个阶段主要就是为即将要诞生的"容器"做一些充足的准备。
java">public ConfigurableApplicationContext run(String... args) {if (this.registerShutdownHook) {SpringApplication.shutdownHook.enableShutdownHookAddition();}long startTime = System.nanoTime();// 1.创建 DefaultBootstrapContext 对象,并逐一调用initialize()启动注册初始化器的初始化方法(刚刚从 META-INF/spring.factories 文件加载到的 BootstrapRegistryInitializer)// 默认情况下这里只是创建了 DefaultBootstrapContext 对象,因为SpringBoot没有默认的注册初始化器DefaultBootstrapContext bootstrapContext = createBootstrapContext();ConfigurableApplicationContext context = null;// 2.设置系统环境变量 java.awt.headless=true 表示缺少显示器、键盘等输入设备也可以正常启动configureHeadlessProperty();// 3.启动"服务"本身的运行监听器SpringApplicationRunListeners listeners = getRunListeners(args);// 4.发布启动事件(事件监听者为前面我们从 META-INF/spring.factories 文件加载到的7个监听器)listeners.starting(bootstrapContext, this.mainApplicationClass);try {ApplicationArguments applicationArguments = new DefaultApplicationArguments(args);ConfigurableEnvironment environment = prepareEnvironment(listeners, bootstrapContext, applicationArguments);Banner printedBanner = printBanner(environment);context = createApplicationContext();context.setApplicationStartup(this.applicationStartup);prepareContext(bootstrapContext, context, environment, listeners, applicationArguments, printedBanner);refreshContext(context);afterRefresh(context, applicationArguments);Duration timeTakenToStartup = Duration.ofNanos(System.nanoTime() - startTime);if (this.logStartupInfo) {new StartupInfoLogger(this.mainApplicationClass).logStarted(getApplicationLog(), timeTakenToStartup);}listeners.started(context, timeTakenToStartup);callRunners(context, applicationArguments);}catch (Throwable ex) {throw handleRunFailure(context, ex, listeners);}try {if (context.isRunning()) {Duration timeTakenToReady = Duration.ofNanos(System.nanoTime() - startTime);listeners.ready(context, timeTakenToReady);}}catch (Throwable ex) {throw handleRunFailure(context, ex, null);}return context;
}