为什么要手写webpack 不用cli (无的放矢)并不是 其实是为了加深我们对webpack 的了解方便以后灵活运用webpack 的技术
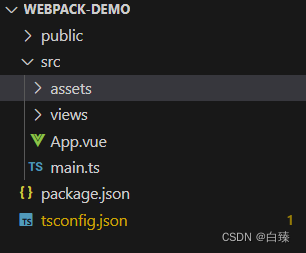
- 初始化项目结构(跟cli 结构保持一致)
- 新建 public src 等文件夹
- npm init -y 创建package.json文件
- tsc --init 创建 tsconfig.json 文件
注:如果没有tsc的话 终端执行 npm install typescript -g 命令然后再执行 tsc --init 命令
- 然后在 src文件夹下 创建以下文件

3.在public 文件夹下创建 index.html
javascript"><!DOCTYPE html>
<html lang="en"><head><meta charset="UTF-8"><meta name="viewport" content="width=device-width, initial-scale=1.0"><title>webpack demo</title>
</head><body><div id="app"></div>
</body></html>
- 在根目录下创建 webpack.config.js 文件 然后在终端执行以下命令
javascript">pnpm add webpack
pnpm add webpack-cli // 如果webpack 是3以上的版本 需要再配套安装
// 启动 dev 的环境
pnpm add webpack-dev-server
// html 模板
pnpm add html-webpack-plugin
// 安装vue
pnpm add vue
5.webpack.config.js 文件
javascript">const { Configuration } = require("webpack"); // 智能提示
const path = require("path");
const htmlWebpackPlugin = require("html-webpack-plugin");
/*** @type {Configuration}*/
const config = {mode: "development",entry: "./src/main.ts", // 入口文件output: {// 出口文件 打完包出口在哪filename: "[hash].js",path: path.resolve(__dirname, "dist"),},plugins: [new htmlWebpackPlugin({template: "./public/index.html",}),],
};
module.exports = config;
注:想在webpack.config.js 文件中获得智能提示 需要 以下代码
javascript">const { Configuration } = require("webpack"); // 智能提示
/**@type {Configuration}*/
- 修改 main.ts文件
javascript">import { createApp } from 'vue'
import App from './App.vue'
createApp(App).mount('#app')
- 在src 文件夹下新建 env.d.ts 文件
配置vue生命文件不然ts 识别不了vue后缀
javascript">
declare module "*.vue" {import { DefineComponent } from "vue"const component: DefineComponent<{}, {}, any>export default component}
- 安装 loader 解析sfc
javascript">pnpm add vue-loader@next //解析vue
pnpm add @vue/compiler-sfc //解析vue文件
- 配置webpack.config.js 文件
const { VueLoaderPlugin } = require(‘vue-loader/dist/index’);
然后再plugins里注册下
new VueLoaderPlugin(), //解析vue
javascript">const { Configuration } = require("webpack"); // 智能提示
const path = require("path");
const htmlWebpackPlugin = require("html-webpack-plugin");
const { VueLoaderPlugin } = require("vue-loader/dist/index");
/*** @type {Configuration}*/
const config = {mode: "development",entry: "./src/main.ts", // 入口文件module: {rules: [{test: /\.vue$/, //解析vue 模板use: "vue-loader",},],},output: {// 出口文件 打完包出口在哪filename: "[hash].js",path: path.resolve(__dirname, "dist"),},plugins: [new htmlWebpackPlugin({template: "./public/index.html",}),new VueLoaderPlugin(), //解析vue],
};
module.exports = config;-
打包的时候清空dist 就不用做手动删除了
pnpm add clean-webpack-plugin -
配置别名 @ 代表src
修改 webpack.config.js 文件 进行别名 添加 resolve 属性
javascript">const { Configuration } = require("webpack"); // 智能提示
const path = require("path");
const htmlWebpackPlugin = require("html-webpack-plugin");
const { VueLoaderPlugin } = require("vue-loader/dist/index");
/*** @type {Configuration}*/
const config = {mode: "development",entry: "./src/main.ts", // 入口文件module: {rules: [{test: /\.vue$/, //解析vue 模板use: "vue-loader",},],},output: {// 出口文件 打完包出口在哪filename: "[hash].js",path: path.resolve(__dirname, "dist"),},resolve: {alias: {"@": path.resolve(__dirname, "src"),},extensions: [".vue", ".ts", ".js"], // 自动补全后缀},plugins: [new htmlWebpackPlugin({template: "./public/index.html",}),new VueLoaderPlugin(), //解析vue],
};
module.exports = config;
- 安装插件解析css 并配置webpack.config.json
pnpm add css-loader 解析css 文件
pnpm add style-loader 解析 css 样式
也可以安装 less、scss
pnpm add less
pnpm add less-loader
配置 webpack.config.json 文件
javascript">const { Configuration } = require("webpack"); // 智能提示
const path = require("path");
const htmlWebpackPlugin = require("html-webpack-plugin");
const { VueLoaderPlugin } = require("vue-loader/dist/index");
/*** @type {Configuration}*/
const config = {mode: "development",entry: "./src/main.ts", // 入口文件module: {rules: [{test: /\.vue$/, //解析vue 模板use: "vue-loader",},{test: /\.css$/, //解析cssuse: ["style-loader", "css-loader"],},{test: /\.less$/, //解析 lessuse: ["style-loader", "css-loader", "less-loader"],},],},output: {// 出口文件 打完包出口在哪filename: "[hash].js",path: path.resolve(__dirname, "dist"),},resolve: {alias: {"@": path.resolve(__dirname, "src"),},extensions: [".vue", ".ts", ".js"], // 自动补全后缀},plugins: [new htmlWebpackPlugin({template: "./public/index.html",}),new VueLoaderPlugin(), //解析vue],
};
module.exports = config;
- 识别ts
javascript">pnpm add typescript
pnpm add ts-loader
修改webpack.config.js
javascript">const { Configuration } = require("webpack"); // 智能提示
const path = require("path");
const htmlWebpackPlugin = require("html-webpack-plugin");
const { VueLoaderPlugin } = require("vue-loader/dist/index");
/*** @type {Configuration}*/
const config = {mode: "development",entry: "./src/main.ts", // 入口文件module: {rules: [{test: /\.vue$/, //解析vue 模板use: "vue-loader",},{test: /\.css$/, //解析cssuse: ["style-loader", "css-loader"],},{test: /\.less$/, //解析 lessuse: ["style-loader", "css-loader", "less-loader"],},{test: /\.ts$/, //解析tsloader: "ts-loader",options: {// 需要对单文件做特殊处理configFile: path.resolve(process.cwd(), "tsconfig.json"),appendTsSuffixTo: [/\.vue$/],},},],},output: {// 出口文件 打完包出口在哪filename: "[hash].js",path: path.resolve(__dirname, "dist"),},resolve: {alias: {"@": path.resolve(__dirname, "src"),},extensions: [".vue", ".ts", ".js"], // 自动补全后缀},plugins: [new htmlWebpackPlugin({template: "./public/index.html",}),new VueLoaderPlugin(), //解析vue],
};
module.exports = config;- 美化webpack 控制台日志的
pnpm add friendly-errors-webpack-plugin
javascript">const { Configuration } = require("webpack"); // 智能提示
const path = require("path");
const htmlWebpackPlugin = require("html-webpack-plugin");
const { VueLoaderPlugin } = require("vue-loader/dist/index");
const FriendlyErrorsWebpackPlugin = require("friendly-errors-webpack-plugin");
/*** @type {Configuration}*/
const config = {mode: "development",entry: "./src/main.ts", // 入口文件module: {rules: [// 处理文件{test: /\.vue$/, //解析vue 模板use: "vue-loader",},{test: /\.css$/, //解析cssuse: ["style-loader", "css-loader"],},{test: /\.less$/, //解析 lessuse: ["style-loader", "css-loader", "less-loader"],},{test: /\.ts$/, //解析tsloader: "ts-loader",options: {// 需要对单文件做特殊处理configFile: path.resolve(process.cwd(), "tsconfig.json"),appendTsSuffixTo: [/\.vue$/],},},],},output: {// 出口文件 打完包出口在哪filename: "[hash].js",path: path.resolve(__dirname, "dist"),},resolve: {alias: {"@": path.resolve(__dirname, "src"),},extensions: [".vue", ".ts", ".js"], // 自动补全后缀},stats: "errors-only", // 去掉一些没有用的提示plugins: [// 只要放在plugins里面都是插件new htmlWebpackPlugin({template: "./public/index.html",}),new VueLoaderPlugin(), //解析vuenew FriendlyErrorsWebpackPlugin({compilationSuccessInfo: {messages: ["you this hear:http://localhost:8080"],},}),],
};
module.exports = config;
- 配置 devServer 可修改端口 指定地址等
javascript">const { Configuration } = require("webpack"); // 智能提示
const path = require("path");
const htmlWebpackPlugin = require("html-webpack-plugin");
const { VueLoaderPlugin } = require("vue-loader/dist/index");
const FriendlyErrorsWebpackPlugin = require("friendly-errors-webpack-plugin");
/*** @type {Configuration}*/
const config = {mode: "development",entry: "./src/main.ts", // 入口文件module: {rules: [// 处理文件{test: /\.vue$/, //解析vue 模板use: "vue-loader",},{test: /\.css$/, //解析cssuse: ["style-loader", "css-loader"],},{test: /\.less$/, //解析 lessuse: ["style-loader", "css-loader", "less-loader"],},{test: /\.ts$/, //解析tsloader: "ts-loader",options: {// 需要对单文件做特殊处理configFile: path.resolve(process.cwd(), "tsconfig.json"),appendTsSuffixTo: [/\.vue$/],},},],},output: {// 出口文件 打完包出口在哪filename: "[hash].js",path: path.resolve(__dirname, "dist"),},resolve: {alias: {"@": path.resolve(__dirname, "src"),},extensions: [".vue", ".ts", ".js"], // 自动补全后缀},devServer: {port: 9001,},stats: "errors-only", // 去掉一些没有用的提示plugins: [// 只要放在plugins里面都是插件new htmlWebpackPlugin({template: "./public/index.html",}),new VueLoaderPlugin(), //解析vuenew FriendlyErrorsWebpackPlugin({compilationSuccessInfo: {messages: ["you this hear:http://localhost:8080"],},}),],
};
module.exports = config;
- externals 性能优化
javascript">const { Configuration } = require("webpack"); // 智能提示
const path = require("path");
const htmlWebpackPlugin = require("html-webpack-plugin");
const { VueLoaderPlugin } = require("vue-loader/dist/index");
const FriendlyErrorsWebpackPlugin = require("friendly-errors-webpack-plugin");
/*** @type {Configuration}*/
const config = {mode: "development",entry: "./src/main.ts", // 入口文件module: {rules: [// 处理文件{test: /\.vue$/, //解析vue 模板use: "vue-loader",},{test: /\.css$/, //解析cssuse: ["style-loader", "css-loader"],},{test: /\.less$/, //解析 lessuse: ["style-loader", "css-loader", "less-loader"],},{test: /\.ts$/, //解析tsloader: "ts-loader",options: {// 需要对单文件做特殊处理configFile: path.resolve(process.cwd(), "tsconfig.json"),appendTsSuffixTo: [/\.vue$/],},},],},output: {// 出口文件 打完包出口在哪filename: "[hash].js",path: path.resolve(__dirname, "dist"),},resolve: {alias: {"@": path.resolve(__dirname, "src"),},extensions: [".vue", ".ts", ".js"], // 自动补全后缀},devServer: {port: 9001,},stats: "errors-only", // 去掉一些没有用的提示plugins: [// 只要放在plugins里面都是插件new htmlWebpackPlugin({template: "./public/index.html",}),new VueLoaderPlugin(), //解析vuenew FriendlyErrorsWebpackPlugin({compilationSuccessInfo: {messages: ["you this hear:http://localhost:8080"],},}),],externals: {vue:'Vue'}
};
module.exports = config;
最终的 package.json 包详解
javascript">{"name": "webpack-vue","version": "1.0.0","description": "","main": "webpack.config.js","scripts": {"test": "echo \"Error: no test specified\" && exit 1","dev": "webpack-dev-server","build": "webpack"},"keywords": [],"author": "","license": "ISC","dependencies": {"@vue/compiler-sfc": "^3.2.38", //解析vue文件"clean-webpack-plugin": "^4.0.0", //打包 的时候清空dist"css-loader": "^6.7.1", //处理css文件"friendly-errors-webpack-plugin": "^1.7.0", //美化dev"html-webpack-plugin": "^5.5.0", //html 模板"less": "^4.1.3", //处理less"less-loader": "^11.0.0", //处理less文件"style-loader": "^3.3.1", //处理style样式"ts-loader": "^9.3.1", //处理ts"typescript": "^4.8.2", //ts"vue": "^3.2.38", //vue"vue-loader": "^17.0.0", //解析vue"webpack": "^5.74.0","webpack-cli": "^4.10.0","webpack-dev-server": "^4.10.0"}


