为了展现在MicroStation二次开发中使用WinForm界面控件与MicroStation内的数据交互,这里我们使用三个案例进行展示,分别为可视化矩形梁生成工具,EC属性赋值工具与文件选择复制工具。
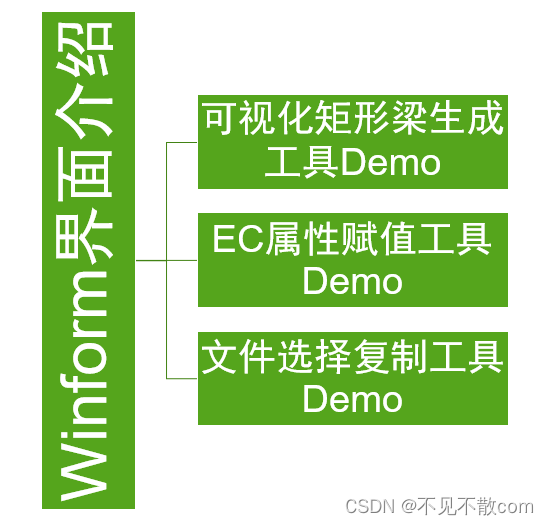
可视化矩形梁生成工具
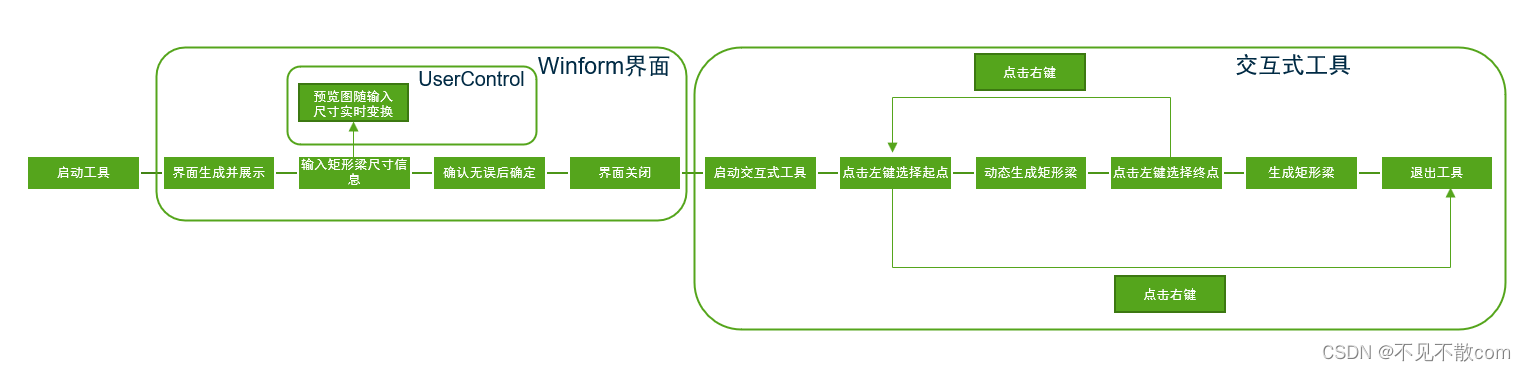
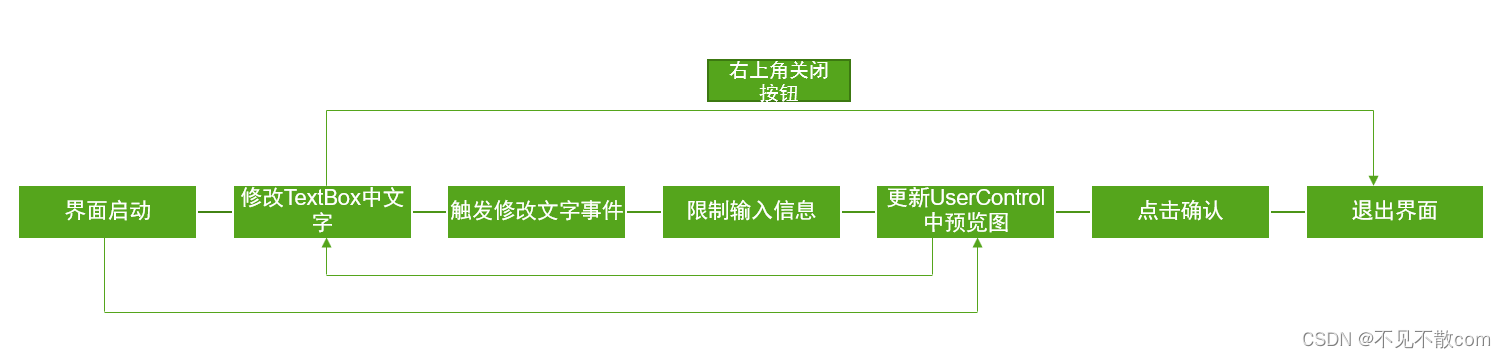
该工具会根据用户输入的数据实时在Panel中的用户控件中对截面信息进行预览,确定截面信息无误后点击确认会启动交互式工具,根据用户输入的信息生成矩形梁截面,通过交互式工具用户点击的位置确认矩形梁的起点与终点。
该工具涉及到的WinForm控件有:Label,TextBox,Button,Panel,UserControl(用户自定义控件)。
using Bentley.DgnPlatformNET;class CreateDimensionCallbacks : DimensionCreateData{private DimensionStyle m_dimStyle;private DgnTextStyle m_textStyle;private Symbology m_symbology;private LevelId m_levelId;private DirectionFormatter m_directionFormatter;public CreateDimensionCallbacks(DimensionStyle dimStyle, DgnTextStyle textStyle, Symbology symb, LevelId levelId, DirectionFormatter formatter){m_dimStyle = dimStyle;m_textStyle = textStyle;m_symbology = symb;m_levelId = levelId;m_directionFormatter = formatter;}public override DimensionStyle GetDimensionStyle(){return m_dimStyle;}public override DgnTextStyle GetTextStyle(){return m_textStyle;}public override Symbology GetSymbology(){return m_symbology;}public override LevelId GetLevelId(){return m_levelId;}public override int GetViewNumber(){return 0;}//此函数返回的旋转矩阵与GetViewRotation返回的旋转矩阵共同声明了尺寸标注元素的方向public override DMatrix3d GetDimensionRotation(){return DMatrix3d.Identity;}public override DMatrix3d GetViewRotation(){return DMatrix3d.Identity;}//用于从数字方向值构造字符串。public override DirectionFormatter GetDirectionFormatter(){return m_directionFormatter;}}
}
namespace WinformUIIntroduction.UI// // textBox2// this.textBox2.Location = new System.Drawing.Point(62, 47);this.textBox2.Name = "textBox2";this.textBox2.Size = new System.Drawing.Size(100, 20);this.textBox2.TabIndex = 2;this.textBox2.Text = "500";this.textBox2.TextChanged += new System.EventHandler(this.textBox2_TextChanged);this.textBox2.KeyPress += new System.Windows.Forms.KeyPressEventHandler(this.textBox2_KeyPress);// // button1// this.button1.Font = new System.Drawing.Font("Microsoft YaHei UI", 9F, System.Drawing.FontStyle.Regular, System.Drawing.GraphicsUnit.Point, ((byte)(0)));this.button1.Location = new System.Drawing.Point(41, 210);this.button1.Name = "button1";this.button1.Size = new System.Drawing.Size(75, 23);this.button1.TabIndex = 3;this.button1.Text = "确认";this.button1.UseVisualStyleBackColor = true;this.button1.Click += new System.EventHandler(this.button1_Click);// // BeamCreateMenu// this.AutoScaleDimensions = new System.Drawing.SizeF(6F, 13F);this.AutoScaleMode = System.Windows.Forms.AutoScaleMode.Font;this.ClientSize = new System.Drawing.Size(397, 261);this.Controls.Add(this.button1);this.Controls.Add(this.textBox2);this.Controls.Add(this.textBox1);this.Controls.Add(this.label2);this.Controls.Add(this.label1);this.Controls.Add(this.panel_view);this.FormBorderStyle = System.Windows.Forms.FormBorderStyle.FixedDialog;this.MaximizeBox = false;this.Name = "BeamCreateMenu";this.ShowIcon = false;this.Text = "BeamCreateMenu";this.TopMost = true;this.ResumeLayout(false);this.PerformLayout();}#endregionprivate System.Windows.Forms.Panel panel_view;private System.Windows.Forms.Label label1;private System.Windows.Forms.Label label2;private System.Windows.Forms.TextBox textBox1;private System.Windows.Forms.TextBox textBox2;private System.Windows.Forms.Button button1;}
}
extern alias dgnDisplayAlias;
using System.Windows.Forms;
using System.Windows.Forms.Integration;
using dgnDisplayAlias::Bentley.DgnPlatform;namespace WinformUIIntroduction.UI
{public partial class PreviewPanel : UserControl{private readonly dgnDisplayAlias::Bentley.DgnPlatform.PreviewControl mPreviewControl;public PreviewPanel(Bentley.DgnPlatformNET.DgnModelRef modelRef){InitializeComponent();unsafe{this.mPreviewControl =new dgnDisplayAlias::Bentley.DgnPlatform.PreviewControl((dgnDisplayAlias::Bentley.DgnPlatform.DgnModel*)modelRef.GetDgnModel().GetNative());}this.mPreviewControl.ActivatePanTool();this.mPreviewControl.PreviewControlOptions.IsFitToolVisible = true;this.mPreviewControl.PreviewControlOptions.IsPanToolVisible = true;this.mPreviewControl.PreviewControlOptions.IsViewingToolsVisible = true;this.mPreviewControl.PreviewControlOptions.IsZoomToolsVisible = true;this.mPreviewControl.PreviewControlOptions.IsRotationToolVisible = true;this.mPreviewControl.IsEnabled = true;this.mPreviewControl.IsManipulationEnabled = true;this.mPreviewControl.PreviewControlOptions.RotationMode = RotationMode.Top;this.mPreviewControl.PreviewControlOptions.RenderMode = RenderMode.FilledVisibleEdge;ElementHost elementHost = new ElementHost();elementHost.Dock = DockStyle.Fill;elementHost.Child = this.mPreviewControl;this.Controls.Add(elementHost);}public void ShowPreview(Bentley.DgnPlatformNET.Elements.Element ele){Bentley.DgnPlatformNET.ElementAgenda agenda = new Bentley.DgnPlatformNET.ElementAgenda();if (ele != null){agenda.Insert(ele, true);}this.mPreviewControl.ShowPreview(agenda);}}
}
using Bentley.DgnPlatformNET;else{EndDynamics();//关闭动态绘制m_pos.Clear();//清空列表                }return true;}protected override void OnDynamicFrame(DgnButtonEvent ev)//动态绘制时触发{ShapeElement m_beamProfile = CreateBeamProfile(m_pos[0]);//创建形元素用于确定梁截面Element element = CreateSolidElement(m_pos[0], ev.Point,m_beamProfile);//创建梁实体元素if (null == element)//若未成功生成梁实体元素return;//返回DynamicDrawElems(element);//动态绘制元素            }private ShapeElement CreateBeamProfile(DPoint3d startPo)//创建用于表达梁截面的形元素{DPoint3d[] pos ={new DPoint3d(startPo.X-0.5*UI.BeamCreateMenu.m_width*m_uorPerMilliMeter,startPo.Y,startPo.Z),new DPoint3d(startPo.X-0.5*UI.BeamCreateMenu.m_width*m_uorPerMilliMeter,startPo.Y,startPo.Z-1*UI.BeamCreateMenu.m_height*m_uorPerMilliMeter),new DPoint3d(startPo.X+0.5*UI.BeamCreateMenu.m_width*m_uorPerMilliMeter,startPo.Y,startPo.Z-1*UI.BeamCreateMenu.m_height*m_uorPerMilliMeter),new DPoint3d(startPo.X+0.5*UI.BeamCreateMenu.m_width*m_uorPerMilliMeter,startPo.Y,startPo.Z)};//确定梁截面端点坐标集ShapeElement beamProfile = new ShapeElement(m_dgnModel,null,pos);//创建表达梁截面的形元素return beamProfile;//返回梁截面的形元素}private void DynamicDrawElems(Element element){RedrawElems redrawElems = new RedrawElems();//使用元素用于动态绘制redrawElems.SetDynamicsViewsFromActiveViewSet(Session.GetActiveViewport());//设置视角redrawElems.DrawMode = DgnDrawMode.TempDraw;//设置绘制模式redrawElems.DrawPurpose = DrawPurpose.Dynamics;//设置绘制目标redrawElems.DoRedraw(element);//使用元素用于动态绘制}private Element CreateSolidElement(DPoint3d startPo, DPoint3d endPo, ShapeElement beamProfile){DVector3d vector = new DVector3d(startPo, endPo);//声明梁方向向量if (vector == DVector3d.Zero)//判断是否成功获取{return null;//返回空}           TransformInfo trans = new TransformInfo(DTransform3d.FromRotationAroundLine(startPo, DVector3d.UnitZ, vector.Rotate90CCWXY().AngleXY));//声明变换信息beamProfile.ApplyTransform(trans);//对形元素施加变换Element solid = SolidElement.CreateProjectionElement(m_dgnModel, null, beamProfile, startPo, vector, DTransform3d.Identity, true);//创建拉伸实体return solid;//返回拉伸实体}private void CreateBeamElem(){ShapeElement beamProfile= CreateBeamProfile(m_pos[0]);//创建表达梁截面的形元素Element element = CreateSolidElement(m_pos[0], m_pos[1], beamProfile);//创建拉伸元素element.AddToModel();//将拉伸元素写入模型}}
}