XComponent组件作为一种绘制组件,通常用于满足开发者较为复杂的自定义绘制需求,例如相机预览流的显示和游戏画面的绘制。
其可通过指定其type字段来实现不同的功能,主要有两个“surface”和“component”字段可供选择。
对于“surface”类型,开发者可将相关数据传入XComponent单独拥有的“NativeWindow”来渲染画面。
对于“component”类型,主要用于实现动态加载显示内容的目的。
surface类型
XComponent设置为surface类型时,通常用于EGL/OpenGLES和媒体数据写入,并将其显示在XComponent组件上。
设置为“surface“类型时XComponent组件可以和其他组件一起进行布局和渲染。
同时XComponent又拥有单独的“NativeWindow“,可以为开发者在native侧提供native window用来创建EGL/OpenGLES环境,进而使用标准的OpenGL ES开发。
除此之外,媒体相关应用(视频、相机等)也可以将相关数据写入XComponent所提供的NativeWindow,从而呈现相应画面。
使用EGL/OpenGLES渲染
native侧代码开发要点
应用如果要通过js来桥接native,一般需要使用napi接口来处理js交互,XComponent同样不例外。
Native侧处理js逻辑的文件类型为so:
- 每个模块对应一个so
- so的命名规则为 lib{模块名}.so
对于使用XComponent进行标准OpenGL ES开发的场景,CMAKELists.txt文件内容大致如下:
cmake_minimum_required(VERSION 3.4.1)
project(XComponent) # 项目名称set(NATIVERENDER_ROOT_PATH ${CMAKE_CURRENT_SOURCE_DIR})
# 头文件查找路径
include_directories(${NATIVERENDER_ROOT_PATH}${NATIVERENDER_ROOT_PATH}/include)# 编译目标so,SHARED表示动态库
add_library(nativerender SHAREDxxx.cpp)# 查找相关库 (包括OpenGL ES相关库和XComponent提供的ndk接口)
find_library( EGL-libEGL )find_library( GLES-libGLESv3 )find_library( libace-libace_ndk.z )# 编译so所需要的依赖
target_link_libraries(nativerender PUBLIC ${EGL-lib} ${GLES-lib} ${libace-lib} libace_napi.z.so libc++.a)
Napi模块注册
static napi_value Init(napi_env env, napi_value exports)
{// 定义暴露在模块上的方法napi_property_descriptor desc[] ={// 通过DECLARE_NAPI_FUNCTION宏完成方法名的映射,这里就是将native侧的PluginRender::NapiChangeColor方法映射到ets侧的changeColor方法DECLARE_NAPI_FUNCTION("changeColor", PluginRender::NapiChangeColor),};// 通过此接口开发者可在exports上挂载native方法(即上面的PluginRender::NapiChangeColor),exports会通过js引擎绑定到js层的一个js对象NAPI_CALL(env, napi_define_properties(env, exports, sizeof(desc) / sizeof(desc[0]), desc));return exports;
}static napi_module nativerenderModule = {.nm_version = 1,.nm_flags = 0,.nm_filename = nullptr,.nm_register_func = Init, // 指定加载对应模块时的回调函数.nm_modname = "nativerender", // 指定模块名称,对于XComponent相关开发,这个名称必须和ArkTS侧XComponent中libraryname的值保持一致.nm_priv = ((void*)0),.reserved = { 0 },
};extern "C" __attribute__((constructor)) void RegisterModule(void)
{// 注册so模块napi_module_register(&nativerenderModule);
}
c++
static napi_value Init(napi_env env, napi_value exports)
{// 定义暴露在模块上的方法napi_property_descriptor desc[] ={// 通过DECLARE_NAPI_FUNCTION宏完成方法名的映射,这里就是将native侧的PluginRender::NapiChangeColor方法映射到ets侧的changeColor方法DECLARE_NAPI_FUNCTION("changeColor", PluginRender::NapiChangeColor),};// 通过此接口开发者可在exports上挂载native方法(即上面的PluginRender::NapiChangeColor),exports会通过js引擎绑定到js层的一个js对象NAPI_CALL(env, napi_define_properties(env, exports, sizeof(desc) / sizeof(desc[0]), desc));return exports;
}static napi_module nativerenderModule = {.nm_version = 1,.nm_flags = 0,.nm_filename = nullptr,.nm_register_func = Init, // 指定加载对应模块时的回调函数.nm_modname = "nativerender", // 指定模块名称,对于XComponent相关开发,这个名称必须和ArkTS侧XComponent中libraryname的值保持一致.nm_priv = ((void*)0),.reserved = { 0 },
};extern "C" __attribute__((constructor)) void RegisterModule(void)
{// 注册so模块napi_module_register(&nativerenderModule);
}
解析XComponent组件的NativeXComponent实例
NativeXComponent为XComponent提供了在native层的实例,可作为js层和native层XComponent绑定的桥梁。XComponent所提供的的NDK接口都依赖于该实例。
可以在模块被加载时的回调内(即Napi模块注册中的Init函数)解析获得NativeXComponent实例
{// ...napi_status status;napi_value exportInstance = nullptr;OH_NativeXComponent *nativeXComponent = nullptr;// 用来解析出被wrap了NativeXComponent指针的属性status = napi_get_named_property(env, exports, OH_NATIVE_XCOMPONENT_OBJ, &exportInstance);if (status != napi_ok) {return false;}// 通过napi_unwrap接口,解析出NativeXComponent的实例指针status = napi_unwrap(env, exportInstance, reinterpret_cast<void**>(&nativeXComponent));// ...
}
c++
{// ...napi_status status;napi_value exportInstance = nullptr;OH_NativeXComponent *nativeXComponent = nullptr;// 用来解析出被wrap了NativeXComponent指针的属性status = napi_get_named_property(env, exports, OH_NATIVE_XCOMPONENT_OBJ, &exportInstance);if (status != napi_ok) {return false;}// 通过napi_unwrap接口,解析出NativeXComponent的实例指针status = napi_unwrap(env, exportInstance, reinterpret_cast<void**>(&nativeXComponent));// ...
}
注册XComponent事件回调
依赖解析XComponent组件的NativeXComponent实例拿到的NativeXComponent指针,通过OH_NativeXComponent_RegisterCallback接口进行回调注册。一般的会在模块被加载时的回调内(即Napi模块注册中的Init函数)进行回调注册。
{...OH_NativeXComponent *nativeXComponent = nullptr;// 解析出NativeXComponent实例OH_NativeXComponent_Callback callback;callback->OnSurfaceCreated = OnSurfaceCreatedCB; // surface创建成功后触发,开发者可以从中获取native window的句柄callback->OnSurfaceChanged = OnSurfaceChangedCB; // surface发生变化后触发,开发者可以从中获取native window的句柄以及XComponent的变更信息callback->OnSurfaceDestroyed = OnSurfaceDestroyedCB; // surface销毁时触发,开发者可以在此释放资源callback->DispatchTouchEvent = DispatchTouchEventCB; // XComponent的touch事件回调接口,开发者可以从中获得此次touch事件的信息OH_NativeXComponent_RegisterCallback(nativeXComponent, callback);...
}
c++
{...OH_NativeXComponent *nativeXComponent = nullptr;// 解析出NativeXComponent实例OH_NativeXComponent_Callback callback;callback->OnSurfaceCreated = OnSurfaceCreatedCB; // surface创建成功后触发,开发者可以从中获取native window的句柄callback->OnSurfaceChanged = OnSurfaceChangedCB; // surface发生变化后触发,开发者可以从中获取native window的句柄以及XComponent的变更信息callback->OnSurfaceDestroyed = OnSurfaceDestroyedCB; // surface销毁时触发,开发者可以在此释放资源callback->DispatchTouchEvent = DispatchTouchEventCB; // XComponent的touch事件回调接口,开发者可以从中获得此次touch事件的信息OH_NativeXComponent_RegisterCallback(nativeXComponent, callback);...
}
创建EGL/OpenGLES环境
在注册的OnSurfaceCreated回调中,开发者能拿到native window的句柄(其本质就是XComponent所单独拥有的NativeWindow),因此可以在这里创建应用自己的EGL/OpenGLES开发环境,由此开始具体渲染逻辑的开发。
EGLCore* eglCore_; // EGLCore为封装了OpenGL相关接口的类
uint64_t width_;
uint64_t height_;
void OnSurfaceCreatedCB(OH_NativeXComponent* component, void* window)
{int32_t ret = OH_NativeXComponent_GetXComponentSize(component, window, &width_, &height_);if (ret === OH_NATIVEXCOMPONENT_RESULT_SUCCESS) {eglCore_->GLContextInit(window, width_, height_); // 初始化OpenGL环境}
}
c++
EGLCore* eglCore_; // EGLCore为封装了OpenGL相关接口的类
uint64_t width_;
uint64_t height_;
void OnSurfaceCreatedCB(OH_NativeXComponent* component, void* window)
{int32_t ret = OH_NativeXComponent_GetXComponentSize(component, window, &width_, &height_);if (ret === OH_NATIVEXCOMPONENT_RESULT_SUCCESS) {eglCore_->GLContextInit(window, width_, height_); // 初始化OpenGL环境}
}
ArkTS侧语法介绍
开发者在ArkTS侧使用如下代码,即可用XComponent组件进行利用EGL/OpenGLES渲染的开发。
XComponent({ id: 'xcomponentId1', type: 'surface', libraryname: 'nativerender' }).onLoad((context) => {}).onDestroy(() => {})
- id :与XComponent组件为一一对应关系,不建议重复。通常开发者可以在native侧通过OH_NativeXComponent_GetXComponentId接口来获取对应的id从而绑定对应的XComponent。
说明:
如果id重复,在native侧将无法对多个XComponent进行区分。
- libraryname:加载模块的名称,必须与在native侧Napi模块注册时nm_modname的名字一致。
说明:
应用加载模块实现跨语言调用有两种方式:
1.使用NAPI的import方式加载:
import nativerender from "libnativerender.so"
2.使用XComponent组件加载,本质也是使用了NAPI机制来加载。 该加载方式和import加载方式的区别在于,在加载动态库时会将XComponent的NativeXComponent实例暴露到应用的native层中,从而让开发者可以使用XComponent的NDK接口。
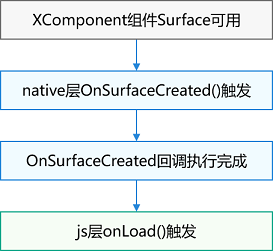
- onLoad事件
- 触发时刻:XComponent准备好surface后触发。
- 参数context:其上面挂载了暴露在模块上的native方法,使用方法类似于利用 import context2 from“libnativerender.so” 直接加载模块后获得的context2实例。
- 时序:onLoad事件的触发和Surface相关,其和native侧的OnSurfaceCreated的时序如下图:
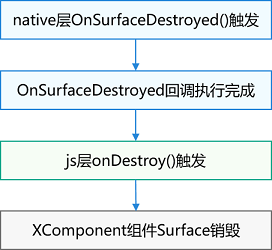
- onDestroy事件
触发时刻:XComponent组件被销毁时触发与一般ArkUI的组件销毁时机一致,其和native侧的OnSurfaceDestroyed的时序如下图:
媒体数据写入
XComponent所持有的NativeWindow符合“生产者-消费者”模型。
Camera、AVPlayer等符合生产者设计的部件都可以将数据写入XComponent持有的NativeWindow并通过XComponent显示。
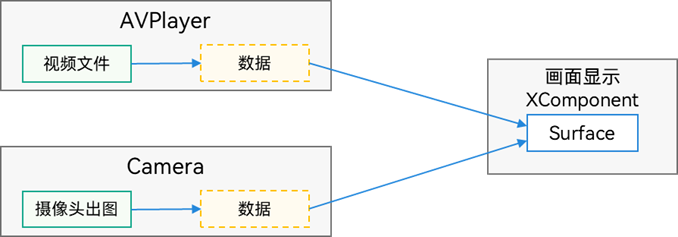
开发者可通过绑定XComponentController获得对应XComponent的surfaceId(该id可以唯一确定一个surface),从而传给相应的部件接口。
class suf{surfaceId:string = "";mXComponentController: XComponentController = new XComponentController();set(){this.surfaceId = this.mXComponentController.getXComponentSurfaceId()}
}
@State surfaceId:string = "";
mXComponentController: object = new XComponentController();
XComponent({ id: '', type: 'surface', controller: this.mXComponentController }).onLoad(() => {let sufset = new suf()sufset.set()})
component类型
XComponent设置为component类型时通常用于在XComponent内部执行非UI逻辑以实现动态加载显示内容的目的。
说明:
type为"component"时,XComponent作为容器,子组件沿垂直方向布局:
- 垂直方向上对齐格式:FlexAlign.Start
- 水平方向上对齐格式:FlexAlign.Center
不支持所有的事件响应。
布局方式更改和事件响应均可通过挂载子组件来设置。
内部所写的非UI逻辑需要封装在一个或多个函数内。
场景示例
@Builder
function addText(label: string): void {Text(label).fontSize(40)
}@Entry
@Component
struct Index {@State message: string = 'Hello XComponent'@State messageCommon: string = 'Hello World'build() {Row() {Column() {XComponent({ id: 'xcomponentId-container', type: 'component' }) {addText(this.message)Divider().margin(4).strokeWidth(2).color('#F1F3F5').width("80%")Column() {Text(this.messageCommon).fontSize(30)}}}.width('100%')}.height('100%')}
}

如果大家还没有掌握鸿蒙,现在想要在最短的时间里吃透它,我这边特意整理了《鸿蒙语法ArkTS、TypeScript、ArkUI等…视频教程》以及《鸿蒙开发>鸿蒙开发学习手册》(共计890页),希望对大家有所帮助:https://docs.qq.com/doc/DZVVBYlhuRkZQZlB3
鸿蒙语法ArkTS、TypeScript、ArkUI等…视频教程:https://docs.qq.com/doc/DZVVBYlhuRkZQZlB3

OpenHarmony APP开发教程步骤:https://docs.qq.com/doc/DZVVBYlhuRkZQZlB3
《鸿蒙开发>鸿蒙开发学习手册》:
如何快速入门:https://docs.qq.com/doc/DZVVBYlhuRkZQZlB3
1.基本概念
2.构建第一个ArkTS应用
3.……

开发基础知识:https://docs.qq.com/doc/DZVVBYlhuRkZQZlB3
1.应用基础知识
2.配置文件
3.应用数据管理
4.应用安全管理
5.应用隐私保护
6.三方应用调用管控机制
7.资源分类与访问
8.学习ArkTS语言
9.……

基于ArkTS 开发:https://docs.qq.com/doc/DZVVBYlhuRkZQZlB3
1.Ability开发
2.UI开发
3.公共事件与通知
4.窗口管理
5.媒体
6.安全
7.网络与链接
8.电话服务
9.数据管理
10.后台任务(Background Task)管理
11.设备管理
12.设备使用信息统计
13.DFX
14.国际化开发
15.折叠屏系列
16.……

鸿蒙生态应用开发白皮书V2.0PDF:https://docs.qq.com/doc/DZVVBYlhuRkZQZlB3


![[ESP32]:TFLite Micro推理CIFAR10模型](https://img-blog.csdnimg.cn/direct/ae16a3c0615d4e91b58fd70e30d64cd0.png)