SpringBoot整合Mybatis
文章目录
- SpringBoot整合Mybatis
- 1. 新建User表
- 2. 初始化项目
- 2.1 新建项目
- 2.2 配置数据库连接
- 2.3 完善项目的架子
- 3. 正式开始
- 3.1 新增用户
- 3.2 根据邮箱查询
- 3.4 改密码 和 删除用户
- 3.5 用xml再写一遍
- 4. 进阶
1. 新建User表
CREATE DATABASE mybatis_demo;
USE mybatis_demo;CREATE TABLE user (id BIGINT PRIMARY KEY AUTO_INCREMENT,username VARCHAR(50) NOT NULL,email VARCHAR(100) NOT NULL UNIQUE,password VARCHAR(255) NOT NULL
);
2. 初始化项目
2.1 新建项目
这个项目是可以直接用IDEA创建的,就不给pom文件了。

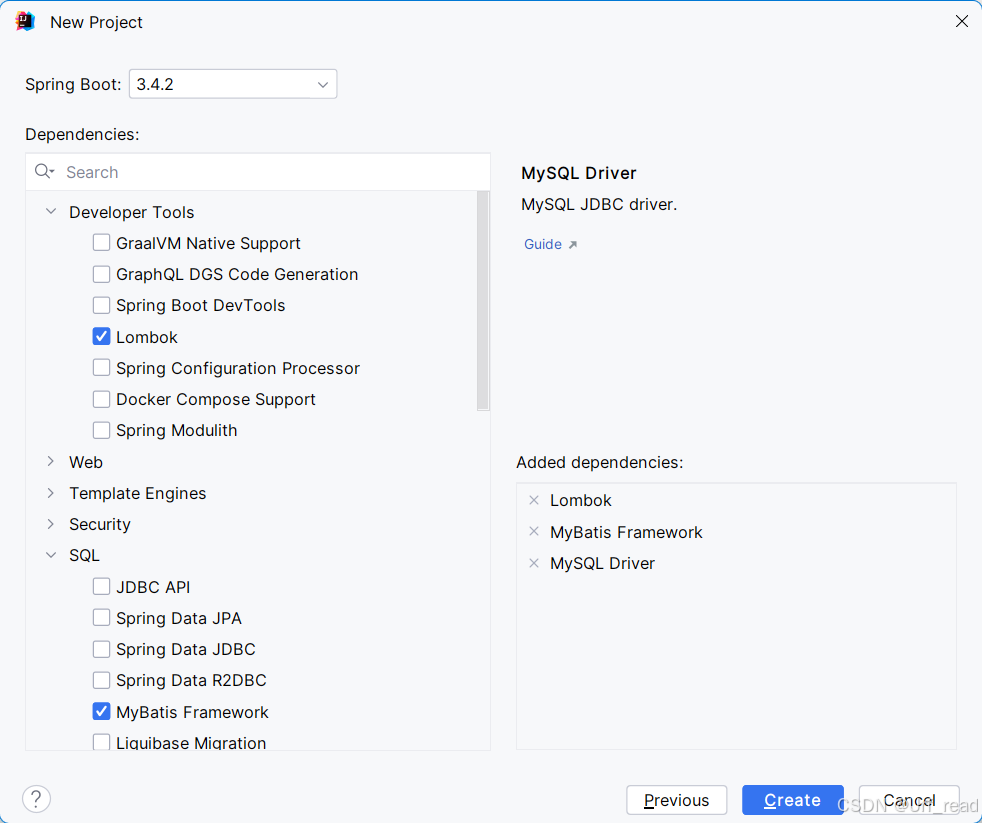

创建好之后,记得去改改mvn的配置和jdk版本
2.2 配置数据库连接
数据库的ip、端口号、数据库名以及用户名和密码,改成自己的
spring:datasource:url: jdbc:mysql://192.168.171.135:3306/mybatis_demo?serverTimezone=UTC&useSSL=falseusername: new_userpassword: your_passworddriver-class-name: com.mysql.cj.jdbc.Drivermybatis:mapper-locations: classpath:mapper/*.xmlconfiguration:map-underscore-to-camel-case: true # 下划线转驼峰 user_name userName
2.3 完善项目的架子

3. 正式开始
3.1 新增用户
在UserMapper里写一个insert接口:
package com.example.demo.mapper;import com.example.demo.domain.User;
import org.apache.ibatis.annotations.Insert;
import org.apache.ibatis.annotations.Mapper;
import org.apache.ibatis.annotations.Options;@Mapper
public interface UserMapper {@Insert("INSERT INTO user (username, email, password) VALUES (#{username}, #{email}, #{password})")@Options(useGeneratedKeys = true, keyProperty = "id")  // 自动获取数据库生成的主键IDint insertUser(User user);
}
在UserService和测试类里编写调用和测试的代码
package com.example.demo.service;import com.example.demo.domain.User;
import com.example.demo.mapper.UserMapper;
import org.springframework.beans.factory.annotation.Autowired;
import org.springframework.stereotype.Service;@Service
public class UserService {@Autowiredprivate UserMapper userMapper;public int insertUser(User user) {return userMapper.insertUser(user);}
}
package com.example.demo.unit;import com.example.demo.domain.User;
import com.example.demo.service.UserService;
import org.junit.jupiter.api.Test;
import org.springframework.beans.factory.annotation.Autowired;
import org.springframework.boot.test.context.SpringBootTest;import static org.junit.jupiter.api.Assertions.assertEquals;@SpringBootTest
class UserServiceTest {@AutowiredUserService userService;@Testvoid insertUser(){int res=userService.insertUser(User.builder().email("123@example.com").password("password").username("urfread").build());assertEquals(1, res);}
}
这里可能会遇到重复录入的问题,后续再解决。
3.2 根据邮箱查询
@Select("SELECT * FROM user where email = #{email}")
User findUserByEmail(String email);
3.4 改密码 和 删除用户
@Update("UPDATE user SET password = #{password} WHERE email = #{email}")
int updateUserPassword(String password,String email);
@Delete("DELETE FROM user WHERE email = #{email}")
int deleteUserByEmail(String email);
3.5 用xml再写一遍
``UserMapper`只保留方法定义
package com.example.demo.mapper;import com.example.demo.domain.User;
import org.apache.ibatis.annotations.Mapper;@Mapper
public interface UserMapper {int insertUser(User user);User findUserByEmail(String email);int updateUserPasswordByEmail(String password, String email);int deleteUserById(Long id);
}
<?xml version="1.0" encoding="UTF-8"?>
<!DOCTYPE mapperPUBLIC "-//mybatis.org//DTD Mapper 3.0//EN""http://mybatis.org/dtd/mybatis-3-mapper.dtd">
<mapper namespace="com.example.demo.mapper.UserMapper"><insert id="insertUser" parameterType="com.example.demo.domain.User">insert into user (email,password,username)values (#{email},#{password},#{username})</insert><update id="updateUserPasswordByEmail">update user set password = #{password} where email = #{email}</update><delete id="deleteUserById" parameterType="java.lang.Long">delete from user where id = #{id}</delete><select id="findUserByEmail" resultType="com.example.demo.domain.User">SELECT * FROM user WHERE email = #{email}</select>
</mapper>
再往后,逻辑删除、只更新非空字段、分页查询、事务等内容我都不太熟,所以都放在进阶里了。


