八. Spring Boot2 整合连接 Redis(超详细剖析)
文章目录
- 八. Spring Boot2 整合连接 Redis(超详细剖析)
- 2. 注意事项和细节
- 3. 最后:
在 springboot 中 , 整合 redis
可以通过 RedisTemplate 完成对 redis 的操作, 包括设置数据/获取数据
比如添加和读取数据
具体整合实现:
- 创建 Maven 项目:


- 在 pom.xml 文件当中导入相关的 jar 依赖。如下:

<?xml version="1.0" encoding="UTF-8"?>
<project xmlns="http://maven.apache.org/POM/4.0.0"xmlns:xsi="http://www.w3.org/2001/XMLSchema-instance"xsi:schemaLocation="http://maven.apache.org/POM/4.0.0 http://maven.apache.org/xsd/maven-4.0.0.xsd"><modelVersion>4.0.0</modelVersion><parent><groupId>org.springframework.boot</groupId><artifactId>spring-boot-starter-parent</artifactId><version>2.6.6</version><relativePath/> <!-- lookup parent from repository --></parent><groupId>com.rainbowsea</groupId><artifactId>redis_springboot</artifactId><version>1.0-SNAPSHOT</version><properties><java.version>1.8</java.version></properties><dependencies><dependency><groupId>org.springframework.boot</groupId><!--   说明:   如果这里是 spring-boot-start 就改成如下 spring-boot-start-web--><artifactId>spring-boot-starter-web</artifactId></dependency><!--        redis--><dependency><groupId>org.springframework.boot</groupId><artifactId>spring-boot-starter-data-redis</artifactId></dependency><!-- spring2.X 集成 redis 所需 common-pool--><dependency><groupId>org.apache.commons</groupId><artifactId>commons-pool2</artifactId><!--不要带版本号,防止冲突--></dependency><dependency><groupId>org.springframework.boot</groupId><artifactId>spring-boot-starter-test</artifactId><scope>test</scope></dependency><!--         json 转换的 jar 包依赖--><dependency><groupId>com.fasterxml.jackson.core</groupId><artifactId>jackson-databind</artifactId><version>2.13.2.2</version></dependency></dependencies><!--    插件--><build><plugins><plugin><groupId>org.springframework.boot</groupId><artifactId>spring-boot-maven-plugin</artifactId></plugin></plugins></build></project>
- 在 resources 目录下创建 application.properties,完成 redis 的基本配置,如下所示:

#Redis 服务器地址
spring.redis.host=192.168.76.145
#Redis 服务器连接端口
spring.redis.port=6379
#Redis 如果有密码,需要配置,  没有密码就不要写
spring.redis.password=rainbowsea
#Redis 数据库索引(默认为 0)
spring.redis.database=0
#连接超时时间(毫秒)
spring.redis.timeout=1800000
#连接池最大连接数(使用负值表示没有限制)
spring.redis.lettuce.pool.max-active=20
#最大阻塞等待时间(负数表示没限制)
spring.redis.lettuce.pool.max-wait=-1
#连接池中的最大空闲连接
spring.redis.lettuce.pool.max-idle=5
#连接池中的最小空闲连接
spring.redis.lettuce.pool.min-idle=0
- 创建/定义一个 Redis 配置类。
- 这个 Redis 配置类是对要使用 RedisTemplate bean 对象的配置,可以理解成是一个常规配置。
- 和我们以前学过的一个 JdbcTemplate 的设计理念类似。
- 如果不是配置,那么 Spring boot 会使用默认配置,这个默认配置,会出现一些问题,比如:redisTemplate 的 key 序列化等问题,所以通常我们需要配置这个。Redis 配置类.
创建:\redis_springboot\src\main\java\com\rainbowsea\redis\config\ RedisConfig.java 配置类

java">package com.rainbowsea.redis.config;import org.springframework.cache.annotation.CachingConfigurerSupport;
import org.springframework.cache.annotation.EnableCaching;
import org.springframework.context.annotation.Configuration;
import com.fasterxml.jackson.annotation.JsonAutoDetect;
import com.fasterxml.jackson.annotation.JsonTypeInfo;
import com.fasterxml.jackson.annotation.PropertyAccessor;
import com.fasterxml.jackson.databind.ObjectMapper;
import com.fasterxml.jackson.databind.jsontype.impl.LaissezFaireSubTypeValidator;
import org.springframework.cache.CacheManager;
import org.springframework.cache.annotation.CachingConfigurerSupport;
import org.springframework.cache.annotation.EnableCaching;
import org.springframework.context.annotation.Bean;
import org.springframework.context.annotation.Configuration;
import org.springframework.data.redis.cache.RedisCacheConfiguration;
import org.springframework.data.redis.cache.RedisCacheManager;
import org.springframework.data.redis.connection.RedisConnectionFactory;
import org.springframework.data.redis.core.RedisTemplate;
import org.springframework.data.redis.serializer.Jackson2JsonRedisSerializer;
import org.springframework.data.redis.serializer.RedisSerializationContext;
import org.springframework.data.redis.serializer.RedisSerializer;
import org.springframework.data.redis.serializer.StringRedisSerializer;import java.time.Duration;@EnableCaching  // 配置开启缓存
@Configuration // 定义配置类
public class RedisConfig extends CachingConfigurerSupport {@Beanpublic RedisTemplate<String, Object> redisTemplate(RedisConnectionFactory factory) {RedisTemplate<String, Object> template =new RedisTemplate<>();System.out.println("template=>" + template);RedisSerializer<String> redisSerializer =new StringRedisSerializer();Jackson2JsonRedisSerializer jackson2JsonRedisSerializer = new Jackson2JsonRedisSerializer(Object.class);ObjectMapper om = new ObjectMapper();om.setVisibility(PropertyAccessor.ALL, JsonAutoDetect.Visibility.ANY);om.activateDefaultTyping(LaissezFaireSubTypeValidator.instance, ObjectMapper.DefaultTyping.NON_FINAL, JsonTypeInfo.As.WRAPPER_ARRAY);jackson2JsonRedisSerializer.setObjectMapper(om);template.setConnectionFactory(factory);// key 序列化方式template.setKeySerializer(redisSerializer);// value 序列化template.setValueSerializer(jackson2JsonRedisSerializer);// value hashmap 序列化template.setHashValueSerializer(jackson2JsonRedisSerializer);return template;}@Beanpublic CacheManager cacheManager(RedisConnectionFactory factory) {RedisSerializer<String> redisSerializer =new StringRedisSerializer();Jackson2JsonRedisSerializer jackson2JsonRedisSerializer = new Jackson2JsonRedisSerializer(Object.class);//解决查询缓存转换异常的问题ObjectMapper om = new ObjectMapper();om.setVisibility(PropertyAccessor.ALL, JsonAutoDetect.Visibility.ANY);om.activateDefaultTyping(LaissezFaireSubTypeValidator.instance,ObjectMapper.DefaultTyping.NON_FINAL,JsonTypeInfo.As.WRAPPER_ARRAY);jackson2JsonRedisSerializer.setObjectMapper(om);// 配置序列化(解决乱码的问题),过期时间 600 秒RedisCacheConfiguration config = RedisCacheConfiguration.defaultCacheConfig().entryTtl(Duration.ofSeconds(600)).serializeKeysWith(RedisSerializationContext.SerializationPair.fromSerializer(redisSerializer)).serializeValuesWith(RedisSerializationContext.SerializationPair.fromSerializer(jackson2JsonRedisSerializer)).disableCachingNullValues();RedisCacheManager cacheManager = RedisCacheManager.builder(factory).cacheDefaults(config).build();return cacheManager;}
}- 创建 controller 访问设置/获取到 Redis 数据库当中的数据。

重点: 我们这里的
RedisTemplate模板对象,就是已经配置好了 Jedis 的连接上 Redis的一个模板,该模板提供了很多,我们操作 Redis 数据库的方法。就和我们前面学习 MySQL ,操作连接 MySQL 当中的 JdbcTemplate 模板是类似的。
如下所示:

java">package com.rainbowsea.redis.controller;import org.springframework.data.redis.core.RedisTemplate;
import org.springframework.web.bind.annotation.GetMapping;
import org.springframework.web.bind.annotation.RequestMapping;
import org.springframework.web.bind.annotation.RestController;import javax.annotation.Resource;@RestController
@RequestMapping("/redisTest")
public class RedisTestController {// 装配 RedisTemplate@Resourceprivate RedisTemplate redisTemplate;// 编写一个测试方法// 演示设置数据和获取数据@GetMapping("/t1")public String t1() {// 设置值到 redis 当中,opsForValue 是操作 string 字符串的redisTemplate.opsForValue().set("book", "天龙八部");// 从 redis 当中获取值String book = (String) redisTemplate.opsForValue().get("book");return book;}
}- 创建场景启动器。


java">package com.rainbowsea.redis;import org.springframework.boot.SpringApplication;
import org.springframework.boot.autoconfigure.SpringBootApplication;@SpringBootApplication
public class RedisSpringBootApplication {public static void main(String[] args) {SpringApplication.run(RedisSpringBootApplication.class, args);}
}- 启动程序run, 打开浏览器地址栏上输入:http://localhost:9090/redisTest/t1 。
在这里插入图片描述
**演示:如何操作 List **


java">package com.rainbowsea.redis.controller;import org.springframework.data.redis.core.RedisTemplate;
import org.springframework.web.bind.annotation.GetMapping;
import org.springframework.web.bind.annotation.RequestMapping;
import org.springframework.web.bind.annotation.RestController;import javax.annotation.Resource;
import java.util.List;@RestController
@RequestMapping("/redisTest")
public class RedisTestController {// 装配 RedisTemplate@Resourceprivate RedisTemplate redisTemplate;// 演示如何操作 list 列表@GetMapping("/t2")public String t2() {// list-存redisTemplate.opsForList().leftPush("books", "笑傲江湖");redisTemplate.opsForList().leftPush("books", "hello world");// list - 取数据List books = redisTemplate.opsForList().range("books", 0, -1);String booksList = "";for (Object book : books) {System.out.println("book->" + book.toString());booksList += book.toString();}return booksList;}// 编写一个测试方法// 演示设置数据和获取数据@GetMapping("/t1")public String t1() {// 设置值到 redis 当中,opsForValue 是操作 string 字符串的redisTemplate.opsForValue().set("book", "天龙八部");// 从 redis 当中获取值String book = (String) redisTemplate.opsForValue().get("book");return book;}
}
演示:如何操作 hash


java">
@RestController
@RequestMapping("/redisTest")
public class RedisTestController {// 装配 RedisTemplate@Resourceprivate RedisTemplate redisTemplate;@GetMapping("/t3")public String t3() {// hash - 存数据redisTemplate.opsForHash();// 操作 Zset 有序集合redisTemplate.opsForZSet();// 操作 set 集合redisTemplate.opsForSet();return null;}
2. 注意事项和细节
- 如果没有提供 RedisConfig 配置类 , springboot 会使用默认配置 也可以使用。但是会存在问题。比如 redisTemplate 模糊查找 key 数据为空。
测试:
这里我们先将 我们配置的 RedisConfig 配置类注释掉。

编写一个方法,获取所有的 key:
*,表示获取所有的 key

java">@RestController
@RequestMapping("/redisTest")
public class RedisTestController {// 装配 RedisTemplate@Resourceprivate RedisTemplate redisTemplate;// 编写一个方法,获取所有的 key@GetMapping("/t3")public String t3() {Set keys = redisTemplate.keys("*");for (Object key : keys) {System.out.println("key -->" + key.toString());}return "OK";}
}

**当我们将我们的配置的 RedisConfig 类打开,不使用 Spring Boot 默认的配置。则不会出现该空的情况。 **


Unrecognized token 'beijing': was expecting ('true', 'false' or 'null')
看报错,是 jason 转换异常,实际上是因为 redisTemplate 在做数据存储的时候会把存储的内容序列化,所以,redisTemplate 读取的时候也会反序列化,而在 redis 客户端 set 的时候并不会做序列化,因此 set 的进去的值在用 redisTemplate 读的时候就会报类 型转换异常了。
演示:
我们在 Redis 命令行客户端(不通过Java程序的方式),创建 一个 k100的字符串。
然后,我们再通过Java程序获取到该(Redis命令行客户端)所创建的 k100 字符串的数据。


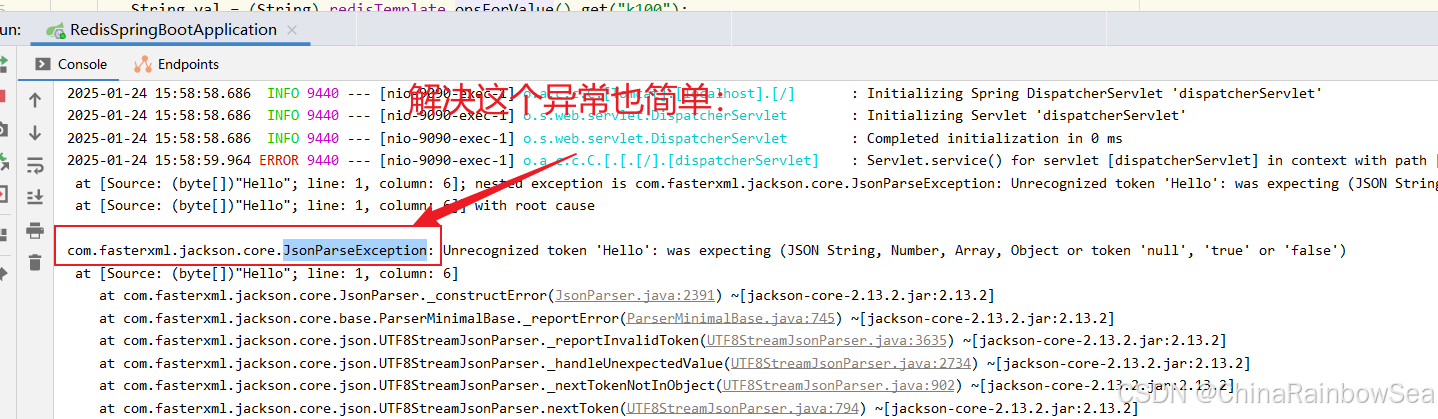
解决这个
com.fasterxml.jackson.core.JsonParseException也简单,既然我们 Resi 命令行客户端(创建的 对象信息/值)不会被序列化,那我们就不用 Redis 命令行客户端创建对象了,直接就是。我们想用Java程序当中反序化的功能:我们就用 Java程序创建对象/值,同时也用Java程序获取对象的数据。存和取都保持一致,都是在Java程序当中即可(因为Java程序创建的对象会自行序列化的)。这里就不演示了,因为我们上述的所有操作都是:Java程序连接 Redis 创建对象,也是Java程序获取数据。都是没问题的。
3. 最后:
“在这个最后的篇章中,我要表达我对每一位读者的感激之情。你们的关注和回复是我创作的动力源泉,我从你们身上吸取了无尽的灵感与勇气。我会将你们的鼓励留在心底,继续在其他的领域奋斗。感谢你们,我们总会在某个时刻再次相遇。”


