目录
习题6-4 推导LSTM网络中参数的梯度, 并分析其避免梯度消失的效果
编辑
习题6-3P 编程实现下图LSTM运行过程
1. 使用Numpy实现LSTM算子
2. 使用nn.LSTMCell实现
3. 使用nn.LSTM实现
参考链接
习题6-4 推导LSTM网络中参数的梯度, 并分析其避免梯度消失的效果
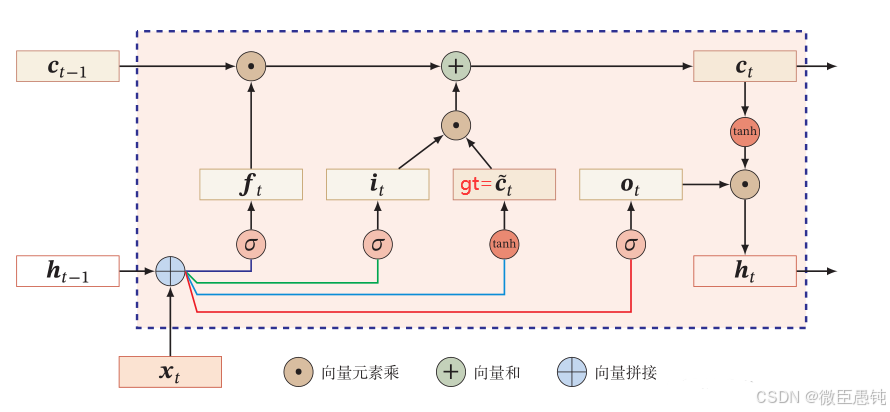
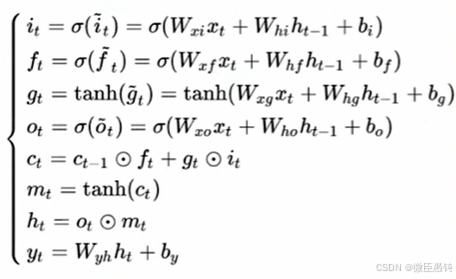
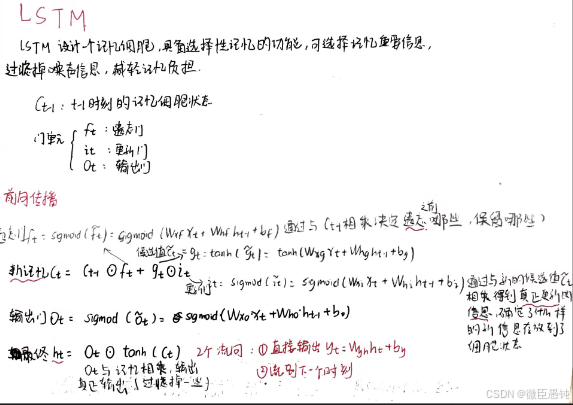
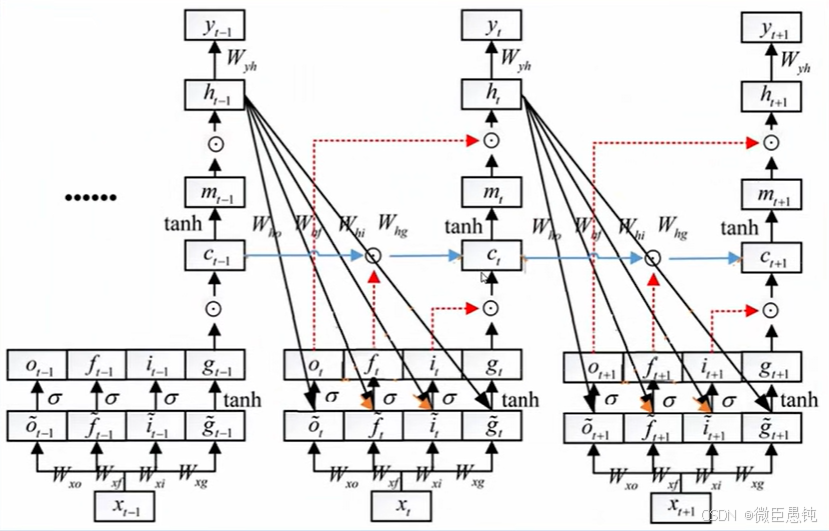
LSTM框架如下:
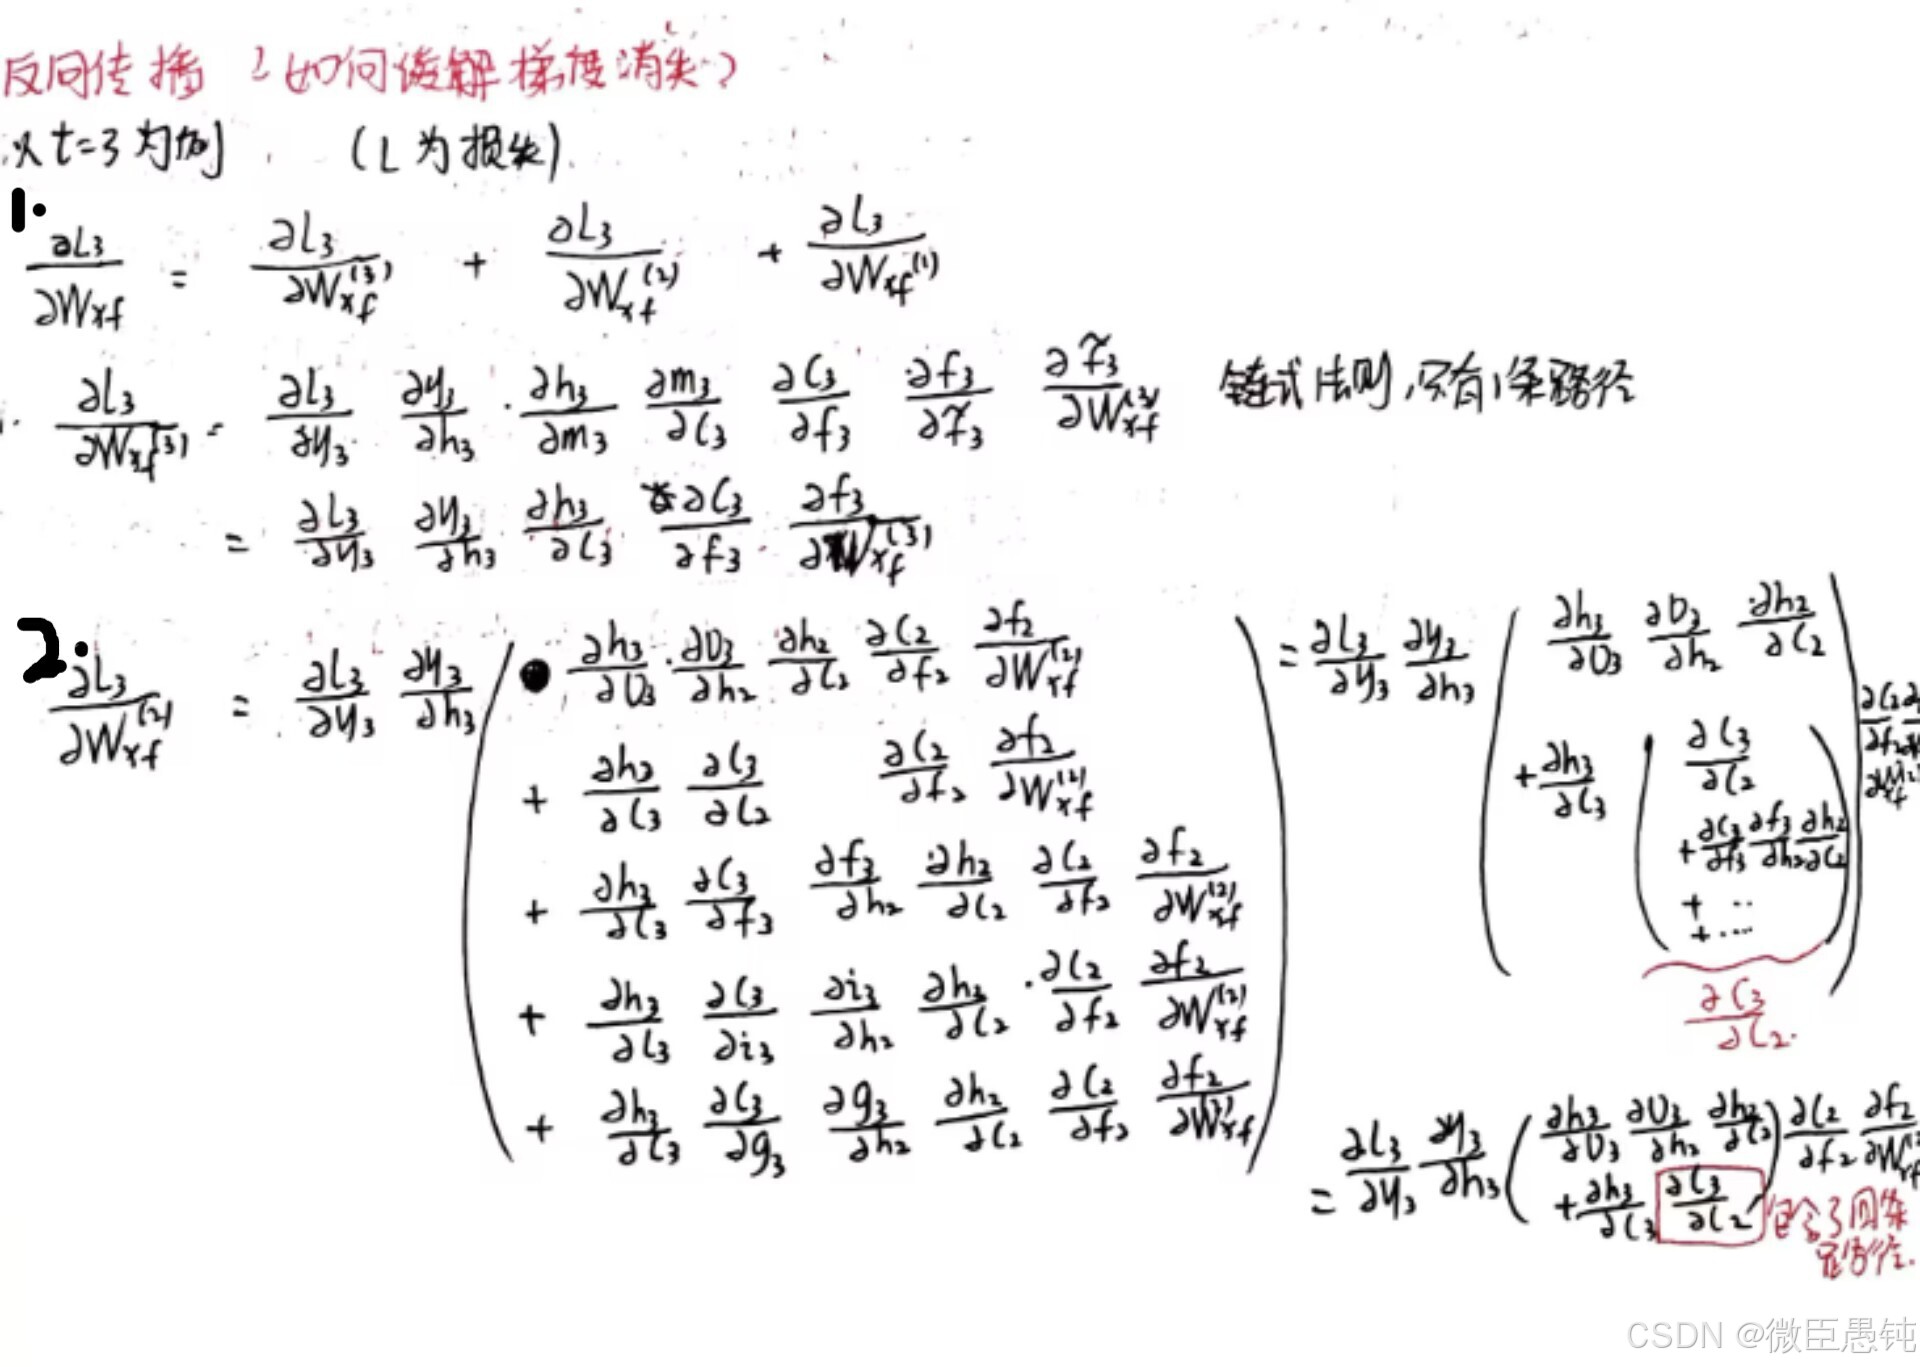
总而言之:LSTM遗忘门值可以选择在[0,1]之间,让LSTM来改善梯度消失的情况。也可以选择接近1,让遗忘门饱和,此时远距离信息梯度不消失。也可以选择接近0,此时模型是故意阻断梯度流,遗忘之前信息。
习题6-3P 编程实现下图LSTM运行过程
1. 使用Numpy实现LSTM算子
2. 使用nn.LSTMCell实现
3. 使用nn.LSTM实现
1. 使用Numpy实现LSTM算子
import numpy as np#定义激活函数
def sigmoid(x):return 1/(1+np.exp(-x))def tanh(x):return (np.exp(x)-np.exp(-x))/(np.exp(x)+np.exp(-x))#权重
input_weight=np.array([1,0,0,0])
inputgate_weight=np.array([0,100,0,-10])
forgetgate_weight=np.array([0,100,0,10])
outputgate_weight=np.array([0,0,100,-10])#输入
input=np.array([[1,0,0,1],[3,1,0,1],[2,0,0,1],[4,1,0,1],[2,0,0,1],[1,0,1,1],[3,-1,0,1],[6,1,0,1],[1,0,1,1]])y=[]   #输出
c_t=0  #内部状态for x in input:g_t=tanh(np.matmul(input_weight,x)) #候选状态i_t=np.round(sigmoid(np.matmul(inputgate_weight,x)))  #输入门after_inputgate=g_t*i_t       #候选状态经过输入门f_t=np.round(sigmoid(np.matmul(forgetgate_weight,x))) #遗忘门after_forgetgate=f_t*c_t      #内部状态经过遗忘门c_t=np.add(after_inputgate,after_forgetgate) #新的内部状态o_t=np.round(sigmoid(np.matmul(outputgate_weight,x))) #输出门after_outputgate=o_t*tanh(c_t)     #激活后新的内部状态经过输出门y.append(round(after_outputgate,2))   #输出print('输出:',y)
输出:
output:[0.0, 0.0, 0.0, 0.0, 0.0, 0.96, 0.0, 0.0, 0.76]
2. 使用nn.LSTMCell实现
import torch
import torch.nn as nn#实例化
input_size=4
hidden_size=1
cell=nn.LSTMCell(input_size=input_size,hidden_size=hidden_size)
#修改模型参数 weight_ih.shape=(4*hidden_size, input_size),weight_hh.shape=(4*hidden_size, hidden_size),
#weight_ih、weight_hh分别为输入x、隐层h分别与输入门、遗忘门、候选、输出门的权重
cell.weight_ih.data=torch.tensor([[0,100,0,-10],[0,100,0,10],[1,0,0,0],[0,0,100,-10]],dtype=torch.float32)
cell.weight_hh.data=torch.zeros(4,1)
print('cell.weight_ih.shape:',cell.weight_ih.shape)
print('cell.weight_hh.shape',cell.weight_hh.shape)
#初始化h_0,c_0
h_t=torch.zeros(1,1)
c_t=torch.zeros(1,1)
#模型输入input_0.shape=(batch,seq_len,input_size)
input_0=torch.tensor([[[1,0,0,1],[3,1,0,1],[2,0,0,1],[4,1,0,1],[2,0,0,1],[1,0,1,1],[3,-1,0,1],[6,1,0,1],[1,0,1,1]]],dtype=torch.float32)
#交换前两维顺序,方便遍历input.shape=(seq_len,batch,input_size)
input=torch.transpose(input_0,1,0)
print('input.shape:',input.shape)
output=[]
#调用
for x in input:h_t,c_t=cell(x,(h_t,c_t))output.append(np.around(h_t.item(), decimals=3))#保留3位小数
print('output:',output)
输出:
output:[0.0, 0.0, 0.0, 0.0, 0.0, 0.96, 0.0, 0.0, 0.76]
3. 使用nn.LSTM实现
#LSTM
#实例化
input_size=4
hidden_size=1
lstm=nn.LSTM(input_size=input_size,hidden_size=hidden_size,batch_first=True)
#修改模型参数
lstm.weight_ih_l0.data=torch.tensor([[0,100,0,-10],[0,100,0,10],[1,0,0,0],[0,0,100,-10]],dtype=torch.float32)
lstm.weight_hh_l0.data=torch.zeros(4,1)
#模型输入input.shape=(batch,seq_len,input_size)
input=torch.tensor([[[1,0,0,1],[3,1,0,1],[2,0,0,1],[4,1,0,1],[2,0,0,1],[1,0,1,1],[3,-1,0,1],[6,1,0,1],[1,0,1,1]]],dtype=torch.float32)
#初始化h_0,c_0
h_t=torch.zeros(1,1,1)
c_t=torch.zeros(1,1,1)
#调用
output,(h_t,c_t)=lstm(input,(h_t,c_t))
rounded_output = torch.round(output * 1000) / 1000  # 保留3位小数
print(rounded_output)
输出结果
output:[0.0, 0.0, 0.0, 0.0, 0.0, 0.96, 0.0, 0.0, 0.7672]
参考链接
LSTM参数梯度推导与实现:对抗梯度消失,
LSTM参数梯度推导与编程实现,
李宏毅机器学习笔记:RNN循环神经网络_李宏毅机器学习课程笔记-CSDN博客
HBU-NNDL 作业10:第六章课后题(LSTM | GRU)-CSDN博客


