目录
前言
1.为什么需要生命周期函数
2.开发过程中常用的生命周期函数
1.initState()
2.didChangeDependencies()
3.build()
4.didUpdateWidget()
5.setState()
6.deactivate()
7.dispose()
3.Flutter生命周期总结
1.调用顺序
2.函数调用时机以及主要作用
4.生命周期函数的验证
1.创建和销毁时期函数的验证
2.didUpdateWidget函数验证
3.didChangeDependencies函数验证
前言
在Flutter中,生命周期函数是管理StatefulWidget状态的关键机制。通过生命周期函数,我们可以控制Widget的初始化、更新和销毁过程,使得应用的状态管理和资源控制更加灵活。本文将详细介绍Flutter中的生命周期函数,帮助你更好地掌握Flutter应用的生命周期。
1.为什么需要生命周期函数
生命周期函数允许我们在Widget的创建、更新和销毁过程中执行特定操作,比如数据的初始化、网络请求、资源的释放等。尤其是在StatefulWidget中,这些函数确保了应用在不同状态下的正确行为。
2.开发过程中常用的生命周期函数
1.initState()
这个方法在State对象被插入到树中时调用,仅调用一次。
适合做初始化操作,例如初始化变量、加载数据或创建动画控制器。
Dart">@override
void initState() {super.initState();debugPrint("initState method is called!");
}
2.didChangeDependencies()
这个方法在initState()调用之后,或者当依赖的InheritedWidget发生变化时调用。
这个方法适用于需要访问依赖于上下文的情况,比如当Widget依赖于某个InheritedWidget的变化。
下面的代用于打印"didChangeDependencies method is called!"。
Dart">@override
void didChangeDependencies() {super.didChangeDependencies();debugPrint("didChangeDependencies method is called!");
}
3.build()
build函数是构建UI的核心函数。
build()在每次Widget需要重建时都会调用,包括在初次加载时、调用setState()之后。
build方法用于描述Widget在屏幕上的展示方式。这个函数会频繁调用,因此确保代码尽量简洁高效。
在这段代码中,build()函数返回一个带有计数器的页面,并包含一个按钮用于增加计数器。
Dart">@override
Widget build(BuildContext context) {debugPrint("build method is called!");return Scaffold(appBar: AppBar(backgroundColor: Theme.of(context).colorScheme.inversePrimary,title: Text(widget.title),),body: Center(child: Column(mainAxisAlignment: MainAxisAlignment.center,children: <Widget>[const Text('You have pushed the button this many times:',),Text('$_counter',style: Theme.of(context).textTheme.headlineMedium,),ElevatedButton(onPressed: (){// 跳转逻辑}, child: const Text('跳转下一个页面')),],),),floatingActionButton: FloatingActionButton(onPressed: _incrementCounter,tooltip: 'Increment',child: const Icon(Icons.add),),);
}
4.didUpdateWidget()
调用时机:当父Widget重新构建,并将新的Widget传递给子Widget时调用。
作用:适合在父Widget属性变化时执行相应操作,比如更新状态或重新初始化数据。
在下面代码中,它打印"didUpdateWidget method is called!",用于展示父级属性更新时的情况。
Dart">@override
void didUpdateWidget(covariant MyHomePage oldWidget) {super.didUpdateWidget(oldWidget);debugPrint("didUpdateWidget method is called!");
}
5.setState()
调用时机:在状态变化时,通过手动调用setState()来触发。
作用:通知Flutter框架状态已改变,触发build()方法重新构建Widget。注意避免频繁调用setState()以减少性能开销。
Dart">@override
void didUpdateWidget(covariant MyHomePage oldWidget) {super.didUpdateWidget(oldWidget);debugPrint("didUpdateWidget method is called!");
}
6.deactivate()
调用时机:当State对象被临时从树中移除时调用。
作用:可以在这里执行一些临时清理工作。通常不需要在这里执行大量操作,使用场景不多。
在这段代码中,deactivate()打印了"deactivate method is called!"。
Dart">@override
void deactivate() {super.deactivate();debugPrint("deactivate method is called!");
}
7.dispose()
调用时机:当State对象永久性地从树中移除时调用。
作用:适合释放资源,比如取消订阅、关闭控制器等。
在代码中,dispose()打印了"dispose method is called!",用来展示页面被销毁时的情况。
Dart">@override
void dispose() {super.dispose();debugPrint("dispose method is called!");
}3.Flutter生命周期总结
1.调用顺序
通过上面的介绍,可以看到StatefulWidget的生命周期有以下顺序:
- 创建阶段:initState() → didChangeDependencies()
- 更新阶段:build() → didUpdateWidget() → setState()
- 销毁阶段:deactivate() → dispose()
每个函数在Widget生命周期中扮演着不同的角色:
2.函数调用时机以及主要作用
| 函数 | 调用时机 | 主要作用 |
| initState() | Widget被插入树中时调用一次 | 初始化操作,仅调用一次 |
| didChangeDependencies() | initState()后及依赖变化时调用 | 处理依赖项 |
| build() | 每次Widget需要重建时 | 构建UI并返回Widget |
| didUpdateWidget() | 父Widget重新构建并传入新参数时调用 | 处理父组件属性变化 |
| setState() | 状态变化时手动调用 | 更新Widget并触发重建 |
| deactivate() | State从树中暂时移除时 | 清理临时状态(不常用) |
| dispose() | State永久移除时 | 释放资源,避免内存泄漏 |
4.生命周期函数的验证
1.创建和销毁时期函数的验证
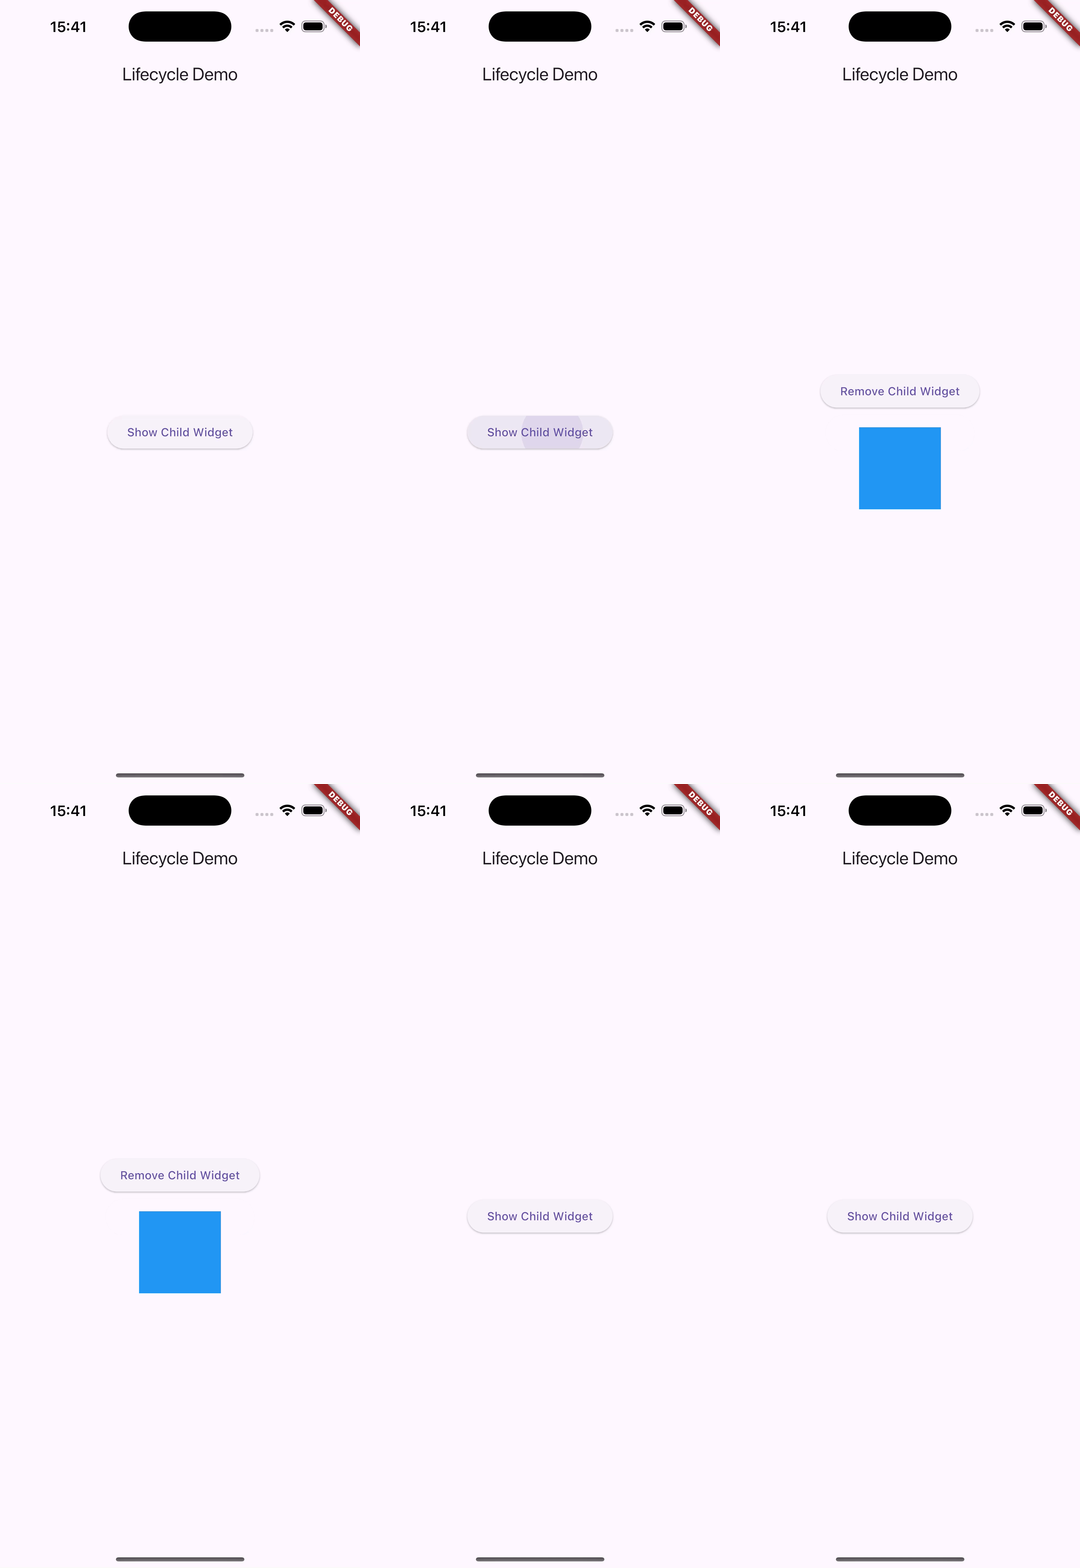
我们以下面的代码为例,当app启动的之后:

图1.示例demo
控制台打印信息如下:

图2.进入页面控制台打印日志
当我们点击remove按钮之后,移除子控件,控制台的打印信息如下:

图3.点击Remove之后控制台打印日志
2.didUpdateWidget函数验证
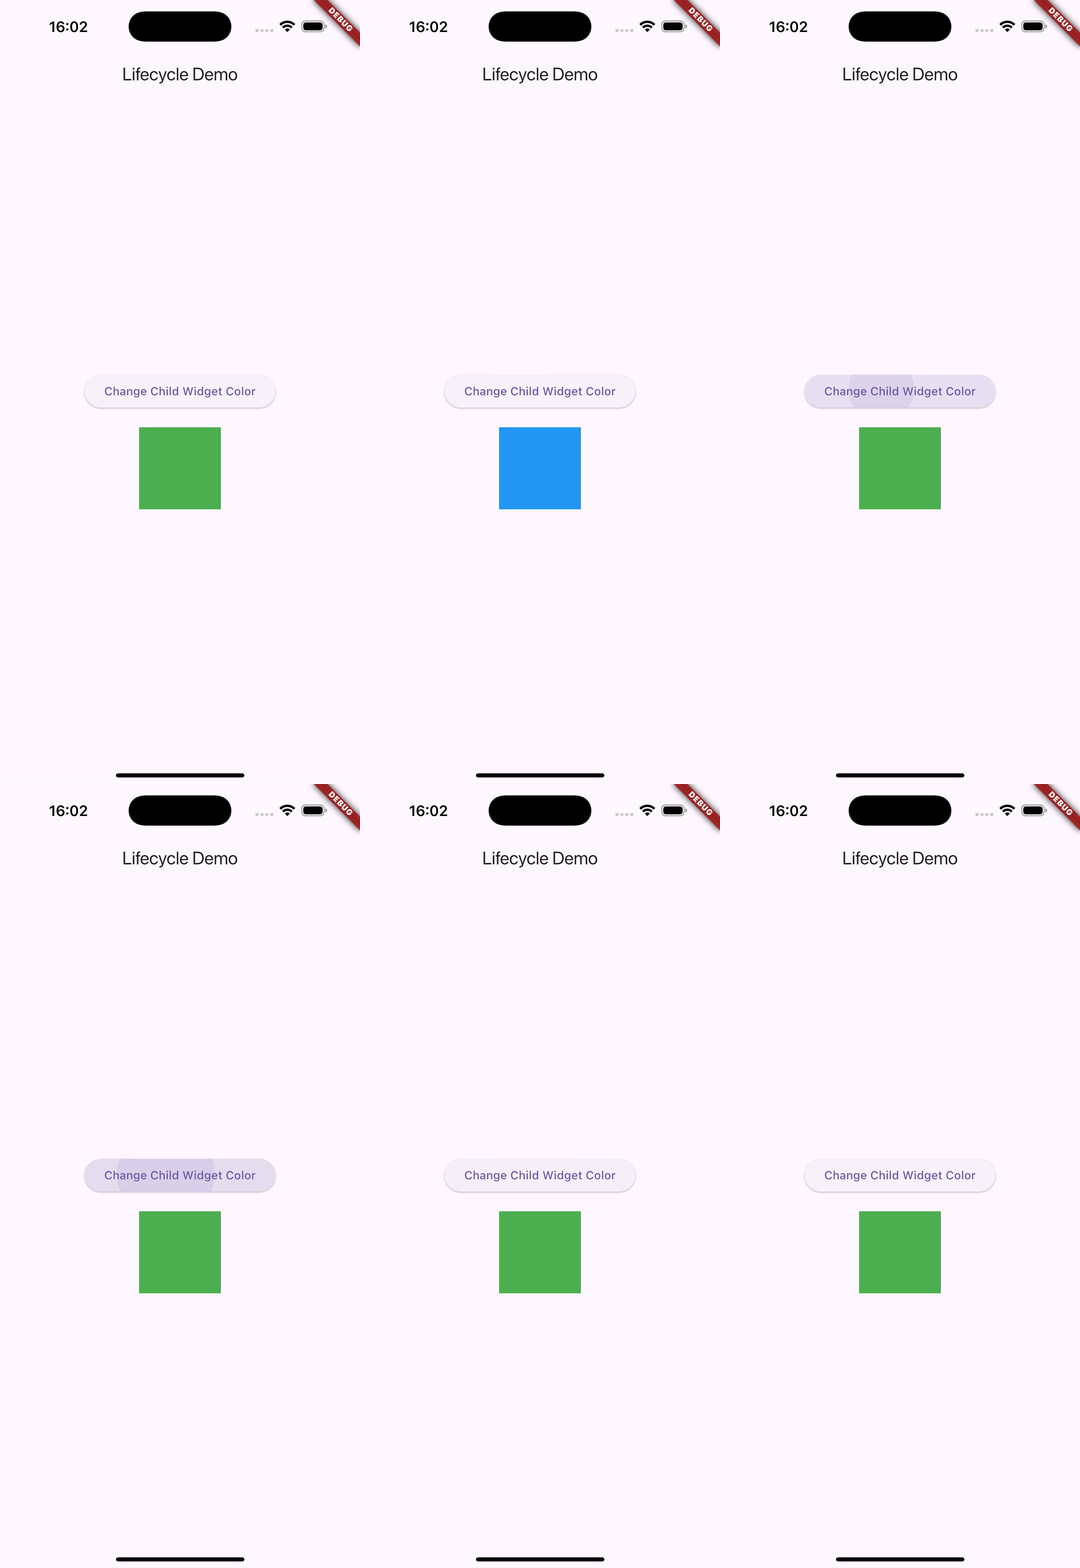
要确保 didUpdateWidget 函数被调用,需要使 StatefulWidget 的 父级组件对其属性进行更新,而不是使用 UniqueKey 强制组件重新创建。我们修改下代码,点击按钮之后,修改子组件的颜色,通过更新 ChildWidget 的 color 属性触发 didUpdateWidget 的调用。
效果图如下:

图4.didUpdateWidge函数验证demo
然后我们在didUpdateWidge中打印该函数,点击按钮之后,控制台打印信息如下:

图5.控制台打印日志
完整代码如下:
Dart">import 'package:flutter/material.dart';class LifecycleDemoApp extends StatelessWidget {const LifecycleDemoApp({super.key});@overrideWidget build(BuildContext context) {return MaterialApp(home: const ParentPage(),);}
}class ParentPage extends StatefulWidget {const ParentPage({super.key});@overrideState<ParentPage> createState() => _ParentPageState();
}class _ParentPageState extends State<ParentPage> {Color childColor = Colors.blue;@overrideWidget build(BuildContext context) {return Scaffold(appBar: AppBar(title: const Text('Lifecycle Demo')),body: Center(child: Column(mainAxisAlignment: MainAxisAlignment.center,children: [ElevatedButton(onPressed: () {setState(() {// Toggle color between blue and greenchildColor = childColor == Colors.blue ? Colors.green : Colors.blue;});},child: const Text('Change Child Widget Color'),),const SizedBox(height: 20),ChildWidget(color: childColor, // Pass updated color),],),));}
}class ChildWidget extends StatefulWidget {final Color color;const ChildWidget({super.key, required this.color});@overrideState<ChildWidget> createState() => _ChildWidgetState();
}class _ChildWidgetState extends State<ChildWidget> {@overridevoid initState() {super.initState();debugPrint("ChildWidget: initState");}@overridevoid didChangeDependencies() {super.didChangeDependencies();debugPrint("ChildWidget: didChangeDependencies");}@overridevoid didUpdateWidget(covariant ChildWidget oldWidget) {super.didUpdateWidget(oldWidget);debugPrint("ChildWidget: didUpdateWidget - Old color: ${oldWidget.color}, New color: ${widget.color}");}@overrideWidget build(BuildContext context) {debugPrint("ChildWidget: build");return Container(height: 100,width: 100,color: widget.color,);}@overridevoid deactivate() {super.deactivate();debugPrint("ChildWidget: deactivate");}@overridevoid dispose() {super.dispose();debugPrint("ChildWidget: dispose");}
}
3.didChangeDependencies函数验证
要验证 didChangeDependencies 的调用时机,我们需要引入一个可以触发依赖改变的机制,比如 InheritedWidget 或 MediaQuery 的更新。以下是代码的更新版本,通过使用 InheritedWidget 来测试 didChangeDependencies 的调用。
我们修改下代码:
Dart">import 'package:flutter/material.dart';void main() {runApp(const LifecycleDemoApp());
}class LifecycleDemoApp extends StatelessWidget {const LifecycleDemoApp({super.key});@overrideWidget build(BuildContext context) {return InheritedColorProvider(color: Colors.blue,child: MaterialApp(home: const ParentPage(),),);}
}class InheritedColorProvider extends InheritedWidget {final Color color;const InheritedColorProvider({super.key,required this.color,required Widget child,}) : super(child: child);static InheritedColorProvider? of(BuildContext context) {return context.dependOnInheritedWidgetOfExactType<InheritedColorProvider>();}@overridebool updateShouldNotify(InheritedColorProvider oldWidget) {return color != oldWidget.color;}
}class ParentPage extends StatefulWidget {const ParentPage({super.key});@overrideState<ParentPage> createState() => _ParentPageState();
}class _ParentPageState extends State<ParentPage> {Color appColor = Colors.blue;void _changeColor() {setState(() {appColor = appColor == Colors.blue ? Colors.green : Colors.blue;});}@overrideWidget build(BuildContext context) {return InheritedColorProvider(color: appColor,child: Scaffold(appBar: AppBar(title: const Text('Lifecycle Demo'),),body: Column(mainAxisAlignment: MainAxisAlignment.center,children: [ElevatedButton(onPressed: _changeColor,child: const Text('Change Inherited Color'),),const SizedBox(height: 20),const ChildWidget(),],),),);}
}class ChildWidget extends StatefulWidget {const ChildWidget({super.key});@overrideState<ChildWidget> createState() => _ChildWidgetState();
}class _ChildWidgetState extends State<ChildWidget> {@overridevoid initState() {super.initState();debugPrint("ChildWidget: initState");}@overridevoid didChangeDependencies() {super.didChangeDependencies();debugPrint("ChildWidget: didChangeDependencies - Color: ${InheritedColorProvider.of(context)?.color}");}@overrideWidget build(BuildContext context) {debugPrint("ChildWidget: build");final color = InheritedColorProvider.of(context)?.color ?? Colors.transparent;return Container(height: 100,width: 100,color: color,);}@overridevoid didUpdateWidget(covariant ChildWidget oldWidget) {super.didUpdateWidget(oldWidget);debugPrint("ChildWidget: didUpdateWidget");}@overridevoid deactivate() {super.deactivate();debugPrint("ChildWidget: deactivate");}@overridevoid dispose() {super.dispose();debugPrint("ChildWidget: dispose");}
}
在修改之后的代码中,我们做了以下工作:
1.引入了InheritedWidget
InheritedColorProvider 是一个简单的 InheritedWidget,用来共享 color 属性。
2.修改了更新逻辑
在 ParentPage 中,通过修改 InheritedColorProvider 的 color 属性触发 didChangeDependencies。
3.验证依赖关系
子组件 ChildWidget 会依赖 InheritedColorProvider,当 color 发生变化时,didChangeDependencies 会被调用。
当我们点击修改按钮之后,控制台打印日志如下:
ChildWidget: initState
ChildWidget: didChangeDependencies - Color: Color(0xff0000ff)
ChildWidget: build
ChildWidget: didChangeDependencies - Color: Color(0xff00ff00)
ChildWidget: build


