- 关于FastAPI
- FastAPI 是一个现代、快速(高性能)的 Python Web 框架,用于构建基于标准 Python 类型提示的 API。它以简洁、直观和高效的方式提供工具,特别适合开发现代 web 服务和后端应用程序。
- 问题:_pad() got an unexpected keyword argument ‘padding_side’
- 解决:降级 transformers,
pip install transformers==4.34.0,同时更改相关包版本以实现适配,pip install accelerate==0.25.0,pip install huggingface_hub==0.16.4
- 问题:报错500
- 服务器防火墙问题,只能在指定端口访问
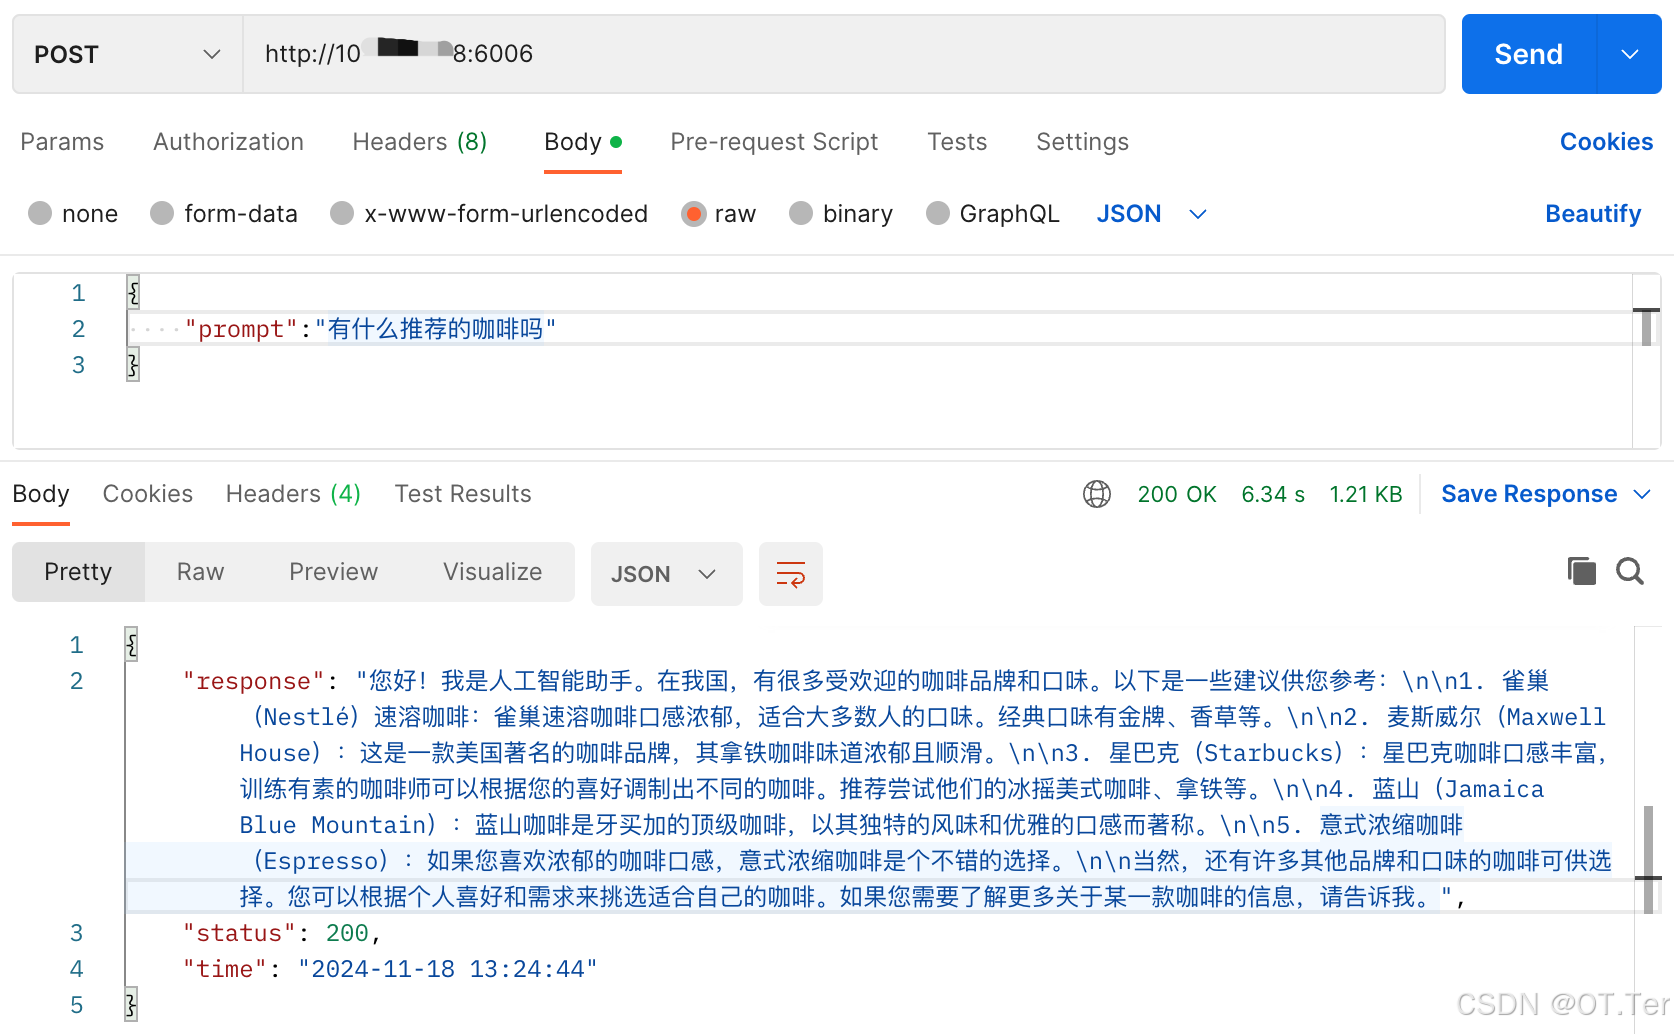
- post请求的参数通过
request body传递,需要以 application/json 的方式 ,请求body体 - 以postman测试为例:
Body中选择“raw”,则对应的Headers中的“Content-Type”是“application/json”,参数形式是{"content":"有什么推荐的咖啡吗"}

- 代码实现
- fastapi_demo.py(运行开启服务)
- post.py(服务测试)
from fastapi import FastAPI, Request, HTTPException
from transformers import AutoTokenizer, AutoModelForCausalLM, GenerationConfig
import uvicorn
import json
import datetime
import torch
import loggingprint(f"CUDA 是否可用: {torch.cuda.is_available()}")
print(f"当前 CUDA 版本: {torch.version.cuda}")
print(f"当前可用 CUDA 设备数量: {torch.cuda.device_count()}")
DEVICE = "cuda"
DEVICE_ID = "0"
CUDA_DEVICE = f"{DEVICE}:{DEVICE_ID}" if DEVICE_ID else DEVICE
def torch_gc():if torch.cuda.is_available(): with torch.cuda.device(CUDA_DEVICE): torch.cuda.empty_cache() torch.cuda.ipc_collect()
def bulid_input(prompt, history=[], system_message=None):system_format = 'system\n\n{content}\n'user_format = 'user\n\n{content}\n'assistant_format = 'assistant\n\n{content}\n'prompt_str = ''if system_message:prompt_str += system_format.format(content=system_message)for item in history:if item['role'] == 'user':prompt_str += user_format.format(content=item['content'])else:prompt_str += assistant_format.format(content=item['content'])prompt_str += user_format.format(content=prompt)return prompt_str
app = FastAPI()
@app.get("/")
async def read_root():return {"message": "Welcome to the API. Please use POST method to interact with the model."}@app.get('/favicon.ico')
async def favicon():return {'status': 'ok'}
@app.post("/")
async def create_item(request: Request):try:json_post_raw = await request.json()json_post = json.dumps(json_post_raw)json_post_list = json.loads(json_post)prompt = json_post_list.get('prompt')if not prompt:raise HTTPException(status_code=400, detail="提示词不能为空")history = json_post_list.get('history', [])system_message = json_post_list.get('system_message')logging.info(f"收到请求: prompt={prompt}, history={history}, system_message={system_message}")input_str = bulid_input(prompt=prompt, history=history, system_message=system_message)try:input_ids = process_input(input_str).to(CUDA_DEVICE)except Exception as e:logging.error(f"Tokenizer 错误: {str(e)}")raise HTTPException(status_code=500, detail=f"Tokenizer 处理失败: {str(e)}")try:generated_ids = model.generate(input_ids=input_ids, max_new_tokens=1024, do_sample=True,top_p=0.5, temperature=0.95, repetition_penalty=1.1)except Exception as e:logging.error(f"模型生成错误: {str(e)}")raise HTTPException(status_code=500, detail=f"模型生成失败: {str(e)}")outputs = generated_ids.tolist()[0][len(input_ids[0]):]response = tokenizer.decode(outputs)response = response.strip().replace('assistant\n\n', '').strip() now = datetime.datetime.now() time = now.strftime("%Y-%m-%d %H:%M:%S") answer = {"response": response,"status": 200,"time": time}log = "[" + time + "] " + '", prompt:"' + prompt + '", response:"' + repr(response) + '"'print(log) torch_gc() return answer except json.JSONDecodeError:raise HTTPException(status_code=400, detail="无效的 JSON 格式")except Exception as e:logging.error(f"处理请求时发生错误: {str(e)}")raise HTTPException(status_code=500, detail=str(e))
if __name__ == '__main__':gpu_count = torch.cuda.device_count()if int(DEVICE_ID) >= gpu_count:raise ValueError(f"指定的DEVICE_ID ({DEVICE_ID}) 无效。系统只有 {gpu_count} 个GPU设备(0-{gpu_count-1})")torch.cuda.set_device(int(DEVICE_ID))model_name_or_path = '/data/user23262833/MemoryStrategy/ChatGLM-Finetuning/chatglm3-6b(需要填写你的模型位置所在路径)'tokenizer = AutoTokenizer.from_pretrained(model_name_or_path,use_fast=False,trust_remote_code=True,padding_side='left' )def process_input(text):inputs = tokenizer.encode(text, return_tensors='pt')return inputs if torch.is_tensor(inputs) else torch.tensor([inputs])model = AutoModelForCausalLM.from_pretrained(model_name_or_path, device_map={"": int(DEVICE_ID)}, torch_dtype=torch.float16)uvicorn.run(app, host='需填写你的本地或者服务器ip', port=6006, workers=1)
import requests
import jsondef get_completion(prompt):try:headers = {'Content-Type': 'application/json'}data = {"prompt": prompt}response = requests.post(url='需填写你的本地或者服务器ip:6006', headers=headers, data=json.dumps(data))response.raise_for_status()print("Response content:", response.text)return response.json()['response']except requests.exceptions.RequestException as e:print(f"请求错误: {e}")return Noneexcept json.JSONDecodeError as e:print(f"JSON解析错误: {e}")return Noneexcept KeyError as e:print(f"响应中缺少 'response' 键: {e}")return None
response = get_completion('你好')
if response is not None:print(response)
- 测试结果

- 参考博文:https://blog.csdn.net/qq_34717531/article/details/142092636?spm=1001.2101.3001.6661.1&utm_medium=distribute.pc_relevant_t0.none-task-blog-2%7Edefault%7EOPENSEARCH%7EPaidSort-1-142092636-blog-139909949.235%5Ev43%5Epc_blog_bottom_relevance_base5&depth_1-utm_source=distribute.pc_relevant_t0.none-task-blog-2%7Edefault%7EOPENSEARCH%7EPaidSort-1-142092636-blog-139909949.235%5Ev43%5Epc_blog_bottom_relevance_base5&utm_relevant_index=1


