一,画板的介绍
画板(Paint Board)是一个提供用户绘图、涂鸦和创作的平台。现代数字画板通常是由软件程序实现的,具有多种功能。以下是画板的一些主要特征和功能:
1. 基本绘图工具
- 画笔和铅笔:用户可以选择不同的笔刷或笔触类型,调整粗细和透明度来进行绘图。
- 橡皮擦:用于删除不需要的部分。
2. 颜色选择
- 颜色调色板:提供多种颜色供用户选择,用户还可以自定义颜色。
- 渐变和填充:一些画板支持渐变效果和区域填充,让绘图更为丰富。
3. 形状工具
- 用户可以绘制几何图形,如矩形、圆形、线条和多边形等。
4. 图层管理
- 支持图层的概念,允许用户在不同的层上绘图,便于编辑和修改,不同图层之间相互独立。
5. 撤销和重做
- 提供撤销和重做功能,让用户可以轻松修正错误,支持多步撤销。
6. 区域选择和填充
- 一些画板允许用户选择特定区域进行删除或填充颜色,增加创作灵活性。
7. 导入和导出
- 用户可以导入图片进行编辑,也能把创作的作品导出为多种格式(如PNG、JPEG等)。
8. 界面友好
- 设计简洁直观,适合各年龄段用户,提供易于使用的工具和菜单。
9. 额外功能
- 一些高级画板软件还有滤镜、效果、文本工具和图形编辑功能。
10. 可用于多种平台
- 画板可以按需在桌面(Windows、macOS)、在线(浏览器应用)、手机(iOS、Android)等多种平台上使用。
应用场景
- 艺术创作:帮助艺术家进行草图、插画和数字绘画。
- 设计:用于界面设计、图标设计和做原型。
- 教育:教师和学生使用画板进行图形化表达和创作。
- 娱乐:简单的涂鸦游戏或创作活动。
总结
现代画板提供了丰富的功能,能够满足不同用户的创作需求,从简单的涂鸦到复杂的艺术作品,都是一个很好的创作工具。无论是专业艺术家还是业余爱好者,都可以在画板中找到乐趣和表达的可能性。
二,第一步实现画板
我们可以使用 Python 的 Tkinter 库来创建一个简单的画板应用程序。下面的示例代码展示了如何构建一个基本的画板,用户可以通过鼠标在画布上绘画。
python">import tkinter as tk class PaintApp: def __init__(self, root): self.root = root self.root.title("简单画板") # 创建画布 self.canvas = tk.Canvas(root, bg="white", width=800, height=600) self.canvas.pack() # 初始化绘图相关的变量 self.last_x = None self.last_y = None # 绑定鼠标事件 self.canvas.bind("<Motion>", self.paint) self.canvas.bind("<Button-1>", self.set_last_pos) self.canvas.bind("<ButtonRelease-1>", self.reset) def set_last_pos(self, event): # 设置最后的坐标 self.last_x = event.x self.last_y = event.y def paint(self, event): # 在画布上绘制线条 if self.last_x and self.last_y: x, y = event.x, event.y self.canvas.create_line(self.last_x, self.last_y, x, y, fill="black", width=2) self.last_x = x self.last_y = y def reset(self, event): # 重置最后的坐标 self.last_x = None self.last_y = None if __name__ == "__main__": root = tk.Tk() app = PaintApp(root) root.mainloop()运行结果:

代码解释
- 创建主窗口:使用
tk.Tk()创建主窗口,并设置标题。 - 创建画布:使用
tk.Canvas创建一个白色背景的画布,设置宽度和高度。 - 绘图逻辑:
- 通过绑定
<Motion>事件,跟踪鼠标移动,并在画布上绘制线条。 - 使用
set_last_pos方法记录鼠标按下的位置,reset方法在鼠标释放时重置位置。 - 当鼠标移动时,
paint方法绘制线条。
- 通过绑定
- 启动应用:在主程序中创建 Tkinter 主循环。
三,优化画板
接下来是一个更完整的 Tkinter 画板代码,包含删除(清空画布)、撤销(恢复上一步操作)、橡皮擦(擦除绘图)和涂颜色的功能。
python">import tkinter as tk
from tkinter import colorchooser  class PaintApp:  def __init__(self, root):  self.root = root  self.root.title("功能完善的画板")  # 创建画布  self.canvas = tk.Canvas(root, bg="white", width=800, height=600)  self.canvas.pack()  # 初始化绘图相关的变量  self.last_x = None  self.last_y = None  self.color = "black"  self.stroke_width = 2  self.lines = []  # 绑定鼠标事件  self.canvas.bind("<Motion>", self.paint)  self.canvas.bind("<Button-1>", self.set_last_pos)  self.canvas.bind("<ButtonRelease-1>", self.reset)  # 创建工具栏  self.toolbar = tk.Frame(root)  self.toolbar.pack(fill=tk.X)  # 选择颜色按钮  self.color_button = tk.Button(self.toolbar, text="选择颜色", command=self.choose_color)  self.color_button.pack(side=tk.LEFT)  # 橡皮擦按钮  self.eraser_button = tk.Button(self.toolbar, text="橡皮擦", command=self.use_eraser)  self.eraser_button.pack(side=tk.LEFT)  # 撤销按钮  self.undo_button = tk.Button(self.toolbar, text="撤销", command=self.undo)  self.undo_button.pack(side=tk.LEFT)  # 清空画布按钮  self.clear_button = tk.Button(self.toolbar, text="清空画布", command=self.clear_canvas)  self.clear_button.pack(side=tk.LEFT)  def set_last_pos(self, event):  # 设置最后的坐标  self.last_x = event.x  self.last_y = event.y  def paint(self, event):  # 在画布上绘制线条  if self.last_x and self.last_y:  x, y = event.x, event.y  line = self.canvas.create_line(self.last_x, self.last_y, x, y, fill=self.color, width=self.stroke_width)  self.lines.append(line)  self.last_x = x  self.last_y = y  def reset(self, event):  # 重置最后的坐标  self.last_x = None  self.last_y = None  def choose_color(self):  # 选择颜色的函数  color = colorchooser.askcolor()[1]  if color:  self.color = color  def use_eraser(self):  # 切换到橡皮擦模式  self.color = "white"  def undo(self):  # 撤销最后一步操作  if self.lines:  line = self.lines.pop()  self.canvas.delete(line)  def clear_canvas(self):  # 清空画布  self.canvas.delete("all")  self.lines.clear()  if __name__ == "__main__":  root = tk.Tk()  app = PaintApp(root)  root.mainloop()
功能解释
- 选择颜色:使用
colorchooser让用户选择颜色,创建一个新的颜色变量来存储所选颜色。 - 橡皮擦:将当前绘图颜色设置为白色,以模拟橡皮擦的效果。
- 撤销:通过
self.lines列表保存每一条线,撤销时从列表中删除最后一条线。 - 清空画布:使用
self.canvas.delete("all")清空画布,并清空存储的线条列表。
四,添加选择区域的功能
下面是更新后的画板应用程序,这个版本添加了选择区域的功能,使用户可以选择区域并对其进行涂色或删除操作。工具栏也已经移动到窗口的顶部。
python">import tkinter as tk
from tkinter import colorchooser class PaintApp: def __init__(self, root): self.root = root self.root.title("功能完善的画板") # 创建画布 self.canvas = tk.Canvas(root, bg="white", width=800, height=600) self.canvas.pack() # 初始化绘图相关的变量 self.last_x = None self.last_y = None self.color = "black" self.stroke_width = 2 self.lines = [] self.rect_id = None self.start_x = None self.start_y = None # 绑定鼠标事件 self.canvas.bind("<Motion>", self.paint) self.canvas.bind("<Button-1>", self.set_last_pos) self.canvas.bind("<ButtonRelease-1>", self.reset) self.canvas.bind("<Button-3>", self.start_select) # 右键开始选择区域 self.canvas.bind("<B3-Motion>", self.draw_rectangle) # 右键拖动选择区域 self.canvas.bind("<ButtonRelease-3>", self.end_select) # 右键释放结束选择 # 创建工具栏 self.toolbar = tk.Frame(root) self.toolbar.pack(fill=tk.X) # 选择颜色按钮 self.color_button = tk.Button(self.toolbar, text="选择颜色", command=self.choose_color) self.color_button.pack(side=tk.LEFT) # 橡皮擦按钮 self.eraser_button = tk.Button(self.toolbar, text="橡皮擦", command=self.use_eraser) self.eraser_button.pack(side=tk.LEFT) # 撤销按钮 self.undo_button = tk.Button(self.toolbar, text="撤销", command=self.undo) self.undo_button.pack(side=tk.LEFT) # 清空画布按钮 self.clear_button = tk.Button(self.toolbar, text="清空画布", command=self.clear_canvas) self.clear_button.pack(side=tk.LEFT) # 区域删除按钮 self.delete_area_button = tk.Button(self.toolbar, text="区域删除", command=self.delete_selected_area) self.delete_area_button.pack(side=tk.LEFT) # 区域填充按钮 self.fill_area_button = tk.Button(self.toolbar, text="区域填充", command=self.fill_selected_area) self.fill_area_button.pack(side=tk.LEFT) def set_last_pos(self, event): # 设置最后的坐标 self.last_x = event.x self.last_y = event.y def paint(self, event): # 在画布上绘制线条 if self.last_x and self.last_y: x, y = event.x, event.y line = self.canvas.create_line(self.last_x, self.last_y, x, y, fill=self.color, width=self.stroke_width) self.lines.append(line) self.last_x = x self.last_y = y def reset(self, event): # 重置最后的坐标 self.last_x = None self.last_y = None def choose_color(self): # 选择颜色的函数 color = colorchooser.askcolor()[1] if color: self.color = color def use_eraser(self): # 切换到橡皮擦模式 self.color = "white" def undo(self): # 撤销最后一步操作 if self.lines: line = self.lines.pop() self.canvas.delete(line) def clear_canvas(self): # 清空画布 self.canvas.delete("all") self.lines.clear() def start_select(self, event): # 开始选择区域 self.start_x = event.x self.start_y = event.y self.rect_id = self.canvas.create_rectangle(self.start_x, self.start_y, self.start_x, self.start_y, outline='blue', dash=(2, 2)) def draw_rectangle(self, event): # 绘制选择区域 self.canvas.coords(self.rect_id, self.start_x, self.start_y, event.x, event.y) def end_select(self, event): # 结束选择区域 pass def delete_selected_area(self): # 删除选择区域内的内容 if self.rect_id: x1, y1, x2, y2 = self.canvas.coords(self.rect_id) self.canvas.delete(self.rect_id) self.rect_id = None self.clear_area(x1, y1, x2, y2) def clear_area(self, x1, y1, x2, y2): # 清除选择区域内的内容 overlapping_items = self.canvas.find_overlapping(x1, y1, x2, y2) for item in overlapping_items: self.canvas.delete(item) def fill_selected_area(self): # 在选择区域内涂色 if self.rect_id: x1, y1, x2, y2 = self.canvas.coords(self.rect_id) self.canvas.delete(self.rect_id) self.rect_id = None self.canvas.create_rectangle(x1, y1, x2, y2, fill=self.color, outline='') if __name__ == "__main__": root = tk.Tk() app = PaintApp(root) root.mainloop() 
功能说明
- 选择区域:用户可以使用鼠标的右键点击并拖动来选择一个矩形区域,该区域用虚线框表示。
- 区域删除:点击“区域删除”按钮后,将删除所选区域内的所有绘制内容。
- 区域填充:点击“区域填充”按钮后,将用当前选择的颜色填充所选区域。
- 工具栏:包含颜色选择、橡皮擦、撤销、清空画布、区域删除和区域填充等功能。
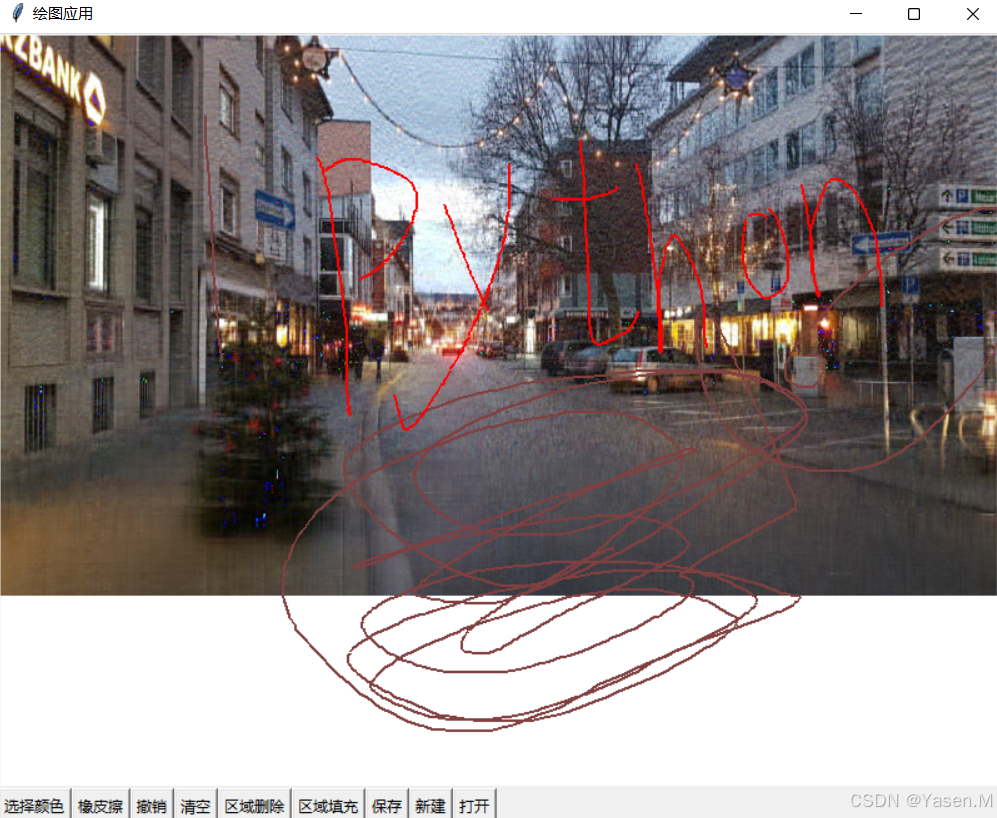
五,最完整的画板
完整版可以把页面保存下来,还可以打开图片,可以各种画图
python">import tkinter as tk
from tkinter import colorchooser, filedialog
from PIL import Image, ImageDraw, ImageTk  class PaintApp:  def __init__(self, root):  self.root = root  self.root.title("绘图应用")  self.canvas = tk.Canvas(root, bg="white", width=800, height=600)  self.canvas.pack(expand=tk.YES, fill=tk.BOTH)  self.toolbar = tk.Frame(root)  self.toolbar.pack(side=tk.TOP, fill=tk.X)  self.color = "black"  self.stroke_width = 2  self.lines = []  self.last_x = None  self.last_y = None  self.rect_id = None  self.image = Image.new("RGB", (800, 600), "white")  self.draw = ImageDraw.Draw(self.image)  # 工具栏按钮  self.color_button = tk.Button(self.toolbar, text="选择颜色", command=self.choose_color)  self.color_button.pack(side=tk.LEFT)  self.eraser_button = tk.Button(self.toolbar, text="橡皮擦", command=self.use_eraser)  self.eraser_button.pack(side=tk.LEFT)  self.undo_button = tk.Button(self.toolbar, text="撤销", command=self.undo)  self.undo_button.pack(side=tk.LEFT)  self.clear_button = tk.Button(self.toolbar, text="清空", command=self.clear_canvas)  self.clear_button.pack(side=tk.LEFT)  self.delete_area_button = tk.Button(self.toolbar, text="区域删除", command=self.delete_selected_area)  self.delete_area_button.pack(side=tk.LEFT)  self.fill_area_button = tk.Button(self.toolbar, text="区域填充", command=self.fill_selected_area)  self.fill_area_button.pack(side=tk.LEFT)  self.save_button = tk.Button(self.toolbar, text="保存", command=self.save_image)  self.save_button.pack(side=tk.LEFT)  self.new_button = tk.Button(self.toolbar, text="新建", command=self.new_canvas)  self.new_button.pack(side=tk.LEFT)  self.open_button = tk.Button(self.toolbar, text="打开", command=self.open_image)  self.open_button.pack(side=tk.LEFT)  # 事件绑定  self.canvas.bind("<Button-1>", self.set_last_pos)  self.canvas.bind("<B1-Motion>", self.paint)  self.canvas.bind("<ButtonRelease-1>", self.reset)  self.canvas.bind("<Button-3>", self.start_select)  self.canvas.bind("<B3-Motion>", self.draw_rectangle)  self.canvas.bind("<ButtonRelease-3>", self.end_select)  self.start_x = self.start_y = None  def set_last_pos(self, event):  self.last_x = event.x  self.last_y = event.y  def paint(self, event):  if self.last_x is not None and self.last_y is not None:  x, y = event.x, event.y  line = self.canvas.create_line(self.last_x, self.last_y, x, y, fill=self.color, width=self.stroke_width)  self.lines.append(line)  self.draw.line((self.last_x, self.last_y, x, y), fill=self.color, width=self.stroke_width)  self.last_x = x  self.last_y = y  def reset(self, event):  self.last_x = None  self.last_y = None  def choose_color(self):  color = colorchooser.askcolor()[1]  if color:  self.color = color  def use_eraser(self):  self.color = "white"  def undo(self):  if self.lines:  line = self.lines.pop()  self.canvas.delete(line)  def clear_canvas(self):  self.canvas.delete("all")  self.lines.clear()  self.image = Image.new("RGB", (800, 600), "white")  self.draw = ImageDraw.Draw(self.image)  def start_select(self, event):  self.start_x = event.x  self.start_y = event.y  if self.rect_id is not None:  self.canvas.delete(self.rect_id)  self.rect_id = self.canvas.create_rectangle(self.start_x, self.start_y, self.start_x, self.start_y, outline='blue', dash=(2, 2))  def draw_rectangle(self, event):  self.canvas.coords(self.rect_id, self.start_x, self.start_y, event.x, event.y)  def end_select(self, event):  pass  def delete_selected_area(self):  if self.rect_id:  x1, y1, x2, y2 = self.canvas.coords(self.rect_id)  self.canvas.delete(self.rect_id)  self.rect_id = None  self.clear_area(x1, y1, x2, y2)  def clear_area(self, x1, y1, x2, y2):  overlapping_items = self.canvas.find_overlapping(x1, y1, x2, y2)  for item in overlapping_items:  self.canvas.delete(item)  def fill_selected_area(self):  if self.rect_id:  x1, y1, x2, y2 = self.canvas.coords(self.rect_id)  self.canvas.delete(self.rect_id)  self.rect_id = None  self.canvas.create_rectangle(x1, y1, x2, y2, fill=self.color, outline='')  self.draw.rectangle([x1, y1, x2, y2], fill=self.color)  def save_image(self):  # 创建一个与画布相同大小的图像  x = self.canvas.winfo_width()  y = self.canvas.winfo_height()  self.image = Image.new("RGB", (x, y), "white")  self.draw = ImageDraw.Draw(self.image)  # 将画布上的所有图形绘制到Pillow图像上  self.canvas.update()  self.canvas.postscript(file="temp_canvas.eps")  # 导出为EPS文件  img = Image.open("temp_canvas.eps")  # 用Pillow读取EPS文件  # 获取保存路径  file_path = filedialog.asksaveasfilename(defaultextension=".png", filetypes=[("PNG files", "*.png"), ("JPEG files", "*.jpg"), ("All files", "*.*")])  if file_path:  img.save(file_path)  # 保存为用户选择的路径  # 清理临时文件  import os  if os.path.exists("temp_canvas.eps"):  os.remove("temp_canvas.eps")  def new_canvas(self):  self.clear_canvas()  def open_image(self):  file_path = filedialog.askopenfilename(filetypes=[("PNG files", "*.png"), ("JPEG files", "*.jpg"), ("All files", "*.*")])  if file_path:  self.clear_canvas()  img = Image.open(file_path)  self.image = img.convert("RGB")  self.draw = ImageDraw.Draw(self.image)  self.tk_image = self.image_to_tk(self.image)  self.canvas.create_image(0, 0, anchor=tk.NW, image=self.tk_image)  def image_to_tk(self, image):  # Convert PIL image to PhotoImage  image.thumbnail((800, 600))  # Resize image to fit canvas  return ImageTk.PhotoImage(image)  if __name__ == "__main__":  root = tk.Tk()  app = PaintApp(root)  root.mainloop()