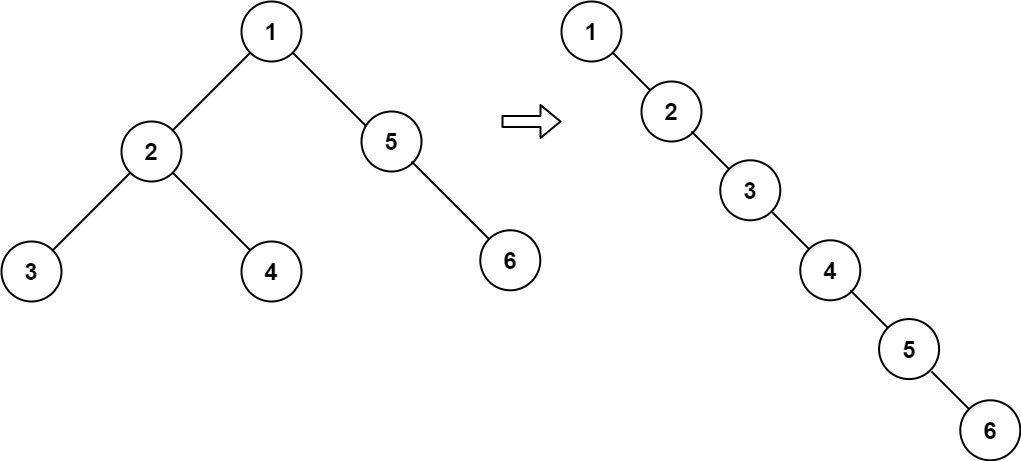
实现一个如图的时间段选择器
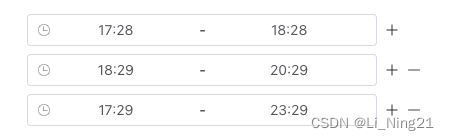
- 处理好时间回显逻辑,组件内[‘’,‘’],后端数据[{startTime:‘’,endTime:‘’}]
- 处理好加和减的显示逻辑
<template><div><div v-for="(item, index) in currentChoose" :key="index" class="flex justify-center items-center" :class="index ? 'mt-2': ''"><el-time-pickerv-model="currentChoose[index]"v-bind="_options":disabled="_options.disabled"@change="handleChange(item, index)"/><div class="flex ml-2 w-2" v-if="!_options.disabled"><el-icon @click="plusTime(item, index)"><Plus /></el-icon><el-icon class="ml-2" v-if="index" @click="minusTime(item, index)"><Minus /></el-icon></div></div></div>
</template><script>
export default {name: "multipletimepicker",
};
</script><script setup>
import { ref, computed, watch } from "vue";
import _ from "lodash";const emits = defineEmits(["update:modelValue"
]);const props = defineProps({disabled: {//禁用type: Boolean,default: false,},options: {type: Object,default: () => {},},modelValue: {type: [Array, Object],default: () => ([]),},
});// 设置option默认值,如果传入自定义的配置则合并option配置项
const _options = computed(() => {const option = {'value-format': 'HH:mm','format':"HH:mm",'is-range': true};option.disabled = props.disabled;return Object.assign(option, props.options);
});const currentChoose = ref([]);const created = () => {if (!props.modelValue) {return []}if (props.modelValue instanceof Array) {if (props.modelValue.length) {currentChoose.value = props.modelValue.map(item => {return [item.startTime, item.endTime]})} else {currentChoose.value = [['', '']]}} else {console.log('时间选择插件,非数组格式')}
}const handleChange = () => {handleDataEmits()
}const minusTime = (item, index) => {if (index === 0) {return;}currentChoose.value.splice(index, 1);handleDataEmits()
}const plusTime = (item, index) => {currentChoose.value.splice(index + 1, 0, [])handleDataEmits()
}// 统一处理数据回显
const handleDataEmits = () => {if (currentChoose.value && currentChoose.value.length) {// 将数组处理成后端数据格式,并触发父组件的model更新const arrFilter = currentChoose.value.filter(item => item)if (!arrFilter.length) {emits('update:modelValue', [{startTime: "", endTime: ""}])return}const arr = arrFilter.map(i => {return {startTime: i[0],endTime: i[1]}})emits('update:modelValue', arr)return arr}emits('update:modelValue', [{startTime: "", endTime: ""}])
}// 数据第一次进入,返显数据
watch(()=>props.modelValue, (val) => {created();
}, { immediate: true })
</script>