简介 用于对 Spring Boot 应用的管理和监控。可以用来监控服务是否健康、是否在线、以及一些jvm数据等等 Spring Boot Admin 分为服务端(spring-boot-admin-server)和客户端(spring-boot-admin-client),服务端和客户端之间采用 http 通讯方式实现数据交互;单体项目中需要整合 spring-boot-admin-client 才能让应用被监控 在 SpringCloud 项目中,spring-boot-admin-server 是直接从注册中心抓取应用信息,不需要每个微服务应用整合 spring-boot-admin-client 就可以实现应用的管理和监控 单体项目 服务端 引入spring-boot-admin服务端依赖 < dependency> < groupId> </ groupId> < artifactId> </ artifactId> </ dependency> < dependency> < groupId> </ groupId> < artifactId> </ artifactId> < version> </ version> </ dependency> < dependency> < groupId> </ groupId> < artifactId> </ artifactId> </ dependency> 启动类上开启admin@EnableAdminServer java">@SpringBootApplication
@EnableAdminServer
public class MonitorApplication { public static void main ( String [ ] args) { SpringApplication . run ( MonitorApplication . class , args) ; }
}
security安全防护配置 java">package org. demo. monitor. config ; import de. codecentric. boot. admin. server. config. AdminServerProperties ;
import org. springframework. context. annotation. Configuration ;
import org. springframework. security. config. annotation. web. builders. HttpSecurity ;
import org. springframework. security. config. annotation. web. configuration. WebSecurityConfigurerAdapter ;
import org. springframework. security. web. authentication. SavedRequestAwareAuthenticationSuccessHandler ;
import org. springframework. security. web. csrf. CookieCsrfTokenRepository ;
@Configuration
public class SecuritySecureConfig extends WebSecurityConfigurerAdapter { private final String adminContextPath; public SecuritySecureConfig ( AdminServerProperties adminServerProperties) { this . adminContextPath = adminServerProperties. getContextPath ( ) ; } @Override protected void configure ( HttpSecurity http) throws Exception { SavedRequestAwareAuthenticationSuccessHandler successHandler = new SavedRequestAwareAuthenticationSuccessHandler ( ) ; successHandler. setTargetUrlParameter ( "redirectTo" ) ; successHandler. setDefaultTargetUrl ( adminContextPath + "/" ) ; http. authorizeRequests ( ) . antMatchers ( adminContextPath + "/assets/**" ) . permitAll ( ) . antMatchers ( adminContextPath + "/login" , "/css/**" , "/js/**" , "/image/*" ) . permitAll ( ) . anyRequest ( ) . authenticated ( ) . and ( ) . formLogin ( ) . loginPage ( adminContextPath + "/login" ) . successHandler ( successHandler) . and ( ) . logout ( ) . logoutUrl ( adminContextPath + "/logout" ) . and ( ) . httpBasic ( ) . and ( ) . csrf ( ) . csrfTokenRepository ( CookieCsrfTokenRepository . withHttpOnlyFalse ( ) ) . ignoringAntMatchers ( "/instances" , "/actuator/**" ) ; } }
yml配置 server : port : 9111
spring : boot : admin : ui : title : 服务监控中心client : instance : metadata : tags : environment : localprobed-endpoints : health, env, metrics, httptrace: trace, threaddump: dump, jolokia, info, logfile, refresh, flyway, liquibase, heapdump, loggers, auditeventsmonitor : default-timeout : 20000 security : user : name : adminpassword : admin
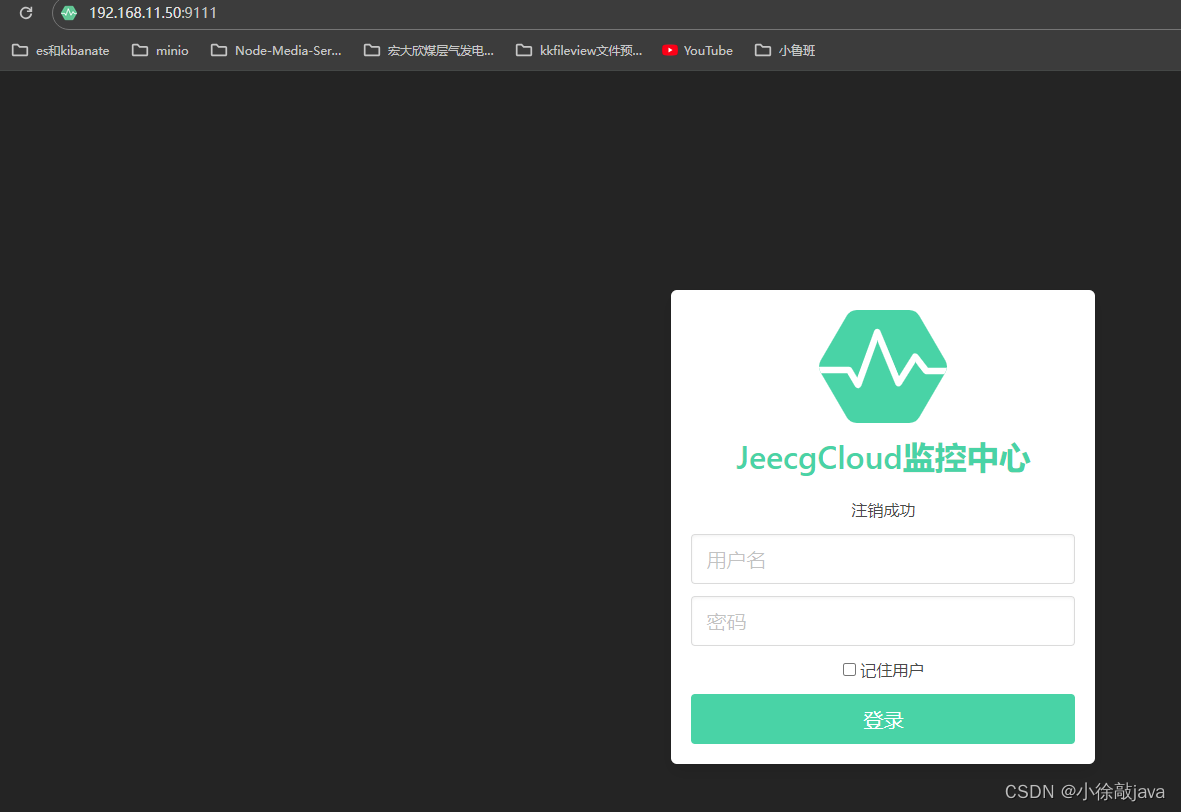
management : trace : http : enabled : true endpoints : web : exposure : include : "*" endpoint : health : show-details : always访问 192.168.11.50:9111 项目启动如下
自定义服务状态变化后,提醒功能 java">import de. codecentric. boot. admin. server. domain. entities. Instance ;
import de. codecentric. boot. admin. server. domain. entities. InstanceRepository ;
import de. codecentric. boot. admin. server. domain. events. InstanceEvent ;
import de. codecentric. boot. admin. server. notify. AbstractStatusChangeNotifier ;
import org. springframework. stereotype. Component ;
import reactor. core. publisher. Mono ;
import java . text. SimpleDateFormat ;
import java . util. Date ;
import java . util. Map ; @Component
public class WarnNotifier extends AbstractStatusChangeNotifier { public WarnNotifier ( InstanceRepository repository) { super ( repository) ; } @Override protected Mono < Void > doNotify ( InstanceEvent event, Instance instance) { String serviceName = instance. getRegistration ( ) . getName ( ) ; String serviceUrl = instance. getRegistration ( ) . getServiceUrl ( ) ; String status = instance. getStatusInfo ( ) . getStatus ( ) ; Map < String , Object > = instance. getStatusInfo ( ) . getDetails ( ) ; Date date = new Date ( ) ; SimpleDateFormat simpleDateFormat = new SimpleDateFormat ( "yyyy-MM-dd HH:mm:ss" ) ; String format = simpleDateFormat. format ( date) ; StringBuilder str = new StringBuilder ( ) ; str. append ( "服务名:【" + serviceName + "】 \r\n" ) ; str. append ( "服务状态:【" + status + "】 \r\n" ) ; str. append ( "地址:【" + serviceUrl + "】\r\n" ) ; str. append ( "时间:" + format + "\r\n" ) ; return Mono . fromRunnable ( ( ) -> { } ) ; }
} 客户端pom.xml < dependency> < groupId> </ groupId> < artifactId> </ artifactId> < version> </ version> </ dependency> < dependency> < groupId> </ groupId> < artifactId> </ artifactId> </ dependency> yml配置 server : port : 9222 spring : application : name : clientboot : admin : client : url : http: //localhost: 9111 username : admin password : admin instance : prefer-ip : true
management :
trace : http : enabled : true endpoints : web : exposure : include : "*" endpoint : health : show-details : alwayslogfile : external-file : ./logs/client- info.log 微服务项目 添加依赖 <?xml version="1.0" encoding="UTF-8"?>
< projectxmlns = " http://maven.apache.org/POM/4.0.0" xmlns: xsi= " http://www.w3.org/2001/XMLSchema-instance" xsi: schemaLocation= " http://maven.apache.org/POM/4.0.0 http://maven.apache.org/xsd/maven-4.0.0.xsd" > < parent> < artifactId> </ artifactId> < groupId> </ groupId> < version> </ version> </ parent> < modelVersion> </ modelVersion> < artifactId> </ artifactId> < dependencies> < dependency> < groupId> </ groupId> < artifactId> </ artifactId> </ dependency> < dependency> < groupId> </ groupId> < artifactId> </ artifactId> < version> </ version> </ dependency> < dependency> < groupId> </ groupId> < artifactId> </ artifactId> </ dependency> < dependency> < groupId> </ groupId> < artifactId> </ artifactId> </ dependency> < dependency> < groupId> </ groupId> < artifactId> </ artifactId> < exclusions> < exclusion> < groupId> </ groupId> < artifactId> </ artifactId> </ exclusion> </ exclusions> </ dependency> < dependency> < groupId> </ groupId> < artifactId> </ artifactId> </ dependency> </ dependencies> < build> < plugins> < plugin> < groupId> </ groupId> < artifactId> </ artifactId> </ plugin> </ plugins> < resources> < resource> < directory> </ directory> < filtering> </ filtering> </ resource> </ resources> </ build> </ project> yml配置 server : port : 9111
spring : boot : admin : ui : title : 服务监控中心client : instance : metadata : tags : environment : localsecurity : user : name : "admin" password : "admin" application : name : jeecg- monitorcloud : nacos : discovery : server-addr : @config.server- addr@password : nacosusername : nacosmetadata :
user.name : ${ spring.security.user.name} user.password : ${ spring.security.user.password}
management : trace : http : enabled : true endpoints : web : exposure : include : "*" endpoint : health : show-details : always
客户端 客户端不用引spring-boot-admin-starter-clien依赖,springbootadmin会去服务列表里找 如果客户端服务有配置context-path路径,则需添加yml配置 spring : cloud : nacos : discovery : metadata : management : context-path : ${ server.servlet.context- path} /actuator
注意:如果安装的springbootadmin服务的和客户端不在一个局域网,需要设置客户端注册到nacos的IP地址,springbootadmin才能通过实际ip地址找到客户端 spring : cloud : nacos : config : server-addr : @config.server- addr@group : @config.group@namespace : @config.namespace@username : @config.username@password : @config.password@discovery : metadata : management : context-path : ${ server.servlet.context- path} /actuatorserver-addr : ${ spring.cloud.nacos.config.server- addr} group : @config.group@namespace : @config.namespace@username : @config.username@password : @config.password@ip : 192.168.11.50
如果需要查看日记,就需要每一个客户端都需要设置读取各自日记的文件名字
management : endpoint : logfile : external-file : ./logs/client- info.log


![[实例] Unity Shader 利用顶点着色器模拟简单水波](https://img-blog.csdnimg.cn/direct/6c6ee226723640bc90779997afc13754.gif)