Jammy@Jetson Orin - Tensorflow & Keras Get Started: 000 setup for tutorial
- 1. 源由
- 2. 搭建环境
- 2.1 安装IDE环境
- 2.2 安装numpy
- 2.3 安装keras
- 2.4 安装JAX
- 2.5 安装tensorflow
- 2.6 安装PyTorch
- 2.7 安装nbdiff
- 3. 测试DEMO
- 3.1 numpy版本兼容问题
- 3.2 karas API - model.compile问题
- 3.3 karas API - model.predict问题
- 4. 总结
- 5. 参考资料
1. 源由
凡事开头难!入门搭建环境难!
这里就从最基本的环境搭建和大家共一起勉!
2. 搭建环境
2.1 安装IDE环境
- jupyterlab环境
$ pip install jupyterlab
$ jupyter lab
- jupyternotebook环境
$ pip install notebook
$ jupyter notebook
注:推荐使用jupyterlab。
2.2 安装numpy
$ pip install -U numpy  //升级到最新版本$ python
Python 3.10.12 (main, Nov 20 2023, 15:14:05) [GCC 11.4.0] on linux
Type "help", "copyright", "credits" or "license" for more information.
>>> import numpy
>>> numpy.__version__
'1.26.4'
>>>注:升级到指定版本可以使用命令pip install numpy==1.24.3
keras_46">2.3 安装keras
$ pip install --upgrade keras$ python
Python 3.10.12 (main, Nov 20 2023, 15:14:05) [GCC 11.4.0] on linux
Type "help", "copyright", "credits" or "license" for more information.
>>> import keras
>>> keras.__version__
'3.3.2'
>>>
2.4 安装JAX
- CPU-only (Linux/macOS/Windows)
$ pip install -U "jax[cpu]"
- GPU (NVIDIA, CUDA 12, x86_64)
$ pip install -U "jax[cuda12_pip]" -f https://storage.googleapis.com/jax-releases/jax_cuda_releases.html
注:更多关于JAX的硬件版本信息,详见:Installing JAX
tensorflow_77">2.5 安装tensorflow
$ pip install tensorflow$ python
Python 3.10.12 (main, Nov 20 2023, 15:14:05) [GCC 11.4.0] on linux
Type "help", "copyright", "credits" or "license" for more information.
>>> import tensorflow as tf
>>> tf.__version__
'2.16.1'
>>> tf.__path__
['/home/daniel/.local/lib/python3.10/site-packages/keras/api/_v2', '/home/daniel/.local/lib/python3.10/site-packages/keras/_tf_keras', '/home/daniel/.local/lib/python3.10/site-packages/tensorflow', '/home/daniel/.local/lib/python3.10/site-packages/tensorflow/_api/v2']
>>>
2.6 安装PyTorch
具体安装版本因硬件差异,命令不同,详见:Install pytorch
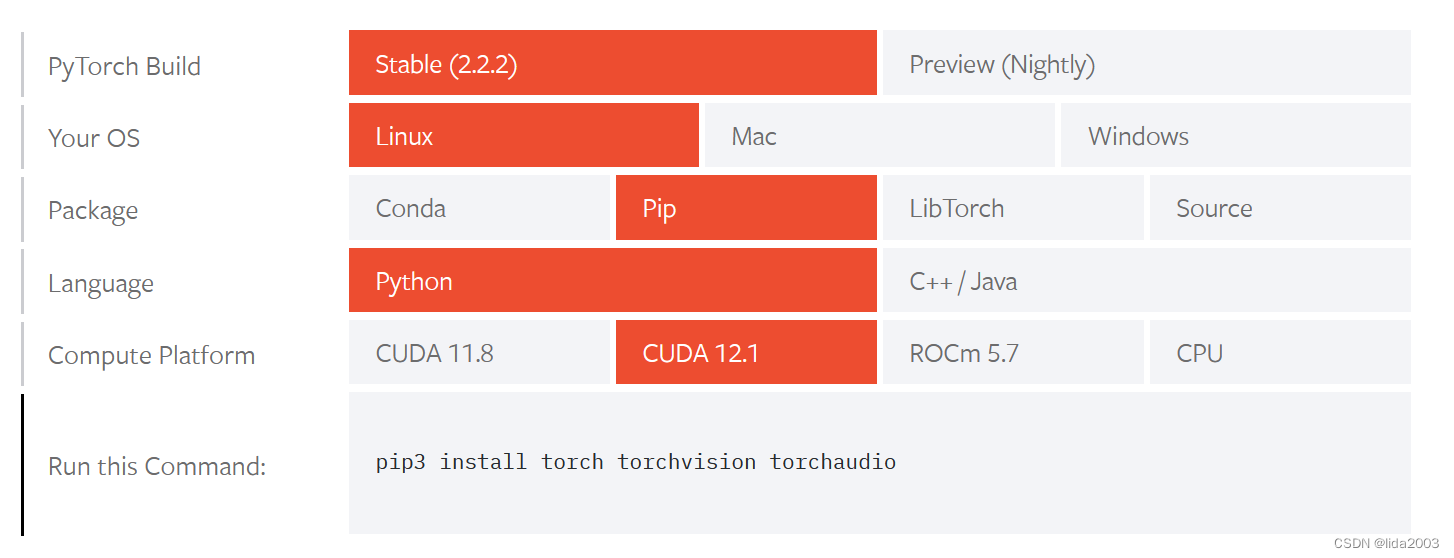 因为,笔者这里环境是Jetson Orin,所以选择了上面的配置版本:
$ pip install torch torchvision torchaudio
2.7 安装nbdiff
鉴于.ipynb文件会包含最后一次执行的输出信息,不像通常代码diff那样可以看的很清楚,这里需要安装一个类似diff的命令。
$ pip install nbdime$ nbdiff --help
usage: nbdiff [-h] [--version] [--config] [--log-level {DEBUG,INFO,WARN,ERROR,CRITICAL}] [-s] [-o] [-a] [-m] [-i] [-d] [--color-words] [--no-color] [--no-git] [--no-use-diff] [--out OUT][base] [remote] [paths ...]Compute the difference between two Jupyter notebooks.positional arguments:base                  the base notebook filename OR base git-revision.remote                the remote modified notebook filename OR remote git-revision.paths                 filter diffs for git-revisions based on pathoptions:-h, --help            show this help message and exit--version             show program's version number and exit--config              list the valid config keys and their current effective values--log-level {DEBUG,INFO,WARN,ERROR,CRITICAL}set the log level by name.--color-words         whether to pass the --color-words flag to any internal calls to git diff--no-color            prevent use of ANSI color code escapes for text output--no-git              prevent use of git for formatting diff/merge text output--no-use-diff         prevent use of diff/diff3 for formatting diff/merge text output--out OUT             if supplied, the diff is written to this file. Otherwise it is printed to the terminal.ignorables:Set which parts of the notebook (not) to process.-s, --sources, -S, --ignore-sourcesprocess/ignore sources.-o, --outputs, -O, --ignore-outputsprocess/ignore outputs.-a, --attachments, -A, --ignore-attachmentsprocess/ignore attachments.-m, --metadata, -M, --ignore-metadataprocess/ignore metadata.-i, --id, -I, --ignore-idprocess/ignore identifiers.-d, --details, -D, --ignore-detailsprocess/ignore details not covered by other options.
3. 测试DEMO
学习是一个过程,是一种大学生应该掌握的技能。手把手教那是在学校,真正的学习是不断的自我学习和提高,这种螺旋式学习技能将会受益一辈子!
即使很好的搭建了环境,代码依然会出现问题!
001_Keras-Linear-Regression
$ git log -n 2
commit 84b7f5ee7c80d9faecf79af96f8a677f47c44f0d (HEAD -> main, origin/main, origin/HEAD)
Author: Daniel Li <lida_mail@163.com>
Date:   Tue Apr 23 16:49:42 2024 +0800Fix Keras-Linear-Regression demo code issue with Jammy(Jetson Orin)commit 8c89b4c2b9e9df2e854f280ce19ed3010c7ac2fc
Author: Daniel Li <lida_mail@163.com>
Date:   Tue Apr 23 15:00:46 2024 +0800Add raw 001_Keras-Linear-Regression/Keras-Linear-Regression.ipynb
3.1 numpy版本兼容问题
解决方法:numpy版本降级
$ pip install numpy==1.23.4
3.2 karas API - model.compile问题
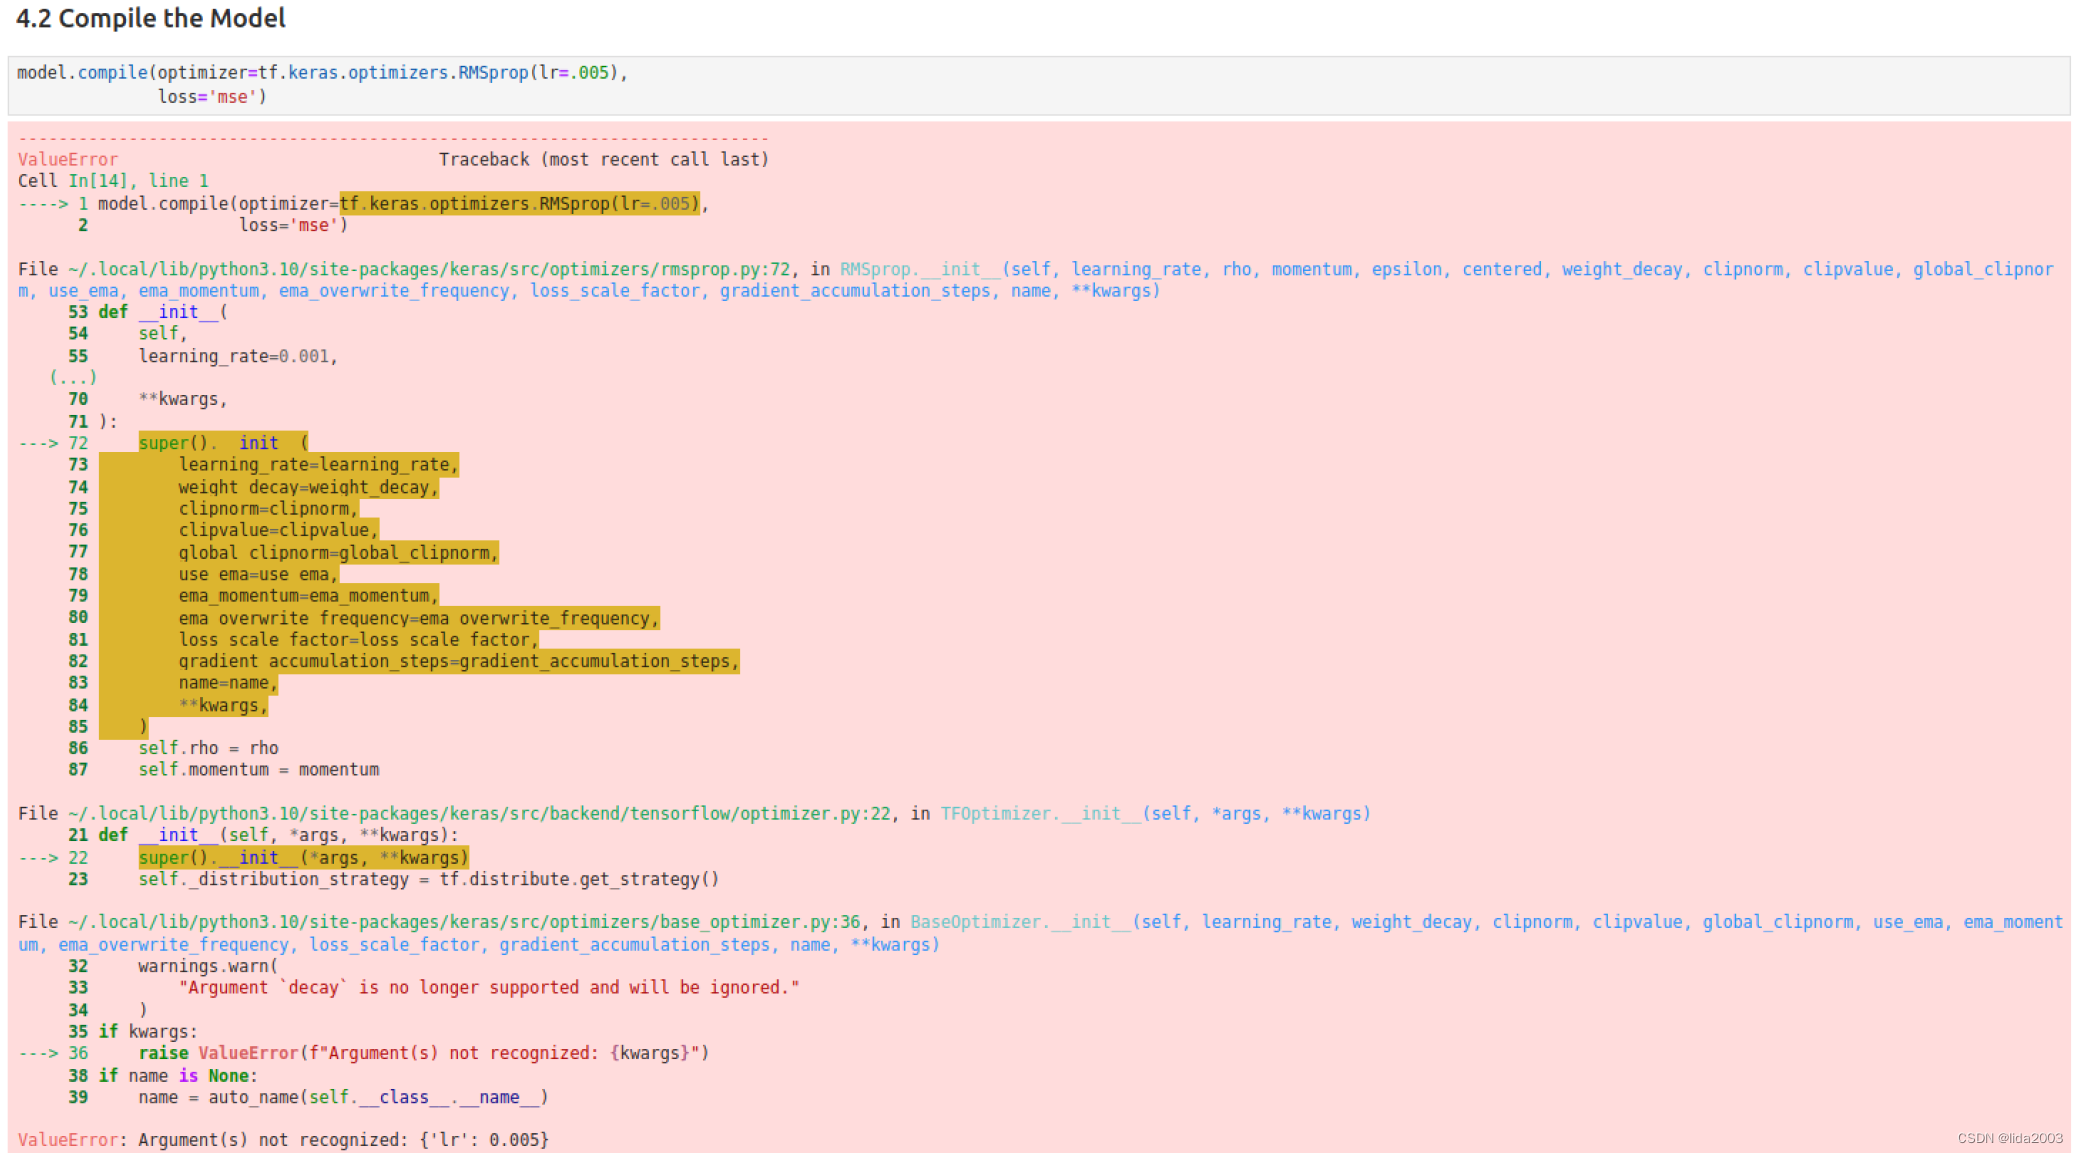
解决方法:修正API入参参数
## modified /cells/15/source:
@@ -1,2 +1,2 @@
-model.compile(optimizer=tf.keras.optimizers.RMSprop(lr=.005),
+model.compile(optimizer=tf.keras.optimizers.RMSprop(learning_rate=.005),loss='mse')
3.3 karas API - model.predict问题
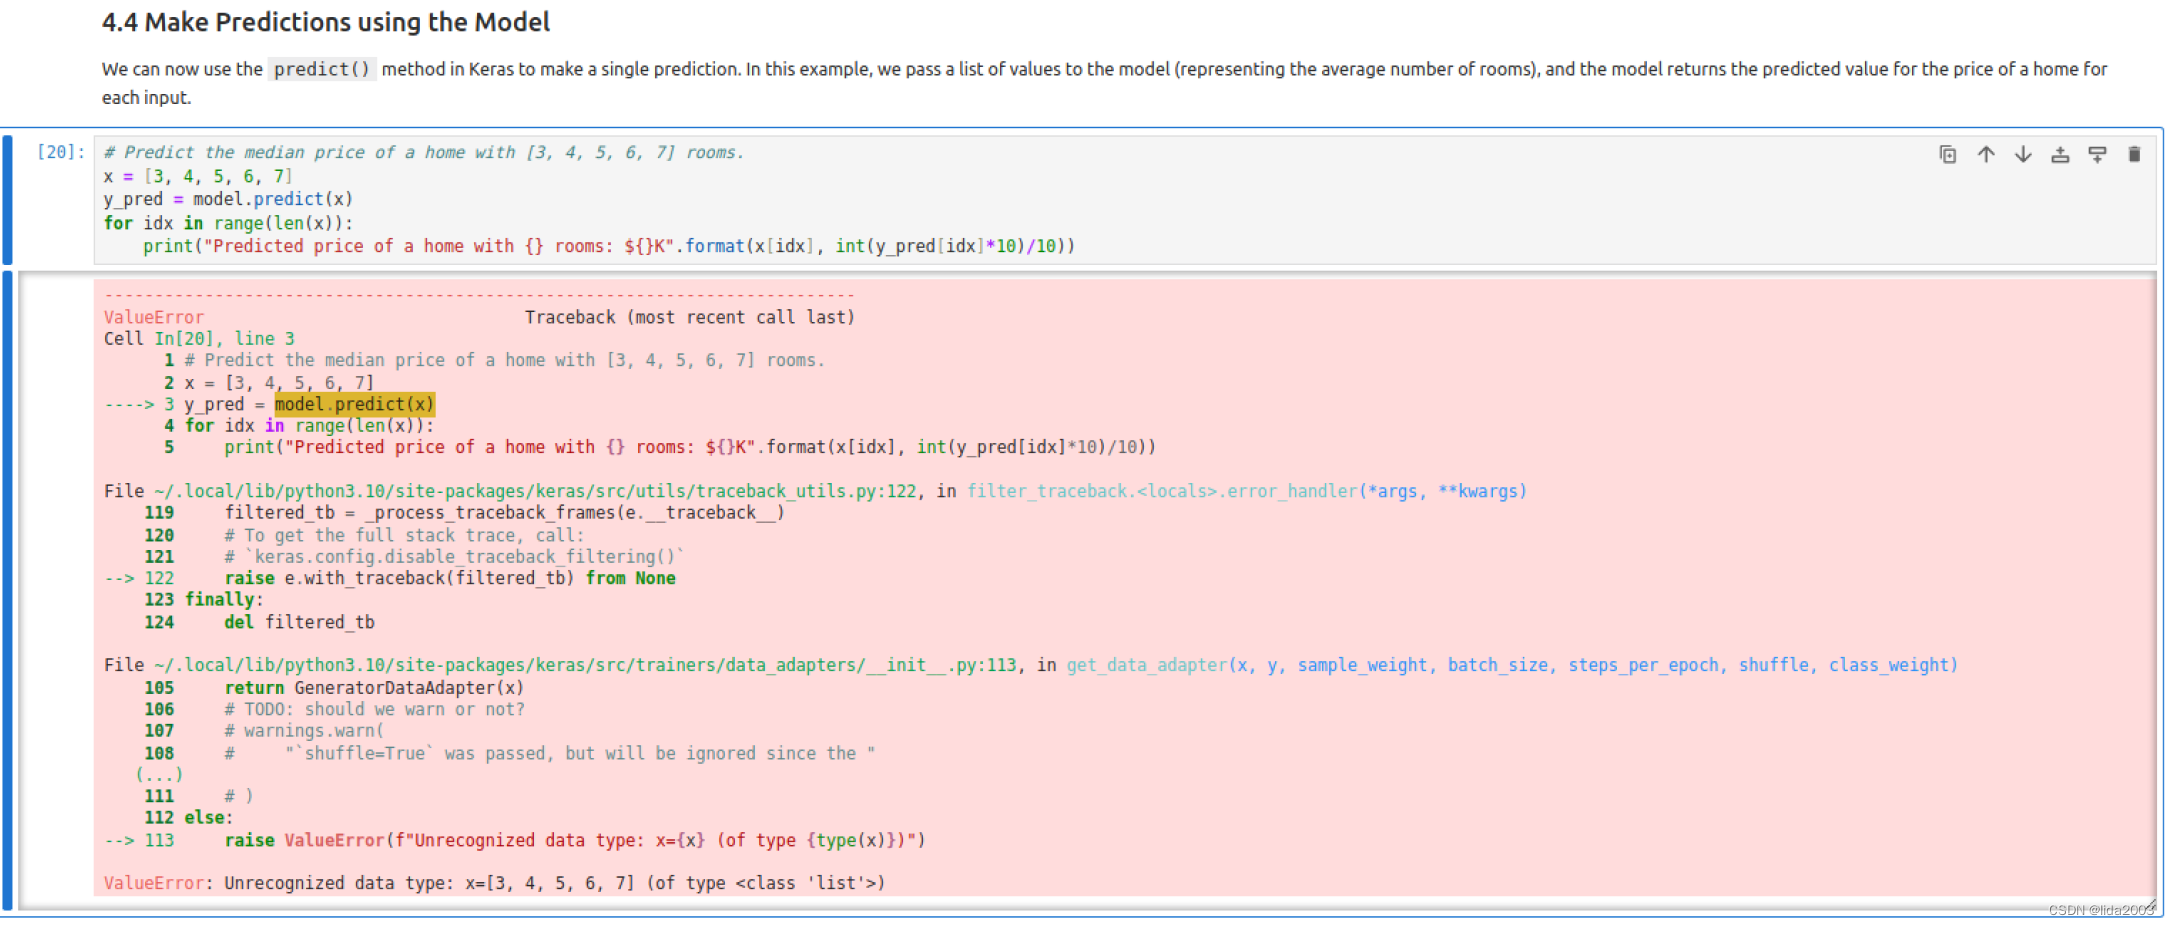
解决方法:修正API入参参数
## modified /cells/23/source:
@@ -1,5 +1,5 @@# Predict the median price of a home with [3, 4, 5, 6, 7] rooms.
-x = [3, 4, 5, 6, 7]
-y_pred = model.predict(x)
-for idx in range(len(x)):
-    print("Predicted price of a home with {} rooms: ${}K".format(x[idx], int(y_pred[idx]*10)/10))+rooms = [3, 4, 5, 6, 7]
+y_pred = model.predict(x = np.array(rooms))
+for idx in range(len(rooms)):
+    print("Predicted price of a home with {} rooms: ${}K".format(rooms[idx], int(y_pred[idx][0]*10)/10))
4. 总结
学习的第一步,总是感觉那么繁琐,如果感兴趣可以直接写一个setup.sh脚本。
但从学习的角度,一个问题,一个脚印,一步步的操作,纠错,理解,为后续组件/系统的理解可以奠定非常好的基础。
万事开头难,其实就是这么简单的一回事情!
关于线性拟合,这个大家估计能看到这里的兄弟们,都懂的。后面我们也会专门看下科学计算方法和这个神经网络拟合之间的差异。
切记一点,神经网络这个是模拟人类大脑的的工作模式,尽管对于人类大脑工作原理远没有搞得这么清楚,但是从目前的一些视频/图片识别角度看,该方法确实比较好的解决了多因素预测的准确性问题(大概率的准确性)。
相信数学原理更深层次的论证有待去研究渐近和收敛的问题,或者说需要更好的专业领域知识叠加神经网络算法来做到更好的应用。
5. 参考资料
【1】Jammy@Jetson Orin - Tensorflow & Keras Get Started