一、CIFAR-10二进制数据集介绍
1、CIFAR-10数据集
CIFAR-10数据集由10个类别的60000个32x32彩色图像组成,每个类别有6000个图像。有50000个训练图像和10000个测试图像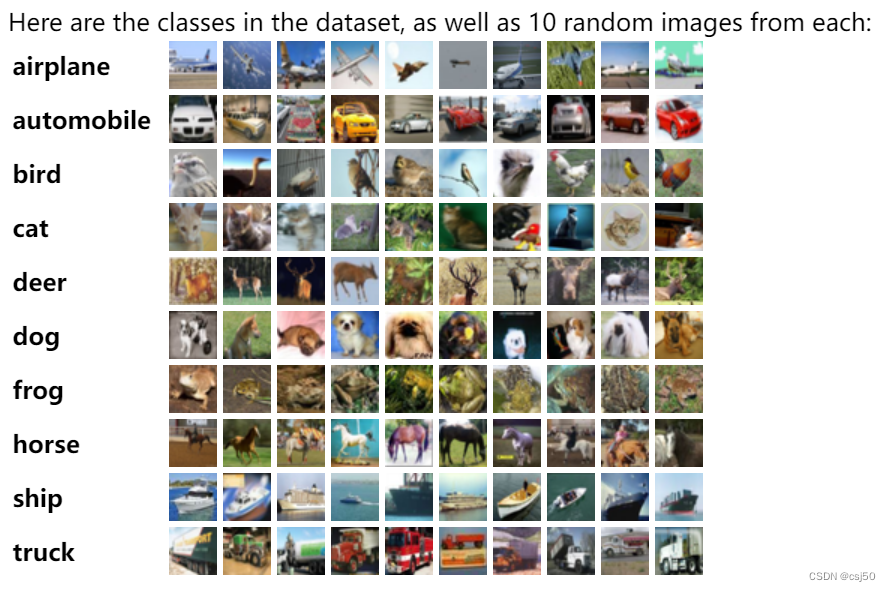
2、数据集分为五个训练批次和一个测试批次,每个批次有10000个图像
3、data_batch_1.bin 到 data_batch_5.bin 训练集
4、test_batch.bin 测试集
5、这些类别完全相互互斥,汽车和卡车之间没有重叠。汽车包括轿车、SUV,卡车只包括大卡车
6、二进制数据文件内容格式
二进制数据文件包含data_batch_1.bin 到 data_batch_5.bin、test_batch.bin
这些文件中每一个格式如下,数据中每个样本包含了特征值和目标值:
<1x标签> <3072x像素>
...
<1x标签> <3072x像素>
每3073个字节是一个样本:
1个目标值+3072个像素
7、格式说明
第一个字节,是第一个图像的标签(目标值:飞机是0,汽车是2,鸟是3。。。),它是一个0-9范围内的数字。接下来的3072个字节是图像像素的值。前1024个字节是红色通道值,下1024个是绿色通道值,最后1024个是蓝色通道值
值以行优先顺序存储,因此前32个字节是图像第一行的红色通道值
每个文件都包含10000个这样的3073字节的“行”图像,但没有任何分隔行的限制。因此每个文件应该完全是30730000字节长
二、CIFAR-10二进制数据读取
1、分析
(1)构造文件名列表
(2)读取二进制数据并进行解码
(3)将数据的标签和图片进行分割
对tensor对象进行切片
label
一个样本image(3072字节 = 1024r + 1024g + 1024b)
[[1024r],
[1024g],
[1024b]]
shape = (3, 32, 32) = (channels, height, width)
因为tensorflow的图像表示习惯是(height, width, channel)
所以需要转换
(4)处理图片数据形状以及数据类型
(5)运行
2、代码day02_binary_read.py
import os
os.environ['TF_CPP_MIN_LOG_LEVEL']='2'
import tensorflow as tfclass Cifar(object):def __init__(self):# 初始化操作self.height = 32self.width = 32self.channels = 3# 字节数self.image_bytes = self.height * self.width * self.channelsself.label_bytes = 1self.all_bytes = self.label_bytes + self.image_bytesdef read_and_decode(self):decoded_data = []# 1、构造文件名列表filenames = tf.data.Dataset.list_files("./cifar-10-batches-bin/data_batch_*.bin")for filename in filenames:print(filename)# 2、读取与解码for filename in filenames:raw = tf.io.read_file(filename)# 解码为一维的uint8数组data = tf.io.decode_raw(raw, out_type=tf.uint8)print(data)decoded_data.append(data)# 3、运行# 将文件按照样本切片切开for data in decoded_data:for i in range(10000):cut_data = tf.slice(data, [i*self.all_bytes], [self.all_bytes])#print(cut_data)label = tf.slice(cut_data, [0], [self.label_bytes])image = tf.slice(cut_data, [self.label_bytes], [self.image_bytes])#print("label: ", label)#print("image: ", image)# 调整图片形状image_reshaped = tf.reshape(image, shape=[self.channels, self.height, self.width])#print("image_reshaped: ", image_reshaped)# 转置,将图片顺序转为height, width, channelsimage_transposed = tf.transpose(image_reshaped, [1, 2, 0])#print("image_transposed: ", image_transposed)# 调整图像类型image_cast = tf.cast(image_transposed, tf.float32)print("image_cast: ", image_cast)return Noneif __name__ == "__main__":# 实例化Cifarcifar = Cifar()cifar.read_and_decode()
filename打印例子:
tf.Tensor(b'./cifar-10-batches-bin/data_batch_4.bin', shape=(), dtype=string)
tf.Tensor(b'./cifar-10-batches-bin/data_batch_3.bin', shape=(), dtype=string)
tf.Tensor(b'./cifar-10-batches-bin/data_batch_1.bin', shape=(), dtype=string)
tf.Tensor(b'./cifar-10-batches-bin/data_batch_2.bin', shape=(), dtype=string)
tf.Tensor(b'./cifar-10-batches-bin/data_batch_5.bin', shape=(), dtype=string)
解码后打印例子:
tf.Tensor([  8  26  17 ... 127 124 116], shape=(30730000,), dtype=uint8)
tf.Tensor([  6  59  43 ... 130 130 131], shape=(30730000,), dtype=uint8)
tf.Tensor([  0 178 178 ... 182 175 174], shape=(30730000,), dtype=uint8)
tf.Tensor([  1  35  27 ... 119 127 136], shape=(30730000,), dtype=uint8)
tf.Tensor([  1 255 252 ... 173 162 161], shape=(30730000,), dtype=uint8)
切片后打印例子:
label:  tf.Tensor([6], shape=(1,), dtype=uint8)
image:  tf.Tensor([255 254 255 ...  79  81  76], shape=(3072,), dtype=uint8)
调整图片形状后打印例子:
image_reshaped:  tf.Tensor(
[[[229 236 234 ... 217 221 222][222 239 233 ... 223 227 210][213 234 231 ... 220 220 202]...[150 140 132 ... 224 230 241][137 130 125 ... 181 202 212][122 118 120 ... 179 164 163]][[229 237 236 ... 219 223 223][221 239 234 ... 223 228 211][206 232 233 ... 220 219 203]...[143 135 127 ... 222 228 241][132 127 121 ... 180 201 211][119 116 116 ... 177 164 163]][[239 247 247 ... 233 234 233][229 249 246 ... 236 238 220][211 239 244 ... 232 232 215]...[135 127 120 ... 218 225 238][126 120 115 ... 178 198 207][114 110 111 ... 173 162 161]]], shape=(3, 32, 32), dtype=uint8)
转置后打印例子:
image_transposed:  tf.Tensor(
[[[235 252 252][239 251 251][239 251 251]...[225 251 252][228 251 252][228 252 252]][[249 255 255][251 253 255][252 254 255]...[229 255 255][231 255 255][232 255 255]][[241 250 254][243 248 252][245 248 252]...[231 253 251][232 253 252][233 253 252]]...[[ 81 118 176][ 85 123 178][ 83 123 175]...[167 167 168][168 168 170][165 166 169]][[ 79 119 176][ 69 108 163][ 67 105 158]...[170 172 174][163 164 167][161 164 169]][[ 46  87 142][ 45  83 137][ 52  88 141]...[175 179 182][168 172 175][163 169 174]]], shape=(32, 32, 3), dtype=uint8)
调整图像类型后打印例子:
image_cast:  tf.Tensor(
[[[229. 229. 239.][236. 237. 247.][234. 236. 247.]...[217. 219. 233.][221. 223. 234.][222. 223. 233.]][[222. 221. 229.][239. 239. 249.][233. 234. 246.]...[223. 223. 236.][227. 228. 238.][210. 211. 220.]][[213. 206. 211.][234. 232. 239.][231. 233. 244.]...[220. 220. 232.][220. 219. 232.][202. 203. 215.]]...[[150. 143. 135.][140. 135. 127.][132. 127. 120.]...[224. 222. 218.][230. 228. 225.][241. 241. 238.]][[137. 132. 126.][130. 127. 120.][125. 121. 115.]...[181. 180. 178.][202. 201. 198.][212. 211. 207.]][[122. 119. 114.][118. 116. 110.][120. 116. 111.]...[179. 177. 173.][164. 164. 162.][163. 163. 161.]]], shape=(32, 32, 3), dtype=float32)
3、切片函数
tf.slice(inputs, begin, size, name=None)
说明:
inputs:输入的数组
begin:表示从inputs的哪几个维度上的哪个元素开始抽取,元素的索引
size:表示在inputs的各个维度上抽取的元素个数,要切多长
In [1]: import tensorflow as tfIn [2]: a = tf.constant([0,1,2,3,4,5,6,7,8,9])In [3]: a
Out[3]: <tf.Tensor: shape=(10,), dtype=int32, numpy=array([0, 1, 2, 3, 4, 5, 6, 7, 8, 9], dtype=int32)>In [4]: tf.slice(a, [4], [3])
Out[4]: <tf.Tensor: shape=(3,), dtype=int32, numpy=array([4, 5, 6], dtype=int32)>In [5]: b = tf.constant([[1,2,3],[4,5,6]])In [6]: b
Out[6]:
<tf.Tensor: shape=(2, 3), dtype=int32, numpy=
array([[1, 2, 3],[4, 5, 6]], dtype=int32)>In [7]: tf.slice(b, [0,1], [2,1])
Out[7]:
<tf.Tensor: shape=(2, 1), dtype=int32, numpy=
array([[2],[5]], dtype=int32)>
第一个例子,[0,1,2,3,4,5,6,7,8,9]从第4个索引位置,截取3个长度,所以是[4,5,6]
第二个例子,[[1,2,3],[4,5,6]]是从0行1列开始,就是[1,2,3]的2,对x的第一个维度(行)抽取2个元素,在对x的第二个维度(列)抽取1个元素,所以是[2,5]
4、NHWC和NCHW
这里的图片形状设置从1维的排列到3维数据的时候,涉及到NHWC与NCHW的概念
在读取设置图片形状的时候有两种格式:
设置为“NHWC”时,排列顺序为 [batch, height, width, channels]
设置为“NCHW”时,排列顺序为 [batch, channels, height, width]
其中N表示这批图像有几张,H表示图像在竖直方向有多少像素,W表示水平方向像素,C表示通道数
tensorflow默认的是[height, width, channels]
假设RGB三通道两种格式的区别如下图所示:
理解
假设1,2,3,4-红色,5,6,7,8-绿色,9,10,11,12-蓝色
(1)如果通道在最低维度0[channel, height, width],RGB三颜色分成三组,在第一维度上找到三个RGB颜色(NCHW)
(2)如果通道在最高维度2[height, width, channel],在第三维度上找到RGB三个颜色(NHWC)
5、tf.transpose(image_reshaped, [1, 2, 0])
[1, 2, 0]表示,原来在1号位置的现在在0号位置,原来在2号位置的在1号位置,原来在0号位置的在1号位置
参考资料:
https://blog.csdn.net/Aidam_Bo/article/details/91908637
https://blog.csdn.net/weixin_41845265/article/details/107067012