文章目录
- optuna使用
- 1.导入相关包
- 2.定义模型可选参数
- 3.定义训练代码和评估代码
- 4.定义目标函数
- 5.运行程序
- 6.可视化
- 7.超参数的重要性
- 8.查看相关信息
- 9.可视化的一个完整示例
- 10.lightgbm实验
optuna使用
1.导入相关包
python">import torch
import torch.nn as nn
import torch.nn.functional as F
import torchvision
from fvcore.nn import FlopCountAnalysisimport optunaDEVICE = torch.device("cuda") if torch.cuda.is_available() else torch.device("cpu")
DIR = ".."
BATCHSIZE = 128
N_TRAIN_EXAMPLES = BATCHSIZE * 30   # 128 * 30个训练
N_VALID_EXAMPLES = BATCHSIZE * 10   # 128 * 10个预测
2.定义模型可选参数
optuna支持很多种搜索方式:
(1)trial.suggest_categorical(‘optimizer’, [‘MomentumSGD’, ‘Adam’]):表示从SGD和adam里选一个使用;
(2)trial.suggest_int(‘num_layers’, 1, 3):从1~3范围内的int里选;
(3)trial.suggest_uniform(‘dropout_rate’, 0.0, 1.0):从0~1内的uniform分布里选;
(4)trial.suggest_loguniform(‘learning_rate’, 1e-5, 1e-2):从1e-5~1e-2的log uniform分布里选;
(5)trial.suggest_discrete_uniform(‘drop_path_rate’, 0.0, 1.0, 0.1):从0~1且step为0.1的离散uniform分布里选;
python">def define_model(trial):n_layers = trial.suggest_int("n_layers", 1, 3) # 从[1,3]范围里面选一个layers = []in_features = 28 * 28for i in range(n_layers):out_features = trial.suggest_int("n_units_l{}".format(i), 4, 128)layers.append(nn.Linear(in_features, out_features))layers.append(nn.ReLU())p = trial.suggest_float("dropout_{}".format(i), 0.2, 0.5)layers.append(nn.Dropout(p))in_features = out_featureslayers.append(nn.Linear(in_features, 10))layers.append(nn.LogSoftmax(dim=1))return nn.Sequential(*layers)
3.定义训练代码和评估代码
python"># Defines training and evaluation.
def train_model(model, optimizer, train_loader):model.train()for batch_idx, (data, target) in enumerate(train_loader):data, target = data.view(-1, 28 * 28).to(DEVICE), target.to(DEVICE)optimizer.zero_grad()F.nll_loss(model(data), target).backward()optimizer.step()def eval_model(model, valid_loader):model.eval()correct = 0with torch.no_grad():for batch_idx, (data, target) in enumerate(valid_loader):data, target = data.view(-1, 28 * 28).to(DEVICE), target.to(DEVICE)pred = model(data).argmax(dim=1, keepdim=True)correct += pred.eq(target.view_as(pred)).sum().item()accuracy = correct / N_VALID_EXAMPLESflops = FlopCountAnalysis(model, inputs=(torch.randn(1, 28 * 28).to(DEVICE),)).total()return flops, accuracy
4.定义目标函数
python">def objective(trial):train_dataset = torchvision.datasets.FashionMNIST(DIR, train=True, download=True, transform=torchvision.transforms.ToTensor())train_loader = torch.utils.data.DataLoader(torch.utils.data.Subset(train_dataset, list(range(N_TRAIN_EXAMPLES))),batch_size=BATCHSIZE,shuffle=True,)val_dataset = torchvision.datasets.FashionMNIST(DIR, train=False, transform=torchvision.transforms.ToTensor())val_loader = torch.utils.data.DataLoader(torch.utils.data.Subset(val_dataset, list(range(N_VALID_EXAMPLES))),batch_size=BATCHSIZE,shuffle=True,)model = define_model(trial).to(DEVICE)optimizer = torch.optim.Adam(model.parameters(), trial.suggest_float("lr", 1e-5, 1e-1, log=True))for epoch in range(10):train_model(model, optimizer, train_loader)flops, accuracy = eval_model(model, val_loader)return flops, accuracy
5.运行程序
运行30次实验,每次实验返回 flops,accuracy
python">study = optuna.create_study(directions=["minimize", "maximize"]) # flops 最小化, accuracy 最大化
study.optimize(objective, n_trials=30, timeout=300)print("Number of finished trials: ", len(study.trials))
6.可视化
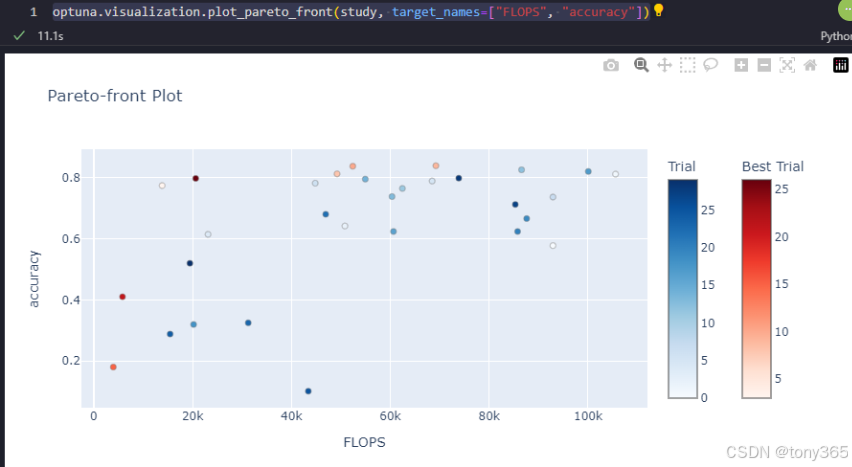
flops, accuracy 二维图
optuna.visualization.plot_pareto_front(study, target_names=[“FLOPS”, “accuracy”])

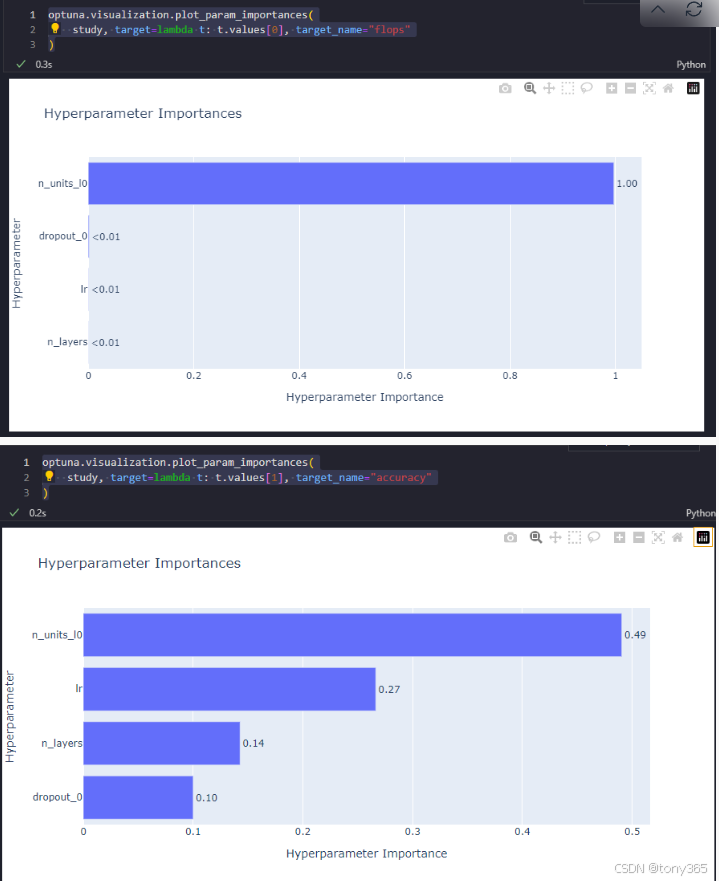
7.超参数的重要性
对于flops
optuna.visualization.plot_param_importances(
study, target=lambda t: t.values[0], target_name=“flops”
)
对于accuracy
optuna.visualization.plot_param_importances(
study, target=lambda t: t.values[1], target_name=“accuracy”
)

8.查看相关信息
python"># https://optuna.readthedocs.io/en/stable/tutorial/20_recipes/002_multi_objective.html
# 利用pytorch mnist 识别
# 设置了一些超参数,lr, layer number, feature_number等
# 然后目标是 flops 和 accurary# 最后是可视化:
# 显示试验的一些结果:
# optuna.visualization.plot_pareto_front(study, target_names=["FLOPS", "accuracy"])
# 左上角是最好的# 显示重要性:
# optuna.visualization.plot_param_importances(
#     study, target=lambda t: t.values[0], target_name="flops"
# )
# optuna.visualization.plot_param_importances(
#     study, target=lambda t: t.values[1], target_name="accuracy"
# )# trials的属性:
print(f"Number of trials on the Pareto front: {len(study.best_trials)}")trial_with_highest_accuracy = max(study.best_trials, key=lambda t: t.values[1])
print(f"Trial with highest accuracy: ")
print(f"\tnumber: {trial_with_highest_accuracy.number}")
print(f"\tparams: {trial_with_highest_accuracy.params}")
print(f"\tvalues: {trial_with_highest_accuracy.values}")
9.可视化的一个完整示例
python"># You can use Matplotlib instead of Plotly for visualization by simply replacing `optuna.visualization` with
# `optuna.visualization.matplotlib` in the following examples.
from optuna.visualization import plot_contour
from optuna.visualization import plot_edf
from optuna.visualization import plot_intermediate_values
from optuna.visualization import plot_optimization_history
from optuna.visualization import plot_parallel_coordinate
from optuna.visualization import plot_param_importances
from optuna.visualization import plot_rank
from optuna.visualization import plot_slice
from optuna.visualization import plot_timelinedef objective(trial):train_dataset = torchvision.datasets.FashionMNIST(DIR, train=True, download=True, transform=torchvision.transforms.ToTensor())train_loader = torch.utils.data.DataLoader(torch.utils.data.Subset(train_dataset, list(range(N_TRAIN_EXAMPLES))),batch_size=BATCHSIZE,shuffle=True,)val_dataset = torchvision.datasets.FashionMNIST(DIR, train=False, transform=torchvision.transforms.ToTensor())val_loader = torch.utils.data.DataLoader(torch.utils.data.Subset(val_dataset, list(range(N_VALID_EXAMPLES))),batch_size=BATCHSIZE,shuffle=True,)model = define_model(trial).to(DEVICE)optimizer = torch.optim.Adam(model.parameters(), trial.suggest_float("lr", 1e-5, 1e-1, log=True))for epoch in range(10):train_model(model, optimizer, train_loader)val_accuracy = eval_model(model, val_loader)trial.report(val_accuracy, epoch)if trial.should_prune():raise optuna.exceptions.TrialPruned()return val_accuracystudy = optuna.create_study(direction="maximize",sampler=optuna.samplers.TPESampler(seed=SEED),pruner=optuna.pruners.MedianPruner(),
)
study.optimize(objective, n_trials=30, timeout=300)
运行之后可视化:


10.lightgbm实验
python">"""
Optuna example that optimizes a classifier configuration for cancer dataset using LightGBM.In this example, we optimize the validation accuracy of cancer detection using LightGBM.
We optimize both the choice of booster model and their hyperparameters."""import numpy as np
import optunaimport lightgbm as lgb
import sklearn.datasets
import sklearn.metrics
from sklearn.model_selection import train_test_split# FYI: Objective functions can take additional arguments
# (https://optuna.readthedocs.io/en/stable/faq.html#objective-func-additional-args).
def objective(trial):data, target = sklearn.datasets.load_breast_cancer(return_X_y=True)train_x, valid_x, train_y, valid_y = train_test_split(data, target, test_size=0.25)dtrain = lgb.Dataset(train_x, label=train_y)param = {"objective": "binary","metric": "binary_logloss","verbosity": -1,"boosting_type": "gbdt","lambda_l1": trial.suggest_float("lambda_l1", 1e-8, 10.0, log=True),"lambda_l2": trial.suggest_float("lambda_l2", 1e-8, 10.0, log=True),"num_leaves": trial.suggest_int("num_leaves", 2, 256),"feature_fraction": trial.suggest_float("feature_fraction", 0.4, 1.0),"bagging_fraction": trial.suggest_float("bagging_fraction", 0.4, 1.0),"bagging_freq": trial.suggest_int("bagging_freq", 1, 7),"min_child_samples": trial.suggest_int("min_child_samples", 5, 100),}gbm = lgb.train(param, dtrain)preds = gbm.predict(valid_x)pred_labels = np.rint(preds)accuracy = sklearn.metrics.accuracy_score(valid_y, pred_labels)return accuracyif __name__ == "__main__":study = optuna.create_study(direction="maximize")study.optimize(objective, n_trials=100)print("Number of finished trials: {}".format(len(study.trials)))print("Best trial:")trial = study.best_trialprint("  Value: {}".format(trial.value))print("  Params: ")for key, value in trial.params.items():print("    {}: {}".format(key, value))
运行结果:

https://github.com/microsoft/LightGBM/tree/master/examples
https://blog.csdn.net/yang1015661763/article/details/131364826


