光照传感器
模块简介
产品描述
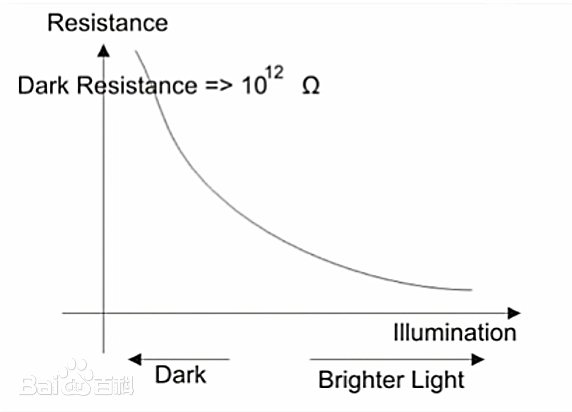
光敏电阻(photoresistor orlight-dependent resistor,后者缩写为LDR)是一种基于内光电效应的半导体元件,它的阻值依赖于入射光强的变化 。入射光强增加,光敏电阻的阻值减小,入射光减弱,光敏电阻阻值增大。光敏电阻没有极性,使用时在其两端施加一个任意方向的外加电压,通过测量回路中的电流大小就可以反映入射光的强弱。
应用场景
光敏电阻属半导体光敏器件,具有灵敏度高,响应速度快,稳定性好的优点。
光敏电阻已经应用于照相机电子快门、火灾报警器、自动窗帘 、太阳跟踪系统 等光自动开关领域。

光强与设备电阻值大小关系曲线
ESP32中的模数转换器 (ADC)
ESP32 有 两 个 ADC 单元,可以在以下场景使用:
- 生成 ADC 单次转换结果
- 生成连续 ADC 转换结果
Vref是ESP32 ADC内部用于测量输入电压的参考电压。ESP32 ADC可以测量从0 V到Vref的模拟电压。在不同的芯片中,Vref是不同的,中位数是1.1V。为了转换大于Vref的电压,输入电压在输入到ADC之前可以被衰减。有4种可用的衰减选项,衰减越高,可测量的输入电压就越高。
| 衰减 | 可测量的输入电压范围 |
|
| 100 mV ~ 950 mV |
|
| 100 mV ~ 1250 mV |
|
| 150 mV ~ 1750 mV |
|
| 150 mV ~ 2450 mV |
ADC转换是将输入的模拟电压转换为数字值。由ADC驱动器APls提供的ADC转换结果是原始数据。在单读模式下,ESP32 ADC原始结果的分辨率为12位。
adc1_get_raw()adc2_get_raw()
要根据ADC的原始结果计算电压,可以使用这个公式:
![]()
其中
| 变量 | 作用 |
| Vout | 数字输出结果,代表的是电压。 |
| Dout | ADC原始数字读取结果 |
| Vmax | 最大可测量输入模拟电压 |
| Dmax | 输出ADC原始数字读取结果的最大值,在单次读取模式下为4095,在连续读取模式下为4095。 |
对于带有eFuse ADC校准位的板子,可以使用esp_adc_cal_raw_to_voltage()来获得校准的转换结果。这些结果代表了实际电压(单位:mV)。不需要通过公式来转换这些数据。如果在没有eFuse ADC校准位的板上使用ADC校准API,将产生警告。
注意事项:我们推荐使用adc1而不是adc2,adc2被用作捆扎引脚(GPIO 0,2,15),因此无法与WIFI共用!
所以我们的程序以adc1的读取为例:
对于 ADC1 我们主要使用3个 API 函数:
- esp_err_t adc1_config_width(adc_bits_width_t width_bit); 配置ADC1所有通道的捕获宽度。
- esp_err_t adc1_config_channel_atten(adc1_channel_t channel, adc_atten_t atten); 配置ADC1某个通道的衰减。
- int adc1_get_raw(adc1_channel_t channel); 读取 1 次 ADC 值。
示例:使用 ADC1 单次读取 channel 0 (GPIO36),位宽 12 BIT,衰减 11 db
adc1_config_width(ADC_WIDTH_BIT_12);
adc1_config_channel_atten(ADC1_CHANNEL_0,ADC_ATTEN_DB_11);
int val = adc1_get_raw(ADC1_CHANNEL_0);
参考代码
gpio_light_test.c
/** Copyright (c) 2022 Hunan OpenValley Digital Industry Development Co., Ltd.* Licensed under the Apache License, Version 2.0 (the "License");* you may not use this file except in compliance with the License.* You may obtain a copy of the License at**    http://www.apache.org/licenses/LICENSE-2.0** Unless required by applicable law or agreed to in writing, software* distributed under the License is distributed on an "AS IS" BASIS,* WITHOUT WARRANTIES OR CONDITIONS OF ANY KIND, either express or implied.* See the License for the specific language governing permissions and* limitations under the License.*/#include <stdio.h>
#include "cmsis_os2.h"
#include "ohos_run.h"
#include "esp_system.h"
#include "nvs_flash.h"
#include "esp_log.h"
#include "driver/gpio.h"
#include "driver/ledc.h"
#include "driver/adc.h"
#include "esp_adc_cal.h"#define SYS_DELAY_TICKS 200
#define TASK_STACK_SIZE 4096
#define TASK_PRIO 25#define DEFAULT_VREF 1100                        // 默认参考电压,单位mV
static esp_adc_cal_characteristics_t *adc_chars; // 分配内存使用#define myADC_heat_sensitive_channel ADC_CHANNEL_6 // GPIO34 光敏传感器Ao输入#define AD_Value1_Channnel myADC_heat_sensitive_channel // 重新定义一个, 为例后续更好的更改#define width ADC_WIDTH_BIT_12 // ADC分辨率 12位
#define atten ADC_ATTEN_DB_11  // ADC衰减   11 dB 衰减,输入电压范围为 0-3.3V。
#define unit ADC_UNIT_1        // ADC1
#define NO_OF_SAMPLES 128      // 采样次数, 目的: 多次采样, 滤波/*** @description: ADC初始化* @return {无}*/
void myADC_Init()
{adc1_config_width(ADC_WIDTH_BIT_12);                                   // 12位分辨率adc1_config_channel_atten(AD_Value1_Channnel, atten);                  // 配置ADC通道adc_chars = calloc(1, sizeof(esp_adc_cal_characteristics_t));          // 分配内存esp_adc_cal_characterize(unit, atten, width, DEFAULT_VREF, adc_chars); // 对ADC特性进行初始化
}/*** @description: 获取传感器的AD值和电压值* @param {int16_t} *AD_Value1 第一个传感器的AD值的地址* @param {float*} Voltage1    第一个传感器的电压值的地址* @return {*}*/
void myADC_GetAdAndVoltage_Value(int16_t *AD_Value1, float *Voltage1)
{uint32_t adc_reading1 = 0;for (int i = 0; i < NO_OF_SAMPLES; i++){                                                   // 多次采样, 滤波adc_reading1 += adc1_get_raw(AD_Value1_Channnel); // 采集光照值}adc_reading1 /= NO_OF_SAMPLES; // 得到滤波后的数据// esp_adc_cal_raw_to_voltage返回的是mV, 想得到单位V, 除以1000*AD_Value1 = (int16_t)adc_reading1;                                       // 转换为int16_t类型*Voltage1 = esp_adc_cal_raw_to_voltage(adc_reading1, adc_chars) / 1000.0; // 获取光照电压值
}int16_t light_AdVal;
float light_Voltage;static void gpio_test(void)
{myADC_Init();while (1){myADC_GetAdAndVoltage_Value(&light_AdVal, &light_Voltage);printf("gz adc cal: %d\t gz v: %.2f \n", light_AdVal, light_Voltage);sleep(2); // 延时}
}static void gpio_example_task(void)
{osThreadAttr_t attr;int g_taskID;attr.name = "adc_test";attr.attr_bits = 0U;attr.cb_mem = NULL;attr.cb_size = 0U;attr.stack_mem = NULL;attr.stack_size = TASK_STACK_SIZE;attr.priority = TASK_PRIO;g_taskID = osThreadNew((osThreadFunc_t)gpio_test, NULL, &attr);if (g_taskID == NULL){printf("Failed to create Test GPIO thread!\n");}
}OHOS_APP_RUN(gpio_example_task);
BUILD.gn
# Copyright (c) 2022 Hunan OpenValley Digital Industry Development Co., Ltd.
# Licensed under the Apache License, Version 2.0 (the "License");
# you may not use this file except in compliance with the License.
# You may obtain a copy of the License at
#
#     http://www.apache.org/licenses/LICENSE-2.0
#
# Unless required by applicable law or agreed to in writing, software
# distributed under the License is distributed on an "AS IS" BASIS,
# WITHOUT WARRANTIES OR CONDITIONS OF ANY KIND, either express or implied.
# See the License for the specific language governing permissions and
# limitations under the License.import("//kernel/liteos_m/liteos.gni")
module_name = get_path_info(rebase_path("."), "name")
kernel_module(module_name){sources = ["adc_light_test.c",]include_dirs = ["//drivers/hdf_core/framework/include/platform/","//drivers/hdf_core/framework/include/utils/","//drivers/hdf_core/framework/support/platform/include/adc","//drivers/hdf_core/adapter/khdf/liteos_m/osal/include/","//drivers/hdf_core/framework/include/core/","//drivers/hdf_core/framework/include/osal/","//drivers/hdf_core/interfaces/inner_api/utils","//device/soc/esp/esp32/components/driver/include","//device/soc/esp/esp32/components/esp_adc_cal/include","//device/soc/esp/esp32/components/driver/esp32/include",]
}
编译并烧录

在源码根目录下使用hb工具对写好的代码进行编译

选择mini级系统
同理 产品选择esp公司下的esp32

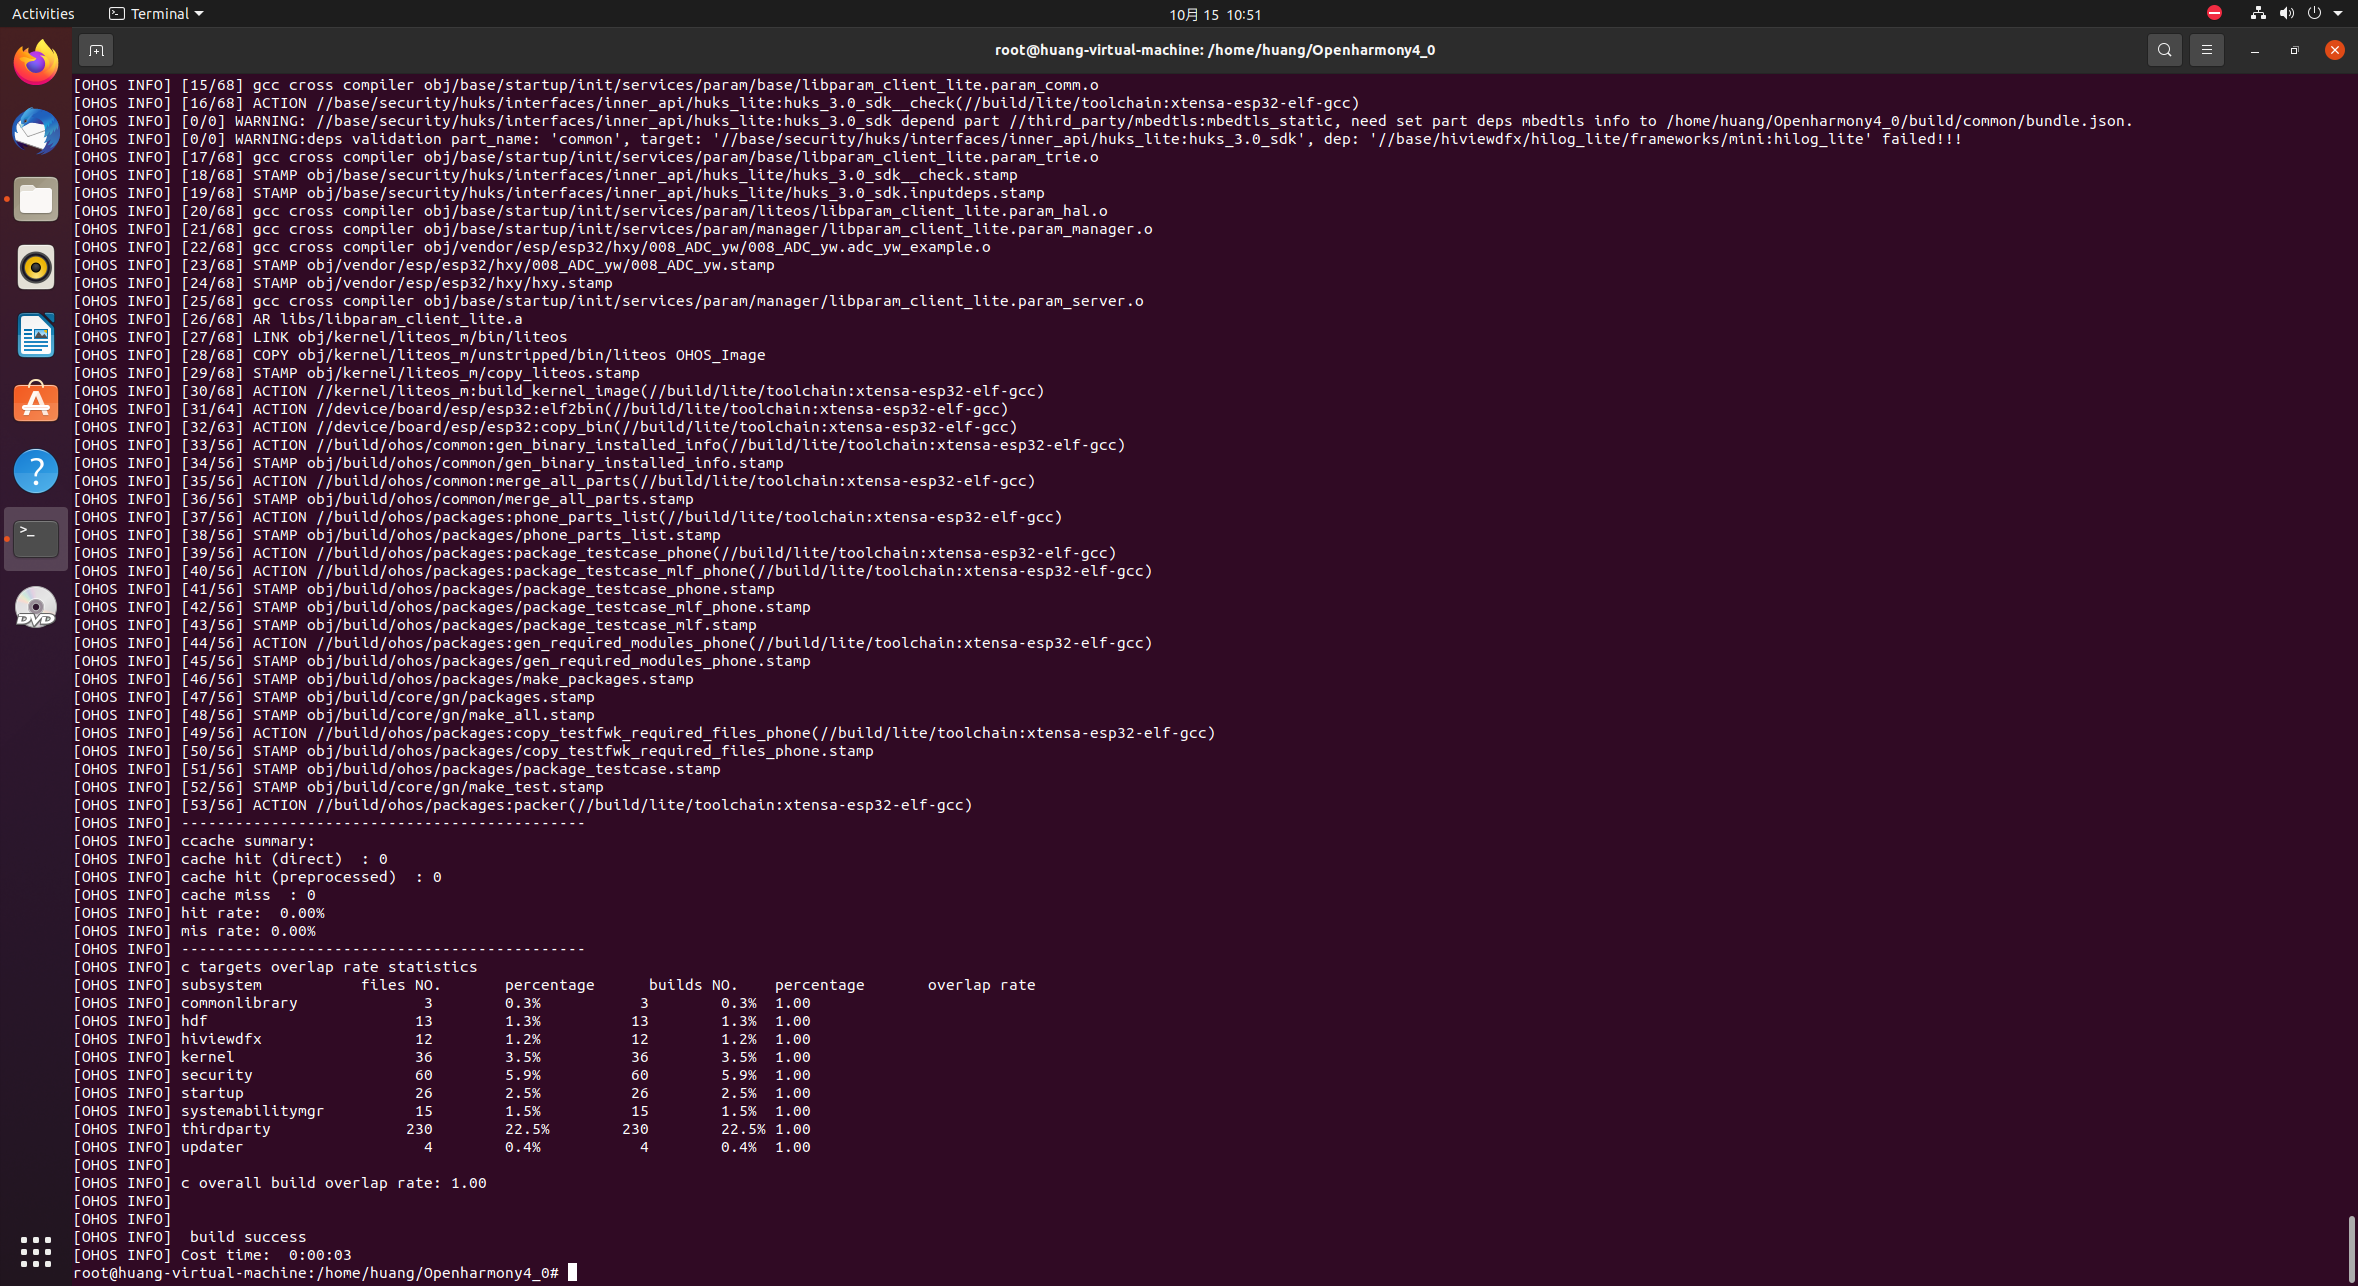
选择完毕后在源码根目录下执行hb build -f 进行编译

编译完成后会有如下界面,并且编译后的代码固件位于:out\esp32\esp32

实验现象

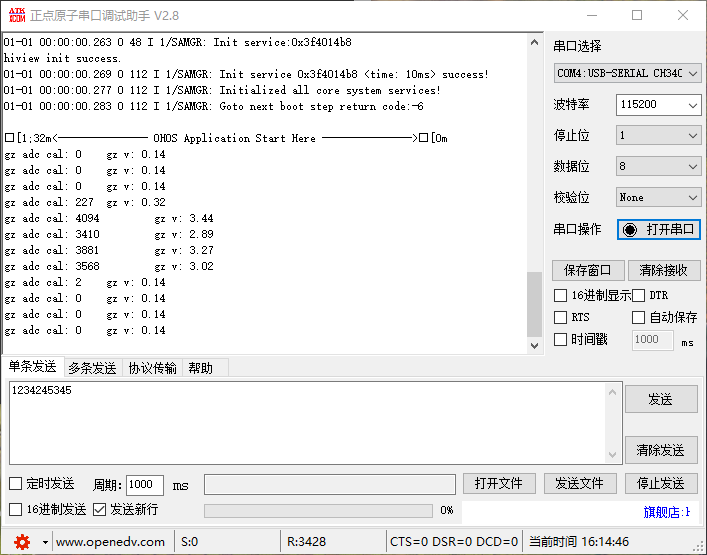
按下ESP32开发板上的EN键,即可观察到实验现象:

打开手机手电筒对准传感器可以观察到传感器感应到灯光并通过串口助手打印提示信息!
# Copyright (c) 2022 Hunan OpenValley Digital Industry Development Co., Ltd.
# Licensed under the Apache License, Version 2.0 (the "License");
# you may not use this file except in compliance with the License.
# You may obtain a copy of the License at
#
#     http://www.apache.org/licenses/LICENSE-2.0
#
# Unless required by applicable law or agreed to in writing, software
# distributed under the License is distributed on an "AS IS" BASIS,
# WITHOUT WARRANTIES OR CONDITIONS OF ANY KIND, either express or implied.
# See the License for the specific language governing permissions and
# limitations under the License.import("//kernel/liteos_m/liteos.gni")
module_name = get_path_info(rebase_path("."), "name")
kernel_module(module_name){sources = ["uart_example.c",]include_dirs = ["//drivers/hdf_core/framework/include/platform/","//drivers/hdf_core/framework/include/utils/","//drivers/hdf_core/framework/support/platform/include/gpio","//drivers/hdf_core/adapter/khdf/liteos_m/osal/include/","//drivers/hdf_core/framework/include/core/","//drivers/hdf_core/framework/include/osal/","//device/soc/esp/esp32/components/driver/include","//device/soc/esp/esp32/components/esp_adc_cal/include","//device/soc/esp/esp32/components/driver/esp32/include",]
}


