Google Cloud 设置
访问 https://console.cloud.google.com/apis
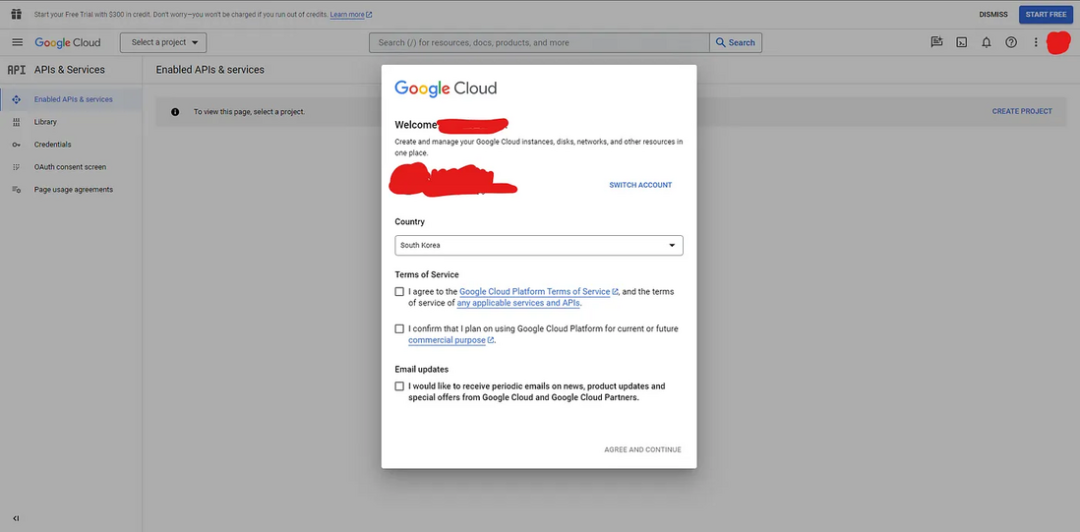
如果你是第一次使用Google Cloud,请确保同意服务条款。
按照以下步骤继续:
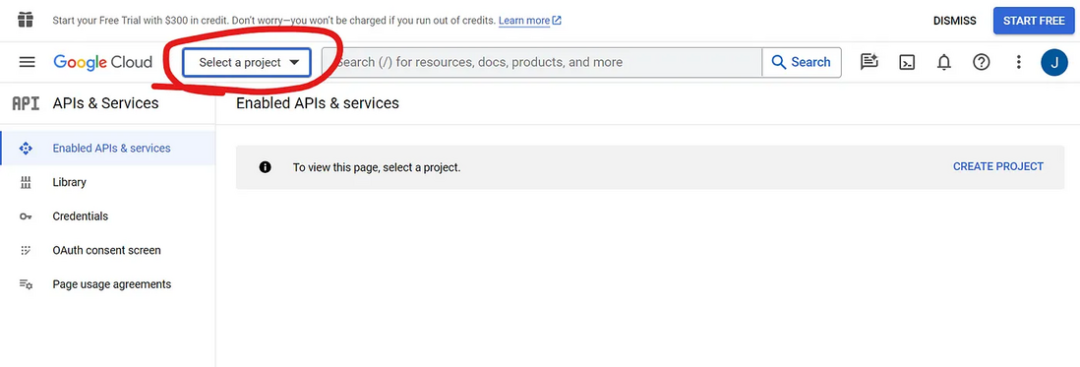
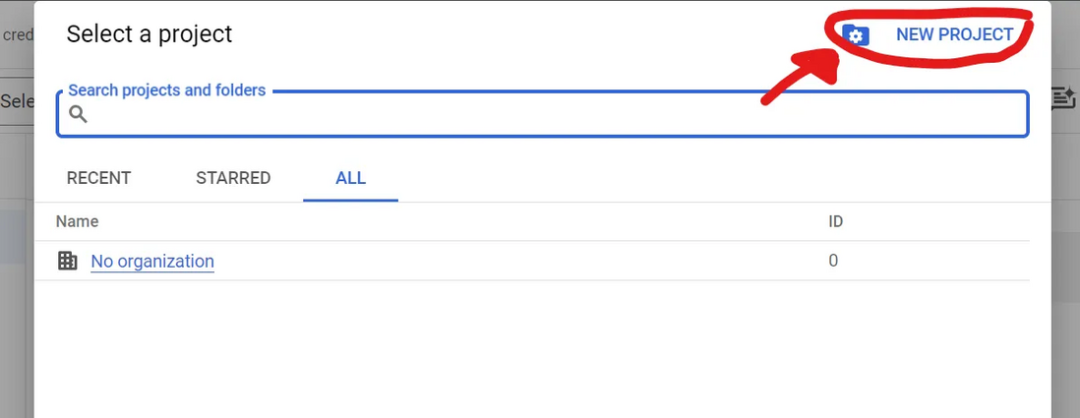
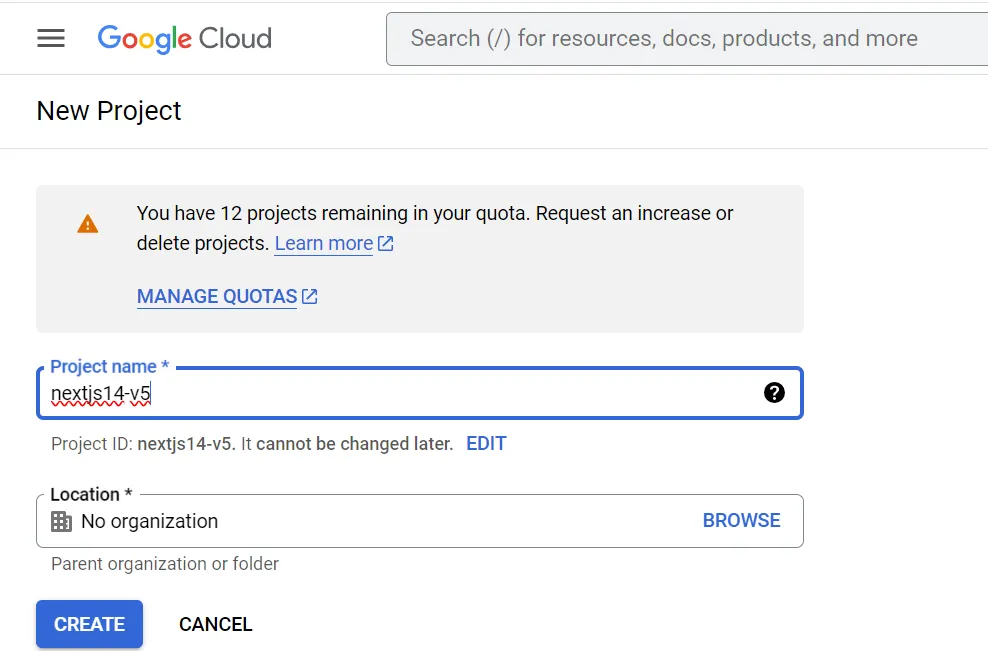
根据你的喜好编辑项目名称,然后点击"CREATE"
 你将被重定向到这个界面
👉 OAuth 同意屏幕
让我们首先配置OAuth同意屏幕

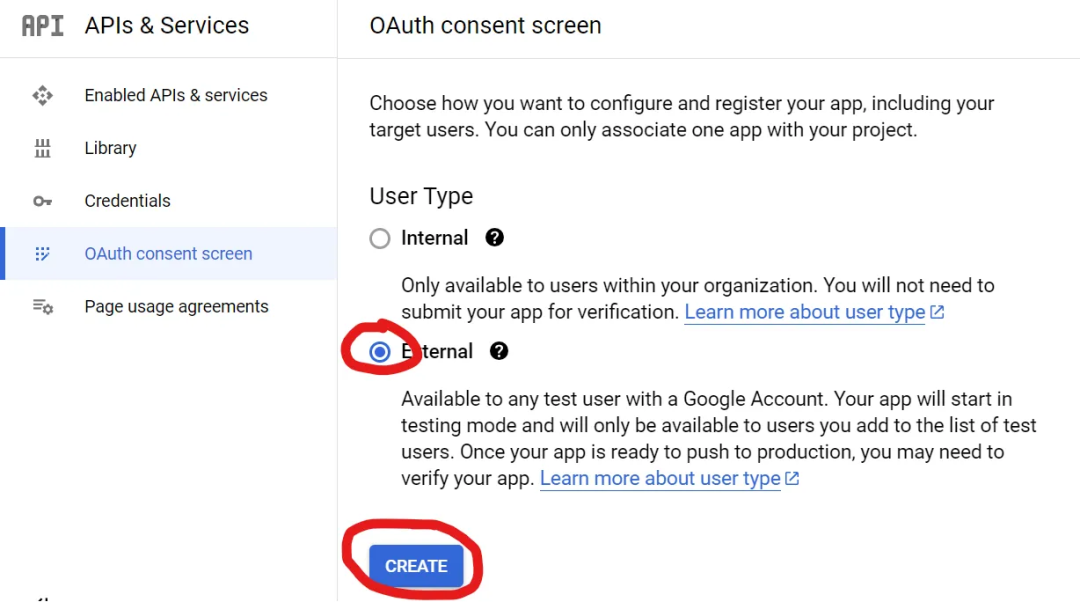
如果你的组织中有内部测试人员,选择Internal用户类型。否则继续选择External用户
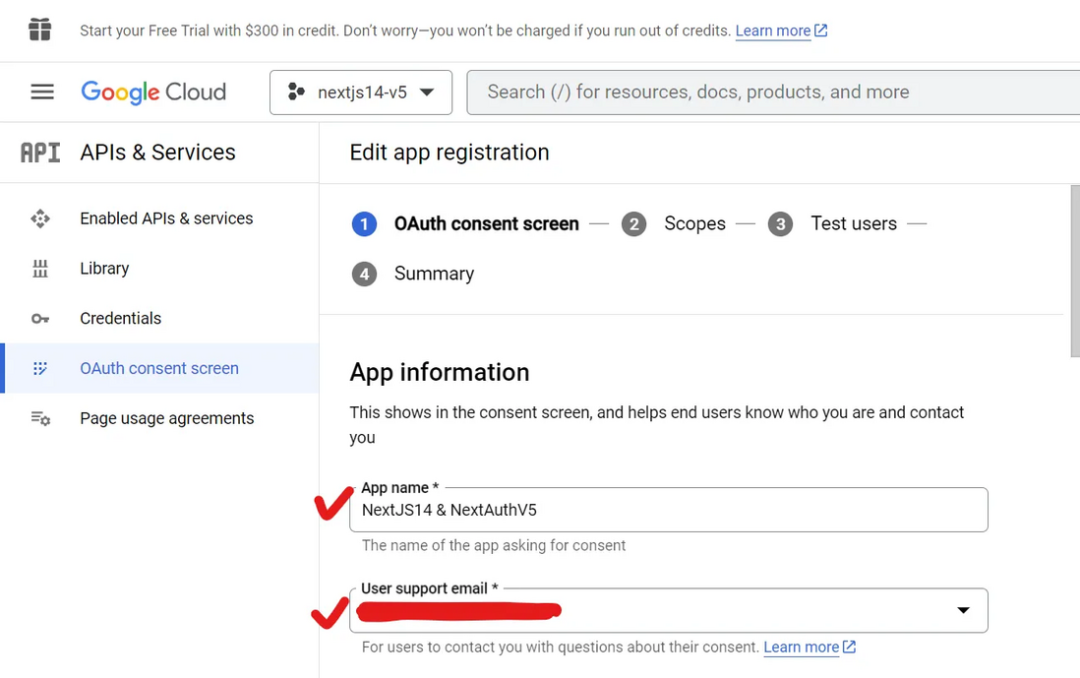
编辑应用名称并选择用户支持邮箱,然后向下滚动直到找到"Developer contact information"(开发者联系信息)
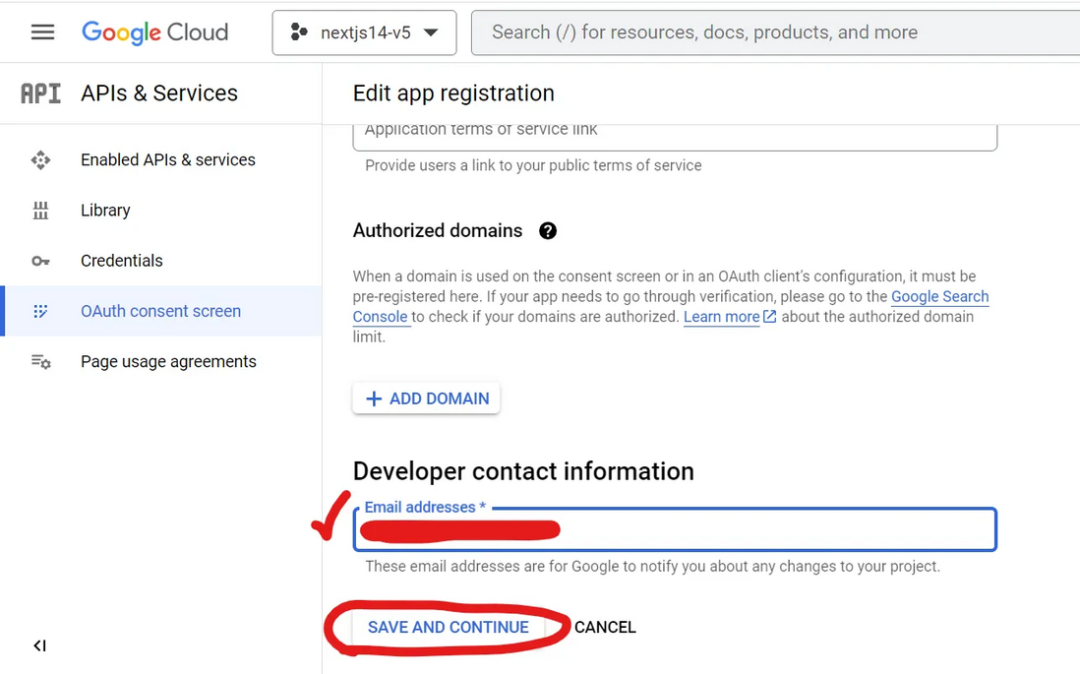
填写电子邮件地址,然后点击"SAVE AND CONTINUE"(保存并继续)按钮
依次点击剩余步骤(Scopes、Test Users、Summary)的"SAVE AND CONTINUE"按钮
👉 凭据
现在设置凭据

首先选择应用类型为"Web"
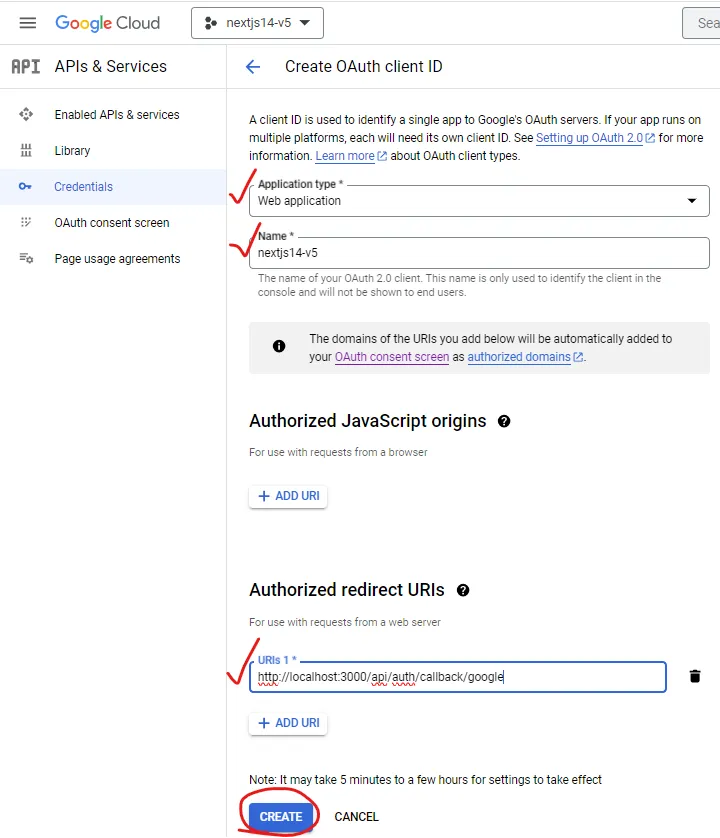
然后填写"Name"部分,并点击Authorized redirect URIs下方的"ADD URI"按钮。
在URIs部分填写 http://localhost:3000/api/auth/callback/google ,然后点击"CREATE"按钮
🔴注意🔴 部署服务时,确保将URI修改为:https://${部署域名URL}/api/auth/callback/google 以避免错误。
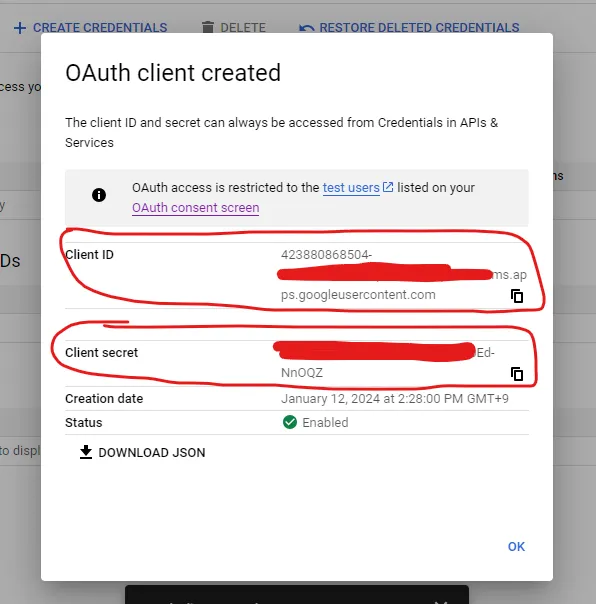
几秒钟后,你将收到OAuth客户端已创建的通知,并可以查看和复制"Client ID"和"Client Secret"
最后将"Client ID"和"Client Secret"添加到你的.env文件中
GOOGLE_CLIENT_ID = ${YOUR GOOGLE CLIENT ID}
GOOGLE_CLIENT_SECRET =${YOUR GOOGLE CLIENT SECRET}
代码实现
首先,在src/auth.ts中添加Google provider// src.auth.ts
import NextAuth from 'next-auth';
import { authConfig } from './auth.config';
import Credentials from 'next-auth/providers/credentials';
import { User } from '@/lib/definitions';
import google from 'next-auth/providers/google'; // 添加导入export const { handlers: { GET, POST }, auth, signIn, signOut, update } = NextAuth({...authConfig,providers: [// **************************************************************// 添加providergoogle({clientId: process.env.GOOGLE_CLIENT_ID ?? '',clientSecret: process.env.GOOGLE_CLIENT_SECRET ?? '',}),// **************************************************************Credentials({async authorize(credentials) {if (credentials.id && credentials.password) {// 在这里添加你的后端代码// let loginRes = await backendLogin(credentials.id, credentials.password)let loginRes = {success : true,data : {user: {ID: "john_doe",NAME: "John Doe",EMAIL: "email@email.email",},}}// 登录失败if (!loginRes.success) return null;// 登录成功const user = {id: loginRes.data.user.ID ?? '',name: loginRes.data.user.NAME ?? '',email: loginRes.data.user.EMAIL ?? '',} as User;return user;}return null;},})],callbacks: {async session({ session, token, user }) {session.user = token.user as Userreturn session;},async jwt({ token, user, trigger, session }) {if (user) {token.user = user;}if (trigger === "update" && session) {token = {...token, user : session}return token;};return token;},},
});在src/lib/actions.ts中创建一个在客户端调用的Google登录方法
// src/lib/actions.ts
"use server"import { signIn } from "../auth";
import { AuthError } from "next-auth";...export async function googleAuthenticate(prevState: string | undefined,formData: FormData,
) {try {await signIn('google');} catch (error) {if (error instanceof AuthError) {return 'google log in failed'}throw error;}
}
确保src/app/api/auth/[…nextauth]/route.ts文件存在
// src/app/api/auth/[...nextauth]/route.ts
export { GET, POST } from "@/auth"
export const runtime = "edge"
最后,在登录页面src/app/login/page.tsx中创建Google登录按钮
// src/app/login/page.tsx
"use client"import { authenticate, googleAuthenticate } from "@/lib/actions" // 添加导入
import { useFormState } from "react-dom"export default function Page() {const [errorMsg, dispatch] = useFormState(authenticate, undefined)const [errorMsgGoogle, dispatchGoogle] = useFormState(googleAuthenticate, undefined) //googleAuthenticate钩子return (<div><h1>Log in Page</h1><form className="flex flex-col" action={dispatch}><input className="bg-blue-300 text-black" name="id"></input><input className="bg-yellow-300 text-black" name="password" type="password"></input><button>Log In</button><p>{errorMsg}</p></form>{/* 添加Google登录按钮 */}<br /><form className="flex flex-col" action={dispatchGoogle}><button>Google Sign In</button><p>{errorMsgGoogle}</p></form>{/* 添加Google登录按钮 */}</div>)}
现在使用npx next dev或npm run dev运行Next应用,访问 http://localhost:3000/login 并点击"Google Sign In"按钮。你将被重定向到Google的OAuth同意屏幕。
成功登录Google账户后,你将被重定向回主页,你的Google账户详细信息将打印在终端上!

源代码和备注
https://github.com/youngjun625/nextauth14-nextauthv5?source=post_page-----3683d8fae69c--------------------------------最后:
React Hook 深入浅出
CSS技巧与案例详解
vue2与vue3技巧合集
VueUse源码解读


