环境:Win11
软件:WSL2
安装环境:Ubuntu 22.04
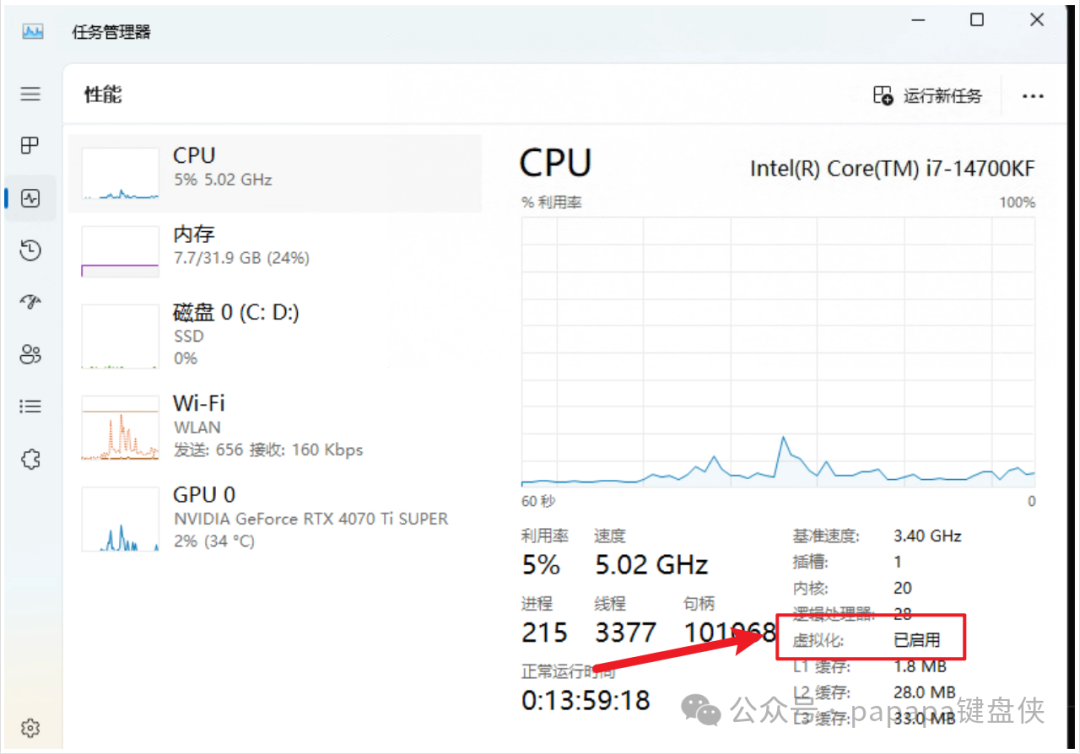
检查电脑是否开启虚拟化
打开:任务管理器->性能->CPU
CPU 开启虚拟化(通常默认是开启的,如果没有开启需要BIOS开启)
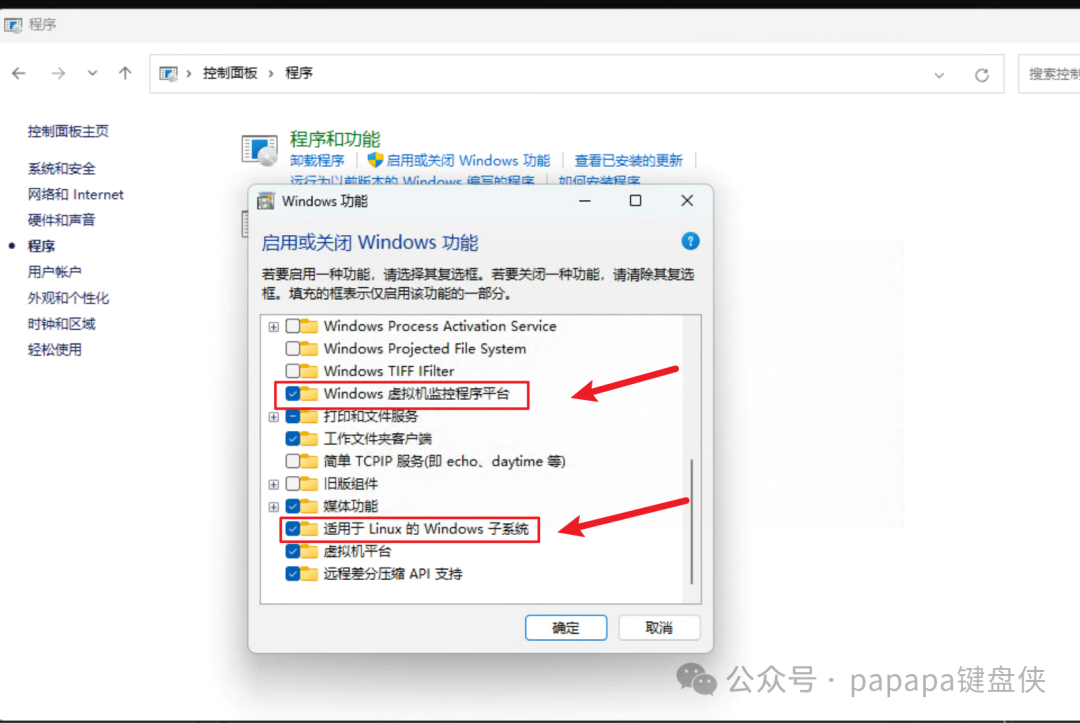
虚拟化设置,打开:控制面板->程序->启动或关闭Windows功能
WSL2 安装 Ubuntu24.04
以管理员的身份运行 cmd
step1、更新 WSL2
## step1、更新 WSL2
C:\Users\> wsl --update  --web-download
正在下载: 适用于 Linux 的 Windows 子系统
正在安装: 适用于 Linux 的 Windows 子系统
已安装 适用于 Linux 的 Windows 子系统。
step2、查看支持安装的Linux系统
# 查看 支持安装的Linux 系统
C:\Users\> wsl --list -o
以下是可安装的有效分发的列表。
使默认分发用 “*” 表示。
使用 'wsl --install -d Ubuntu-24.04' 安装。NAME                            FRIENDLY NAME
* Ubuntu                          UbuntuDebian                          Debian GNU/Linuxkali-linux                      Kali Linux RollingUbuntu-18.04                    Ubuntu 18.04 LTSUbuntu-20.04                    Ubuntu 20.04 LTSUbuntu-22.04                    Ubuntu 22.04 LTSUbuntu-24.04                    Ubuntu 24.04 LTSOracleLinux_7_9                 Oracle Linux 7.9OracleLinux_8_7                 Oracle Linux 8.7OracleLinux_9_1                 Oracle Linux 9.1openSUSE-Leap-15.6              openSUSE Leap 15.6SUSE-Linux-Enterprise-15-SP5    SUSE Linux Enterprise 15 SP5SUSE-Linux-Enterprise-15-SP6    SUSE Linux Enterprise 15 SP6openSUSE-Tumbleweed             openSUSE Tumbleweed
step3、安装 Ubuntu 24.04
# 安装 Ubuntu24.04(安装过程中需要设置Ubuntu用户名和密码)
C:\Users>wsl --install -d Ubuntu-24.04 --web-download
正在下载: Ubuntu 24.04 LTS
正在安装: Ubuntu 24.04 LTS
已安装 Ubuntu 24.04 LTS。
正在启动 Ubuntu 24.04 LTS...
Installing, this may take a few minutes...Welcome to Ubuntu 24.04 LTS (GNU/Linux 5.15.153.1-microsoft-standard-WSL2 x86_64)* Documentation:  https://help.ubuntu.com* Management:     https://landscape.canonical.com* Support:        https://ubuntu.com/proSystem information as of Mon Oct 21 10:01:19 CST 2024System load:  0.0                 Processes:             47Usage of /:   0.1% of 1006.85GB   Users logged in:       0Memory usage: 3%                  IPv4 address for eth0: 172.27.50.209Swap usage:   0%This message is shown once a day. To disable it please create the
/home/keyboardman/.hushlogin file.
Ubuntu24.04 基础环境配置
step1、更新环境
sudo apt-get update
sudo apt-get upgrade
step2、安装Docker
## 卸载老版本
for pkg in docker.io docker-doc docker-compose docker-compose-v2 podman-docker containerd runc; do sudo apt-get remove $pkg; done## 设置 Docker 仓库
# Add Docker's official GPG key:
sudo apt-get update
sudo apt-get install ca-certificates curl
sudo install -m 0755 -d /etc/apt/keyrings
sudo curl -fsSL https://download.docker.com/linux/ubuntu/gpg -o /etc/apt/keyrings/docker.asc
sudo chmod a+r /etc/apt/keyrings/docker.asc# Add the repository to Apt sources:
echo \"deb [arch=$(dpkg --print-architecture) signed-by=/etc/apt/keyrings/docker.asc] https://download.docker.com/linux/ubuntu \$(. /etc/os-release && echo "$VERSION_CODENAME") stable" | \sudo tee /etc/apt/sources.list.d/docker.list > /dev/null
sudo apt-get update## 安装最新版本 Docker
sudo apt-get install docker-ce docker-ce-cli containerd.io docker-buildx-plugin docker-compose-plugin
step3、Docker NVIDIA 支持安装
curl -fsSL https://nvidia.github.io/libnvidia-container/gpgkey | sudo gpg --dearmor -o /usr/share/keyrings/nvidia-container-toolkit-keyring.gpg \&& curl -s -L https://nvidia.github.io/libnvidia-container/stable/deb/nvidia-container-toolkit.list | \sed 's#deb https://#deb [signed-by=/usr/share/keyrings/nvidia-container-toolkit-keyring.gpg] https://#g' | \sudo tee /etc/apt/sources.list.d/nvidia-container-toolkit.list
sudo sed -i -e '/experimental/ s/^#//g' /etc/apt/sources.list.d/nvidia-container-toolkit.list## 安装 NVIDIA 运行时包和依赖项
sudo apt-get update
sudo apt-get install -y nvidia-container-toolkit## 配置
sudo nvidia-ctk runtime configure --runtime=docker
## 重启 Docker
sudo systemctl restart docker
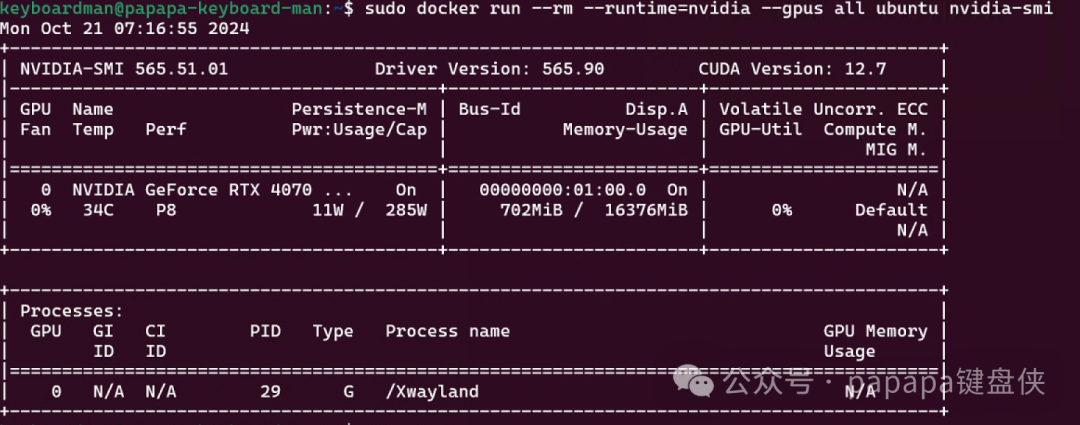
step2、验证 Docker 是否支持GPU运行
sudo docker run --rm --runtime=nvidia --gpus all ubuntu nvidia-smi
打印 GPU 信息,即表示环境搭建成功

![PostgreSQL的学习心得和知识总结(一百五十五)|[performance]优化期间将 WHERE 子句中的 IN VALUES 替换为 ANY](https://i-blog.csdnimg.cn/direct/e64811eefa534b10b01ef9f46f143b41.jpeg#pic_center)