目录
前提条件
Docker命令图
镜像命令的使用
列出镜像列表
搜索镜像
拉取镜像
查看镜像占用存储空间
删除镜像
制作镜像
从已经创建容器的创建镜像
从Dockerfile中构建镜像
保存与加载镜像
发布镜像
1.命名空间和镜像仓库准备
2.登录阿里云Docker Registry
3.给镜像打标签
4.推送镜像到阿里云Docker Registry镜像仓库
5.从阿里云Docker Registry中拉取镜像
6.使用阿里云Docker Registry拉取的镜像运行容器
前提条件
- Linux环境
- 安装好Docker,可参考Rocky Linux9下安装Docker和卸载Docker
Docker命令图

镜像命令的使用
列出镜像列表
使用 docker images 命令来列出本地主机上的镜像。
[root@localhost ~]# docker images
REPOSITORY    TAG       IMAGE ID       CREATED         SIZE
nginx         latest    39286ab8a5e1   3 weeks ago     188MB
hello-world   latest    d2c94e258dcb   16 months ago   13.3kB
搜索镜像
命令帮助
[root@localhost ~]# docker search --help Usage: docker search [OPTIONS] TERM Search Docker Hub for images Options:-f, --filter filter Filter output based on conditions provided--format string Pretty-print search using a Go template--limit int Max number of search results--no-trunc Don't truncate output
案例
[root@localhost ~]# docker search httpd

--limit 限制输出条数
[root@localhost ~]# docker search --limit 3 redis NAME DESCRIPTION STARS OFFICIAL redis Redis is the world’s fastest data platform f… 13028 [OK] redis/redis-stack-server redis-stack-server installs a Redis server w… 82 redis/redis-stack redis-stack installs a Redis server with add… 118
拉取镜像
使用命令 docker pull 来下载镜像。
[root@localhost ~]# docker pull httpd Using default tag: latest latest: Pulling from library/httpd a2318d6c47ec: Already exists 62dd86107c65: Pull complete 4f4fb700ef54: Pull complete 22871f73faed: Pull complete ca061a523d1f: Pull complete 509789394c2a: Pull complete Digest: sha256:ae1124b8d23ee3fc35d49da35d5c748a2fce318d1f55ce59ccab889d612f8be8 Status: Downloaded newer image for httpd:latest docker.io/library/httpd:latest [root@localhost ~]# docker images REPOSITORY TAG IMAGE ID CREATED SIZE nginx latest 39286ab8a5e1 3 weeks ago 188MB httpd latest 9cb0a2315602 7 weeks ago 148MB hello-world latest d2c94e258dcb 16 months ago 13.3kB
这里没有版本号,默认拉取latest版本的镜像,如果带有版本号,就拉取对应版本的镜像,版本号可以到docker hub查找。

拉取指定版本的镜像命令,例如:
docker pull httpd:2.4
查看镜像占用存储空间
docker system df命令可以查看镜像、容器、本地数据卷、构件缓存所占用的存储空间。
[root@localhost ~]# docker system df TYPE TOTAL ACTIVE SIZE RECLAIMABLE Images 6 3 852MB 773.9MB (90%) Containers 3 2 2.501kB 8B (0%) Local Volumes 0 0 0B 0B Build Cache 0 0 0B 0B
删除镜像
使用docker rmi命令删除镜像
[root@localhost ~]# docker rmi httpd Untagged: httpd:latest Untagged: httpd@sha256:ae1124b8d23ee3fc35d49da35d5c748a2fce318d1f55ce59ccab889d612f8be8 Deleted: sha256:9cb0a231560203a9b46325ef6dfe0d21d524813acb74447fd276b9813a9fdd44 Deleted: sha256:f5382eeddcae06a6e29e48624b55f4d7e0247fcb22dd8bc9fab15157b0e7b6b2 Deleted: sha256:7273545347825caf7ca41a01e9383a21098dddc64657717c53f82a94b701b6bd Deleted: sha256:02761981fdb085e46e9eed1db68ee5a81f21a2227af87b7c533c6409b4561397 Deleted: sha256:f1941dcf5921c6411977dc39f1f8f155ff40460ff5fd8824a83ad990e5b139c5 Deleted: sha256:6e8fe2e4a7154a2c63be941fc4edd32f5beb69f22e27da9e8248541a74b6fd92
制作镜像
制作镜像的两种方法如下:
-
从已经创建容器的创建镜像
-
从Dockerfile中构建镜像
从已经创建容器的创建镜像
基本步骤
案例
查看镜像
[root@localhost ~]# docker images
REPOSITORY    TAG       IMAGE ID       CREATED         SIZE
nginx         latest    39286ab8a5e1   3 weeks ago     188MB
hello-world   latest    d2c94e258dcb   16 months ago   13.3kB
进入容器内部修改镜像,以Nginx镜像为例
# 进入容器 [root@localhost ~]# docker exec -it nginx-test bash # 查看容器原来内容 root@f9dae64ca2c9:/# cat /usr/share/nginx/html/index.html <!DOCTYPE html> <html> <head> <title>Welcome to nginx!</title> <style> html { color-scheme: light dark; } body { width: 35em; margin: 0 auto; font-family: Tahoma, Verdana, Arial, sans-serif; } </style> </head> <body> <h1>Welcome to nginx!</h1> <p>If you see this page, the nginx web server is successfully installed and working. Further configuration is required.</p> <p>For online documentation and support please refer to <a href="http://nginx.org/">nginx.org</a>.<br/> Commercial support is available at <a href="http://nginx.com/">nginx.com</a>.</p> <p><em>Thank you for using nginx.</em></p> </body> </html> # 修改容器 root@f9dae64ca2c9:/# echo "hello world" > /usr/share/nginx/html/index.html # 访问容器 root@f9dae64ca2c9:/# curl localhost:80 hello world # 查看修改后的内容 root@f9dae64ca2c9:/# cat /usr/share/nginx/html/index.html hello world # 退出容器 root@f9dae64ca2c9:/# exit exit [root@localhost ~]#
docker commit的功能是提交已修改的容器得到一个新镜像,docker commit帮助
[root@localhost ~]# docker commit --help Usage: docker commit [OPTIONS] CONTAINER [REPOSITORY[:TAG]] Create a new image from a container's changes Aliases:docker container commit, docker commit Options:-a, --author string Author (e.g., "John Hannibal Smith <hannibal@a-team.com>")-c, --change list Apply Dockerfile instruction to the created image-m, --message string Commit message-p, --pause Pause container during commit (default true)
提交修改得到新镜像
修改的容器,此前进入容器时看到的容器ID为f9dae64ca2c9
# 查看所有容器ID [root@localhost ~]# docker ps -a CONTAINER ID IMAGE COMMAND CREATED STATUS PORTS NAMES f9dae64ca2c9 nginx "/docker-entrypoint.…" 9 minutes ago Exited (0) 2 minutes ago vibrant_raman 1f7c31788f4f nginx "/docker-entrypoint.…" 15 minutes ago Up 15 minutes 0.0.0.0:90->80/tcp, [::]:90->80/tcp nginx-test b139e9529ad6 hello-world "/hello" 23 hours ago Exited (0) 23 hours ago objective_tharp # 提交修改得到新镜像 [root@localhost ~]# docker commit -m="change index.html" -a="liang" f9dae64ca2c9 test/mychangenginx:v1 sha256:163664e6a2505b7fc56187d3743522b2dbb02bbff776bed5b48671295eaf6c02 # 再次查看镜像 [root@localhost ~]# docker images REPOSITORY TAG IMAGE ID CREATED SIZE test/mychangenginx v1 163664e6a250 6 seconds ago 188MB nginx latest 39286ab8a5e1 3 weeks ago 188MB hello-world latest d2c94e258dcb 16 months ago 13.3kB
[root@localhost ~]# docker run --name nginx-test1 -p 95:80 -d test/mychangenginx:v1 [root@localhost ~]# curl localhost:95 hello world
从Dockerfile中构建镜像
由于制作镜像的过程中,需要逐层处理和打包,比较复杂,所以Docker就提供了自动打包镜像的功能。我们只需要将打包的过程,每一层要做的事情用固定的语法写下来,交给Docker去执行即可。
而这种记录镜像结构的文件就称为 Dockerfile ,其对应的语法可以参考官方文档:
Dockerfile reference | Docker Docs
基本步骤
-
编写Dockerfile文件
-
执行docker build命令构建镜像
Dockerfile命令
| 命令 | 用途 |
|---|---|
| FROM | 基础镜像文件 |
| RUN | 构建镜像阶段执行命令 |
| ADD | 添加文件,从src目录复制文件到容器的dest,其中 src可以是 Dockerfile所在目录的相对路径,也可以是一个 URL,还可以是一个压缩包 |
| COPY | 拷贝文件,和ADD命令类似,但不支持URL和压缩包 |
| CMD | 容器启动后执行命令 |
| EXPOSE | 声明容器在运行时对外提供的服务端口 |
| WORKDIR | 指定容器工作路径 |
| ENV | 指定环境变量 |
| ENTRYPINT | 容器入口, ENTRYPOINT和 CMD指令的目的一样,都是指定 Docker容器启动时执行的命令,可多次设置,但只有最后一个有效。 |
| USER | 该指令用于设置启动镜像时的用户或者 UID,写在该指令后的 RUN、 CMD以及 ENTRYPOINT指令都将使用该用户执行命令。 |
| VOLUME | 指定挂载点,该指令使容器中的一个目录具有持久化存储的功能,该目录可被容器本身使用,也可共享给其他容器。当容器中的应用有持久化数据的需求时可以在 Dockerfile中使用该指令。格式为: VOLUME["/data"]。 |
常用命令示例
| 指令 | 说明 | 示例 |
|---|---|---|
| FROM | 指定基础镜像 | FROM centos:6 |
| ENV | 设置环境变量,可在后面指令使用 | ENV key value |
| COPY | 拷贝本地文件到镜像的指定目录 | COPY ./xx.jar /tmp/app.jar |
| RUN | 执行Linux的shell命令,一般是安装过程的命令 | RUN yum install gcc |
| EXPOSE | 指定容器运行时监听的端口,是给镜像使用者看的 | EXPOSE 8080 |
| ENTRYPOINT | 镜像中应用的启动命令,容器运行时调用 | ENTRYPOINT java -jar xx.jar |
案例
一个Dockefile案例:以Nginx作为基础镜像,并执行修改首页内容
创建一个名为Dockerfile的文件,内容如下:
FROM nginx
RUN echo '<h1>This is My Nginx!!!</h1>' > /usr/share/nginx/html/index.html
操作过程
创建一个目录并进入该目录 [hadoop@node1 ~]$ mkdir docker-demo [hadoop@node1 ~]$ cd docker-demo/ 创建名为Dockerfile的文件 [hadoop@node1 docker-demo]$ vim Dockerfile Dockerfile的内容 [hadoop@node1 docker-demo]$ cat Dockerfile FROM nginx RUN echo '<h1>This is My Nginx!!!</h1>' > /usr/share/nginx/html/index.html
构建镜像:在Dockerfile所在路径执行以下命令构建镜像,命令如下
sudo docker build -t test/mynginx:v1.00 .
提示:
-t为指定镜像的标签
不要漏掉最后的点"." ,代表基于当前路径构建镜像
docker build命令帮助
[hadoop@node1 docker-demo]$ docker build --help Start a build Usage: docker buildx build [OPTIONS] PATH | URL | - Start a build Aliases:docker buildx build, docker buildx b Options:--add-host strings Add a custom host-to-IP mapping (format: "host:ip")--allow strings Allow extra privileged entitlement (e.g., "network.host", "security.insecure")--annotation stringArray Add annotation to the image--attest stringArray Attestation parameters (format: "type=sbom,generator=image")--build-arg stringArray Set build-time variables--build-context stringArray Additional build contexts (e.g., name=path)--builder string Override the configured builder instance (default "default")--cache-from stringArray External cache sources (e.g., "user/app:cache", "type=local,src=path/to/dir")--cache-to stringArray Cache export destinations (e.g., "user/app:cache", "type=local,dest=path/to/dir")--cgroup-parent string Set the parent cgroup for the "RUN" instructions during build-f, --file string Name of the Dockerfile (default: "PATH/Dockerfile")--iidfile string Write the image ID to a file--label stringArray Set metadata for an image--load Shorthand for "--output=type=docker"--metadata-file string Write build result metadata to a file--network string Set the networking mode for the "RUN" instructions during build (default "default")--no-cache Do not use cache when building the image--no-cache-filter stringArray Do not cache specified stages-o, --output stringArray Output destination (format: "type=local,dest=path")--platform stringArray Set target platform for build--progress string Set type of progress output ("auto", "plain", "tty"). Use plain to show container output (default "auto")--provenance string Shorthand for "--attest=type=provenance"--pull Always attempt to pull all referenced images--push Shorthand for "--output=type=registry"-q, --quiet Suppress the build output and print image ID on success--sbom string Shorthand for "--attest=type=sbom"--secret stringArray Secret to expose to the build (format: "id=mysecret[,src=/local/secret]")--shm-size bytes Shared memory size for build containers--ssh stringArray SSH agent socket or keys to expose to the build (format: "default|<id>[=<socket>|<key>[,<key>]]")-t, --tag stringArray Name and optionally a tag (format: "name:tag")--target string Set the target build stage to build--ulimit ulimit Ulimit options (default []) Experimental commands and flags are hidden. Set BUILDX_EXPERIMENTAL=1 to show them.
操作过程
docker buildx build命令可以执行成功 [root@node1 docker-demo]# docker buildx build -t mynginx:v100 . [+] Building 0.1s (6/6) FINISHED docker:default=> [internal] load build definition from Dockerfile 0.0s=> => transferring dockerfile: 123B 0.0s=> [internal] load metadata for docker.io/library/nginx:latest 0.0s=> [internal] load .dockerignore 0.0s=> => transferring context: 2B 0.0s=> [1/2] FROM docker.io/library/nginx:latest 0.0s=> CACHED [2/2] RUN echo '<h1>This is My Nginx!!!</h1>' > /usr/share/nginx/html/index.html 0.0s=> exporting to image 0.0s=> => exporting layers 0.0s=> => writing image sha256:d8106c8be2b26d9740360eacbfdfe609028184b3de46c59abfbaf55683021387 0.0s=> => naming to docker.io/library/mynginx:v100 0.0s [root@node1 docker-demo]# docker images REPOSITORY TAG IMAGE ID CREATED SIZE mynginx v100 d8106c8be2b2 2 minutes ago 141MB test/mynginx1 v1.0 bd0f5df43117 37 hours ago 140MB test/mynginx v1 ada934093571 38 hours ago 140MB nginx latest 605c77e624dd 2 years ago 141MB hello-world latest feb5d9fea6a5 2 years ago 13.3kB [root@node1 docker-demo]# sudo hadoop sudo: hadoop: command not found [root@node1 docker-demo]# su hadoop docker build也可以执行成功 [hadoop@node1 docker-demo]$ sudo docker build -t mynginx:v101 . [+] Building 0.1s (6/6) FINISHED docker:default=> [internal] load build definition from Dockerfile 0.0s=> => transferring dockerfile: 123B 0.0s=> [internal] load metadata for docker.io/library/nginx:latest 0.0s=> [internal] load .dockerignore 0.0s=> => transferring context: 2B 0.0s=> [1/2] FROM docker.io/library/nginx:latest 0.0s=> CACHED [2/2] RUN echo '<h1>This is My Nginx!!!</h1>' > /usr/share/nginx/html/index.html 0.0s=> exporting to image 0.0s=> => exporting layers 0.0s=> => writing image sha256:d8106c8be2b26d9740360eacbfdfe609028184b3de46c59abfbaf55683021387 0.0s=> => naming to docker.io/library/mynginx:v101 [hadoop@node1 docker-demo]$ sudo docker images REPOSITORY TAG IMAGE ID CREATED SIZE mynginx v100 d8106c8be2b2 4 minutes ago 141MB mynginx v101 d8106c8be2b2 4 minutes ago 141MB test/mynginx1 v1.0 bd0f5df43117 37 hours ago 140MB test/mynginx v1 ada934093571 38 hours ago 140MB nginx latest 605c77e624dd 2 years ago 141MB hello-world latest feb5d9fea6a5 2 years ago 13.3kB
基于构建的镜像启动容器
[hadoop@node1 docker-demo]$ sudo docker ps CONTAINER ID IMAGE COMMAND CREATED STATUS PORTS NAMES 1cfee1f2323f nginx "/docker-entrypoint.…" 43 hours ago Up 43 hours 0.0.0.0:91->80/tcp, :::91->80/tcp nginx-test1 703ef7d2c6b4 nginx "/docker-entrypoint.…" 44 hours ago Up 44 hours 0.0.0.0:90->80/tcp, :::90->80/tcp nginx-test [hadoop@node1 docker-demo]$ sudo docker run -d -p 92:80 mynginx:v100 74da4bc34431c9a2aca6e85cd4c9da8095fbeacb3fe5a18f0f76ceaea0841bee [hadoop@node1 docker-demo]$ curl localhost:92 <h1>This is My Nginx!!!</h1> [hadoop@node1 docker-demo]$
保存与加载镜像
命令
保存镜像为tar文件:docker save
从tar文件加载镜像:docker load
案例
[root@localhost ~]# docker images REPOSITORY TAG IMAGE ID CREATED SIZE nginx latest 39286ab8a5e1 3 weeks ago 188MB hello-world latest d2c94e258dcb 16 months ago 13.3kB # 保存镜像 [root@localhost ~]# docker save -o savenginx.tar nginx:latest[root@localhost ~]# ls anaconda-ks.cfg docker-demo mynginx.tar savenginx.tar [root@localhost ~]# docker images REPOSITORY TAG IMAGE ID CREATED SIZE nginx latest 39286ab8a5e1 3 weeks ago 188MB hello-world latest d2c94e258dcb 16 months ago 13.3kB # 删除镜像 [root@localhost ~]# docker rmi 392 Untagged: nginx:latest Untagged: nginx@sha256:04ba374043ccd2fc5c593885c0eacddebabd5ca375f9323666f28dfd5a9710e3 Deleted: sha256:39286ab8a5e14aeaf5fdd6e2fac76e0c8d31a0c07224f0ee5e6be502f12e93f3 [root@localhost ~]# docker images REPOSITORY TAG IMAGE ID CREATED SIZE hello-world latest d2c94e258dcb 16 months ago 13.3kB # 加载镜像 [root@localhost ~]# docker load -i savenginx.tar Loaded image: nginx:latest # 查看镜像 [root@localhost ~]# docker images REPOSITORY TAG IMAGE ID CREATED SIZE nginx latest 39286ab8a5e1 3 weeks ago 188MB hello-world latest d2c94e258dcb 16 months ago 13.3kB
发布镜像
发布镜像可以把镜像上传到远端仓库地址,这里以把镜像发布到阿里云镜像仓库为例。
1.命名空间和镜像仓库准备
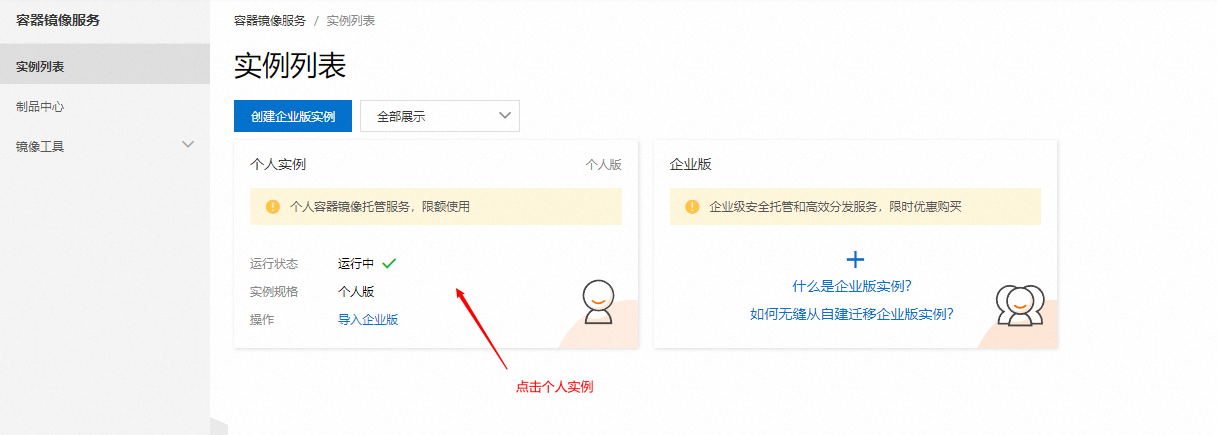
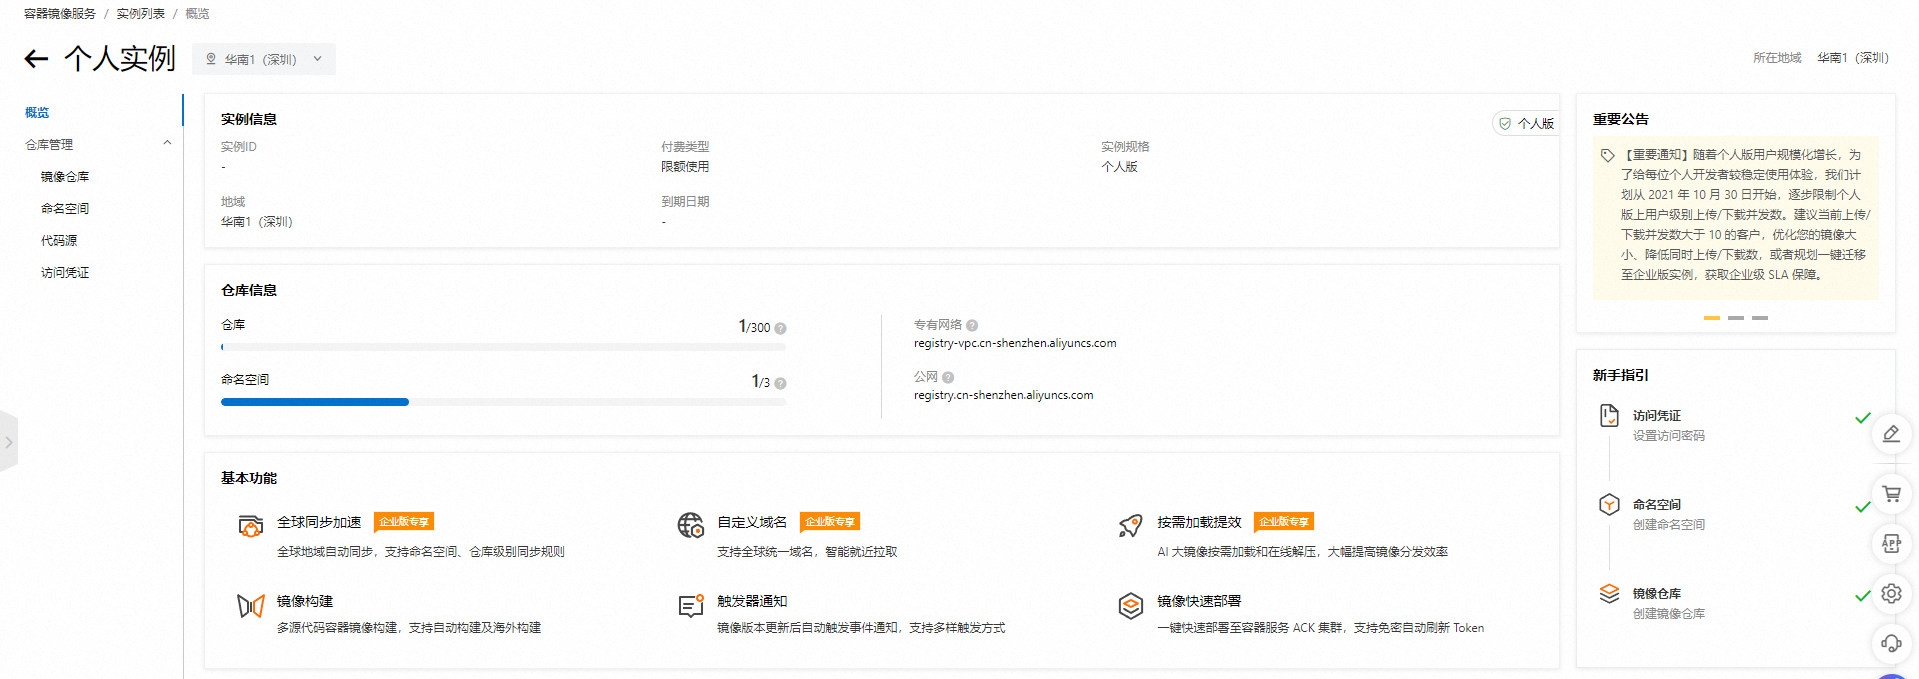
浏览器登录 阿里云,进入控制台,找到容器镜像服务,实例列表,点击个人实例
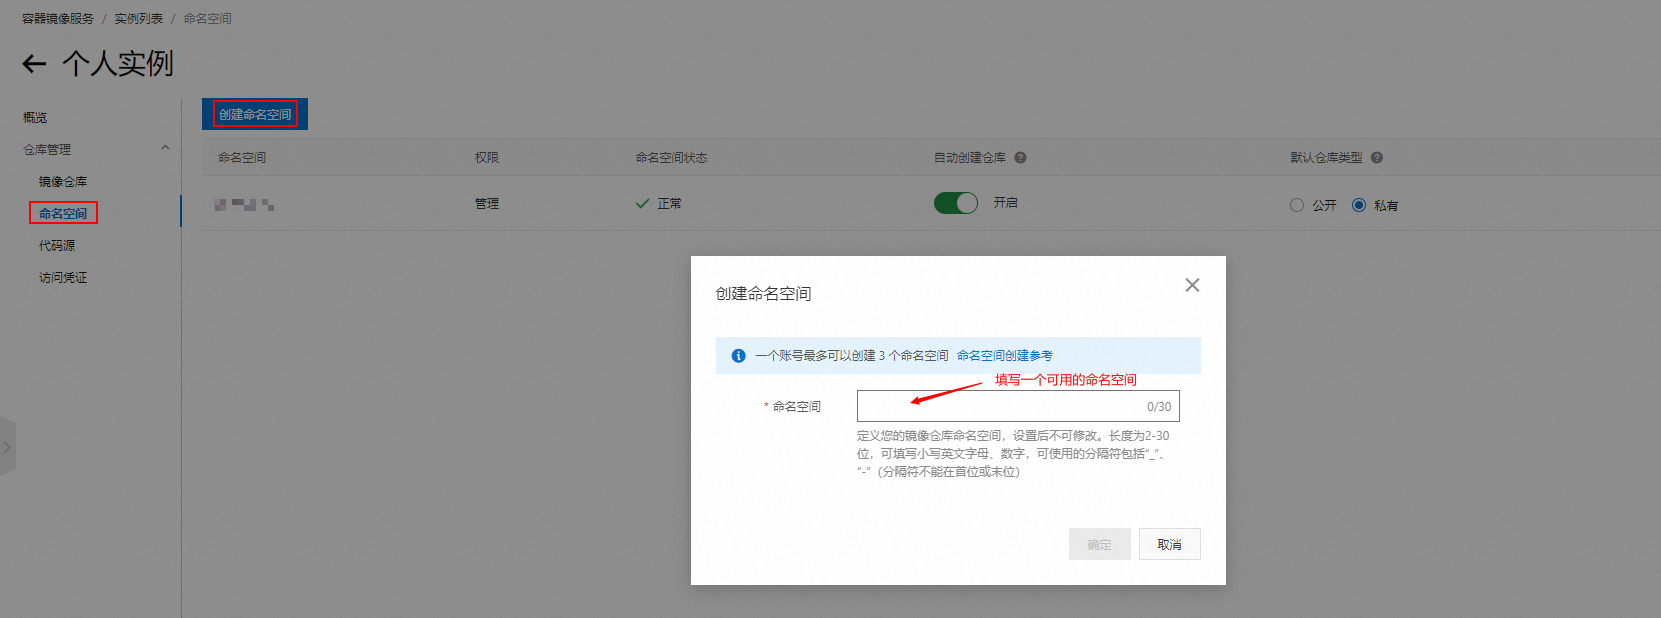
命令空间创建成功如下,命名空间,例如:mytest_ns

创建镜像仓库
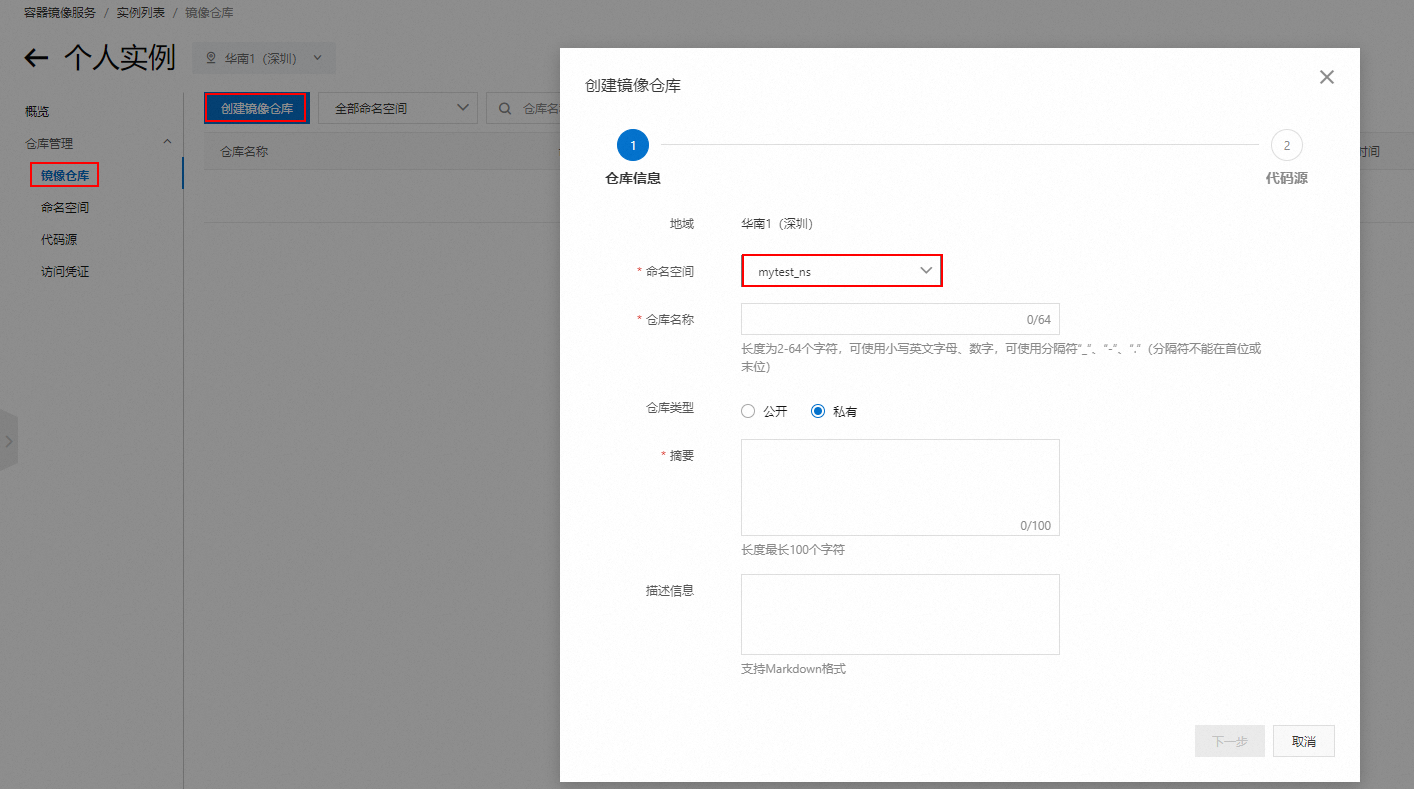
创建镜像仓库
镜像仓库名称尽量能一看就知道这个仓库的功能,例如:my_nginx
仓库类型根据实际需求填写,这里填写私有
根据提示填写其他信息,点击下一步

选中本地仓库
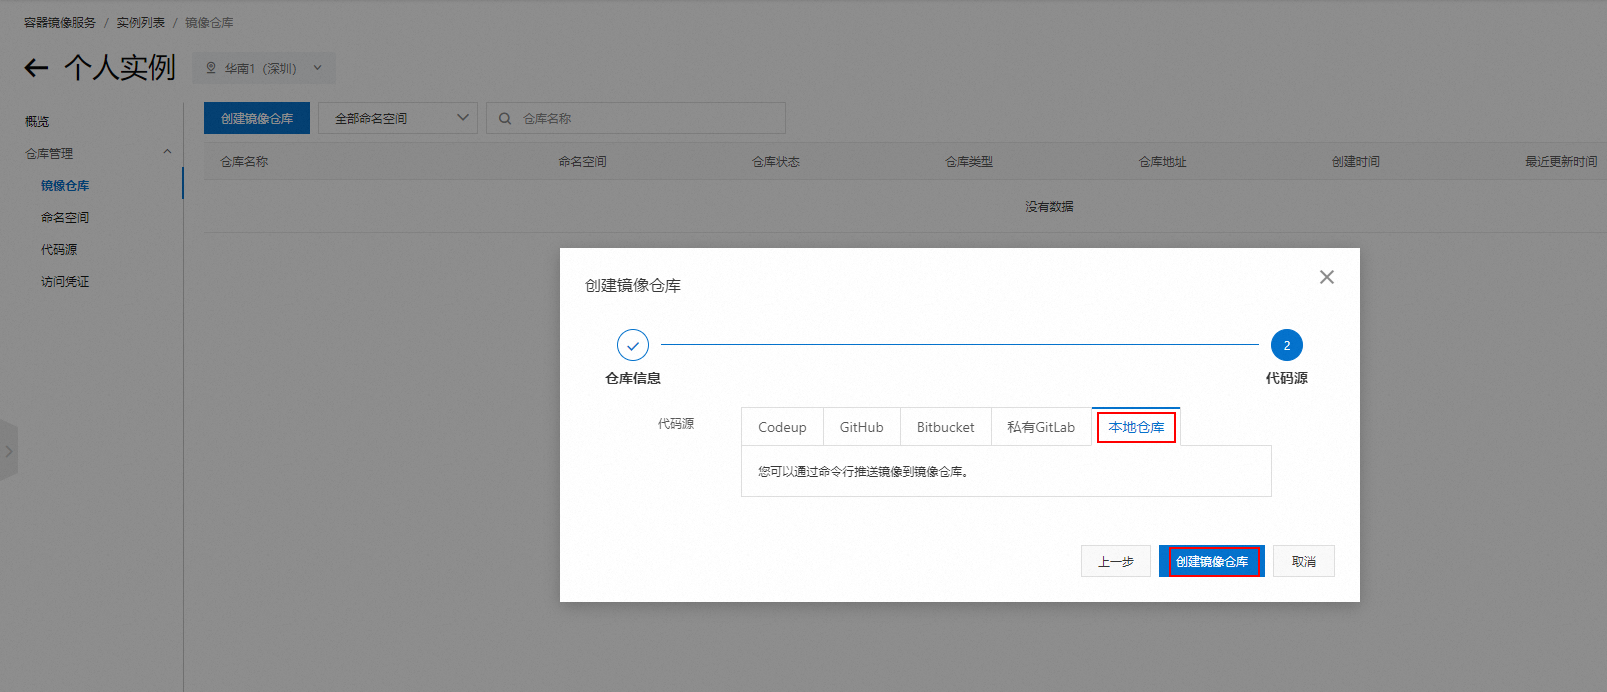
创建成功后,如下:

可以根据页面操作指南进行操作。操作指南的第3步就是将镜像推送到Registry
$ docker login --username=youraccount registry.cn-shenzhen.aliyuncs.com
$ docker tag [ImageId] registry.cn-shenzhen.aliyuncs.com/mytest_ns/my_registry:[镜像版本号]
$ docker push registry.cn-shenzhen.aliyuncs.com/mytest_ns/my_registry:[镜像版本号]
2.登录阿里云Docker Registry
[hadoop@node1 docker-demo]$ docker login --username=youraccount registry.cn-shenzhen.aliyuncs.com Password: WARNING! Your password will be stored unencrypted in /home/hadoop/.docker/config.json. Configure a credential helper to remove this warning. See https://docs.docker.com/engine/reference/commandline/login/#credentials-store Login Succeeded
注意:1.命令中username的值youraccount需要根据实际情况填写 2.执行过程根据提示输入自己阿里云的登录密码
3.给镜像打标签
[hadoop@node1 docker-demo]$ $ docker tag d8106c8be2b2 registry.cn-shenzhen.aliyuncs.com/mytest_ns/my_registry:v101
注意:镜像id、registry地址、镜像版本号根据实际情况修改
4.推送镜像到阿里云Docker Registry镜像仓库
[hadoop@node1 docker-demo]$ sudo docker push registry.cn-shenzhen.aliyuncs.com/mytest_ns/my_registry:v101
The push refers to repository [registry.cn-shenzhen.aliyuncs.com/mytest_ns/my_registry]
364fd38d261c: Pushed
d874fd2bc83b: Pushed
32ce5f6a5106: Pushed
f1db227348d0: Pushed
b8d6e692a25e: Pushed
e379e8aedd4d: Pushed
2edcec3590a4: Pushed
v101: digest: sha256:2d6b0bfdff30afa7d0748021fc07ee22ba377b9b0dc5e99d8bc9088ada4fee93 size: 1777
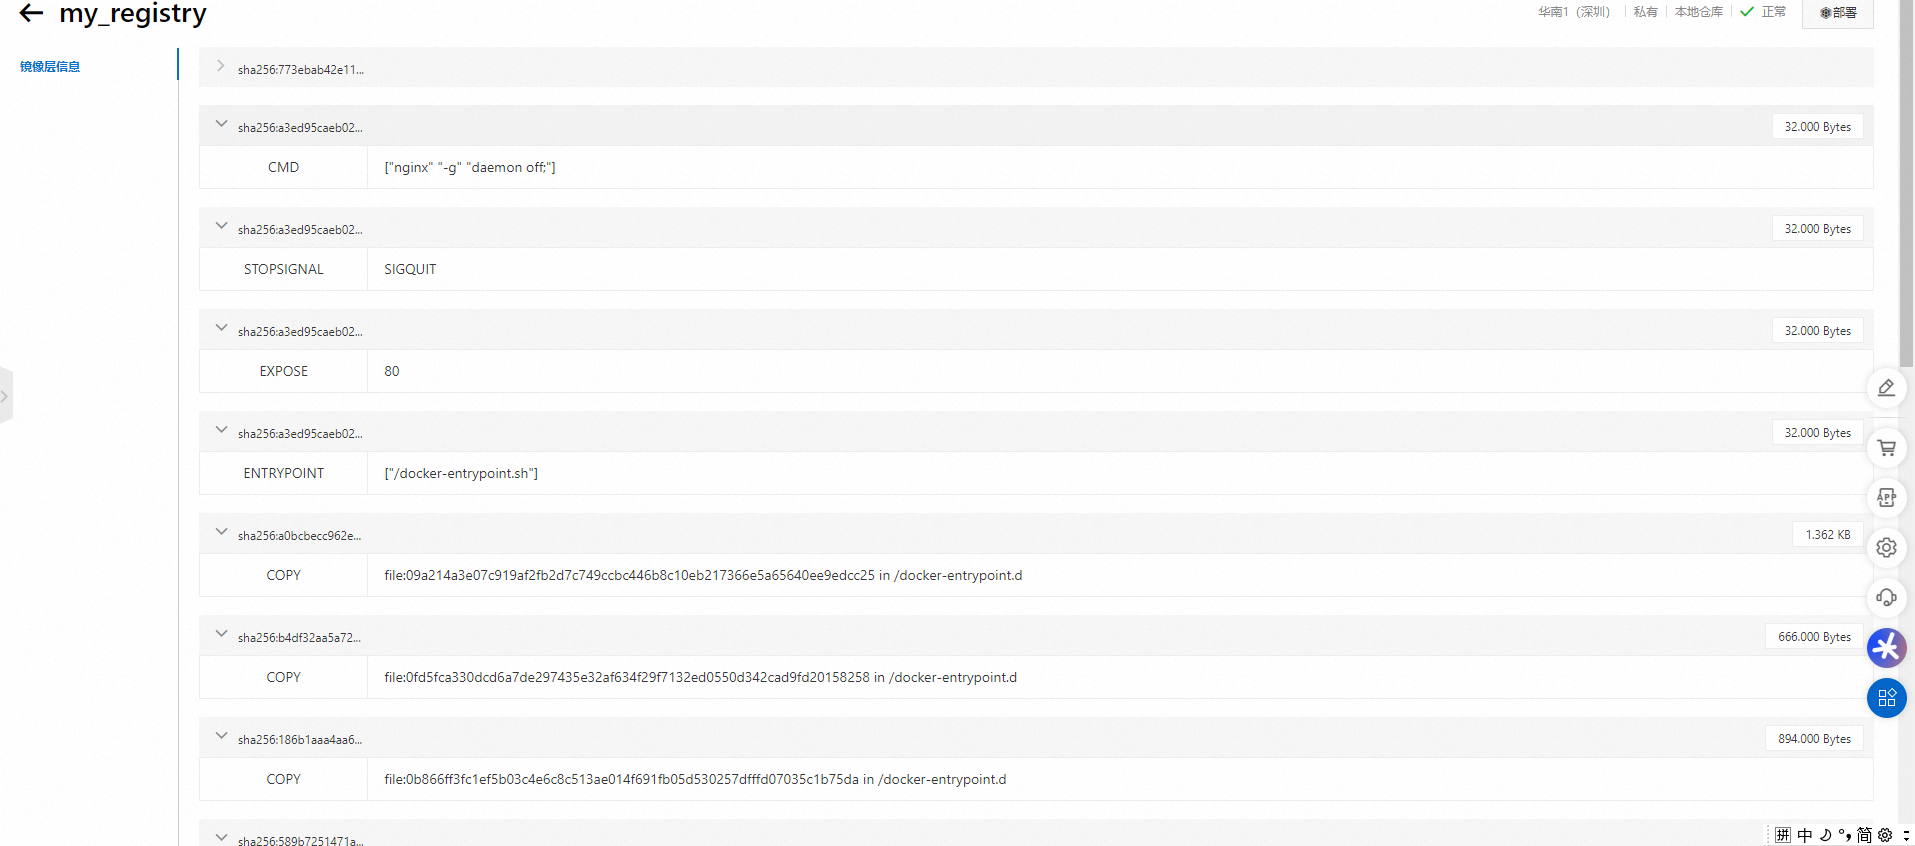
推送成功后,查看阿里云控制台
查看镜像版本

点击操作里的层信息,查看镜像层信息
5.从阿里云Docker Registry中拉取镜像
删除本地的相关镜像
[hadoop@node1 docker-demo]$ sudo docker images REPOSITORY TAG IMAGE ID CREATED SIZE mynginx v100 d8106c8be2b2 8 hours ago 141MB mynginx v101 d8106c8be2b2 8 hours ago 141MB registry.cn-shenzhen.aliyuncs.com/mytest_ns/my_registry v101 d8106c8be2b2 8 hours ago 141MB test/mynginx1 v1.0 bd0f5df43117 46 hours ago 140MB test/mynginx v1 ada934093571 46 hours ago 140MB nginx latest 605c77e624dd 2 years ago 141MB hello-world latest feb5d9fea6a5 2 years ago 13.3kB [hadoop@node1 docker-demo]$ sudo docker rmi -f d8106c8be2b2 Untagged: mynginx:v100 Untagged: mynginx:v101 Untagged: registry.cn-shenzhen.aliyuncs.com/mytest_ns/my_registry:v101 Untagged: registry.cn-shenzhen.aliyuncs.com/mytest_ns/my_registry@sha256:2d6b0bfdff30afa7d0748021fc07ee22ba377b9b0dc5e99d8bc9088ada4fee93 Deleted: sha256:d8106c8be2b26d9740360eacbfdfe609028184b3de46c59abfbaf55683021387 [hadoop@node1 docker-demo]$ sudo docker rmi -f bd0 ada 605 [hadoop@node1 docker-demo]$ sudo docker images REPOSITORY TAG IMAGE ID CREATED SIZE hello-world latest feb5d9fea6a5 2 years ago 13.3kB
从阿里云Docker Registry拉取镜像
[hadoop@node1 docker-demo]$ sudo docker pull registry.cn-shenzhen.aliyuncs.com/mytest_ns/my_registry:v101 v101: Pulling from mytest_ns/my_registry a2abf6c4d29d: Already exists a9edb18cadd1: Already exists 589b7251471a: Already exists 186b1aaa4aa6: Already exists b4df32aa5a72: Already exists a0bcbecc962e: Already exists 773ebab42e11: Already exists Digest: sha256:2d6b0bfdff30afa7d0748021fc07ee22ba377b9b0dc5e99d8bc9088ada4fee93 Status: Downloaded newer image for registry.cn-shenzhen.aliyuncs.com/mytest_ns/my_registry:v101 registry.cn-shenzhen.aliyuncs.com/mytest_ns/my_registry:v101 [hadoop@node1 docker-demo]$ sudo docker images REPOSITORY TAG IMAGE ID CREATED SIZE registry.cn-shenzhen.aliyuncs.com/mytest_ns/my_registry v101 d8106c8be2b2 9 hours ago 141MB hello-world latest feb5d9fea6a5 2 years ago 13.3kB
6.使用阿里云Docker Registry拉取的镜像运行容器
[hadoop@node1 docker-demo]$ sudo docker run --name nginx-test1 -p 94:80 -d registry.cn-shenzhen.aliyuncs.com/mytest_ns/my_registry:v101 2e5ff4b51281daf75bfcc4f2689746bcf1dc2680e76ace4540aa686d31cd2ed3 [hadoop@node1 docker-demo]$ curl localhost:94 <h1>This is My Nginx!!!</h1>
完成!enjoy it!