主机规划
# 主机组件规划
node1  #MON、MGR、OSD、Bootstrap、监控堆栈组件
node2  #MON、MGR、OSD
node3  #MON、OSD# 算力规划
实验主机均为虚拟机,每台4C8GB。# 网络设备规划(使用虚拟机则配置虚拟网卡,物理机则配置交换机路由器)
net1 192.168.11.0/24  #公共网络,可访问公网(NAT或桥接)
net2 192.168.12.0/24  #集群网络,不可访问公网(仅主机模式,三层vlanif)# 静态ip规划
node1  eth0:192.168.11.101  eth1:192.168.12.101
node2  eth0:192.168.11.102  eth1:192.168.12.102
node3  eth0:192.168.11.103  eth1:192.168.12.103# 硬盘规划
1个50G  SSD  #系统盘
3个100G SSD  #OSD # 系统版本Debian 12
# cat /etc/os-release
PRETTY_NAME="Debian GNU/Linux 12 (bookworm)"
NAME="Debian GNU/Linux"
VERSION_ID="12"
VERSION="12 (bookworm)"
VERSION_CODENAME=bookworm
ID=debian
HOME_URL="https://www.debian.org/"
SUPPORT_URL="https://www.debian.org/support"
BUG_REPORT_URL="https://bugs.debian.org/"# 内核版本
# uname -a
Linux nexus 6.1.0-25-amd64 #1 SMP PREEMPT_DYNAMIC Debian 6.1.106-3 (2024-08-26) x86_64 GNU/Linux#系统语言推荐英文#生产环境不要开启系统交换分区
系统镜像源
#一键优化脚本
bash <(curl -sSL https://linuxmirrors.cn/main.sh)    #系统源优化#常用软件安装
apt install -y wget lrzsz tree bash-completion vim nfs-common autofs net-tools apache2-utils chrony curl sudo wget python3-pip python3-venv#卸载系统旧内核
apt-get autoremove --purge
主机名
#设置计算机名称
hostnamectl set-hostname node1
hostnamectl set-hostname node2
hostnamectl set-hostname node3#设置名称解析
cat >> /etc/hosts <<EOF
#public network
192.168.11.101 node1
192.168.11.102 node2
192.168.11.103 node3#cluster network
192.168.12.101 cluster-node1
192.168.12.102 cluster-node2
192.168.12.103 cluster-node3
EOF
网卡命名
# 开启网卡重命名,把网卡变成eth0、eth1、eth2...
vim /etc/default/grub
将GRUB_CMDLINE_LINUX=""
修改成: GRUB_CMDLINE_LINUX="net.ifnames=0 biosdevname=0"# 修改成功更新grub,重启系统
update-grub
reboot
静态ip
# 以node1为例
vim /etc/network/interfaces
--------------------------------------
# This file describes the network interfaces available on your system
# and how to activate them. For more information, see interfaces(5).source /etc/network/interfaces.d/*# The loopback network interface
auto lo
iface lo inet loopback# The primary network interface
auto eth0
#iface eth0 inet dhcp
iface eth0 inet staticaddress 192.168.11.101netmask 255.255.255.0gateway 192.168.11.2dns-nameservers 192.168.11.2auto eth1
iface eth1 inet staticaddress 192.168.12.101netmask 255.255.255.0# 配置完成后重启网络
systemctl restart networking
时间同步
#安装软件
yum install chrony#使用路由作为NTP服务端
vim /etc/chrony.conf
server ntp.aliyun.com iburst#启动时间同步服务
systemctl enable --now chronyd.service#开启时间同步并且配置时区
timedatectl set-timezone Asia/Shanghai
timedatectl set-ntp true
关闭防火墙
ufw disable
systemctl stop firewalld && systemctl disable firewalld# 如果你在Debian上安装了selinux,也需要关闭。
setenforce 0 && sed -i 's/SELINUX=enforcing/SELINUX=disabled/' /etc/selinux/config
Cephadm介绍
#Cephadm命令使用ssh与存储集群中的节点通信
无需使用外部工具即可添加、删除或更新Ceph Storage容器
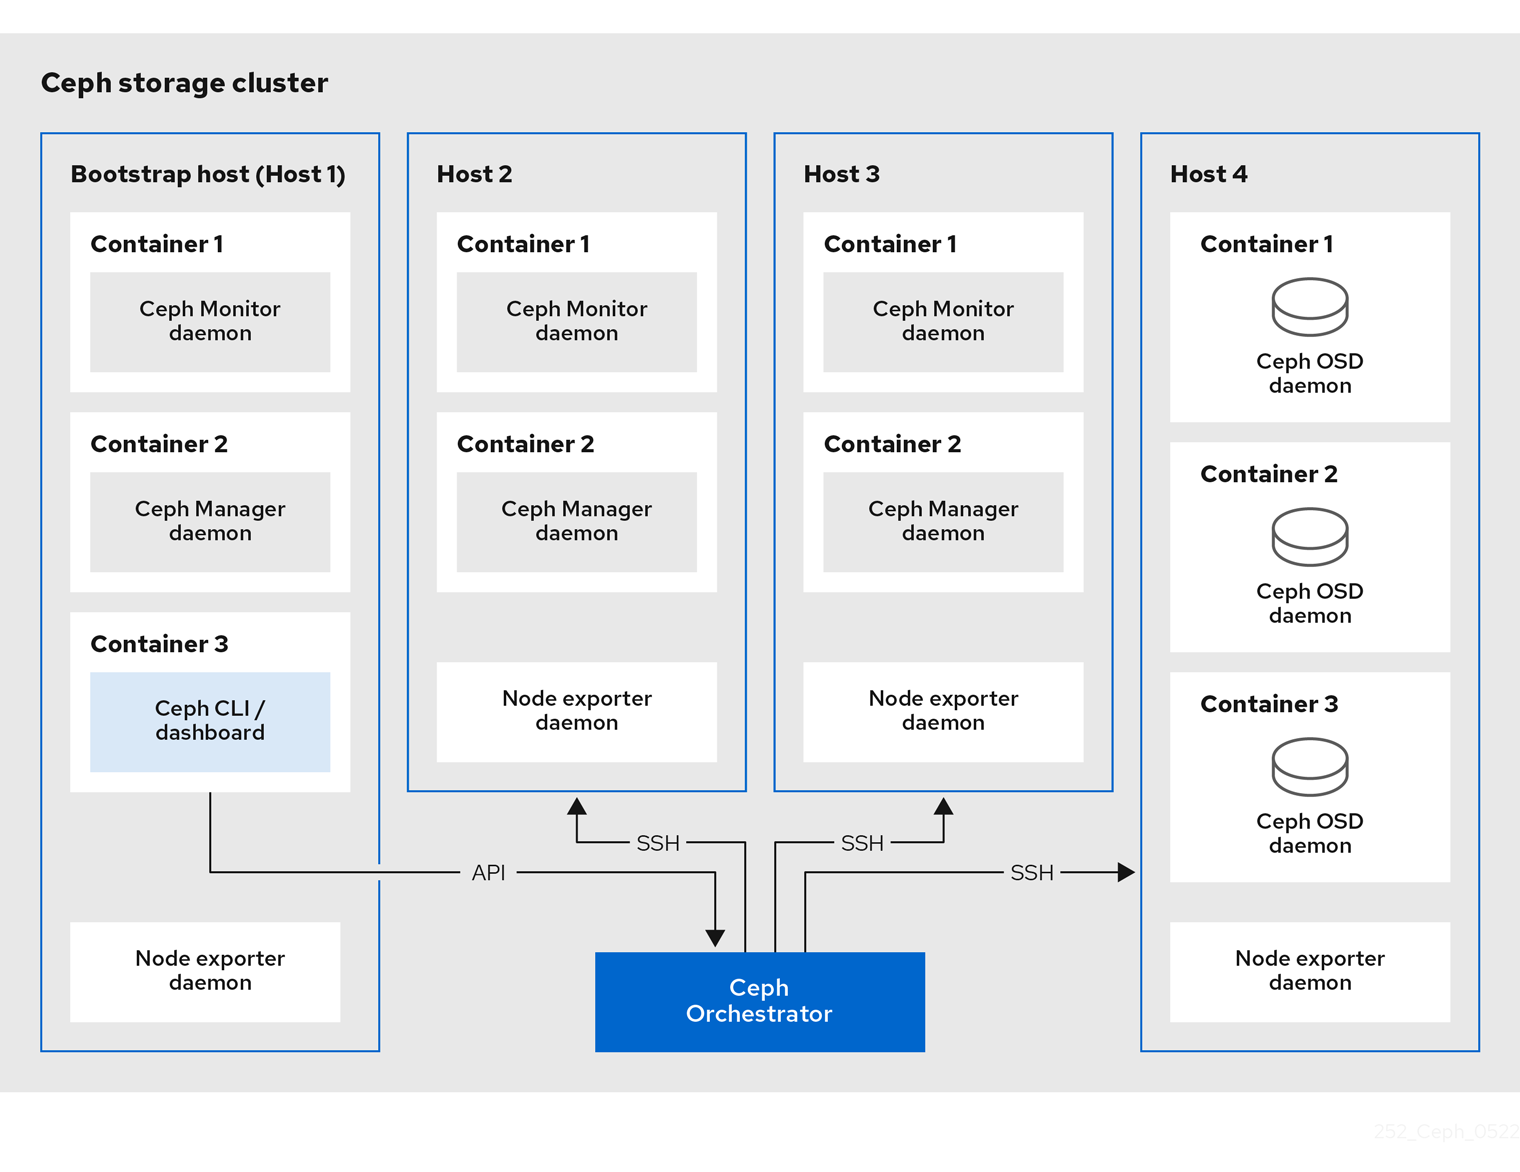
在引导过程中生成ssh密钥对或使用您自己的ssh密钥#Cephadm Bootstrapping过程
在单一节点上创建一个小型存储集群
包含一个MOG和一个MGR以及任何需要的依赖项(监控堆栈组件)#初始化集群以后通过横向拓展来完善集群
可以使用Ceph命令行或Ceph仪表板来添加集群节点cephadm仅支持Octopus以后的版本
cephadm需要容器支持(以Podman或Docker的形式)
cephadm默认使用Podman作为容器引擎
cephadm需要Python 3
cephadm需要systemd
cephadm需要时间同步安装docker
如果系统可访问外网,直接使用脚本安装
curl https://install.1panel.live/docker-install -o docker-install && sudo bash ./docker-install && rm -f ./docker-install
如果需要从制定私有镜像源(比如Nexus)下载安装docker,步骤如下
# 下载脚本
https://install.1panel.live/docker-install# 通过scp进内网机器,执行安装命令
bash ./docker-install --mirror <私有仓库地址>
ceph_187">ceph指定版本安装
# 查看系统源自带的cephadm版本
# apt search release-ceph
cephadm/stable 16.2.11+ds-2 amd64utility to bootstrap ceph daemons with systemd and containers
# 由于Debain12只适配了16版本的ceph,即Pacific版本。# 安装cephadm
apt install -y cephadm ceph-common#确认版本
cephadm version
ceph --version#检查节点是否满足要求
cephadm check-host
# 也可以通过ssh远程检查别人的系统,指定hostname时需要配置SSH免密:cephadm check-host [--expect-hostname HOSTNAME]#为Cephadm准备节点(指定hostname时需要配置SSH免密)
cephadm prepare-host [--expect-hostname HOSTNAME]
初始化集群bootstrap
#Bootstrap的过程简述
在本地主机上为新集群创建MON、MGR守护进程
为Ceph集群生成新的SSH密钥并将其添加到root用户的/root/.ssh/authorized_keys
生成公钥文件/etc/ceph/ceph.pub
生成最小配置文件/etc/ceph/ceph.conf
生成client.admin的特权文件/etc/ceph/ceph.client.admin.keyring
添加_admin标签到引导主机
何具有此标签的主机也将获得/etc/ceph/ceph.conf的副本和/etc/ceph/ceph.client.admin.keyring的副本#当引导集群时会自动生成此SSH密钥且不需要额外的配置#使用自定义SSH密钥进行部署
cephadm bootstrap --mon-ip <ip-addr> --ssh-private-key <private-key-filepath> --ssh-public-key <public-key-filepath>#集群中设置自定义SSH密钥
ceph cephadm generate-key  #生成一个新的SSH密钥
ceph cephadm get-pub-key   #查看SSH公钥
ceph cephadm clear-key     #删除当前存储的SSH密钥
初始化日志
#node1节点上进行操作
cephadm bootstrap --mon-ip 192.168.0.101 --cluster-network 172.26.0.0/24
Verifying podman|docker is present...
Verifying lvm2 is present...
Verifying time synchronization is in place...
Unit chronyd.service is enabled and running
Repeating the final host check...
docker (/usr/bin/docker) is present
systemctl is present
lvcreate is present
Unit chronyd.service is enabled and running
Host looks OK
Cluster fsid: ec79e2f8-4ca3-11ef-a144-000c295daf9b
Verifying IP 192.168.0.101 port 3300 ...
Verifying IP 192.168.0.101 port 6789 ...
Mon IP `192.168.0.101` is in CIDR network `192.168.0.0/24`
Mon IP `192.168.0.101` is in CIDR network `192.168.0.0/24`
Pulling container image quay.io/ceph/ceph:v18...
Ceph version: ceph version 18.2.4 (e7ad5345525c7aa95470c26863873b581076945d) reef (stable)
Extracting ceph user uid/gid from container image...
Creating initial keys...
Creating initial monmap...
Creating mon...
Waiting for mon to start...
Waiting for mon...
mon is available
Assimilating anything we can from ceph.conf...
Generating new minimal ceph.conf...
Restarting the monitor...
Setting public_network to 192.168.0.0/24 in mon config section
Setting cluster_network to 172.26.0.0/24
Wrote config to /etc/ceph/ceph.conf
Wrote keyring to /etc/ceph/ceph.client.admin.keyring
Creating mgr...
Verifying port 0.0.0.0:9283 ...
Verifying port 0.0.0.0:8765 ...
Verifying port 0.0.0.0:8443 ...
Waiting for mgr to start...
Waiting for mgr...
mgr not available, waiting (1/15)...
mgr not available, waiting (2/15)...
mgr not available, waiting (3/15)...
mgr not available, waiting (4/15)...
mgr is available
Enabling cephadm module...
Waiting for the mgr to restart...
Waiting for mgr epoch 5...
mgr epoch 5 is available
Setting orchestrator backend to cephadm...
Generating ssh key...
Wrote public SSH key to /etc/ceph/ceph.pub
Adding key to root@localhost authorized_keys...
Adding host node1...
Deploying mon service with default placement...
Deploying mgr service with default placement...
Deploying crash service with default placement...
Deploying ceph-exporter service with default placement...
Deploying prometheus service with default placement...
Deploying grafana service with default placement...
Deploying node-exporter service with default placement...
Deploying alertmanager service with default placement...
Enabling the dashboard module...
Waiting for the mgr to restart...
Waiting for mgr epoch 9...
mgr epoch 9 is available
Generating a dashboard self-signed certificate...
Creating initial admin user...
Fetching dashboard port number...
Ceph Dashboard is now available at:URL: https://node1:8443/User: adminPassword: l3ym2yyy2nEnabling client.admin keyring and conf on hosts with "admin" label
Saving cluster configuration to /var/lib/ceph/ec79e2f8-4ca3-11ef-a144-000c295daf9b/config directory
Enabling autotune for osd_memory_target
You can access the Ceph CLI as following in case of multi-cluster or non-default config:sudo /usr/sbin/cephadm shell --fsid ec79e2f8-4ca3-11ef-a144-000c295daf9b -c /etc/ceph/ceph.conf -k /etc/ceph/ceph.client.admin.keyringOr, if you are only running a single cluster on this host:sudo /usr/sbin/cephadm shell Please consider enabling telemetry to help improve Ceph:ceph telemetry onFor more information see:https://docs.ceph.com/en/latest/mgr/telemetry/Bootstrap complete.#相关仪表盘地址
https://node1:8443  #Dashboard
https://node1:3000  #Grafana
http://node1:9095   #Prometheus
如何管理集群
建议都在Bootstrap节点上操作。
1.拓展和管理节点:
#免密方式下发公钥
apt install -y sshpass
sshpass -p 'password' ssh-copy-id -f -i /etc/ceph/ceph.pub -o StrictHostKeyChecking=no root@node2
sshpass -p 'password' ssh-copy-id -f -i /etc/ceph/ceph.pub -o StrictHostKeyChecking=no root@node3#添加节点并且配置标签
ceph orch host add <hostname> --labels=_admin,mon,mgr #排空节点中的所有守护进程(节点会被打上_no_schedule的标签)
ceph orch host drain <hostname> [--force] [--zap-osd-devices]
ceph orch osd rm status  #检查OSD删除操作的进度#删除节点(删除节点前要先排空节点)
ceph orch host rm <hostname>                    #正常节点移除
ceph orch host rm <hostname> --offline --force  #离线节点移除(如果主机处于离线状态且无法恢复)#清理节点(节点要已经从集群删除并且要在被清理的节点上运行)
ceph fsid    #获取集群fsid
cephadm rm-cluster --fsid 22a2a1a6-4cc9-11ef-adac-000c295daf9b --force --zap-osds#节点进入维护模式(此时节点状态会被修改为Maintenance)
ceph orch host maintenance enter <hostname> [--force] [--yes-i-really-mean-it]#节点退出维护模式
ceph orch host maintenance exit <hostname>- 节点标签管理:
#节点添加标签
ceph orch host label add <hostname> <label>#节点移除标签
ceph orch host label rm <hostname> <label>      #特殊标签_admin
_admin标签默认拥有mon和mgr的角色
_admin标签默认应用于集群Bootstrap节点
集群Bootstrap节点生成client.admin的特权文件/etc/ceph/ceph.client.admin.keyring
将_admin标签添加给其他节点后,其他节点也会拥有client.admin的特权文件/etc/ceph/ceph.client.admin.keyring#特殊标签_no_schedule
_no_schedule标签会阻止cephadm调度或部署节点上的守护进程
_no_schedule标签上的节点不会在其上部署守护进程
在删除节点前排空时会在改节点上设置_no_schedule标签#特殊标签_no_autotune_memory
_no_autotune_memory标签不会在主机上自动微调内存- 守护进程管理
#守护进程的类型
Ceph服务:mon、mgr、osd、mds、rbd、rbd-mirror、crash
Ceph网关:nfs、rgw
监控堆栈:Alertmanager、Prometheus、Grafana、Node-exporter#配置5个随机MON
ceph orch apply mon 5#禁用自动部署MON
ceph orch apply mon --unmanaged#守护进程放置
ceph orch apply mon --placement="node1 node2 node3"           #MON
ceph orch apply mgr --placement="node1 node2"                 #MGR
ceph orch apply alertmanager --placement="node1 node2 node3"  #Alertmanager
ceph orch apply grafana --placement="node1 node2 node3"       #Grafana
ceph orch apply prometheus --placement="node1 node2 node3"    #Prometheus
4.健康检查
#查看集群的基本健康状态
ceph health#查看集群的详细健康状态
ceph health detail#清除所有健康检查历史记录
ceph healthcheck history clear#列出所有健康检查历史记录
ceph healthcheck history ls [--format {plain|json|json-pretty|yaml}] - OSD管理
#满足以下条件则存储设备被视为可用
该设备不能有分区
不得挂载该设备
该设备不得包含文件系统
该设备不得包含Ceph BlueStore OSD
该设备必须大于5GB#清除设备数据
ceph orch device zap <hostname> <path> [--force]#开启自动添加OSD(Ceph使用任何可用且未使用的存储设备)
ceph orch apply osd --all-available-devices#禁止自动添加OSD(禁用可用设备上的OSD自动创建)
ceph orch apply osd --all-available-devices --unmanaged=true#特定主机上的特定设备创建OSD
ceph orch daemon add osd <hostname>:<device-path>#删除OSD
ceph orch osd rm <osd_id> [--replace] [--force] --zap
ceph orch osd rm status  #检查移除OSD的状态#激活OSD(重新安装主机操作系统后)
ceph cephadm osd activate <hostname>