作者:Mars酱
声明:本文章由Mars酱编写,部分内容来源于网络,如有疑问请联系本人。
转载:欢迎转载,转载前先请联系我!
前言
ElasticJob 是面向互联网生态和海量任务的分布式调度解决方案。 它通过弹性调度、资源管控、以及任务治理的功能,打造一个适用于互联网场景的分布式调度解决方案,并通过开放的架构设计,提供多元化的任务生态。 它的各个产品使用统一的任务 API,开发者仅需一次开发,即可随意部署。
架构
elasticjob由两个相互独立的子项目 ElasticJob-Lite 和 ElasticJob-Cloud 组成组成,这是ElasticJob-Lite 的架构图:
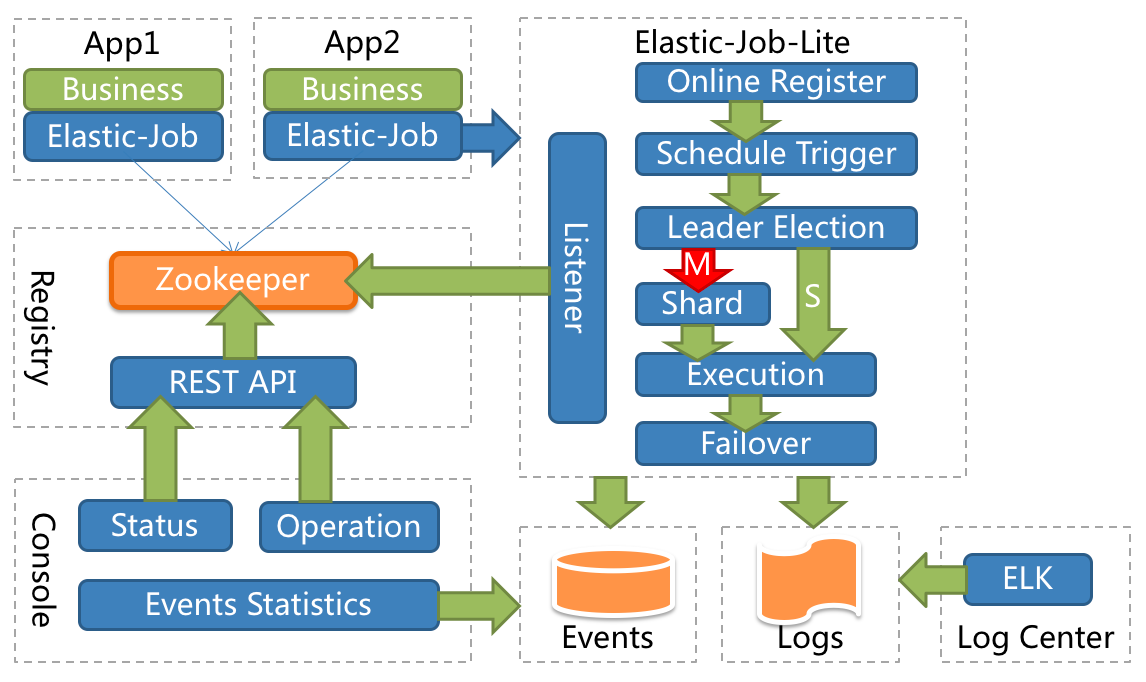
从架构图可以看到,左上角App1和App2两个业务模块中的Elastic-Job往zk中注册了信息,右边的Elastic-Job-Lite是监听了zk的,因此,整个任务的调度是由zk来完成的。下面的console通过Rest API去获取zk中的信息,得到调度数据和日志,并存盘。
这是ElasticJob-Cloud的架构图:
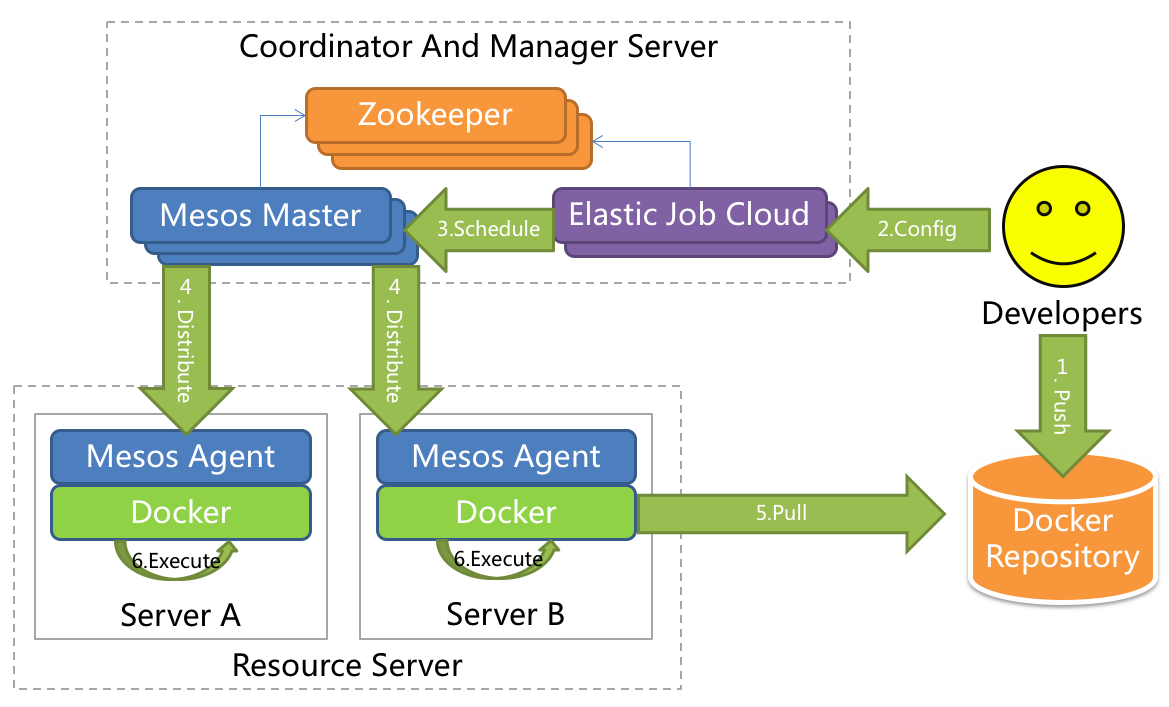
ElasticJob-Cloud的调度是依赖Mesos的,从架构图的理解,Mesos和zk结合做好任务调度,再分发给Mesos的代理并执行。
功能和特性
以下是ElasticJob的特性优点
- 支持任务在分布式场景下的分片和高可用
- 能够水平扩展任务的吞吐量和执行效率
- 任务处理能力随资源配备弹性伸缩
- 优化任务和资源调度
- 相同任务聚合至相同的执行器统一处理
- 动态调配追加资源至新分配的任务
- 失效转移
- 错过任务重新执行
- 分布式环境下任务自动诊断和修复
- 基于有向无环图 (DAG) 的任务依赖
- 基于有向无环图 (DAG) 的任务项目依赖
- 可扩展的任务类型统一接口
- 支持丰富的任务类型库–包括数据流、脚本、HTTP、文件、大数据
- 易于对接业务任务–兼容 Spring IOC
- 任务管控端
- 任务事件追踪
- 注册中心管理
入门角色
既然这么多优点,我们就入门试试吧。入门elasticjob-lite也继承了Quartz框架,同样的很简单,只要三个角色:
SimpleJob:任务主体。如果用过Quartz,那么应该能够理解这个,基本上和Quartz的Job接口类似,只要实现一个execute方法就行了,入门用这个就行;
JobConfiguration:任务配置。同样的可以理解为类似Quartz框架中的Trigger,最重要的就是配置任务的执行频率;
ScheduleJobBootstrap:调度主体。这个一样,参考Quartz框架中的Scheduler对象,它把任务和配置结合起来,任务按照配置中的频率执行。
写个例子
我们创建这三种角色,首先创建任务主体:
import org.apache.shardingsphere.elasticjob.api.ShardingContext;
import org.apache.shardingsphere.elasticjob.simple.job.SimpleJob;import java.text.SimpleDateFormat;
import java.util.Date;
import java.util.List;/*** (这个类的说明)** @author mars酱*/public class MarsSimpleJob implements SimpleJob {@Overridepublic void execute(final ShardingContext shardingContext) {System.out.printf("Item: %s | Time: %s | Thread: %s | %s%n",shardingContext.getShardingItem(), new SimpleDateFormat("HH:mm:ss").format(new Date()), Thread.currentThread().getId(), "就是这么简单~");}
}
再创建任务配置:
import org.apache.shardingsphere.elasticjob.api.JobConfiguration;
import org.apache.shardingsphere.elasticjob.tracing.api.TracingConfiguration;import javax.sql.DataSource;
import java.util.Objects;/*** (这个类的说明)** @author mars酱*/public class JobConfigurationBuilder {public static JobConfiguration buildJobConfiguration(String jobName, String cronExpression, TracingConfiguration<DataSource> tracingConfig) {JobConfiguration.Builder builder = JobConfiguration.newBuilder(jobName, 3).cron(cronExpression).shardingItemParameters("0=a,1=b,2=c");if (Objects.nonNull(tracingConfig)) {builder.addExtraConfigurations(tracingConfig);}return builder.build();}
}
最后创建调度器,并执行:
import org.apache.shardingsphere.elasticjob.lite.api.bootstrap.impl.ScheduleJobBootstrap;
import org.apache.shardingsphere.elasticjob.lite.example.job.simple.JavaSimpleJob;
import org.apache.shardingsphere.elasticjob.reg.base.CoordinatorRegistryCenter;
import org.apache.shardingsphere.elasticjob.reg.zookeeper.ZookeeperConfiguration;
import org.apache.shardingsphere.elasticjob.reg.zookeeper.ZookeeperRegistryCenter;
import org.apache.shardingsphere.elasticjob.tracing.api.TracingConfiguration;import javax.sql.DataSource;/*** (这个类的说明)** @author mars酱*/public final class SchedulerMain {private static final int EMBED_ZOOKEEPER_PORT = 4181;private static final String ZOOKEEPER_CONNECTION_STRING = "localhost:" + EMBED_ZOOKEEPER_PORT;private static final String JOB_NAMESPACE = "elasticjob-marsz-lite-java";// CHECKSTYLE:OFFpublic static void main(final String[] args) {// 内嵌zk服务EmbedZookeeperServer.start(EMBED_ZOOKEEPER_PORT);CoordinatorRegistryCenter regCenter = setUpRegistryCenter();// 简单作业setUpSimpleJob(regCenter, null);}private static CoordinatorRegistryCenter setUpRegistryCenter() {ZookeeperConfiguration zkConfig = new ZookeeperConfiguration(ZOOKEEPER_CONNECTION_STRING, JOB_NAMESPACE);CoordinatorRegistryCenter result = new ZookeeperRegistryCenter(zkConfig);result.init();return result;}private static void setUpSimpleJob(final CoordinatorRegistryCenter regCenter, final TracingConfiguration<DataSource> tracingConfig) {new ScheduleJobBootstrap(regCenter,new MarsSimpleJob(),JobConfigurationBuilder.buildJobConfiguration("marsSimpleJob", "0/5 * * * * ?", tracingConfig)).schedule();}}
运行的效果:
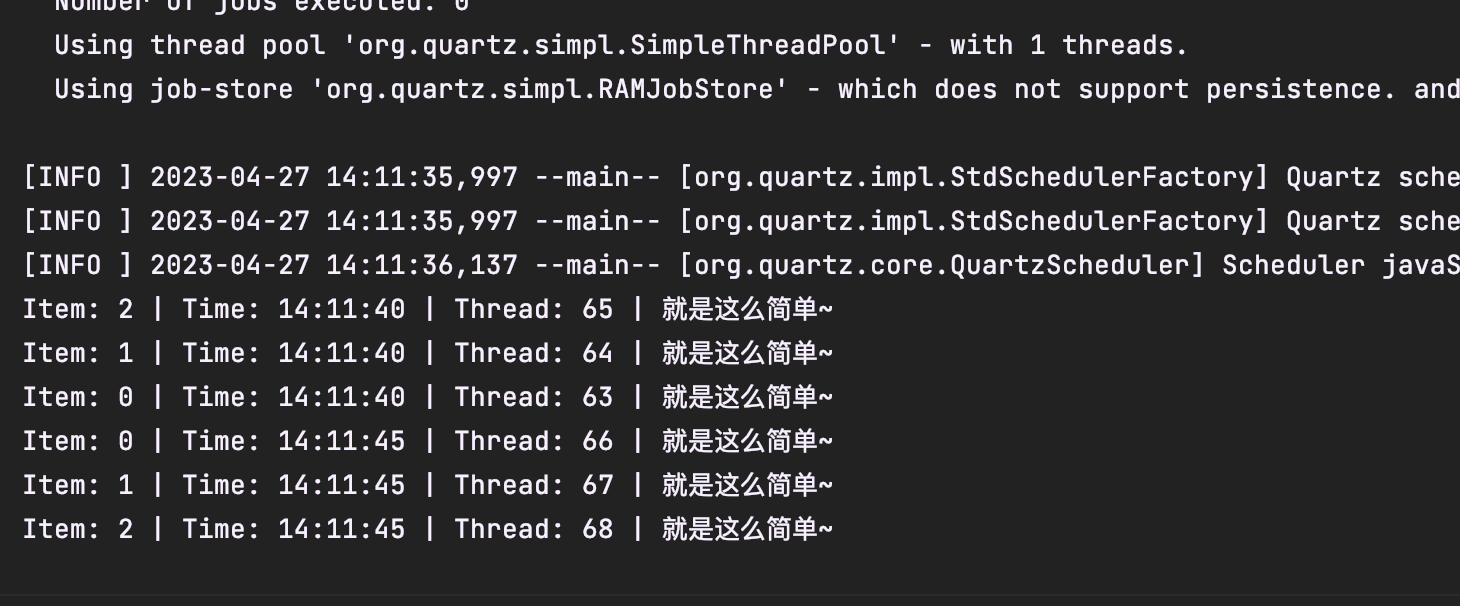
截图中Item是处理的分片项,Thread是当前线程的id,看到了Quartz框架的影子…。
任务执行流程
既然能成功运行,我们看看内部的处理逻辑吧。Mars酱本机并没有安装zk,所以copy了官方的例子,在程序运行前先启用了一个内嵌的zk服务:
EmbedZookeeperServer.start(EMBED_ZOOKEEPER_PORT);
这个只能在模拟的时候使用,千万不能拿去放生产环境。接下来就是注册中心的配置了,我们需要的是CoordinatorRegistryCenter对象:
private static CoordinatorRegistryCenter setUpRegistryCenter() {ZookeeperConfiguration zkConfig = new ZookeeperConfiguration(ZOOKEEPER_CONNECTION_STRING, JOB_NAMESPACE);CoordinatorRegistryCenter result = new ZookeeperRegistryCenter(zkConfig);result.init();return result;
}
好了,zk的部分处理完成,下面就是直接SchedulerJobBootstrap的部分了。
ScheduleJobBootstrap初始化
ScheduleJobBootstrap的初始化在例子中需要三个参数:
CoordinatorRegistryCenter:这个是协调用的注册中心。是一个接口类,它的实现在ElasticJob里面只有一个ZookeeperRegisterCenter对象,未来是不是会支持其他的注册中心呢?
ElasticJob: Mars酱理解为任务对象。但是ElasticJob这个对象本身是个空接口,有两个子接口SimpleJob和DataflowJob,前者Mars酱的理解是和Quartz中的Job对象类似,只要实现execute函数就行,后者有需要实现两个接口,一个fetchData获取数据,一个processData处理数据。所以,ElasticJob这个接口留空,是为了还有其他扩展吧?
JobConfiguration:弹性任务配置项。构建这个对象不能直接设置,只能用buider的方式构建。需要配置的属性很多,但是核心属性大致就是几个:任务名称、分片数、执行频率、分片参数。JobConfiguration的所有属性如下:
| 属性名 | 说明 |
|---|---|
| String jobName | 任务名称 |
| String cron | cron表达式 |
| String timeZone | 任务运行的时区 |
| int shardingTotalCount | 任务分片总数 |
| String shardingItemParameters | 分片序号和参数,多个键值对之间用逗号分隔,从0开始,但是不能大于或等于任务分片的总数 |
| String jobParameter | 任务自定义任务参数 |
| boolean monitorExecution | 是否监听执行 |
| boolean failover | 是否启用故障转移。开启表示如果任务在一次任务执行中途宕机,允许将该次未完成的任务在另一任务节点上补偿执行 |
| boolean misfire | 不发火。哈哈,其实是是否开启错过任务重新执行 |
| int maxTimeDiffSeconds | 最大时差 |
| int reconcileIntervalMinutes | 间隔时长 |
| String jobShardingStrategyType | 任务分片策略类型,总共三种 |
| String jobExecutorServiceHandlerType | 任务执行程序服务处理程序类型 |
| String jobErrorHandlerType | 任务错误处理类型 |
| Collection jobListenerTypes | 任务监听类型 |
| Collection extraConfigurations | 附加配置信息 |
| String description | 任务描述 |
| Properties props | 扩展用属性值 |
| boolean disabled | 是否禁用 |
| boolean overwrite | 是否覆盖 |
| String label | 标签 |
| boolean staticSharding | 是否支持静态分片 |
ScheduleJobBootstrap执行
同样的,例子中的MarsSimpleJob的execute函数,最终会被ElasticJob框架调用,我们按照被执行的反向顺序往上找。MarsSimpleJob是继承SimpleJob的, 而SimpleJob的execute函数是被SimpleJobExecutor所调用:
/*** Simple job executor.*/
public final class SimpleJobExecutor implements ClassedJobItemExecutor<SimpleJob> {@Overridepublic void process(final SimpleJob elasticJob, final JobConfiguration jobConfig, final JobFacade jobFacade, final ShardingContext shardingContext) {// 这里调用execute函数elasticJob.execute(shardingContext);}@Overridepublic Class<SimpleJob> getElasticJobClass() {return SimpleJob.class;}
}
再继续往上找,process的核心流程就是在ElasticJobExecutor里面了,调用process的部分在ElasticJobExcutor中几个重载的process方法调用的,两个process函数完成不同的功能,调用SimpleExecutor的process部分是这样:
@SuppressWarnings("unchecked")
private void process(final JobConfiguration jobConfig, final ShardingContexts shardingContexts, final int item, final JobExecutionEvent startEvent) {jobFacade.postJobExecutionEvent(startEvent);log.trace("Job '{}' executing, item is: '{}'.", jobConfig.getJobName(), item);JobExecutionEvent completeEvent;try {// 这里调用SimpleJobExecutor的processjobItemExecutor.process(elasticJob, jobConfig, jobFacade, shardingContexts.createShardingContext(item));completeEvent = startEvent.executionSuccess();log.trace("Job '{}' executed, item is: '{}'.", jobConfig.getJobName(), item);jobFacade.postJobExecutionEvent(completeEvent);// CHECKSTYLE:OFF} catch (final Throwable cause) {// CHECKSTYLE:ONcompleteEvent = startEvent.executionFailure(ExceptionUtils.transform(cause));jobFacade.postJobExecutionEvent(completeEvent);itemErrorMessages.put(item, ExceptionUtils.transform(cause));JobErrorHandler jobErrorHandler = executorContext.get(JobErrorHandler.class);jobErrorHandler.handleException(jobConfig.getJobName(), cause);}
}
上面这个process负责最终任务的执行部分,由JobItemExecutor对象调用,SimpleJobExecutor被JobItemExecutor接口定义。整个这个proces由guava包的EventBus处理消息事件,执行之前有startEvent,执行完成有completeEvent,异常也有对应的失败event,方面架构图中存盘事件日志、ELK日志收集动作。
调用这个process的部分,由另一个process完成,长这样的:
private void process(final JobConfiguration jobConfig, final ShardingContexts shardingContexts, final ExecutionSource executionSource) {Collection<Integer> items = shardingContexts.getShardingItemParameters().keySet();if (1 == items.size()) {int item = shardingContexts.getShardingItemParameters().keySet().iterator().next();JobExecutionEvent jobExecutionEvent = new JobExecutionEvent(IpUtils.getHostName(), IpUtils.getIp(), shardingContexts.getTaskId(), jobConfig.getJobName(), executionSource, item);process(jobConfig, shardingContexts, item, jobExecutionEvent);return;}CountDownLatch latch = new CountDownLatch(items.size());for (int each : items) {JobExecutionEvent jobExecutionEvent = new JobExecutionEvent(IpUtils.getHostName(), IpUtils.getIp(), shardingContexts.getTaskId(), jobConfig.getJobName(), executionSource, each);ExecutorService executorService = executorContext.get(ExecutorService.class);if (executorService.isShutdown()) {return;}// 提交给线程池执行executorService.submit(() -> {try {process(jobConfig, shardingContexts, each, jobExecutionEvent);} finally {latch.countDown();}});}try {latch.await();} catch (final InterruptedException ex) {Thread.currentThread().interrupt();}
}
上面这个process负责把分片参数依次组装好,设置好JobExecutionEvent中的ip、主机名等参数,然后放入线程池中去执行。再往上,看现在这个process被调用的部分:
private void execute(final JobConfiguration jobConfig, final ShardingContexts shardingContexts, final ExecutionSource executionSource) {if (shardingContexts.getShardingItemParameters().isEmpty()) {jobFacade.postJobStatusTraceEvent(shardingContexts.getTaskId(), State.TASK_FINISHED, String.format("Sharding item for job '%s' is empty.", jobConfig.getJobName()));return;}// 往注册中心注册ShardingContexts信息jobFacade.registerJobBegin(shardingContexts);String taskId = shardingContexts.getTaskId();// 发送跟踪日志,标记任务正在运行jobFacade.postJobStatusTraceEvent(taskId, State.TASK_RUNNING, "");try {// 调用processprocess(jobConfig, shardingContexts, executionSource);} finally {// TODO Consider increasing the status of job failure, and how to handle the overall loop of job failure// 告知注册中心任务完成jobFacade.registerJobCompleted(shardingContexts);if (itemErrorMessages.isEmpty()) {// 没有失败信息,通知任务完成jobFacade.postJobStatusTraceEvent(taskId, State.TASK_FINISHED, "");} else {// 否则通知失败jobFacade.postJobStatusTraceEvent(taskId, State.TASK_ERROR, itemErrorMessages.toString());itemErrorMessages.clear();}}
}
方法execute从注册中心注册ShardingContext信息,并发送跟踪日志事件,然后调用process,最后发送跟踪消息标记任务完成。再有一个重载的execute方法调用上面这个execute方法,如下:
public void execute() {// job的配置信息JobConfiguration jobConfig = jobFacade.loadJobConfiguration(true);executorContext.reloadIfNecessary(jobConfig);JobErrorHandler jobErrorHandler = executorContext.get(JobErrorHandler.class);try {jobFacade.checkJobExecutionEnvironment();} catch (final JobExecutionEnvironmentException cause) {jobErrorHandler.handleException(jobConfig.getJobName(), cause);}// 这里有玄机ShardingContexts shardingContexts = jobFacade.getShardingContexts();// 发送时间消息总线jobFacade.postJobStatusTraceEvent(shardingContexts.getTaskId(), State.TASK_STAGING, String.format("Job '%s' execute begin.", jobConfig.getJobName()));if (jobFacade.misfireIfRunning(shardingContexts.getShardingItemParameters().keySet())) {jobFacade.postJobStatusTraceEvent(shardingContexts.getTaskId(), State.TASK_FINISHED, String.format("Previous job '%s' - shardingItems '%s' is still running, misfired job will start after previous job completed.", jobConfig.getJobName(),shardingContexts.getShardingItemParameters().keySet()));return;}try {// 任务执行的前置流程jobFacade.beforeJobExecuted(shardingContexts);//CHECKSTYLE:OFF} catch (final Throwable cause) {//CHECKSTYLE:ONjobErrorHandler.handleException(jobConfig.getJobName(), cause);}// 调用上面的execute方法execute(jobConfig, shardingContexts, ExecutionSource.NORMAL_TRIGGER);while (jobFacade.isExecuteMisfired(shardingContexts.getShardingItemParameters().keySet())) {jobFacade.clearMisfire(shardingContexts.getShardingItemParameters().keySet());execute(jobConfig, shardingContexts, ExecutionSource.MISFIRE);}// 故障转移jobFacade.failoverIfNecessary();try {// 任务执行的后置流程jobFacade.afterJobExecuted(shardingContexts);//CHECKSTYLE:OFF} catch (final Throwable cause) {//CHECKSTYLE:ONjobErrorHandler.handleException(jobConfig.getJobName(), cause);}
}
这个execute就由Quartz的JobRunShell调用了,Quartz的调用的过程在 Java | 一分钟掌握定时任务 | 6 - Quartz定时任务 - 掘金 (juejin.cn) 里面还好Mars酱分析过了。
执行流程总结
那么,追踪完源代码,大致的流程就应该是如下:
1.组装基本参数(任务、频率等) -> 2. ScheduleJobBootstrap初始化 -> 3.配置任务属性 -> 4.设置各种facade -> 5.初始化ElasticJobExecutor -> 6.调用scheduler执行任务 -> 7.获取任务执行器(SimpleJobExecutor) -> 8.各种校验逻辑 -> 9. 处理分片参数 -> 10. 设置任务为运行状态 -> 11. 提交任务到线程池 -> 12.执行任务 -> 13.处理任务后续逻辑
任务的调度过程由zk完成,取决于zk的任务调度策略吧?如果一台机器的定时运行时挂了,zk会转移到另一台运行中的机器中去。-- Mars酱
分片的策略
任务的分片策略,用于将任务在分布式环境下分解成为任务使用。
| SPI 名称 | 详细说明 |
|---|---|
| JobShardingStrategy | 作业分片策略接口 |
| 已知实现类 | 详细说明 |
|---|---|
| AverageAllocationJobShardingStrategy | 根据分片项平均分片 |
| OdevitySortByNameJobShardingStrategy | 根据任务名称哈希值的奇偶数决定按照任务服务器 IP 升序或是降序的方式分片 |
| RoundRobinByNameJobShardingStrategy | 根据任务名称轮询分片 |
那么任务的分片策略在哪里使用的呢?就在代码中注释的“这里有玄机”那行。在getShardingContexts的方法中会调用ShardingService,它会去获取JobConfiguration中配置的分片策略方式:
public void shardingIfNecessary() {List<JobInstance> availableJobInstances = instanceService.getAvailableJobInstances();if (!isNeedSharding() || availableJobInstances.isEmpty()) {return;}if (!leaderService.isLeaderUntilBlock()) {blockUntilShardingCompleted();return;}waitingOtherShardingItemCompleted();JobConfiguration jobConfig = configService.load(false);int shardingTotalCount = jobConfig.getShardingTotalCount();log.debug("Job '{}' sharding begin.", jobName);jobNodeStorage.fillEphemeralJobNode(ShardingNode.PROCESSING, "");resetShardingInfo(shardingTotalCount);// 获取任务分片策略JobShardingStrategy jobShardingStrategy = JobShardingStrategyFactory.getStrategy(jobConfig.getJobShardingStrategyType());jobNodeStorage.executeInTransaction(getShardingResultTransactionOperations(jobShardingStrategy.sharding(availableJobInstances, jobName, shardingTotalCount)));log.debug("Job '{}' sharding complete.", jobName);
}
如果不设置,默认使用的是平均分片策略。
总结
这,大抵就是ElasticJob的工作原理了吧。


