1 NetCat方式

]# ./bin/flume-ng agent --conf conf--conf-file ./conf/flume_netcat.conf --name a1 -Dflume.root.logger=INFO,console
[root@master ~]# yum -y intalll telnet
发数据:
]# telnet master 44444

数据接收,是在终端上接收的,而且接收数据已经是编码后的
工作输入主要是来自文件,输出也不是终端上,这里只是测试
2 Exec方式
监控一个输入文件,一般是日记文件,日记变化,flume自动接收

运行flume-ng
]# ./bin/flume-ng agent --conf conf--conf-file ./conf/flume_exec.conf --name a1 -Dflume.root.logger=INFO,console
发数据:

数据接收

3 输出到HDFS
master启动
]# ./bin/flume-ng agent --conf conf--conf-file ./conf/flume.conf --name a1 -Dflume.root.logger=INFO,console
写入
[root@master flume]# echo'flume-hdfs1'>> 2.log
[root@master flume]# echo'flume-hdfs2'>> 2.log
[root@master flume]# echo'flume-hdfs3'>> 2.log
HDFS查看
[root@master ~]# hadoop fs -ls /flume/18-09-17
4 故障转移(failover)
刚开始数据接收服务器是A的,A出问题了,转移B接收数据,A恢复之后A继续B接收数据
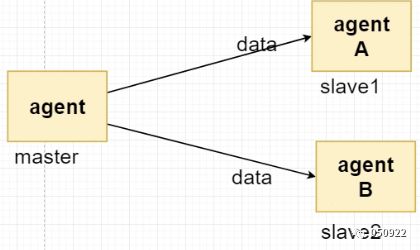
这需要集群模式才能实现,三台机器:master、slave1、slave2

avro是网络协议,用于连接agent与agent
master配置:
[root@master agent_agent_collector_base]#pwd
/root/07/flume/apache-flume-1.6.0-bin/conf/agent_agent_collector_base
[root@master agent_agent_collector_base]#ll flume-client.properties
-rwxrwxrwx 1 root root 880 4月 22 10:47 flume-client.properties
master启动:
]# ./bin/flume-ng agent --conf conf--conf-file ./conf/agent_agent_collector_base/flume-client.properties--name agent1 -Dflume.root.logger=INFO,console

Slave1启动:
]# ./bin/flume-ng agent --conf conf--conf-file ./conf/agent_agent_collector_base/flume-server.properties--name a1 -Dflume.root.logger=INFO,console
slave2启动:
]# ./bin/flume-ng agent --conf conf--conf-file ./conf/agent_agent_collector_base/flume-server.properties--name a1 -Dflume.root.logger=INFO,console
测试
写数据
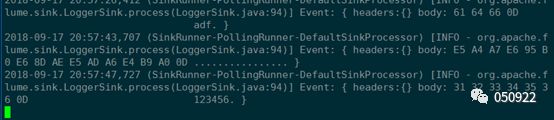
Slave1接收==》正常
把slave1停掉,再写数据,发现是Slave2接收
再开启slave1,再测试

Slave1接收

5 负载均衡(loadbalance)
从服务器轮训读取信息
maste启动:
]# ./bin/flume-ng agent --conf conf--conf-file ./conf/agent_agent_collector_base/flume-client.properties_loadbalance--name a1 -Dflume.root.logger=INFO,console
slave1启动:
]# ./bin/flume-ng agent --conf conf--conf-file ./conf/agent_agent_collector_base/flume-server.properties--name a1 -Dflume.root.logger=INFO,console
slave2启动:
]# ./bin/flume-ng agent --conf conf--conf-file ./conf/agent_agent_collector_base/flume-server.properties--name a1 -Dflume.root.logger=INFO,console
测试:
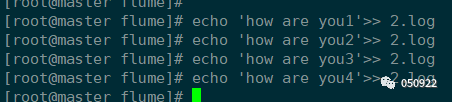
写数据
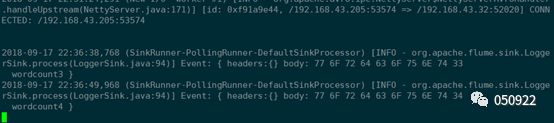
接收数据
Slave1
Slave2
可以看到,它并不是按数量轮流分发的,而是按批次分发的,再写for循环验证
#for i in `seq 1 100`;do echo “$i” >>2.log; sleep 1;done
6 拦截与过滤(Interceptor)
(1) TimestampInterceptor:在event的header中添加一个key叫:timestamp,value为当前的时间戳
[root@master interceptor_test]# catflume_ts_interceptor.conf
a1.sources = r1
a1.sinks = k1
a1.channels = c1
a1.sources.r1.type = http ##以http方式连接
a1.sources.r1.host = master
a1.sources.r1.port = 52020
a1.sources.r1.channels = c1
a1.sources.r1.interceptors = i1
a1.sources.r1.interceptors.i1.preserveExisting=false
a1.sources.r1.interceptors.i1.type =timestamp
a1.sinks.k1.type = hdfs
a1.sinks.k1.channel = c1
a1.sinks.k1.hdfs.path =hdfs://master:9000/flume/%Y-%m-%d/%H%M #接收地址
a1.sinks.k1.hdfs.filePrefix = badou.
a1.sinks.k1.hdfs.fileType=DataStream
a1.channels.c1.type = memory
a1.channels.c1.capacity = 1000
a1.channels.c1.transactionCapacity = 100
a1.sources.r1.channels = c1
a1.sinks.k1.channel = c1
master启动
]# ./bin/flume-ng agent --conf conf--conf-file ./conf/interceptor_test/flume_ts_interceptor.conf --name a1-Dflume.root.logger=INFO,console
http方式输入:(也是在master端)
]# curl -X POST -d'[{"headers":{"hadoop1":"hadoop1 is header"},"body":"hellobadou"}]' http://master:52020
头信息用来做路由选择
输出


(2) HostInterceptor:在event的header中添加一个key叫:host,value为当前机器的hostname或者ip
[root@master interceptor_test]# catflume_hostname_interceptor.conf
a1.sources = r1
a1.sinks = k1
a1.channels = c1
a1.sources.r1.type = syslogtcp #以syslogtcp输入
a1.sources.r1.host = master
a1.sources.r1.port = 52020
a1.sources.r1.channels = c1
a1.sources.r1.interceptors = i1 i2 #可以定义多个拦截器
a1.sources.r1.interceptors.i1.preserveExisting=false
a1.sources.r1.interceptors.i1.type=timestamp
a1.sources.r1.interceptors.i2.type =host
a1.sources.r1.interceptors.i2.hostHeader=hostname
a1.sources.r1.interceptors.i2.useIP =false
a1.sinks.k1.type = hdfs
a1.sinks.k1.channel = c1
a1.sinks.k1.hdfs.path =hdfs://master:9000/flume/%Y-%m-%d/%H%M
a1.sinks.k1.hdfs.filePrefix = %{hostname}.
a1.sinks.k1.hdfs.fileType=DataStream
a1.channels.c1.type = memory
a1.channels.c1.capacity = 1000
a1.channels.c1.transactionCapacity = 100
a1.sources.r1.channels = c1
a1.sinks.k1.channel = c1
master启动
]# ./bin/flume-ng agent --conf conf--conf-file ./conf/interceptor_test/flume_hostname_interceptor.conf --name a1-Dflume.root.logger=INFO,console
syslogtcp方式输入:
]# echo "xxxxx" | nc master 52020

输出

(3) StaticInterceptor:可以在event的header中添加自定义的key和value
[root@master interceptor_test]# catflume_static_interceptor.conf
a1.sources = r1
a1.sinks = k1
a1.channels = c1
a1.sources.r1.type = http #http方式输入
a1.sources.r1.host = master
a1.sources.r1.port = 52020
a1.sources.r1.channels = c1
a1.sources.r1.interceptors = i1
a1.sources.r1.interceptors.i1.type = static
a1.sources.r1.interceptors.i1.key = badou_flume
a1.sources.r1.interceptors.i1.value = so_easy
#设置为static之后,强制输出badou_flume和so_easy
a1.sinks.k1.type = logger
a1.channels.c1.type = memory
a1.channels.c1.capacity = 1000
a1.channels.c1.transactionCapacity = 100
a1.sources.r1.channels = c1
a1.sinks.k1.channel = c1
master启动
]# ./bin/flume-ng agent --conf conf--conf-file ./conf/interceptor_test/flume_static_interceptor.conf --name a1 -Dflume.root.logger=INFO,console
输入:
]# curl -X POST -d'[{"headers":{"hadoop1":"hadoop1 is header"},"body":"hellobadou"}]' http://master:52020
输出
把之前强制加入的<key,value>添加进来了
作用:为后面路由选择做准备
(4) RegexFiltering Interceptor:正则过滤器,通过正则来清洗或包含匹配的events
[root@master interceptor_test]# catflume_regex_interceptor.conf
a1.sources = r1
a1.sinks = k1
a1.channels = c1
a1.sources.r1.type = http
a1.sources.r1.host = master
a1.sources.r1.port = 52020
a1.sources.r1.channels = c1
a1.sources.r1.interceptors = i1
a1.sources.r1.interceptors.i1.type=regex_filter
a1.sources.r1.interceptors.i1.regex =^[0-9]*$
a1.sources.r1.interceptors.i1.excludeEvents=true
#数字开头并且数字结尾的过滤掉
a1.sinks.k1.type = logger
a1.channels.c1.type = memory
a1.channels.c1.capacity = 1000
a1.channels.c1.transactionCapacity = 100
a1.sources.r1.channels = c1
a1.sinks.k1.channel = c1
master启动
]# ./bin/flume-ng agent --conf conf--conf-file ./conf/interceptor_test/flume_regex_interceptor.conf --name a1-Dflume.root.logger=INFO,console
输入1:
]# curl -X POST -d'[{"headers":{"hadoop1":"hadoop1 is header"},"body":"123"}]' http://master:52020
输出无反应
输入2:
]# curl -X POST -d'[{"headers":{"hadoop1":"hadoop1 is header"},"body":"12345a"}]' http://master:52020
输出有反应:

输入3:
]# curl -X POST -d'[{"headers":{"hadoop1":"hadoop1 is header"},"body":"abc12345"}]' http://master:52020
输出有反应:
(5) RegexExtractor Interceptor:正则筛选器,通过正则表达式来在header中添加指定的key,value则为正则匹配的部分
[root@master interceptor_test]# catflume_regex_interceptor.conf_extractor
a1.sources = r1
a1.sinks = k1
a1.channels = c1
a1.sources.r1.type = http
a1.sources.r1.host = master
a1.sources.r1.port = 52020
a1.sources.r1.channels = c1
a1.sources.r1.interceptors = i1
a1.sources.r1.interceptors.i1.type =regex_extractor
a1.sources.r1.interceptors.i1.regex = (\\d):(\\d):(\\d)
a1.sources.r1.interceptors.i1.serializers =s1 s2 s3
a1.sources.r1.interceptors.i1.serializers.s1.name= one
a1.sources.r1.interceptors.i1.serializers.s2.name= two
a1.sources.r1.interceptors.i1.serializers.s3.name= three
#\\d代表数字,输入三个单位数数字s1:s2:s3,并且分别赋予给one、two、three,one、two、three作为key输出
a1.sinks.k1.type = logger
a1.channels.c1.type = memory
a1.channels.c1.capacity = 1000
a1.channels.c1.transactionCapacity = 100
a1.sources.r1.channels = c1
a1.sinks.k1.channel = c1
master启动
]# ./bin/flume-ng agent --conf conf--conf-file ./conf/interceptor_test/flume_regex_interceptor.conf_extractor--name a1 -Dflume.root.logger=INFO,console
输入1:
]# curl -X POST -d'[{"headers":{"hadoop1":"hadoop1 is header"},"body":"1:2:3"}]' http://master:52020
输出

输入2:
]# curl -X POST -d'[{"headers":{"hadoop1":"hadoop1 is header"},"body":"1:2:3asd"}]' http://master:52020
输出

可以看到只匹配数字,并加入到header中输出
输入3:
]# curl -X POST -d'[{"headers":{"hadoop1":"hadoop1 is
header"},"body":"6:7:8:9bbb5"}]' http://master:52020

只会匹配前三位
7 复制与复用(选择器Selector)
(1) 复制(广播的形式发送给下游节点)
Master配置文件
[root@master selector_test]# catflume_client_replicating.conf
# Name the components on this agent
a1.sources = r1
a1.sinks = k1 k2
a1.channels = c1 c2
# Describe/configure the source
a1.sources.r1.type = syslogtcp
a1.sources.r1.port = 50000
a1.sources.r1.host = master
a1.sources.r1.selector.type = replicating #复制
a1.sources.r1.channels = c1 c2
# Describe the sink
a1.sinks.k1.type = avro #与下游sinks是通过svro协议连接的
a1.sinks.k1.channel = c1 #连接通道是c1
a1.sinks.k1.hostname = slave1 #服务器slave1
a1.sinks.k1.port = 50000
a1.sinks.k2.type = avro
a1.sinks.k2.channel = c2 #也可以用c1通道的
a1.sinks.k2.hostname = slave2
a1.sinks.k2.port = 50000
#还可以再加slave,就这种形式配置
# Use a channel which buffers eventsinmemory
a1.channels.c1.type = memory
a1.channels.c1.capacity = 1000
a1.channels.c1.transactionCapacity =100
a1.channels.c2.type = memory
a1.channels.c2.capacity = 1000
a1.channels.c2.transactionCapacity = 100
slave配置文件
[root@slave1 selector_test]# catflume_server.conf
# Name the components on this agent
a1.sources = r1 #slave1的agent-name是a1,slave2的是a2
a1.sinks = k1
a1.channels = c1
# Describe/configure the source
a1.sources.r1.type = avro
a1.sources.r1.channels = c1
a1.sources.r1.bind = slave1 #slave2配置也是一样的,只是这里更改为slave2
a1.sources.r1.port = 50000 #端口要跟master对应
# Describe the sink
a1.sinks.k1.type = logger
a1.sinks.k1.channel = c1
# Use a channel which buffers eventsinmemory
a1.channels.c1.type = memory
a1.channels.c1.capacity = 1000
a1.channels.c1.transactionCapacity = 100
master启动
]# ./bin/flume-ng agent --conf conf--conf-file ./conf/selector_test/flume_client_replicating.conf --name a1-Dflume.root.logger=INFO,console
Slave1启动
]# ./bin/flume-ng agent --conf conf--conf-file ./conf/selector_test/flume_server.conf --name a1-Dflume.root.logger=INFO,console
Slave2启动
]# ./bin/flume-ng agent --conf conf--conf-file ./conf/selector_test/flume_server.conf --name a2-Dflume.root.logger=INFO,console
输入:

输出:slave1、slave2都接收到了

(2) 复用
Master配置文件
[root@master selector_test]# catflume_client_multiplexing.conf
# Name the components on this agent
a1.sources = r1
a1.sinks = k1 k2 #有两个sink
a1.channels = c1 c2 #有两个channel
# Describe/configure the source
a1.sources.r1.type= org.apache.flume.source.http.HTTPSource
a1.sources.r1.port= 50000
a1.sources.r1.host= master
a1.sources.r1.selector.type= multiplexing
a1.sources.r1.channels= c1 c2
a1.sources.r1.selector.header= areyouok
a1.sources.r1.selector.mapping.OK = c1
a1.sources.r1.selector.mapping.NO = c2
a1.sources.r1.selector.default= c1
#定义输入策略,ok是走c1通道,on是走c2通道,c1c2对应不同的机器,有个默认通道是c1
# Describe the sink
a1.sinks.k1.type = avro
a1.sinks.k1.channel = c1
a1.sinks.k1.hostname = slave1
a1.sinks.k1.port = 50000
a1.sinks.k2.type = avro
a1.sinks.k2.channel = c2
a1.sinks.k2.hostname = slave2
a1.sinks.k2.port = 50000
# Use a channel which buffers eventsinmemory
a1.channels.c1.type = memory
a1.channels.c1.capacity = 1000
a1.channels.c1.transactionCapacity =100
a1.channels.c2.type = memory
a1.channels.c2.capacity = 1000
a1.channels.c2.transactionCapacity = 100
slave配置文件跟复制的是一样的
先启动slave
Master启动
]# ./bin/flume-ng agent --conf conf--conf-file ./conf/selector_test/flume_client_multiplexing.conf --name a1-Dflume.root.logger=INFO,console
输入1:
]# curl -X POST -d'[{"headers":{"areyouok":"OK","hadoop1":"hadoop1is header"}, "body":"6:7:8bbb5"}]' http://master:50000
输出:slave1接收到信息

输入2:
]# curl -X POST -d '[{"headers":{"areyouok":"OK","hadoop1":"hadoop1is header"}, "body":"abcabc111111"}]'http://master:50000
输出:也一样是slave1接收到信息

输入3:
]# curl -X POST -d'[{"headers":{"areyouok":"NO","hadoop1":"hadoop1is header"}, "body":"abcabc111111"}]' http://master:50000
]# curl -X POST -d'[{"headers":{"areyouok":"NO","hadoop1":"hadoop1is header"}, "body":"abcabc111111"}]' http://master:50000
输出:slave2接收到信息

不做标记输入4:
]# curl -X POST -d'[{"headers":{"areyouok":"IDONEKNOW","hadoop1":"hadoop1is header"}, "body":"abcabc111111"}]'http://master:50000
默认设置slave1输出