目录
一. 基础概念理解
1. 一点个人理解
2. 神经网络
二. bp神经网络的局部概念
1. 神经元
2. 激活函数
三. bp神经网络的过程
1. 算法流程图
2. 神经网络基础架构
2.1 正向传播过程
2.2 反向传播过程(算法核心)
四. 基本bp神经网络的代码实现
1. 抽象类GeneralAnn
2. SimpleAnn类
核心函数
五. 激活函数
1. 关于激活函数的更进一步解释
2. 常见的激活函数
3. 激活函数对应的代码
六. 对于单层bp神经网络的封装
一. 基础概念理解
1. 一点个人理解
对于机器学习部分的知识,我个人觉得需要一个大概的框架(又或者说怎么样理解机器学习)。机器学习——就像它的名字一样,利用机器进行学习的过程(像我们之前学过的adaboosting算法,决策树都可以以归类到机器学习)。但是不同的算法学习效果不一样,接下来我们学习到的bp神经网络算法就是最经常用的,或者效果比较好的。
回顾我们之前的机器学习的帖子,我们的大致工作就是利用数据训练一个映射关系,怎么训练那是不同算法的事情,我们通过训练得到的映射关系是机器学习的结果(这个映射关系说白了就是一个强分类器)。再利用得到的这个映射关系,对没有进行分类的数据分类,这就是大致上的框架过程。
最后对于神经网络也是同样的道理,这里的神经网络也是一个映射(输入层,隐藏层,输出层)。
2. 神经网络
神经网络又称人工神经网络 (ANN),是机器学习的子集,同时也是深度学习算法的核心。 其名称和结构均受到人脑的启发,可模仿生物神经元相互传递信号的方式。
人工神经网络 (ANN) 由节点层组成,包含一个输入层、一个或多个隐藏层和一个输出层。 每个节点也称为一个人工神经元,它们连接到另一个节点,具有相关的权重和阈值。 如果任何单个节点的输出高于指定的阈值,那么会激活该节点,并将数据发送到网络的下一层。 否则,不会将数据传递到网络的下一层,如下图所示。
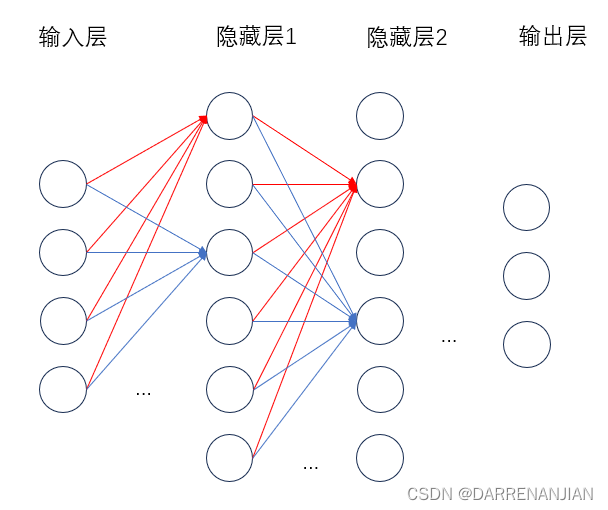
神经网络依靠训练数据来学习,并随时间推移提高自身准确性。 而一旦这些学习算法经过了调优,提高了准确性,它们就会成为计算机科学和人工智能领域的强大工具,使我们能够快速对数据进行分类和聚类。
二. bp神经网络的局部概念
1. 神经元
神经网络是由多个神经元构成的,不同神经元之间不同权重构成了具有学习能力的一个网络。
这里是某一个神经元的图示

神经信号{x1,x2...xn}传入某一个神经元,通过计算得到信号值Σ=x1·w1+x2·w2...+xn·wn-α,最后用激活函数计算y=f(Σ)。
2. 激活函数
首先需要解释的是为什么需要激活函数f?——参考这篇文章。简单来说就是去掉线性关系,有利于后面backforword回溯调整相应参数;倘若不采用激活函数或者没有改变为非线性关系,那么不论你设置多少的隐藏层,最终得到的都是线性关系,没有办法增加网络的复杂程度,从而无法训练出泛化的神经网络。
除此之外,这里有模拟生物的特性,即只有当电位(脉冲)达到一定值的时候才会激活后面的神经元,假如没有激活函数和偏置值,对于一点点外界刺激就会有电位变化,会不会太敏感?所以这里激活函数和偏置值同时引用,只有当脉冲达到一定的数值(>α)才会激活后面的神经元。
这里简单介绍一种激活函数(后面会有详细介绍激活函数的内容)——Sigmod函数

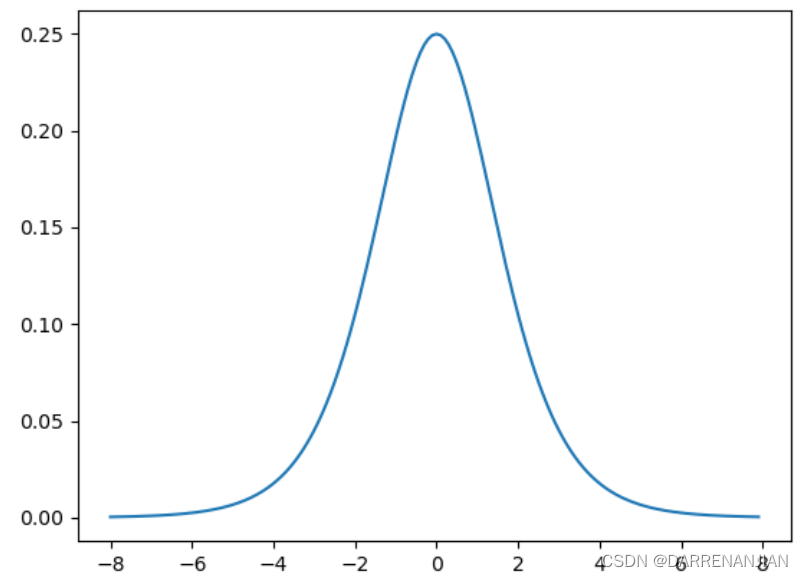
它对应的导数——用于backforword回溯改变
三. bp神经网络的过程
1. 算法流程图

2. 神经网络基础架构
bp神经网络由一个输入层、一个或多个隐藏层、一个输出层组成。
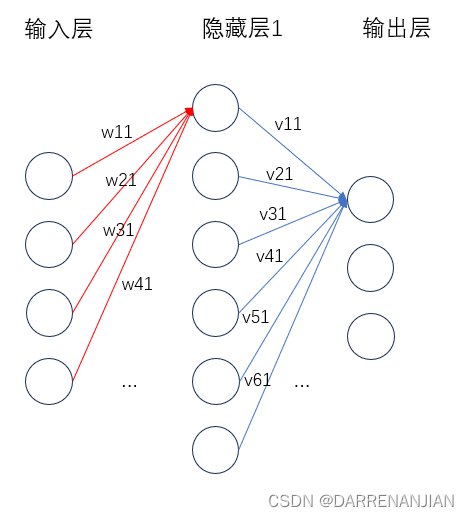
输入层:信息的输入端,是读入输入的数据。
隐藏层:信息的处理端,可以设置这个隐藏层的层数(在这里1层隐藏层)。
输出层:信息的输出端,也就是我们要的结果。
w,v分别的输入层到隐藏层,隐藏层到输出层的是权重。
对于上图的只含一个隐层的神经网络模型:BP神经网络的过程主要分为两个阶段,第一阶段是信号的正向传播,从输入层经过隐含层,最后到达输出层;第二阶段是误差的反向传播,从输出层到隐含层,最后到输入层,依次调节隐含层到输出层的权重和偏置,输入层到隐含层的权重和偏置
2.1 正向传播过程
正向传播就是让信息从输入层进入网络,依次经过每一层的计算,得到最终输出层结果的过程。在下面的网络中,我们的计算过程比较直接,用每一层的数值乘以对应的权重再减去偏置值,得到的数值再传入激活函数f。
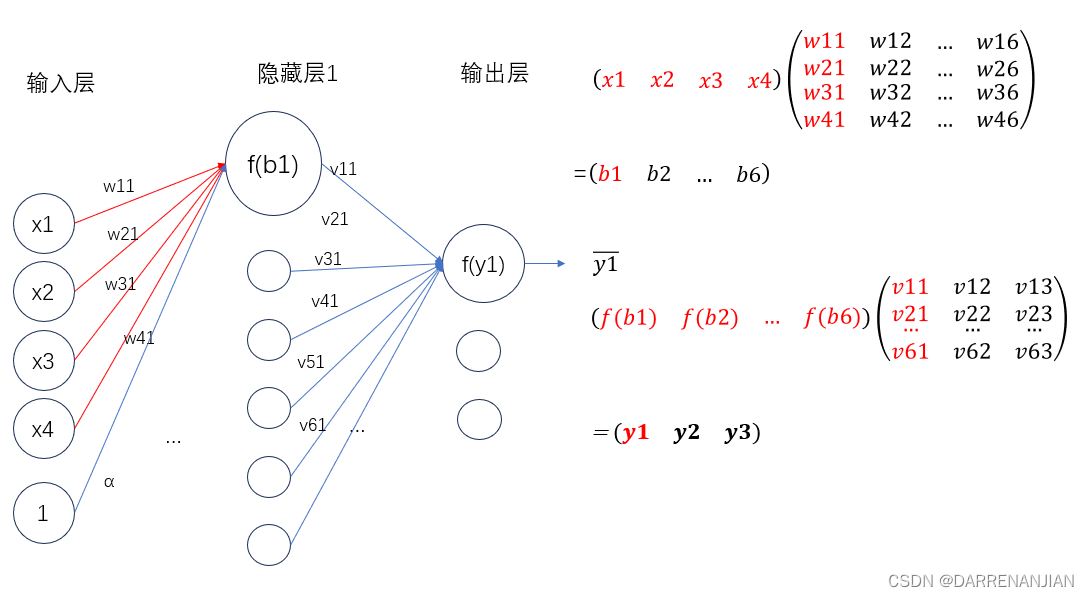
这里补充一点,由于每一次有偏置值α的计算Σ=x1·w11+x2·w21+x3·w31+x4·w41-α,为了后期方便计算我们可以把数值1当做一个节点,且它的权值为α(每一层都需要多设置一个,并不只是输入层设置α,隐藏层也需要设置α),即如下图所示。这里我们就可以把偏置值也作为其中一个节点参与到运算当中(反正我们的目标就是调整权值和偏置值,直接把偏置值当做一个节点参与计算),不然就需要计算Σ-α,调整的时候就十分麻烦。
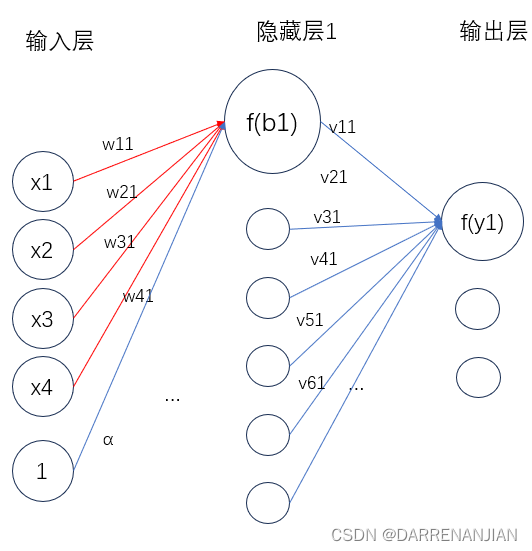
通过一步一步地计算(输入层算隐藏层的节点值,隐藏层算输出层的节点值(当有多个隐藏层的时候也是一样的的道理))我们可以得到几个预测值,这样我们就完成了神经网络的正向传播过程。
2.2 反向传播过程(算法核心)
我们计算出了预测的结果,这时我们需要根据这预测的结果反过来改变每个节点的权重值w,v。那么怎么做呢?
定义误差公式
其中是预测得到的结果。
现在我们的问题是——如何调整权重使得损失函数E不断变小。这里我们引入梯度,梯度是某个函数数值增大最快的方向,既然我们需要让E不断变小,则设置为前进方向为负梯度方向。
以这张图为例:
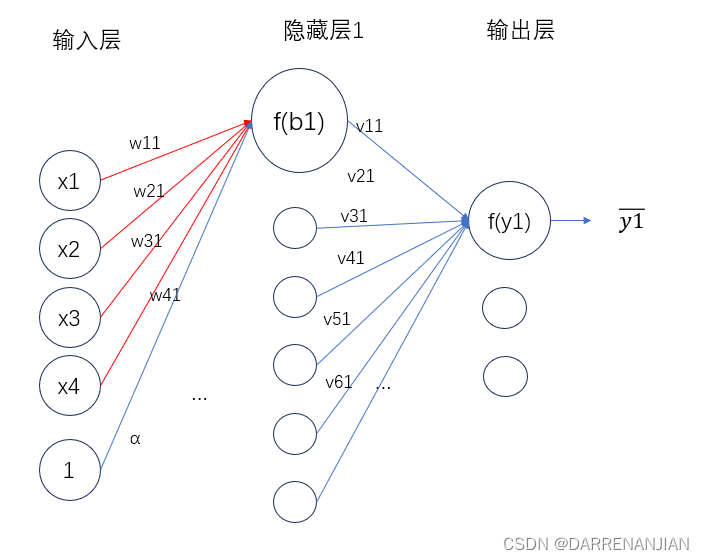
这里我们令

——注意这里我们从数学的角度来看,这个E是关于权值V的函数,所以我们计算从输出层到隐藏层关于V的梯度的公式为:
同理我们计算隐藏层关于W的梯度公式为:
这里回顾一下backforword的过程——通过计算出与
的差值构造出优化目标E,通过梯度最速下降法找到优化的每一个权值W,V。即我们在反推的时候需要计算i层的权重,那么我们就需要用到i+1层的权重值,每一层都是如此不断迭代直到优化完成整个神经网络。

通过上述的操作我们最终得到了一个经过训练的神经网络。同时补充一点,神经网络的隐藏层是可以由我们自己定义的,隐藏层越多,网络越复杂,得到的分类效果越好(前提是有足量的数据来训练,若数据不足则会发生欠拟合的现象),越能够与完成精准度较高的分类。除此之外,对于步长d(梯度下降的距离),我们一般设置为0.08-0.1之间,d过小收敛速度太慢,增加算法开销;过大又会发生在最优解左右横跳(一直不收敛),甚至于反向收敛的情况。
四. 基本bp神经网络的代码实现
1. 抽象类GeneralAnn
1.1初始化部分
首先我们需要特别注意这个数组layerNumNodes,layerNumNodes={4,8,8,3},这个代表每个层的节点的个数,由于iris数据由4个属性和一个标签(这一个标签又有3种),所以设置输入层为4个节点,输出层为3共节点,至于隐藏层的8个节点是一个具体的数值(通过多次试验得到?)。numLayers是总共的层数。
mobp是惯性常量,,learningRate为学习的比率。
/*** The whole dataset.*/Instances dataset;/*** Number of layers. It is counted according to nodes instead of edges.*/int numLayers;/*** The number of nodes for each layer, e.g., [3, 4, 6, 2] means that there* are 3 input nodes (conditional attributes), 2 hidden layers with 4 and 6* nodes, respectively, and 2 class values (binary classification).*/int[] layerNumNodes;/*** Momentum coefficient.*/public double mobp;/*** Learning rate.*/public double learningRate;/*** For random number generation.*/Random random = new Random();1.2 构造函数
读入数据,根据layerNumNodes创建网格。
/*********************** The first constructor.** @param paraFilename* The arff filename.* @param paraLayerNumNodes* The number of nodes for each layer (may be different).* @param paraLearningRate* Learning rate.* @param paraMobp* Momentum coefficient.*********************/public GeneralAnn(String paraFilename, int[] paraLayerNumNodes, double paraLearningRate,double paraMobp) {// Step 1. Read data.try {FileReader tempReader = new FileReader(paraFilename);dataset = new Instances(tempReader);// The last attribute is the decision class.dataset.setClassIndex(dataset.numAttributes() - 1);tempReader.close();} catch (Exception ee) {System.out.println("Error occurred while trying to read \'" + paraFilename+ "\' in GeneralAnn constructor.\r\n" + ee);System.exit(0);} // Of try// Step 2. Accept parameters.layerNumNodes = paraLayerNumNodes;numLayers = layerNumNodes.length;// Adjust if necessary.layerNumNodes[0] = dataset.numAttributes() - 1;layerNumNodes[numLayers - 1] = dataset.numClasses();learningRate = paraLearningRate;mobp = paraMobp;}//Of the first constructor1.3 forword前向预测的接口
/*********************** Forward prediction.** @param paraInput* The input data of one instance.* @return The data at the output end.*********************/public abstract double[] forward(double[] paraInput);1.4 backforword后向预测的接口
/*********************** Back propagation.** @param paraTarget* For 3-class data, it is [0, 0, 1], [0, 1, 0] or [1, 0, 0].**********************/public abstract void backPropagation(double[] paraTarget);1.5 训练函数
tempInput表示输入信息——为4个属性,tempTarget表示输出层应该被分类为标签的哪三个类(真实值),最后循环遍历每一个数据进行前项预测和后向预测。
/*********************** Train using the dataset.*********************/public void train() {double[] tempInput = new double[dataset.numAttributes() - 1];double[] tempTarget = new double[dataset.numClasses()];for (int i = 0; i < dataset.numInstances(); i++) {// Fill the data.for (int j = 0; j < tempInput.length; j++) {tempInput[j] = dataset.instance(i).value(j);} // Of for j// Fill the class label.Arrays.fill(tempTarget, 0);tempTarget[(int) dataset.instance(i).classValue()] = 1;// Train with this instance.forward(tempInput);backPropagation(tempTarget);} // Of for i}// Of train1.6 获取数组最大的索引
/*********************** Get the index corresponding to the max value of the array.** @return the index.*********************/public static int argmax(double[] paraArray) {int resultIndex = -1;double tempMax = -1e10;for (int i = 0; i < paraArray.length; i++) {if (tempMax < paraArray[i]) {tempMax = paraArray[i];resultIndex = i;} // Of if} // Of for i1.7 简单做个测试
对每个数据做测试tempPrediction = forward(tempInput);,得到的是预测的结果,再在预测值里面找到最大值,就被订为预测的最终值。最后计算准确率。
/*********************** Test using the dataset.** @return The precision.*********************/public double test() {double[] tempInput = new double[dataset.numAttributes() - 1];double tempNumCorrect = 0;double[] tempPrediction;int tempPredictedClass = -1;for (int i = 0; i < dataset.numInstances(); i++) {// Fill the data.for (int j = 0; j < tempInput.length; j++) {tempInput[j] = dataset.instance(i).value(j);} // Of for j// Train with this instance.tempPrediction = forward(tempInput);//System.out.println("prediction: " + Arrays.toString(tempPrediction));tempPredictedClass = argmax(tempPrediction);if (tempPredictedClass == (int) dataset.instance(i).classValue()) {tempNumCorrect++;} // Of if} // Of for iSystem.out.println("Correct: " + tempNumCorrect + " out of " + dataset.numInstances());return tempNumCorrect / dataset.numInstances();}// Of test2. SimpleAnn类
2.1 初始化与变量添加
首先说明SimpleAnn是继承GeneralAnn类,故基本变量不再定义,且继承其数据结构。接下来是补充的部分数据结构。layerNodeValues是用于计算节点值,用于backforword计算惩罚函数值;edgeWeights表示节点与节点的权重,edgeWeightsDelta表示backforword改变的权重值。
/*** The value of each node that changes during the forward process. The first* dimension stands for the layer, and the second stands for the node.*/public double[][] layerNodeValues;/*** The error on each node that changes during the back-propagation process.* The first dimension stands for the layer, and the second stands for the* node.*/public double[][] layerNodeErrors;/*** The weights of edges. The first dimension stands for the layer, the* second stands for the node index of the layer, and the third dimension* stands for the node index of the next layer.*/public double[][][] edgeWeights;/*** The change of edge weights. It has the same size as edgeWeights.*/public double[][][] edgeWeightsDelta;
2.2 主函数
tempLayerNodes定义每层节点的个数,利用构造函数tempNetwork初始化,接着训练函数,接着测试函数,输出准确率。
/*********************** Test the algorithm.*********************/public static void main(String[] args) {int[] tempLayerNodes = { 4, 8, 8, 3 };SimpleAnn tempNetwork = new SimpleAnn("D:/data/iris.arff", tempLayerNodes,0.01,0.6);for (int round = 0; round < 5000; round++) {tempNetwork.train();} // Of for n// System.out.println(tempNetwork.dataset.numAttributes());double tempAccuracy = tempNetwork.test();System.out.println("The accuracy is: " + tempAccuracy);}// Of main2.3 构造函数
利用父类的构造函数完成初始化,layerNodeValues,layerNodeErrors的大小和层数一致;edgeWeights,edgeWeightsDelta的层数应该比节点数少一层。
layerNodeValues的每一行的长度和layerNumNodes的列数对应的数字长度一致,layerNodeErrors也是同理。edgeWeights每一个切片的大小为5×8,9×8,9×3(针对于iris数据),为什么不是4×8,8×8,8×3?不要忘记了我们把偏置值也作为节点加入了每一层当中,接着随机赋值。
/*********************** The first constructor.** @param paraFilename* The arff filename.* @param paraLayerNumNodes* The number of nodes for each layer (may be different).* @param paraLearningRate* Learning rate.* @param paraMobp* Momentum coefficient.*********************/public SimpleAnn(String paraFilename, int[] paraLayerNumNodes, double paraLearningRate,double paraMobp) {super(paraFilename, paraLayerNumNodes, paraLearningRate, paraMobp);// Step 1. Across layer initialization.layerNodeValues = new double[numLayers][];layerNodeErrors = new double[numLayers][];edgeWeights = new double[numLayers - 1][][];edgeWeightsDelta = new double[numLayers - 1][][];// Step 2. Inner layer initialization.for (int l = 0; l < numLayers; l++) {layerNodeValues[l] = new double[layerNumNodes[l]];layerNodeErrors[l] = new double[layerNumNodes[l]];// One less layer because each edge crosses two layers.if (l + 1 == numLayers) {break;} // of if// In layerNumNodes[l] + 1, the last one is reserved for the offset.edgeWeights[l] = new double[layerNumNodes[l] + 1][layerNumNodes[l + 1]];edgeWeightsDelta[l] = new double[layerNumNodes[l] + 1][layerNumNodes[l + 1]];for (int j = 0; j < layerNumNodes[l] + 1; j++) {for (int i = 0; i < layerNumNodes[l + 1]; i++) {// Initialize weights.edgeWeights[l][j][i] = random.nextDouble();} // Of for i} // Of for j} // Of for l}// Of the constructor2.4 训练函数
首先我们利用从父类继承的train函数训练,详见1.5。
2.6 forword函数
首先layerNodeValues第一层赋值paraInput,z = edgeWeights[l - 1][layerNodeValues[l - 1].length][j];z确定偏置值的权重。z += edgeWeights[l - 1][i][j] * layerNodeValues[l - 1][i];确定每个前一层节点×对应的权值相加。相当于我们得到了。
最后我们得到了下面一层的节点数据layerNodeValues[l][j] = 1 / (1 + Math.exp(-z));,最终返回得到的layerNodeValues数组最后一层(预测值)。
/*********************** Forward prediction.** @param paraInput* The input data of one instance.* @return The data at the output end.*********************/public double[] forward(double[] paraInput) {// Initialize the input layer.for (int i = 0; i < layerNodeValues[0].length; i++) {layerNodeValues[0][i] = paraInput[i];} // Of for i// Calculate the node values of each layer.double z;for (int l = 1; l < numLayers; l++) {//确定第几层for (int j = 0; j < layerNodeValues[l].length; j++) {//确定第几个节点// Initialize according to the offset, which is always +1z = edgeWeights[l - 1][layerNodeValues[l - 1].length][j];// Weighted sum on all edges for this node.for (int i = 0; i < layerNodeValues[l - 1].length; i++) {z += edgeWeights[l - 1][i][j] * layerNodeValues[l - 1][i];} // Of for i// Sigmoid activation.// This line should be changed for other activation functions.layerNodeValues[l][j] = 1 / (1 + Math.exp(-z));} // Of for j} // Of for lreturn layerNodeValues[numLayers - 1];}// Of forward2.7 backforword函数
核心函数
这段代码是核心函数,用于更新每个节点之间的权重值。传入最终我们的标签值tempTarget。这里的数学逻辑参考张星移师兄的博客。
从最后一层l开始,初始化节点误差layerNodeErrors(这个误差和激活函数也有关),while确定权重层数,j确定这一层是哪个节点,i确定下一层是哪一个节点。z用于记录更新下一层节点误差的中间参数。
我们有了k层节点误差,则可以更新k层的权重值,在这过程中计算k-1层的节点误差,然后也是同样的道理,通过k-1层的节点误差更新k-1层的权重值。直到我们计算到输入层。除此之外,我们需要注意的是更新偏置值的过程if (j == layerNumNodes[l] - 1),同样的道理,只不过我们设定偏置值的节点为1,所以没有乘节点value值,这里需要注意。
最后更新上一层的节点误差layerNodeErrors[l][j] = layerNodeValues[l][j] * (1 - layerNodeValues[l][j]) * z。
/*********************** Back propagation and change the edge weights.** @param paraTarget* For 3-class data, it is [0, 0, 1], [0, 1, 0] or [1, 0, 0].*********************/public void backPropagation(double[] paraTarget) {// Step 1. Initialize the output layer error.int l = numLayers - 1;for (int j = 0; j < layerNodeErrors[l].length; j++) {layerNodeErrors[l][j] = layerNodeValues[l][j] * (1 - layerNodeValues[l][j])* (paraTarget[j] - layerNodeValues[l][j]);} // Of for j// Step 2. Back-propagation even for l == 0while (l > 0) {l--;// Layer l, for each node.for (int j = 0; j < layerNumNodes[l]; j++) {double z = 0.0;// For each node of the next layer.for (int i = 0; i < layerNumNodes[l + 1]; i++) {if (l > 0) {z += layerNodeErrors[l + 1][i] * edgeWeights[l][j][i];} // Of if// Weight adjusting.edgeWeightsDelta[l][j][i] = mobp * edgeWeightsDelta[l][j][i]+ learningRate * layerNodeErrors[l + 1][i] * layerNodeValues[l][j];edgeWeights[l][j][i] += edgeWeightsDelta[l][j][i];if (j == layerNumNodes[l] - 1) {// Weight adjusting for the offset part.edgeWeightsDelta[l][j + 1][i] = mobp * edgeWeightsDelta[l][j + 1][i]+ learningRate * layerNodeErrors[l + 1][i];edgeWeights[l][j + 1][i] += edgeWeightsDelta[l][j + 1][i];} // Of if} // Of for i// Record the error according to the differential of Sigmoid.// This line should be changed for other activation functions.layerNodeErrors[l][j] = layerNodeValues[l][j] * (1 - layerNodeValues[l][j]) * z;} // Of for j} // Of while}// Of backPropagation
综上我认为已经完成了bp神经网络最关键的部分,从数学推导到代码实现。
五. 激活函数
1. 关于激活函数的更进一步解释
在接触到深度学习(Deep Learning)后,我们会发现在每一层的神经网络输出后都会使用一个函数(比如sigmoid,tanh,Relu等等)对结果进行运算,这个函数就是激活函数(Activation Function)。那么为什么需要添加激活函数呢?如果不添加又会产生什么问题呢?
首先,我们知道神经网络模拟了人类神经元的工作机理,激活函数(Activation Function)是一种添加到人工神经网络中的函数,旨在帮助网络学习数据中的复杂模式。在神经元中,输入的input经过一系列加权求和后作用于另一个函数,这个函数就是这里的激活函数。类似于人类大脑中基于神经元的模型,激活函数最终决定了是否传递信号以及要发射给下一个神经元的内容。在人工神经网络中,一个节点的激活函数定义了该节点在给定的输入或输入集合下的输出。
这里来解释一下为什么要用到激活函数?
因为神经网络中每一层的输入输出都是一个线性求和的过程,下一层的输出只是承接了上一层输入函数的线性变换,所以如果没有激活函数,那么无论你构造的神经网络多么复杂,有多少层,最后的输出都是输入的线性组合,纯粹的线性组合并不能够解决更为复杂的问题。而引入激活函数之后,我们会发现常见的激活函数都是非线性的,因此也会给神经元引入非线性元素,使得神经网络可以逼近其他的任何非线性函数,这样可以使得神经网络应用到更多非线性模型中。
一般来说,在神经元中,激活函数是很重要的一部分,为了增强网络的表示能力和学习能力,神经网络的激活函数都是非线性的,通常具有以下几点性质:
- 连续并可导(允许少数点上不可导),可导的激活函数可以直接利用数值优化的方法来学习网络参数;
- 激活函数及其导数要尽可能简单一些,太复杂不利于提高网络计算率;
- 激活函数的导函数值域要在一个合适的区间内,不能太大也不能太小,否则会影响训练的效率和稳定性。
2. 常见的激活函数
2.1 Sigmod函数
Sigmod函数

Sigmod导函数

图像:

2.2 Tanh函数
Tanh函数
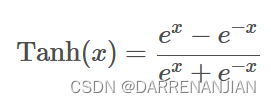
对应的导数

图片:
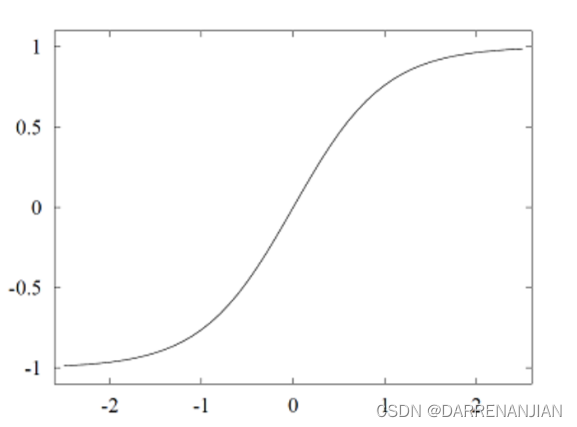
对应后面还有一堆激活函数,但是都是十分简单的,在神经网络里面根据具体情况选取。在这里我就不想重复,详情请看代码。
3. 激活函数对应的代码
这一部分主要是封装了一堆激活函数(包括我没有写在文章里面的),都是十分简单的代码,传入参数k,输出经过激活函数计算之后的值k1,,输出经过激活函数导数的计算之后的值k2。关于不同激活函数对应的作用,请读者参考其他文章。
package Day_71;/*** Activator.** @author Fan Min minfanphd@163.com.*/public class Activator {/*** Arc tan.*/public final char ARC_TAN = 'a';/*** Elu.*/public final char ELU = 'e';/*** Gelu.*/public final char GELU = 'g';/*** Hard logistic.*/public final char HARD_LOGISTIC = 'h';/*** Identity.*/public final char IDENTITY = 'i';/*** Leaky relu, also known as parametric relu.*/public final char LEAKY_RELU = 'l';/*** Relu.*/public final char RELU = 'r';/*** Soft sign.*/public final char SOFT_SIGN = 'o';/*** Sigmoid.*/public final char SIGMOID = 's';/*** Tanh.*/public final char TANH = 't';/*** Soft plus.*/public final char SOFT_PLUS = 'u';/*** Swish.*/public final char SWISH = 'w';/*** The activator.*/private char activator;/*** Alpha for elu.*/double alpha;/*** Beta for leaky relu.*/double beta;/*** Gamma for leaky relu.*/double gamma;/************************ The first constructor.** @param paraActivator*            The activator.**********************/public Activator(char paraActivator) {activator = paraActivator;}// Of the first constructor/************************ Setter.**********************/public void setActivator(char paraActivator) {activator = paraActivator;}// Of setActivator/************************ Getter.**********************/public char getActivator() {return activator;}// Of getActivator/************************ Setter.**********************/void setAlpha(double paraAlpha) {alpha = paraAlpha;}// Of setAlpha/************************ Setter.**********************/void setBeta(double paraBeta) {beta = paraBeta;}// Of setBeta/************************ Setter.**********************/void setGamma(double paraGamma) {gamma = paraGamma;}// Of setGamma/************************ Activate according to the activation function.**********************/public double activate(double paraValue) {double resultValue = 0;switch (activator) {case ARC_TAN:resultValue = Math.atan(paraValue);break;case ELU:if (paraValue >= 0) {resultValue = paraValue;} else {resultValue = alpha * (Math.exp(paraValue) - 1);} // Of ifbreak;// case GELU:// resultValue = ?;// break;// case HARD_LOGISTIC:// resultValue = ?;// break;case IDENTITY:resultValue = paraValue;break;case LEAKY_RELU:if (paraValue >= 0) {resultValue = paraValue;} else {resultValue = alpha * paraValue;} // Of ifbreak;case SOFT_SIGN:if (paraValue >= 0) {resultValue = paraValue / (1 + paraValue);} else {resultValue = paraValue / (1 - paraValue);} // Of ifbreak;case SOFT_PLUS:resultValue = Math.log(1 + Math.exp(paraValue));break;case RELU:if (paraValue >= 0) {resultValue = paraValue;} else {resultValue = 0;} // Of ifbreak;case SIGMOID:resultValue = 1 / (1 + Math.exp(-paraValue));break;case TANH:resultValue = 2 / (1 + Math.exp(-2 * paraValue)) - 1;break;// case SWISH:// resultValue = ?;// break;default:System.out.println("Unsupported activator: " + activator);System.exit(0);}// Of switchreturn resultValue;}// Of activate/************************ Derive according to the activation function. Some use x while others use* f(x).** @param paraValue*            The original value x.* @param paraActivatedValue*            f(x).**********************/public double derive(double paraValue, double paraActivatedValue) {double resultValue = 0;switch (activator) {case ARC_TAN:resultValue = 1 / (paraValue * paraValue + 1);break;case ELU:if (paraValue >= 0) {resultValue = 1;} else {resultValue = alpha * (Math.exp(paraValue) - 1) + alpha;} // Of ifbreak;// case GELU:// resultValue = ?;// break;// case HARD_LOGISTIC:// resultValue = ?;// break;case IDENTITY:resultValue = 1;break;case LEAKY_RELU:if (paraValue >= 0) {resultValue = 1;} else {resultValue = alpha;} // Of ifbreak;case SOFT_SIGN:if (paraValue >= 0) {resultValue = 1 / (1 + paraValue) / (1 + paraValue);} else {resultValue = 1 / (1 - paraValue) / (1 - paraValue);} // Of ifbreak;case SOFT_PLUS:resultValue = 1 / (1 + Math.exp(-paraValue));break;case RELU: // Updatedif (paraValue >= 0) {resultValue = 1;} else {resultValue = 0;} // Of ifbreak;case SIGMOID: // UpdatedresultValue = paraActivatedValue * (1 - paraActivatedValue);break;case TANH: // UpdatedresultValue = 1 - paraActivatedValue * paraActivatedValue;break;// case SWISH:// resultValue = ?;// break;default:System.out.println("Unsupported activator: " + activator);System.exit(0);}// Of switchreturn resultValue;}// Of derive/************************ Overrides the method claimed in Object.**********************/public String toString() {String resultString = "Activator with function '" + activator + "'";resultString += "\r\n alpha = " + alpha + ", beta = " + beta + ", gamma = " + gamma;return resultString;}// Of toString/*********************** Test the class.*********************/public static void main(String[] args) {Activator tempActivator = new Activator('s');double tempValue = 0.6;double tempNewValue;tempNewValue = tempActivator.activate(tempValue);System.out.println("After activation: " + tempNewValue);tempNewValue = tempActivator.derive(tempValue, tempNewValue);System.out.println("After derive: " + tempNewValue);}// Of main
}// Of class Activator
六. 对于单层bp神经网络的封装

