文章目录
- ✨文章有误请指正,如果觉得对你有用,请点三连一波,蟹蟹支持😘
- 前言
- NODE内置模块
- Zlib模块
- createGzip(CreateGzip方法 异步)
- Crypto加密模块
- getHashes 方法
- createHash 方法
- createHmac 方法
- createCipheriv&createDecipheriv 方法
- 相关连接
- 基础路由封装Mime
- 总结
✨文章有误请指正,如果觉得对你有用,请点三连一波,蟹蟹支持😘
                    ⡖⠒⠒⠒⠤⢄⠀⠀⠀
⠀⠀⠀⠀⠀⠀⠀⠀⠀⠀⠀⠀⠀⠀⠀⢸   ⠀⠀⠀⡼⠀⠀⠀⠀ ⠀
⠀⠀⠀⠀⠀⠀⠀⠀⠀⠀⠀⠀⢶⣲⡴⣗⣲⡦⢤⡏⠀⠀⠀⠀⠀
⠀⠀⠀⠀⠀⠀⠀⠀⠀⠀⠀⠀⣰⠋⠉⠉⠓⠛⠿⢷⣶⣦⠀⠀⠀
⠀⠀⠀⠀⠀⠀⠀⠀⠀⠀⠀⢠⠇⠀⠀⠀⠀⠀⠀⠘⡇⠀⠀⠀⠀
⠀⠀⠀⠀⠀⠀⠀⠀⠀⠀⠀⡞⠀⠀⠀⠀⠀⠀⠀⢰⠇⠀⠀⠀⠀
⠀⠀⠀⠀⠀⠀⠀⠀⡴⠊⠉⠳⡄⠀⢀⣀⣀⡀⠀⣸⠀⠀⠀⠀⠀
⠀⠀⠀⠀⠀⠀⠀⢸⠃⠀⠰⠆⣿⡞⠉⠀⠀⠉⠲⡏⠀⠀⠀⠀⠀
⠀⠀⠀⠀⠀⠀⠀⠈⢧⡀⣀⡴⠛⡇⠀⠈⠃⠀⠀⡗⠀⠀⠀⠀⠀
⠀⠀⠀⠀⠀⠀⠀⠀⠀⣿⣱⠃⡴⠙⠢⠤⣀⠤⡾⠁⠀⠀⠀⠀⠀
⠀⠀⠀⠀⠀⠀⠀⠀⢀⡇⣇⡼⠁⠀⠀⠀⠀⢰⠃⠀⠀⠀⠀⠀⠀
⠀⠀⠀⠀⠀⠀⠀⠀⣸⢠⣉⣀⡴⠙⠀⠀⠀⣼⠀⠀⠀⠀⠀⠀⠀
⠀⠀⠀⠀⠀⠀⠀⠀⡏⠀⠈⠁⠀⠀⠀⠀⢀⡇⠀⠀⠀⠀⠀⠀⠀
⠀⠀⠀⠀⠀⠀⠀⢸⠃⠀⠀⠀⠀⠀⠀⠀⡼⠀⠀⠀⠀⠀⠀⠀⠀
⠀⠀⠀⠀⠀⠀⠀⢸⠀⠀⠀⠀⠀⠀⠀⣰⠃⠀⠀⠀⠀⠀⠀⠀⠀
⠀⠀⠀⠀⠀⣀⠤⠚⣶⡀⢠⠄⡰⠃⣠⣇⠀⠀⠀⠀⠀⠀⠀⠀⠀
⠀⢀⣠⠔⣋⣷⣠⡞⠀⠉⠙⠛⠋⢩⡀⠈⠳⣄⠀⠀⠀⠀⠀⠀⠀
⠀⡏⢴⠋⠁⠀⣸⠁⠀⠀⠀⠀⠀ ⠀⣹⢦⣶⡛⠳⣄⠀⠀⠀⠀⠀
⠀⠙⣌⠳⣄⠀⡇   不能   ⡏⠀⠀  ⠈⠳⡌⣦⠀⠀⠀⠀
⠀⠀⠈⢳⣈⣻⡇   白嫖 ⢰⣇⣀⡠⠴⢊⡡⠋⠀⠀⠀⠀
⠀⠀⠀⠀⠳⢿⡇⠀⠀⠀⠀⠀⠀⢸⣻⣶⡶⠊⠁⠀⠀
⠀⠀⠀⠀⠀⢠⠟⠙⠓⠒⠒⠒⠒⢾⡛⠋⠁⠀⠀⠀⠀⠀⠀⠀⠀
⠀⠀⠀⠀⣠⠏⠀⣸⠏⠉⠉⠳⣄⠀⠙⢆⠀⠀⠀⠀⠀⠀⠀⠀⠀
⠀⠀⠀⡰⠃⠀⡴⠃⠀⠀⠀⠀⠈⢦⡀⠈⠳⡄⠀⠀⠀⠀⠀⠀⠀
⠀⠀⣸⠳⣤⠎⠀⠀⠀⠀⠀⠀⠀⠀⠙⢄⡤⢯⡀⠀⠀⠀⠀⠀⠀
⠀⠐⡇⠸⡅⠀⠀⠀⠀⠀⠀⠀⠀⠀⠀⠀⠹⡆⢳⠀⠀⠀⠀⠀⠀
⠀⠀⠹⡄⠹⡄⠀⠀⠀⠀⠀⠀⠀⠀⠀⠀⠀⣇⠸⡆⠀⠀⠀⠀⠀
⠀⠀⠀⠹⡄⢳⡀⠀⠀⠀⠀⠀⠀⠀⠀⠀⠀⢹⡀⣧⠀⠀⠀⠀⠀
⠀⠀⠀⠀⢹⡤⠳⡄⠀⠀⠀⠀⠀⠀⠀⠀⠀⢀⣷⠚⣆⠀⠀⠀⠀
⠀⠀⠀⡠⠊⠉⠉⢹⡀⠀⠀⠀⠀⠀⠀⠀⠀⢸⡎⠉⠀⠙⢦⡀⠀
⠀⠀⠾⠤⠤⠶⠒⠊⠀⠀⠀⠀⠀⠀⠀⠀⠀⠀⠉⠙⠒⠲⠤⠽
前言
Node.js是一个javascript运行环境。它让javascript可以开发后端程序,实现几乎其他后端语言实现的所有功能,可以与```PHP、Java、Python、.NET、Ruby等后端语言平起平坐。- Nodejs是基于V8引擎,V8是Google发布的开源JavaScript引擎,本身就是用于Chrome浏览器的JS解释,但是Node之父
Ryan Dahl 把这V8搬到了服务器上,用于做服务器的软件。
NODE内置模块
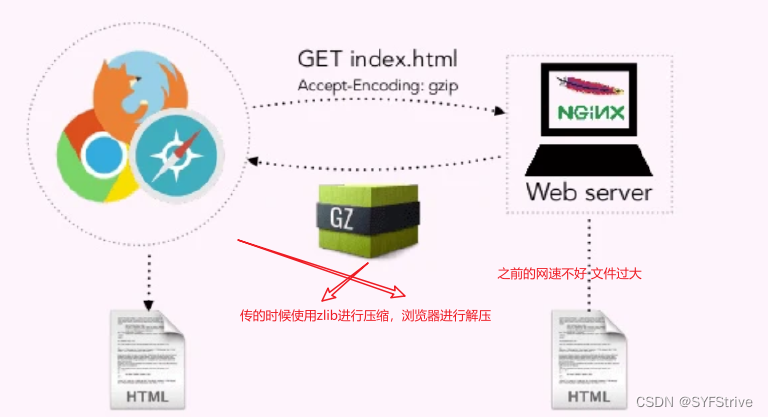
Zlib模块
Node : https://nodejs.cn/api/Zlib
图示 ↓

createGzip(CreateGzip方法 异步)
CreateGzip 压缩
const http = require("http")
const fs = require("fs")
const zlib = require("zlib")
const gzip = zlib.createGzip();
http.createServer((req, res) => {// res 可写流const readStream = fs.createReadStream("./index.js")res.writeHead(200, { "Content-Type": "application/x-javascript;charset=utf-8", "Content-Encoding": "gzip" }) //编码 、 类型readStream.pipe(gzip).pipe(res)
}).listen(3000, () => {console.log('server start')
})
Crypto加密模块
Node:https://nodejs.cn/api/crypto
参考文章 : https://zhuanlan.zhihu.com/p/126502869
参考文章 : https://vimsky.com/examples/usage/node-js-cipher-update-method.html
参考文章 :https://vimsky.com/examples/usage/node-js-decipher-final-method.html
-
作用 : crypto模块的目的是为了提供通用的
加密和哈希算法。用纯JavaScript代码实现这些功能不是不可能,但速度会非常慢。Nodejs用C/C++实现这些算法后,通过cypto这个模块暴露为JavaScript接口,这样用起来方便,运行速度也快。 -
功能:该模块提供了 hash、hmac、加密解密、签名、验证功能等一整套的封装。
getHashes 方法
- 语法:crypto.getHashes();
["RSA-MD4","RSA-MD5","RSA-MDC2","RSA-RIPEMD160","RSA-SHA1","RSA-SHA1-2","RSA-SHA224","RSA-SHA256","RSA-SHA3-224","RSA-SHA3-256","RSA-SHA3-384","RSA-SHA3-512","RSA-SHA384","RSA-SHA512","RSA-SHA512/224","RSA-SHA512/256","RSA-SM3","blake2b512","blake2s256","id-rsassa-pkcs1-v1_5-with-sha3-224","id-rsassa-pkcs1-v1_5-with-sha3-256","id-rsassa-pkcs1-v1_5-with-sha3-384","id-rsassa-pkcs1-v1_5-with-sha3-512","md4","md4WithRSAEncryption","md5","md5-sha1","md5WithRSAEncryption","mdc2","mdc2WithRSA","ripemd","ripemd160","ripemd160WithRSA","rmd160","sha1","sha1WithRSAEncryption","sha224","sha224WithRSAEncryption","sha256","sha256WithRSAEncryption","sha3-224","sha3-256","sha3-384","sha3-512","sha384","sha384WithRSAEncryption","sha512","sha512-224","sha512-224WithRSAEncryption","sha512-256","sha512-256WithRSAEncryption","sha512WithRSAEncryption","shake128","shake256","sm3","sm3WithRSAEncryption","ssl3-md5","ssl3-sha1","whirlpool"
]
//常用的 md5, sha1, sha256, sha512
createHash 方法
- hash 算法
- hash 算法也被称为摘要算法,该算法可以将任意长度的数据,转换为固定长度的 hash 值,这种方式具有
不可逆性。因此,若要获取 hash 的原数据,只能靠字典碰撞。 (但严格来说,摘要算法不算做是加密算法。)
- 语法:crypto.createHash(algorithm[, options])
常用方法使用 演示
//简单演示
// algorithm <string>
// options <Object> stream.transform 选项
// 返回: <Hash>
const crypto = require("crypto")
//常用的 md5, sha1, sha256, sha512
const hashText = ''
const inCommonUseTypeArr = ["md5", "sha1", "sha256", "sha512"]
function CreateHash(text, hashtype) {const hash = crypto.createHash(hashtype).update(text).digest('hex') //领悟 消化 ❓console.log(`类型:${hashtype}  哈希:${hash}  哈希长度:${hash.length}`);
}inCommonUseTypeArr.forEach(item => {CreateHash("hellow world!", item)
})//玩法二
const fs = require('fs')
const filename = './1.txt';
const hash = crypto.createHash("sha1");
const fsStream = fs.createReadStream(filename);fsStream.on("readable", () => {// 哈希流只会生成一个元素。const data = fsStream.read();if (data) {hash.update(data);} else {// 数据接收完毕后,输出hash值console.log(`${hash.digest("hex")} ${filename}`);}
});
输出
类型:md5  哈希:0bd7bda77ced26325c45d19d89b02de9  哈希长度:32
类型:sha1  哈希:0057b8fda68858d4fcbebe976f288c16afd866c2  哈希长度:40
类型:sha256  哈希:ba22e7bd5822db031eb924e31415c81288b8acb7970a31797c2eea1c7eff1178  哈希长度:64
类型:sha512  哈希:dbdec185b881510668b43af983b18b976fdede0f174bb0afab72a296bdfbceebaf497f65ff5ec6be23f21161f3cb67c3e9e707ea0926b8e19de393d01e1ecc8b  哈希长度:128
总结
不同的算法,生成的 hash 值的长度也不一样,碰撞成功的难度也越大。
createHmac 方法
- hmac 算法
- hmac 算法与 hash 算法的调用方式很像,但createHmac()方法这里多了一个参数,这个参数相当于密钥。密钥不一样,即使要加密的文本一样(类似一个随机值),生成的结果也会不一样。
- 语法:crypto.createHmac(algorithm, key[, options])
常用方法使用 演示
//简单演示
// algorithm <string>
// key <string> | <ArrayBuffer> | <Buffer> | <TypedArray> | <DataView> | <KeyObject> | <CryptoKey>
// options <Object> stream.transform 选项
//     encoding <string> 当 key 是字符串时使用的字符串编码。
const crypto = require("crypto")
const hashText = "hellow world!"
const key = Math.random().toString().slice(-10);
const hash = crypto.createHmac("sha256", "kerwin")hash.update(hashText)function createHmac(HmaText, key) {const result = crypto.createHmac("sha1", key).update(HmaText).digest("hex");console.log(HmaText, key, result);
}let n = 10;
while (n--) {createHmac(hashText, key);
}
输出
hellow world! 7431535365 95b59a43c6778d88b5b3a9032a7539dfcf54e6fd
hellow world! 7431535365 95b59a43c6778d88b5b3a9032a7539dfcf54e6fd
hellow world! 7431535365 95b59a43c6778d88b5b3a9032a7539dfcf54e6fd
hellow world! 7431535365 95b59a43c6778d88b5b3a9032a7539dfcf54e6fd
hellow world! 7431535365 95b59a43c6778d88b5b3a9032a7539dfcf54e6fd
hellow world! 7431535365 95b59a43c6778d88b5b3a9032a7539dfcf54e6fd
hellow world! 7431535365 95b59a43c6778d88b5b3a9032a7539dfcf54e6fd
hellow world! 7431535365 95b59a43c6778d88b5b3a9032a7539dfcf54e6fd
hellow world! 7431535365 95b59a43c6778d88b5b3a9032a7539dfcf54e6fd
总结
即使脱库得到了这些数据,反向获取到原密码的机会也非常的低。
createCipheriv&createDecipheriv 方法
- 类型 : 对称 算法
- 前面的两种方法都是不可逆的 hash 加密算法,createCipheriv是可加密和可解密的算法。常见的对称加密算法有
aes和des。
- 语法:crypto.createCipheriv(algorithm, key, iv[, options])
- 语法:crypto.createDecipheriv(algorithm, key, iv[, options])
常用方法使用 演示
//------加密createCipheriv------、
// algorithm <string> 加密的类型 加密使用什么类型 → 解密就得使用什么类型
// key <string> | <Buffer> | <TypedArray> | <DataView> 加密的密钥 →  密钥必须是 8/16/32 位,如果加密算法是 128,,则对应的密钥是 16 位,如果加密算法是 256,则对应的密钥是 32 位;
// iv <string> | <Buffer> | <TypedArray> | <DataView> 初始向量,规则与 key 一样
// options <Object> stream.transform options//------解密createDecipheriv------
// algorithm <string> 解密的类型 加密使用什么类型 → 解密就得使用什么类型
// key <string> | <Buffer> | <TypedArray> | <DataView>   解密的密钥 →  密钥必须是 8/16/32 位,如果加密算法是 128,,则对应的密钥是 16 位,如果加密算法是 256,则对应的密钥是 32 位;
// iv <string> | <Buffer> | <TypedArray> | <DataView>  初始向量,规则与 key 一样
// options <Object> stream.transform options//注意:key 和 iv 两个参数都必须是 'utf8' 编码的字符串、Buffer、 TypedArray 或 DataView。 key 可以是 secret 类型的 KeyObject。 如果密码不需要初始化向量,则 iv 可以为 null。const crypto = require("crypto")// Update?
//语法: (crypto.createCipheriv(???) & crypto.createDecipheriv(???)).Update(data[, inputEncoding][, outputEncoding])方法的使用
//方法的作用 : 方法是加密模块内的Cipher类的内置应用程序编程接口,用于根据给定的编码格式用数据更新密码。
//参数说明: data它用于通过新内容更新密码、 inputEncoding:输入编码格式、outputEncoding:输出编码格式。
//返回值 : 此方法返回包含密码值的缓冲区的对象。// hex参数是什么意思?
// 菜鸟连接:https://www.runoob.com/w3cnote/hex-dec-oct-bin.html
// HEX、DEC、OCT 和 BIN含义如 ↓
// HEX,英文全称 Hexadecimal,表示十六进制。
// DEC,英文全称 Decimal,表示十进制。
// OCT,英文全称 Octal,表示八进制。
// BIN,英文全称 Binary,表示二进制。// final方法什么意思?
//语法: const decipher.final([outputEncoding])
//作用 : decipher.final()方法是加密模块中的Decipher类的内置应用程序编程接口,用于返回包含解密对象值的缓冲区。
//参数说明: 此方法将输出编码格式作为参数。
//返回值 : 此方法返回包含解密值的缓冲区的对象。// Buffer.from() 方法// 语法 : Buffer.from(obj, encoding);
// 参数说明 ↓
// obj  必需。填充缓冲区的对象。 合法对象类型:String、Array、Buffer、arrayBuffer
// encoding  可选。如果对象是字符串,则该参数用于指定其编码。 默认"utf8"// 加密
function encrypt(data, key, iv) {let dep = crypto.createCipheriv("aes-128-cbc", key, iv)return dep.update(data, 'binary', 'hex') + dep.final("hex")
}// 解密
function decrypt(crypted, key, iv) {crypted = Buffer.from(crypted, "hex").toString("binary") //将加密输出的Hex方式 转成 binarylet dep = crypto.createDecipheriv("aes-128-cbc", key, iv)return dep.update(crypted, 'binary', 'utf8') + dep.final("utf8")
}
//16*8 = 128 对应 aes-128(128对应16长度)-cbc
let key = "abcdef1234567890" // Buffer.from('abcdef1234567890', 'utf8');
let iv = "tbcdey1234567890"  // Buffer.from('tbcdey1234567890', 'utf8');
let data = "Hellow World!"let cryted = encrypt(data, key, iv)
console.log("加密结果 :", cryted)let decrypted = decrypt(cryted, key, iv)
console.log("解密结果 :", decrypted)
输出
加密结果 : 60c474615518703bb8becbfbf6080705
解密结果 : Hellow World!
相关连接
参考连接 : crypto: https://zhuanlan.zhihu.com/p/126502869
基础路由封装Mime
说明 : 使用了库mime
Npm : https://www.npmjs.com/package/mime
hone.html
<!DOCTYPE html>
<html lang="en"><head><meta charset="UTF-8"><meta name="viewport" content="width=device-width, initial-scale=1.0"><title>首页</title>
</head><body>home
</body></html>
Login.html
<!DOCTYPE html>
<html lang="en"><head><meta charset="UTF-8"><meta name="viewport" content="width=device-width, initial-scale=1.0"><title>登录页</title>
</head><body><div><div>用户名:<input id="username" /></div><div>密码:<input type="password" id="password" /></div><div><button id="login">登录-get</button><button id="loginpost">登录-post</button></div></div></body>
<script>var ologin = document.querySelector("#login")var ologinpost = document.querySelector("#loginpost")var username = document.querySelector("#username")var password = document.querySelector("#password")ologin.onclick = () => {//get请求fetch(`/api/login?username=${username.value}&password=${password.value}`).then(res => res.text()).then(res => {console.log(res)})}ologinpost.onclick = () => {//get请求fetch(`/api/loginpost`, {method: "POST",body: JSON.stringify({username: username.value,password: password.value}),headers: {"Content-Type": "application/json"}}).then(res => res.text()).then(res => {console.log(res)})}
</script></html>
index.js
//自定义模块
const server = require("./server")
const route = require("./route")
const api = require("./api")
//注册路由
server.use(route)
server.use(api)server.start()
server.js
//内置模块
const http = require("http")// 自定义路由对象 Use 模拟类似Express
const Router = {}
function use(obj) {Object.assign(Router, obj)
}//启动服务器
function start() {http.createServer((req, res) => {const myURL = new URL(req.url, "http://127.0.0.1")try {Router[myURL.pathname](req, res)} catch (error) {Router["/404"](req, res)}}).listen(3000, () => {console.log("server start")})
}exports.start = start
exports.use = use
route.js
//内置模块
const fs = require("fs")
const path = require("path")
const mime = require('mime');//处理路由 icon "image/x-icon"
function render(res, path, type = "") {res.writeHead(200, { "Content-Type": `${type ? type : "text/html"};charset=utf8` })res.write(fs.readFileSync(path), "utf-8")res.end()
}const route = {"/login": (req, res) => {render(res, "./static/login.html")},"/": (req, res) => {render(res, "./static/home.html")},"/home": (req, res) => {render(res, "./static/home.html")},"/404": (req, res) => {if (readStaticFile(req, res)) {return}res.writeHead(404, { "Content-Type": "text/html;charset=utf8" })res.write(fs.readFileSync("./static/404.html"), "utf-8")res.end()},
}//静态资源管理
function readStaticFile(req, res) {//获取路径const myURL = new URL(req.url, "http://127.0.0.1:3000")const pathname = path.join(__dirname, "/static", myURL.pathname)console.log(myURL);console.log(myURL.pathname);if (myURL.pathname === "/") return falseif (fs.existsSync(pathname)) {//处理显示返回render(res, pathname, mime.getType(myURL.pathname.split(".")[1]))return true} else {return false}
}module.exports = route
api.js
function render(res, data, type = "") {res.writeHead(200, { "Content-Type": `${type ? type : "application/json"};charset=utf8` })res.write(data)res.end()
}
const apiRouter = {"/api/login": (req, res) => {//获取参数呢?const myURL = new URL(req.url, "http://127.0.0.1")if (myURL.searchParams.get("username") === "123" && myURL.searchParams.get("password") === "123") {render(res, `{"ok":1}`)} else {render(res, `{"ok":0}`)}},"/api/loginpost": (req, res) => {//获取参数呢?var post = ""req.on("data", chunk => {post += chunk})req.on("end", () => {post = JSON.parse(post)if (post.username === "123" && post.password === "123") {render(res, `{"ok":1}`)} else {render(res, `{"ok":0}`)}})}
}module.exports = apiRouter
总结
以上是个人学习Node的相关知识点,一点一滴的记录了下来,有问题请评论区指正,共同进步,这才是我写文章的原因之,如果这篇文章对您有帮助请三连支持一波


