文章目录
- 博客系统(使用模板技术)
- 准备工作
- 数据库设计
- 表设计
- 文章表
- 用户表
- 完整`SQL`
- 封装数据库操作代码
- 创建`DBUtil`
- 创建`Blog`类和`User`类
- 创建`BlogDao`类和`UserDao`类
- 实现`insert`
- 实现`selectAll`
- 实现`selectOne`
- 实现`delete`
- 实现`selectByName`
- 实现`selectByUserId`
- 验证数据库代码
- 实现博客列表页
- 创建网页模板
- 创建`BlogServlet`
- 实现博客详情页
- 创建网页模板
- 创建`BlogServlet`
- 实现登陆
- 修改`login_html`
- 创建`LoginServlet`
- 强制要求登陆
- 实现显示用户信息
- 修改博客列表页
- 实现注销登录
- 实现发布博客
- 给编辑页加入`form`表单
- 创建`BlogServlet`
- 实现删除博客
- 创建`DeleteServlet`
博客系统(使用模板技术)
我们基于HTML、CSS、JavaScript实现了一个简单的博客系统页面
接下来我们基于博客系统的页面设计一个带服务器版本的博客程序。
准备工作
- 创建
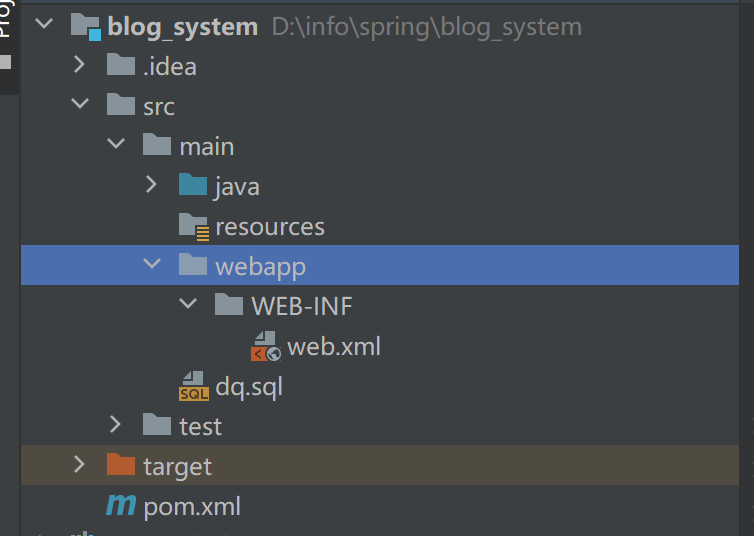
web项目 - 创建目录结构

-
配置
pom.xml- 先到网站上引入依赖网址
- 写配置
<packaging>war</packaging><build><!-- 指定最终 war 包的名称 --><finalName>BlogSystem</finalName></build>
数据库设计
表设计
当前需要设计两张表,文章表和用户表
文章表
mediumtext这是mysql中一个可以表示长字符串的类型
create database if not exists zy;use zy;drop table if exists blog;create table blog(blogId int primary key auto_increment,title varchar(1024),content mediumtext,userId int,postTime datetime
);
用户表
drop table if exists user;create table user(userId int primary key auto_increment,username varchar(1024) unique, -- 确保名字唯一password varchar(1024)
);
完整SQL
create database if not exists zy;use zy;drop table if exists blog;create table blog(blogId int primary key auto_increment,title varchar(1024),content mediumtext,userId int,postTime datetime
);insert into blog values (null, "这是第一篇博客", "我要努力敲代码", 1, now());
insert into blog values (null, "这是第二篇博客", "我要努力学习编程", 2, now());drop table if exists user;create table user(userId int primary key auto_increment,username varchar(1024),password varchar(1024)
);insert into user values (null, "lisi", "123");
insert into user values (null, "zhangsan", "123");
封装数据库操作代码
创建DBUtil
代码和之前版本相同,通过一个单例类来获取数据库连接
package model;import com.mysql.cj.jdbc.MysqlDataSource;import javax.sql.DataSource;
import java.sql.Connection;
import java.sql.PreparedStatement;
import java.sql.ResultSet;
import java.sql.SQLException;public class DBUtil {private static final String URL = "jdbc:mysql://127.0.0.1:3306/zy?characterEncoding=utf8&&useSSL=false";private static final String USERNAME = "root";private static final String PASSWORD = "123456";private static volatile DataSource dataSource = null;private static DataSource getDataSource() {if(dataSource == null) {synchronized(DBUtil.class) {if(dataSource == null) {dataSource = new MysqlDataSource();((MysqlDataSource)dataSource).setURL(URL);((MysqlDataSource)dataSource).setUser(USERNAME);((MysqlDataSource)dataSource).setPassword(PASSWORD);}}}return dataSource;}public static Connection getConnection() throws SQLException {return getDataSource().getConnection();}public static void close(Connection connection, PreparedStatement statement, ResultSet resultSet) {if(connection != null) {try {connection.close();} catch (SQLException e) {e.printStackTrace();}}if(statement != null) {try {statement.close();} catch (SQLException e) {e.printStackTrace();}}if(resultSet != null) {try {resultSet.close();} catch (SQLException e) {e.printStackTrace();}}}
}
创建Blog类和User类
Blog类表示一篇博客
package model;import java.sql.Timestamp;
import java.text.SimpleDateFormat;
import java.util.logging.SimpleFormatter;public class Blog {private int blogId;private String title;private String content;private int userId;private Timestamp postTime;public int getBlogId() {return blogId;}public void setBlogId(int blogId) {this.blogId = blogId;}public String getTitle() {return title;}public void setTitle(String title) {this.title = title;}public String getContent() {return content;}public void setContent(String content) {this.content = content;}public int getUserId() {return userId;}public void setUserId(int userId) {this.userId = userId;}//    public Timestamp getPostTime() {
//        return postTime;
//    }// 使用SimpleDateFormat可以使时间格式化显示public String getPostTime() {SimpleDateFormat simpleDateFormat = new SimpleDateFormat("yy-MM-dd HH:mm:ss");return simpleDateFormat.format(postTime);}public void setPostTime(Timestamp postTime) {this.postTime = postTime;}
}
User类表示一个用户
package model;public class User {private int userId;private String username;private String password;public int getUserId() {return userId;}public void setUserId(int userId) {this.userId = userId;}public String getUsername() {return username;}public void setUsername(String username) {this.username = username;}public String getPassword() {return password;}public void setPassword(String password) {this.password = password;}
}
这里的变量名是根据sql设计的时候起的。
创建BlogDao类和UserDao类
理解
DAO
DAO全程“data access object”,主要功能就是对某个数据库表进行增删改查一般每张数据库表都会对应一个
DAO类,这是一种给类命名的习惯做法,并不是强制要求
创建BlogDao类,针对博客表进行操作
insert:插入一个Blog对象到表blog中selectAll:从blog中查找所有的Blog对象selectOne:从blog中查找指定的Blog对象delete:从blog中删除指定的Blog对象
实现insert
public void insert(Blog blog) {Connection connection = null;PreparedStatement statement = null;try {connection = DBUtil.getConnection();String sql = "insert into blog values(null, ?, ?, ?, now())";statement  = connection.prepareStatement(sql);statement.setInt(1, blog.getBlogId());statement.setString(2, blog.getTitle());statement.setString(3, blog.getContent());statement.executeUpdate();} catch (SQLException e) {e.printStackTrace();}finally {DBUtil.close(connection, statement, null);}
}
实现selectAll
public List<Blog> selectAll() {List<Blog> blogs = new ArrayList<>();Connection connection = null;PreparedStatement statement = null;ResultSet resultSet = null;try {connection = DBUtil.getConnection();String sql = "select * from blog order by postTime desc";statement = connection.prepareStatement(sql);resultSet = statement.executeQuery();while(resultSet.next()) {Blog blog = new Blog();blog.setBlogId(resultSet.getInt("blogId"));blog.setTitle(resultSet.getString("title"));String content = resultSet.getString("content");if(content.length() > 50) {content = content.substring(0, 50);}blog.setContent(content);blog.setUserId(resultSet.getInt("userId"));blog.setPostTime(resultSet.getTimestamp("postTime"));blogs.add(blog);}} catch (SQLException e) {e.printStackTrace();}finally {DBUtil.close(connection, statement, resultSet);}return blogs;
}
实现selectOne
public Blog selectOne(int userId) {Connection connection = null;PreparedStatement statement = null;ResultSet resultSet = null;try {connection = DBUtil.getConnection();String sql = "select * from blog where userId = ?";statement = connection.prepareStatement(sql);statement.setInt(1, userId);resultSet = statement.executeQuery();if(resultSet.next()) {Blog blog = new Blog();blog.setBlogId(resultSet.getInt("blogId"));blog.setTitle(resultSet.getString("title"));blog.setContent(resultSet.getString("content"));blog.setUserId(resultSet.getInt("userId"));blog.setPostTime(resultSet.getTimestamp("postTime"));return blog;}} catch (SQLException e) {e.printStackTrace();}finally {DBUtil.close(connection, statement, resultSet);}return null;
}
实现delete
public void delete(int blogId) {Connection connection = null;PreparedStatement statement = null;try {connection = DBUtil.getConnection();String sql = "delete from blog where blogId = ?";statement = connection.prepareStatement(sql);statement.setInt(1, blogId);statement.executeUpdate();} catch (SQLException e) {e.printStackTrace();}finally {DBUtil.close(connection, statement, null);}
}
创建UserDao类,实现对用户表的增删改查
注意:登录的时候需要根据用户名验证密码,因此查找用户信息也是根据用户名查找
实现selectByName
public User selectByName(String username) {Connection connection = null;PreparedStatement statement = null;ResultSet resultSet = null;try {connection = DBUtil.getConnection();String sql = "select * from user where username = ?";statement = connection.prepareStatement(sql);statement.setString(1, username);resultSet = statement.executeQuery();if(resultSet.next()) {User user = new User();user.setUserId(resultSet.getInt("userId"));user.setUsername(resultSet.getString("username"));user.setPassword(resultSet.getString("password"));return user;}} catch (SQLException e) {e.printStackTrace();}finally{DBUtil.close(connection, statement, resultSet);}return null;
}
实现selectByUserId
public User selectByUserId(int userId) {Connection connection = null;PreparedStatement statement = null;ResultSet resultSet = null;try {connection = DBUtil.getConnection();String sql = "select * from user where userId = ?";statement = connection.prepareStatement(sql);statement.setInt(1, userId);resultSet = statement.executeQuery();if(resultSet.next()) {User user = new User();user.setUserId(resultSet.getInt("userId"));user.setUsername(resultSet.getString("username"));user.setPassword(resultSet.getString("password"));return user;}} catch (SQLException e) {e.printStackTrace();}finally {DBUtil.close(connection, statement, resultSet);}return null;
}
验证数据库代码
public class TestDB {// 1. 验证插入public static void testInsert() {Blog blog = new Blog();blog.setTitle("我的第一篇博客");blog.setContent("这是博客的正文");blog.setUserId(1);// 基于当前的时间戳, 创建 java.sql.Date 对象blog.setPostTime(new Timestamp(System.currentTimeMillis()));BlogDao blogDao = new BlogDao();blogDao.insert(blog);}public static void testSelectAll() {BlogDao blogDao = new BlogDao();List<Blog> blogs = blogDao.selectAll();System.out.println(blogs);}public static void testSelectOne() {BlogDao blogDao = new BlogDao();Blog blog = blogDao.selectOne(1);System.out.println(blog);}public static void testDelete() {BlogDao blogDao = new BlogDao();blogDao.delete(1);}public static void testUserInsert() {User user = new User();user.setUsername("测试用户");user.setPassword("123");UserDao userDao = new UserDao();userDao.insert(user);}public static void testUserSelectByName() {UserDao userDao = new UserDao();User user = userDao.selectByName("测试用户");System.out.println(user);}public static void testUserSelectById() {UserDao userDao = new UserDao();User user = userDao.selectById(1);System.out.println(user);}public static void main(String[] args) {// ......}
}
运行程序,验证每个接口是否正确
实现博客列表页
首先最重要的就是约定前后端交互的接口。这里我们使用
get请求,返回的是一个json数组。
创建网页模板
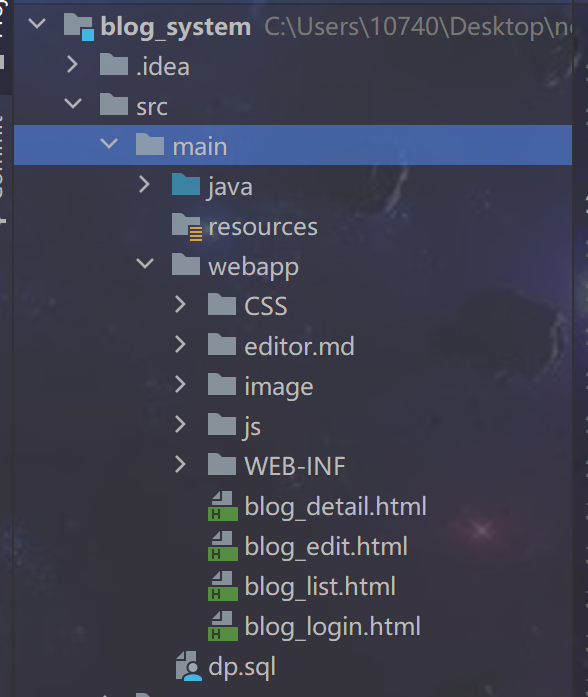
将我们之前写好的博客系统的静态页面拷贝到webapp目录当中
拷贝完成的目录结构如下:
修改blog_list.html
- 导航栏和个人信息部分代码不变
- 直接添加一个
js代码即可
<script src="https://cdn.bootcdn.net/ajax/libs/jquery/3.6.3/jquery.min.js"></script>
<script>// 在页面加载的时候,通过 ajax 给服务器发送数据,获取到博客列表页信息,并显示到界面上function getBlogList() {$.ajax({type: 'get', url: 'blog', success: function(body) {// 获取到的 body 就是一个 js 对象数组,每个元素就是一个 js 对象// 1. 先把.right 里原有的内容清空let rightDiv = document.querySelector('.right');rightDiv.innerHTML = '';// 2. 遍历 body 构造一个一个blogDivfor(let blog of body) {let blogDiv = document.createElement('div');blogDiv.className = 'blog';// 构造标题let titleDiv = document.createElement('div');titleDiv.className = 'title';titleDiv.innerHTML = blog.title;blogDiv.appendChild(titleDiv);// 构造发布时间let dateDiv = document.createElement('div');dateDiv.className = 'date';dateDiv.innerHTML = blog.postTime;blogDiv.appendChild(dateDiv);// 构造博客正文部分let descDiv = document.createElement('div');descDiv.className = 'desc';descDiv.innerHTML = blog.content;blogDiv.appendChild(descDiv); // 构造查看全文let a = document.createElement('a');a.innerHTML = '查看全文 >>';// 告知服务器是哪个博客的详情页a.href = 'blog_detail.html?blogId=' + blog.blogId; blogDiv.appendChild(a);rightDiv.appendChild(blogDiv);}}});
}
getBlogList();
</script>
<script src="js/common.js"></script>
<script>getUserInfo('blog_list.html');
</script>
创建BlogServlet
@WebServlet("/blog")
public class BlogServlet extends HttpServlet {private ObjectMapper mapper = new ObjectMapper();// 这个方法用来获取到数据库中的博客列表@Overrideprotected void doGet(HttpServletRequest req, HttpServletResponse resp) throws ServletException, IOException {// 先尝试获取到 rep 中的blogId 参数,如果参数存在,说明博客详情页// 如果参数不存在,说明是博客列表页String param = req.getParameter("blogId");BlogDao blogDao = new BlogDao();if(param == null) {// 从数据库中查询到博客列表,然后直接返回,转成json格式List<Blog> blogs = new ArrayList<>();blogs = blogDao.selectAll();// 把得到的结果返回成json格式的数据String respJson = mapper.writeValueAsString(blogs);// 以下两行代码顺序不能颠倒resp.setContentType("application/json;charset=utf8");resp.getWriter().write(respJson);}else {int blogId = Integer.parseInt(param);Blog blog = blogDao.selectOne(blogId);String respJson = mapper.writeValueAsString(blog);resp.setContentType("application/json;charset=utf8");resp.getWriter().write(respJson);}}
}
此时我们发现如果博客正文内容太长,就会比较丑陋,我们期望在博客列表页只显示摘要就可以了。
修改BlogDao.selectAll方法,对查询到的content代码进行截取(其他代码不变)
public List<Blog> selectAll() {// ......其他代码不变String content = resultSet.getString("content");if (content.length() > 90) {content = content.substring(0, 90) + "...";}blog.setContent(content);// ......其他代码不变
}
实现博客详情页
创建网页模板
修改blog_detail.html
- 导航栏和个人信息代码不变
- 之前使用
p标签表示正文,现在需要将p标签加入到一个div当中
<script>function getBlogDetail() {$.ajax({type: 'get',url: 'blog' + location.search, success: function(body) {let h3 = document.querySelector('.blog-content>h3');h3.innerHTML = body.title;let dateDiv = document.querySelector('.date');dateDiv.innerHTML = body.postTime;let content = document.querySelector('#content');// 咱们需要的是渲染后的样子// content.innerHTML = body.content;// 第一个参数对应 id = content 的html 标签,渲染后得到的 html 片段就会被放在这个标签下editormd.markdownToHTML('content', {markdown: body.content });}});
}
getBlogDetail();
function getUserInfo(pageName) {$.ajax({type: 'get',url: 'login', success: function(body) {if(body.userId && body.userId > 0) {console.log("登录成功!用户名:" + body.username);// 根据当前用户登录的情况, 将用户名设置到界面上// 在 这个函数里面来获取作者信息getAuthor(body);}else { alert("当前未登录,请先登录!");location.assign('blog_login.html');}},error: function() {alert("当前未登录,请先登录!");location.assign('blog_login.html');}});
}
// 判定用户的登录状态
getUserInfo('blog_detail.html');
// 从服务器获取当前博客的作者信息,并显示到页面上
function getAuthor(user) {$.ajax({type: 'get', url: 'authorInfo' + location.search,success: function(body) {if(body.username) {changeUserName(body.username);if(body.username == user.username) {let navDiv = document.querySelector('.nav');let a = document.createElement('a');a.innerHTML = '删除';a.href = 'blogDelete' + location.search;navDiv.appendChild(a);}// 如果是同一个人,显示删除按钮}else {console.log("获取作者信息失败");}}});
}
function changeUserName(username) {let h3 = document.querySelector('.card>h3');h3.innerHTML = username;
}
</script>
创建BlogServlet
@WebServlet("/blog")
public class BlogServlet extends HttpServlet {private ObjectMapper mapper = new ObjectMapper();// 这个方法用来获取到数据库中的博客列表@Overrideprotected void doGet(HttpServletRequest req, HttpServletResponse resp) throws ServletException, IOException {// 先尝试获取到 rep 中的blogId 参数,如果参数存在,说明博客详情页// 如果参数不存在,说明是博客列表页String param = req.getParameter("blogId");BlogDao blogDao = new BlogDao();if(param == null) {// 从数据库中查询到博客列表,然后直接返回,转成json格式List<Blog> blogs = new ArrayList<>();blogs = blogDao.selectAll();// 把得到的结果返回成json格式的数据String respJson = mapper.writeValueAsString(blogs);// 以下两行代码顺序不能颠倒resp.setContentType("application/json;charset=utf8");resp.getWriter().write(respJson);}else {int blogId = Integer.parseInt(param);Blog blog = blogDao.selectOne(blogId);String respJson = mapper.writeValueAsString(blog);resp.setContentType("application/json;charset=utf8");resp.getWriter().write(respJson);}}
}
实现登陆
修改login_html
blog_login.html中的内容不需要服务器动态渲染,但是为了和服务器端进行交互,我们需要引入form标签
- 在输入框和按钮外面套上一个
form标签 - 把名户名和密码两个输入框加上
name属性
<div class="login-container"><form action="login" method="post"><div class="login-dialog"><h3>登陆</h3><div class="row"><span>用户名</span><input type="text" id="username" name="username"></div><div class="row"><span>密码</span><input type="password" id="password" name="password"></div><div class="row"><button>提交</button><!--<input type="submit" id="submit" value="提交">--></div></div></form>
</div>
创建LoginServlet
实现登陆逻辑
- 此处使用
post请求 - 从
form表单提取数据的时候不要忘了req.setCharacterEncoding("utf8"); - 根据用户提交的用户名,从数据库读取
User对象,并验证密码是否正确 - 如果登陆成功,则把用户信息保存到
HttpSession中 - 最后重定向到博客列表页
@WebServlet("/login")
public class LoginServlet extends HttpServlet {@Overrideprotected void doPost(HttpServletRequest req, HttpServletResponse resp) throws ServletException, IOException {// 针对 utf8 格式来解析请求req.setCharacterEncoding("utf8");resp.setContentType("utf8");// 1. 获取请求中的参数String username = req.getParameter("username");String password = req.getParameter("password");if(username == null || "".equals(username) || password == null || "".equals(password)) {resp.setContentType("text/html; charset=utf8");resp.getWriter().write("用户名或密码为空!");return;}// 2. 和数据库的内容进行比较UserDao userDao = new UserDao();User user = userDao.selectByName(username);if(user == null || !user.getPassword().equals(password)) {resp.setContentType("text/html; charset=utf8");resp.getWriter().write("用户名或密码错误!");return;}// 3. 如果比较通过,就创建会话HttpSession session = req.getSession(true);session.setAttribute("user", user);// 4. 返回一个重定向resp.sendRedirect("blog_list.html");}
}
强制要求登陆
当用户访问博客列表页和博客详情页的时候,如果当前用户未登录,就自动跳转到登陆页面。
function getUserInfo(pageName) {$.ajax({type: 'get',url: 'login', success: function(body) {if(body.userId && body.userId > 0) {console.log("登录成功!用户名:" + body.username);// 根据当前用户登录的情况, 将用户名设置到界面上if(pageName == 'blog_list.html') {changeUserName(body.username);}}else { alert("当前未登录,请先登录!");location.assign('blog_login.html');}},error: function() {alert("当前未登录,请先登录!");location.assign('blog_login.html');}});
}function changeUserName(username) {let h3 = document.querySelector('.card>h3');h3.innerHTML = username;
}
强制登陆这个功能,前端就可以实现。
实现显示用户信息
目前页面的用户信息是写死的:我们希望这个信息随着用户登录的改变而改变。
- 如果当前页面是博客列表页,则显示当前登录用户的信息
- 如果当前页面是博客详情页,则显示博客作者的信息
注意:当前我们只是实现了显示用户信息,没有实现显示用户的图像以及文章数量等信息
修改博客列表页
function getUserInfo(pageName) {$.ajax({type: 'get',url: 'login', success: function(body) {if(body.userId && body.userId > 0) {console.log("登录成功!用户名:" + body.username);// 根据当前用户登录的情况, 将用户名设置到界面上if(pageName == 'blog_list.html') {changeUserName(body.username);}}else { alert("当前未登录,请先登录!");location.assign('blog_login.html');}},error: function() {alert("当前未登录,请先登录!");location.assign('blog_login.html');}});
}function changeUserName(username) {let h3 = document.querySelector('.card>h3');h3.innerHTML = username;
}
实现注销登录
@WebServlet("/logout")
public class LogOutServlet extends HttpServlet {@Overrideprotected void doGet(HttpServletRequest req, HttpServletResponse resp) throws ServletException, IOException {resp.setContentType("application/json;charset=utf8");// 先找到当前用户的会话HttpSession session = req.getSession(false);if(session == null) {resp.getWriter().write("当前用户未登录");}// 删除会话属性session.removeAttribute("user");resp.sendRedirect("blog_login.html");}
}
实现发布博客
给编辑页加入form表单
- 增加
form标签 - 给
form标签增加高度,防止编辑器高度不能正确展开 - 给标题的
input加上name属性
<div class="blog-edit-container"><form action="blog" method="post" style="height: 100% "><div class="title"><input type="text" placeholder="在此处输入标题" name="title" id="submit"><button>发布文章</button><!-- <input type="submit" value="发布文章"> --></div><div id="editor"><!--为了进行 form 的提交, 此处搞一个 textarea 多行编辑,借助这个编辑框进行 form 的提交--><textarea name="content" style="display:none"></textarea></div></form>
</div>
// 初始化编辑器
var editor = editormd("editor", {// 这里的尺寸必须在这里设置. 设置样式会被 editormd 自动覆盖掉.width: "100%",// 高度 100% 意思是和父元素一样高. 要在父元素的基础上去掉标题编辑区的高度height: "calc(100% - 50px)",// 编辑器中的初始内容markdown: "# 在这里写下一篇博客",// 指定 editor.md 依赖的插件路径path: "editor.md/lib/",// 加上这个属性使 编辑器 的内容能保存到用户自己添加的 textarea 中.saveHTMLToTextarea: true,
});
此处点击“发布文章”按钮就能发送一个POST请求
创建BlogServlet
protected void doPost(HttpServletRequest req, HttpServletResponse resp) throws ServletException, IOException {HttpSession session = req.getSession(false);if(session == null) {resp.setContentType("text/html;charset=utf8");resp.getWriter().write("当前用户未登录");return;}User user = (User) session.getAttribute("user");if(user == null) {resp.setContentType("text/html;charset=utf8");resp.getWriter().write("当前用户未登录");return;}// 指定请求按照那种方式解析req.setCharacterEncoding("utf8");// 先从请求中取出参数(标题和正文)String title = req.getParameter("title");String content = req.getParameter("content");if(title == null || "".equals(title) || content == null || "".equals(content)) {resp.setContentType("text/html;charset=utf8");resp.getWriter().write("提交博客失败,缺少参数");return;}// 构造 Blog 对象,把当前的信息填进去,并插入到数据库中Blog blog = new Blog();blog.setTitle(title);blog.setContent(content);blog.setUserId(user.getUserId());BlogDao blogDao = new BlogDao();blogDao.insert(blog);// 重定向resp.sendRedirect("blog_list.html");
}
实现删除博客
进入用户详情页时,如果当前登录用户正是此作者,则在导航栏显示“删除”按钮,用户点击时则删除该文章
function getAuthor(user) {$.ajax({type: 'get', url: 'authorInfo' + location.search,success: function(body) {if(body.username) {changeUserName(body.username);if(body.username == user.username) {let navDiv = document.querySelector('.nav');let a = document.createElement('a');a.innerHTML = '删除';a.href = 'blogDelete' + location.search;navDiv.appendChild(a);}// 如果是同一个人,显示删除按钮}else {console.log("获取作者信息失败");}}});
}
function changeUserName(username) {let h3 = document.querySelector('.card>h3');h3.innerHTML = username;
}
创建DeleteServlet
@WebServlet("/blogDelete")
public class BlogDeleteServlet extends HttpServlet {@Overrideprotected void doGet(HttpServletRequest req, HttpServletResponse resp) throws ServletException, IOException {HttpSession session = req.getSession(false);if(session == null) {resp.setContentType("text/html;charset=utf8");resp.getWriter().write("当前尚未登录,不能删除");return;}User user = (User) session.getAttribute("user");if(user == null) {resp.setContentType("text/html;charset=utf8");resp.getWriter().write("当前用户未登录");return;}// 获取到博客idString param = req.getParameter("blogId");if(param == null || "".equals(param)) {resp.setContentType("text/html;charset=utf8");resp.getWriter().write("当前参数不对");return;}BlogDao blogDao = new BlogDao();Blog blog = blogDao.selectOne(Integer.parseInt(param));if(blog == null) {resp.setContentType("text/html;charset=utf8");resp.getWriter().write("要删除的博客不存在");return;}if(user.getUserId() != blog.getUserId()) {resp.setContentType("text/html;charset=utf8");resp.getWriter().write("当前登录的用户不是作者,不能删除");return;}blogDao.delete(Integer.parseInt(param));resp.sendRedirect("blog_list.html");}
}


