目录
1. 查看服linux服务器信息
2. Linux系统安装pip详细步骤
3. Centos安装python3
4. 安装TensorFlow
5. TensorFlow测试结果解读
6. 参考文档
gpu的占用率为99%,是一种比较正常的使用状态。
gpu是图形处理器的简称,又称显示核心、视觉处理器、显示芯片,用途是将计算机系统所需要的显示信息进行转换驱动,并向显示器提供行扫描信号,控制显示器的正确显示,是连接显示器和个人电脑主板的重要元件,也是“人机对话”的重要设备之一
1. 查看服linux服务器信息
hostnamectl
Operating System: CentOS Linux 7 (Core)

1.Linux查看显卡信息
lspci | grep -i vga
2.使用nvidia GPU
lspci | grep -i nvidia
3.Linux查看Nvidia显卡信息及使用情况
Nvidia自带一个命令行工具可以查看显存的使用情况:
nvidia-smi

Fan:显示风扇转速,数值在0到100%之间,是计算机的期望转速,如果计算机不是通过风扇冷却或者风扇坏了,显示出来就是N/A;
Temp:显卡内部的温度,单位是摄氏度;
Perf:表征性能状态,从P0到P12,P0表示最大性能,P12表示状态最小性能;
Pwr:能耗表示;
Bus-Id:涉及GPU总线的相关信息;
Disp.A:是Display Active的意思,表示GPU的显示是否初始化;
Memory Usage:显存的使用率;
Volatile GPU-Util:浮动的GPU利用率;
Compute M:计算模式
2. Linux系统安装pip详细步骤
1.1 pip下载
wget "https://pypi.python.org/packages/source/p/pip/pip-1.5.4.tar.gz#md5=834b2904f92d46aaa333267fb1c922bb" --no-check-certificate
1.2 pip安装
tar -xzvf pip-1.5.4.tar.gz
cd pip-1.5.4
python setup.py install

3. Centos安装python3
2.1. 安装python3的依赖
sudo yum -y install zlib-devel bzip2-devel openssl-devel ncurses-devel sqlite-devel readline-devel tk-devel gdbm-devel db4-devel libpcap-devel xz-devel libffi-devel
2.2. 下载python3安装包
(以python3.7.2为例)2种方法,如果linux上可使用wget命令,可以通过下面命令直接linux下载
wget https://www.python.org/ftp/python/3.7.2/Python-3.7.2.tgz
如果linux没有安装wget命令,可以在本地下载后上传到linux上,下载地址就是https://www.python.org/ftp/python/3.7.2/Python-3.7.2.tgz。如果安装其他版本,可在该链接下https://www.python.org/ftp/python/找到其他版本下载。下载完成后通过lrzsz命令上传。
rz -e
安装包放在linux上后,解压:
tar -zxvf Python-3.7.2.tgz
2.1 配置安装路径
cd Python-3.7.2
./configure prefix=/usr/local/python3
2.2. 编译安装python3
make && make install
1
编译时如果遇见报错configure: error: no acceptable C compiler found in $PATH,说明没有安装gcc,通过下面命令安装gcc后再重新编译。
yum -y install gcc
1
2.3. 添加软链接
添加软链接,让pip3和python3这两个指令指向刚刚安装的3.7.2
sudo ln -s /usr/local/python3/bin/python3.7 /usr/bin/python3
sudo ln -s /usr/local/python3/bin/pip3.7 /usr/bin/pip3
如果提示ln: 无法创建符号链接"/usr/bin/pip3": 文件已存在。只需要通过下面命令删除文件,重新创建软链接即可
rm -rf /usr/bin/pip3
/usr/bin/python3同理。
3. 检测是否安装成功
python3 -V
pip3 -V

4. 升级pip
通过下面命令升级pip3
pip3 install --upgrade pip
通过下面命令升级pip
pip install -upgrade pip
4. 安装TensorFlow
1.首先需要在计算机上安装 TensorFlow,pip install tensorflow 命令来安装python3安装tensorflow遇到的问题
1. 使用命令:sudo pip3 install --upgrade \ https://storage.googleapis.com/tensorflow/linux/cpu/tensorflow-1.1.0rc2-cp35-cp35m-linux_x86_64.whl 安装。
遇到如下问题:
tensorflow-1.1.0rc2-cp35-cp35m-linux_x86_64.whl is not a supported wheel on this platform.
试过好几个版本都报相同的错误,不支持平台。
2. 换命令 pip3 install tensorflow 安装。
遇到如下问题:
Downloading/unpacking tensorflow
Could not find any downloads that satisfy the requirement tensorflow
Cleaning up...
No distributions at all found for tensorflow
Storing debug log for failure in /home/itcast/.pip/pip.log
(1) 有说tensorflow不支持32位系统只支持64位系统的,特意用命令sudo uname --m查看系统是x86_64,说明是64位。
另 查到这个问题原因是: pip3的版本太低。
使用命令 pip3 -V 可查看版本:pip 1.5.4 from /usr/lib/python3/dist-packages (python 3.4)
参考:ubuntu14 上安装tensorflow 遇到的问题_sisiel的博客-CSDN博客, 如何升级pip3?_夏雨淋河的博客-CSDN博客。
(2) 然后使用网上公认的升级命令: pip3 install --upgrade pip。
此次升级可行,如果不行可参考 如何升级pip3?_夏雨淋河的博客-CSDN博客 :
$ sudo easy_install --upgrade pip #运行后解决问题。
$ sudo easy_install --upgrade six #这个不用也行
(3) 然后再执行 pip3 install tensorflow 可以顺利往下走了,然后遇到如下问题:
Cannot uninstall 'six'. It is a distutils installed project and thus we cannot accurately determine which files belong to it which would lead to only a partial uninstall.
3. 使用 sudo pip3 install --ignore-installed six 命令安装好six
此命令借鉴于:cannot uninstall a distutils installed project'_xiaoxianerqq的博客-CSDN博客 。
然后继续 nohup pip3 install tensorflow > install_log.log 2>&1 & 顺利的话安装完成了
7.12实际操作发现还是报错了。。。如下

解决办法:
7.13日更改为清华源:
一、备份原文件
mv /etc/yum.repos.d/CentOS-Base.repo /etc/yum.repos.d/CentOS-Base.repo.bak
推荐内容
二、编辑新的配置文件
[base]
name=CentOS-$releasever - Base
baseurl=https://mirrors.tuna.tsinghua.edu.cn/centos/$releasever/os/$basearch/
#mirrorlist=http://mirrorlist.centos.org/?release=$releasever&arch=$basearch&repo=os
gpgcheck=1
gpgkey=file:///etc/pki/rpm-gpg/RPM-GPG-KEY-CentOS-7#released updates
[updates]
name=CentOS-$releasever - Updates
baseurl=https://mirrors.tuna.tsinghua.edu.cn/centos/$releasever/updates/$basearch/
#mirrorlist=http://mirrorlist.centos.org/?release=$releasever&arch=$basearch&repo=updates
gpgcheck=1
gpgkey=file:///etc/pki/rpm-gpg/RPM-GPG-KEY-CentOS-7#additional packages that may be useful
[extras]
name=CentOS-$releasever - Extras
baseurl=https://mirrors.tuna.tsinghua.edu.cn/centos/$releasever/extras/$basearch/
#mirrorlist=http://mirrorlist.centos.org/?release=$releasever&arch=$basearch&repo=extras
gpgcheck=1
gpgkey=file:///etc/pki/rpm-gpg/RPM-GPG-KEY-CentOS-7#additional packages that extend functionality of existing packages
[centosplus]
name=CentOS-$releasever - Plus
baseurl=https://mirrors.tuna.tsinghua.edu.cn/centos/$releasever/centosplus/$basearch/
#mirrorlist=http://mirrorlist.centos.org/?release=$releasever&arch=$basearch&repo=centosplus
gpgcheck=1
enabled=0
gpgkey=file:///etc/pki/rpm-gpg/RPM-GPG-KEY-CentOS-7
三、清除yum缓存
yum clean all
四、重新生成yum缓存文件
yum makecache
五、升级yum更新包
yum update
再次尝试nohup pip3 install tensorflow > install_log.log 2>&1 &
发现还是报错:报错日志:
raise ReadTimeoutError(self._pool, None, "Read timed out.")
pip._vendor.urllib3.exceptions.ReadTimeoutError: HTTPSConnectionPool(host='files.pythonhosted.org', port=443): Read timed out.

参考博客解决pip._vendor.urllib3.exceptions.ReadTimeoutError: HTTPSConnectionPool_nocol
最终解决办法:参考博客https://www.cnblogs.com/zmdComeOn/p/12010111.html
pip3 install -i https://pypi.tuna.tsinghua.edu.cn/simple tensorflow
如图成功啦

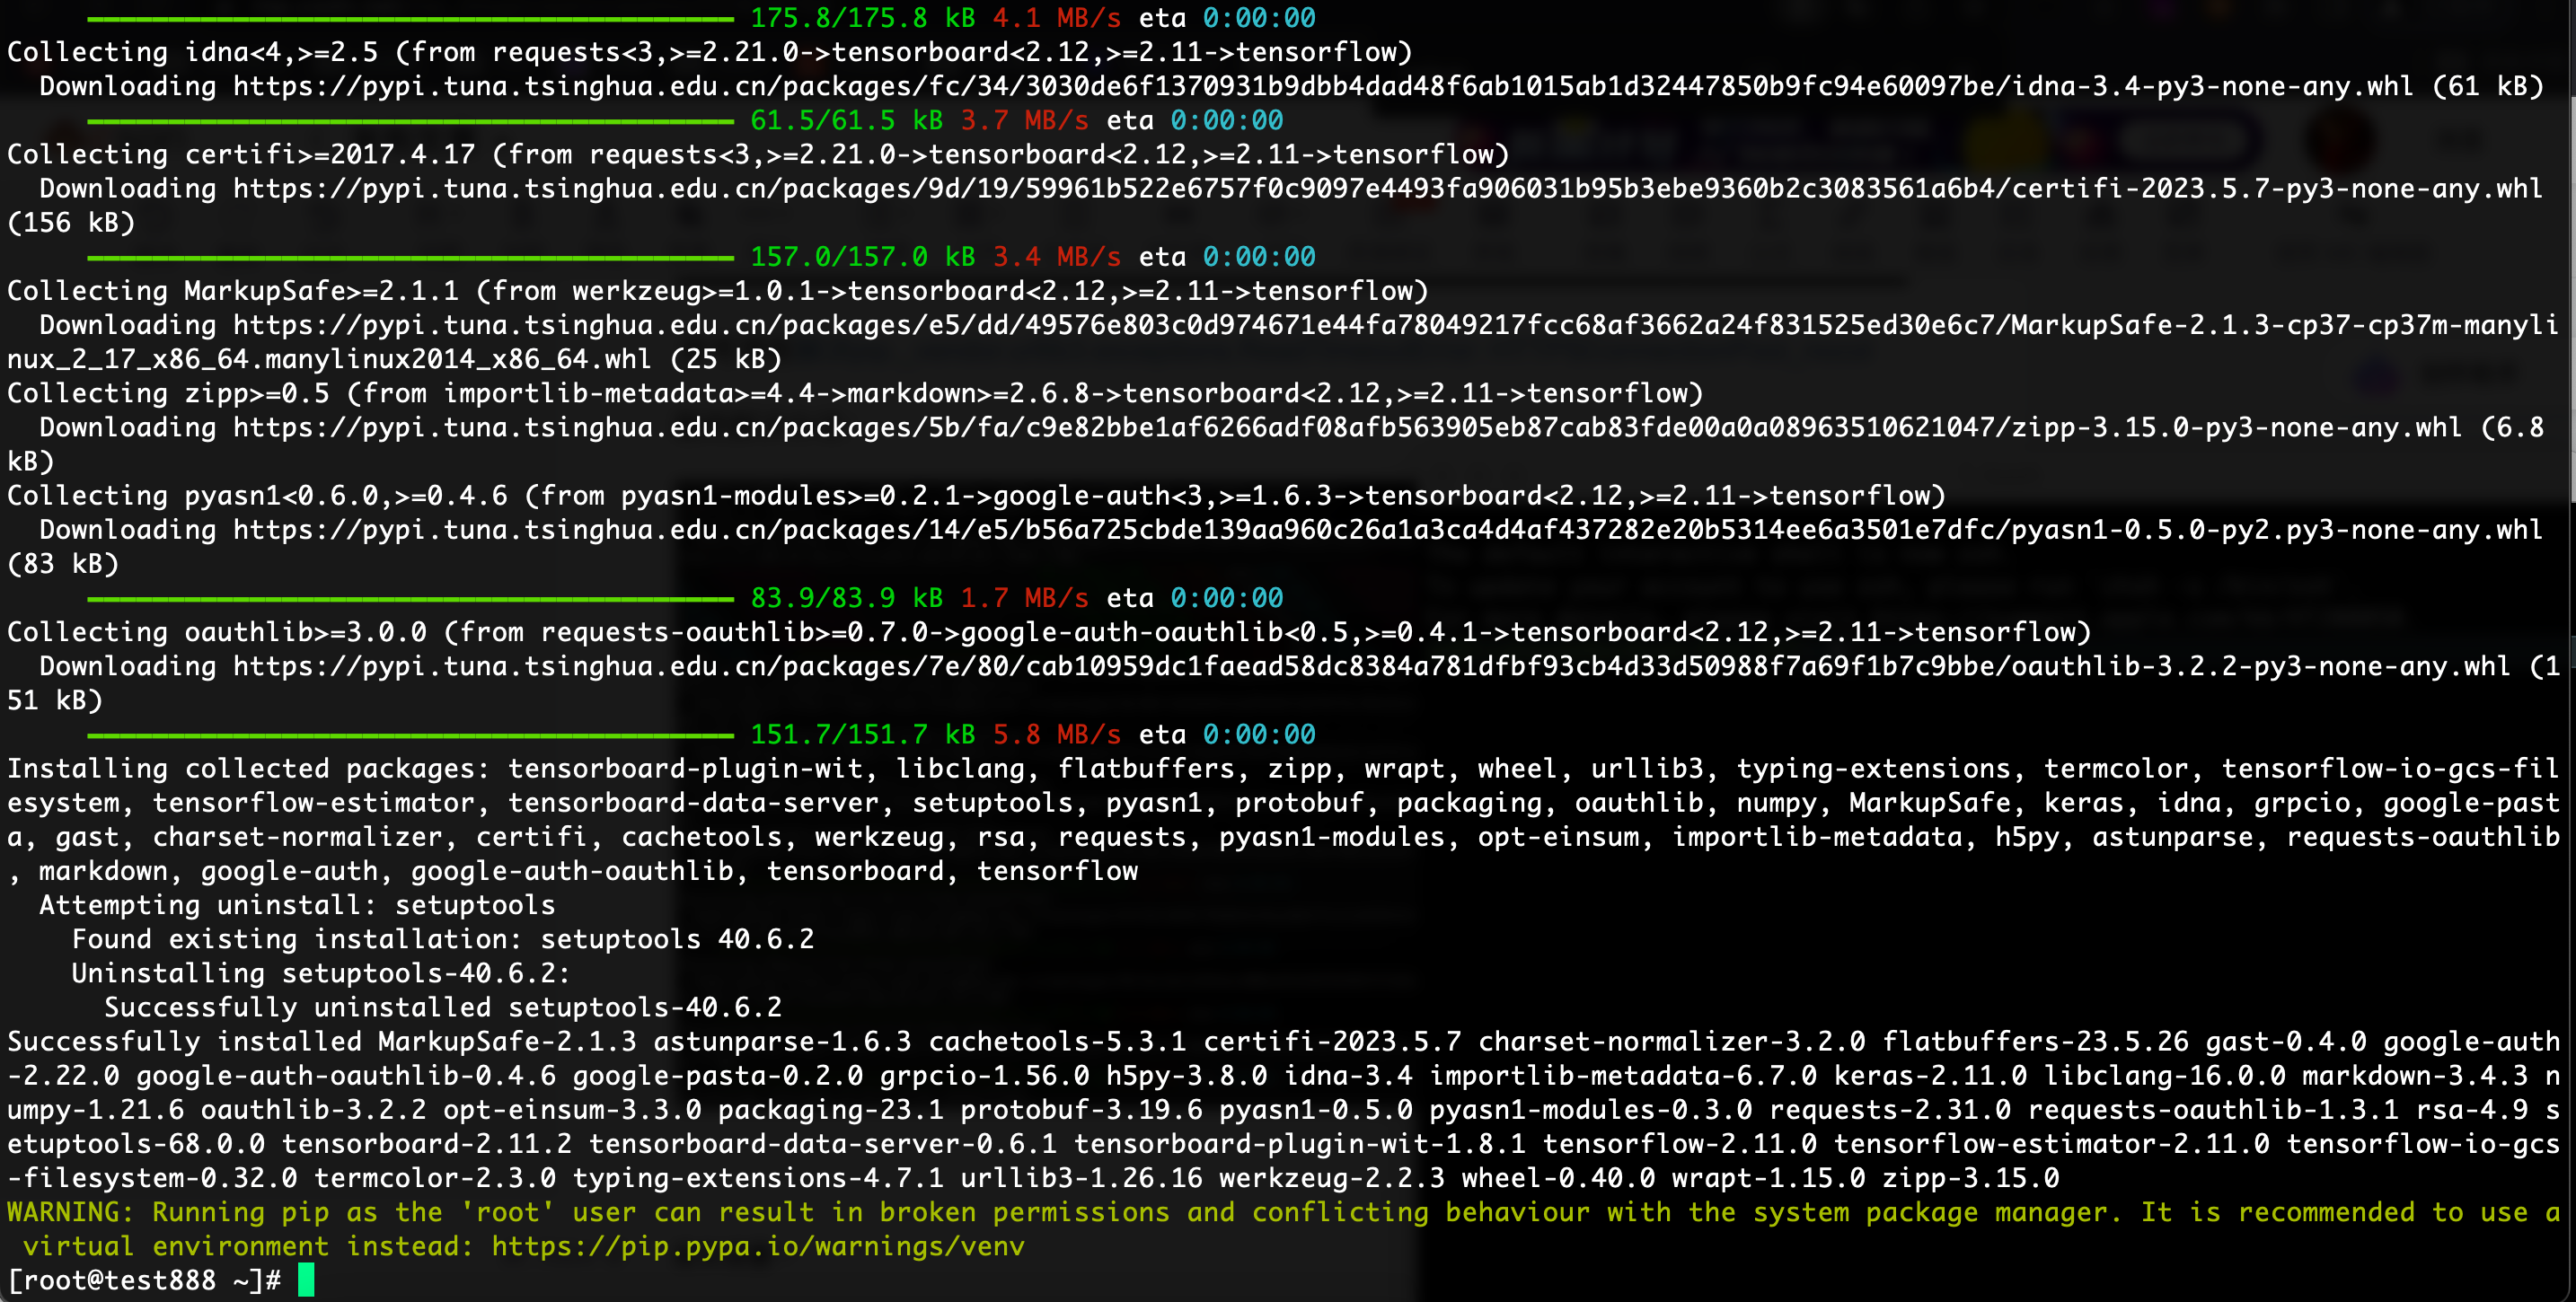
查看tensorflow是否安装成功
# pip3 list |grep tensorflow
tensorflow 2.11.0
tensorflow-estimator 2.11.0
tensorflow-io-gcs-filesystem 0.32.0

2.下载 TensorFlow Benchmarks
从 TensorFlow 的 Github 仓库上下载 TensorFlow Benchmarks,可以通过以下命令来下载:
git clone https://github.com/tensorflow/benchmarks.git
3.运行测试
7.14实际操作:
测试tensorflow是否成功脚本:
测试脚本1
[root@test888 tf_cnn_benchmarks]# cat 1.py
import tensorflow as tf
sess = tf.Session()
a = tf.constant(1)
b = tf.constant(2)
print(sess.run(a+b))
实际结果展示3即成功!!!
测试脚本2
import tensorflow as tf
hello = tf.constant('Hello,TF!!!!!!')
sess = tf.Session()
print(sess.run(hello))
看到结果打印:Hello,TF!!!!!! 即成功
实际操作运行结果:
File "1.py", line 6, in <module>
sess = tf.Session()
AttributeError: module 'tensorflow' has no attribute 'Session'
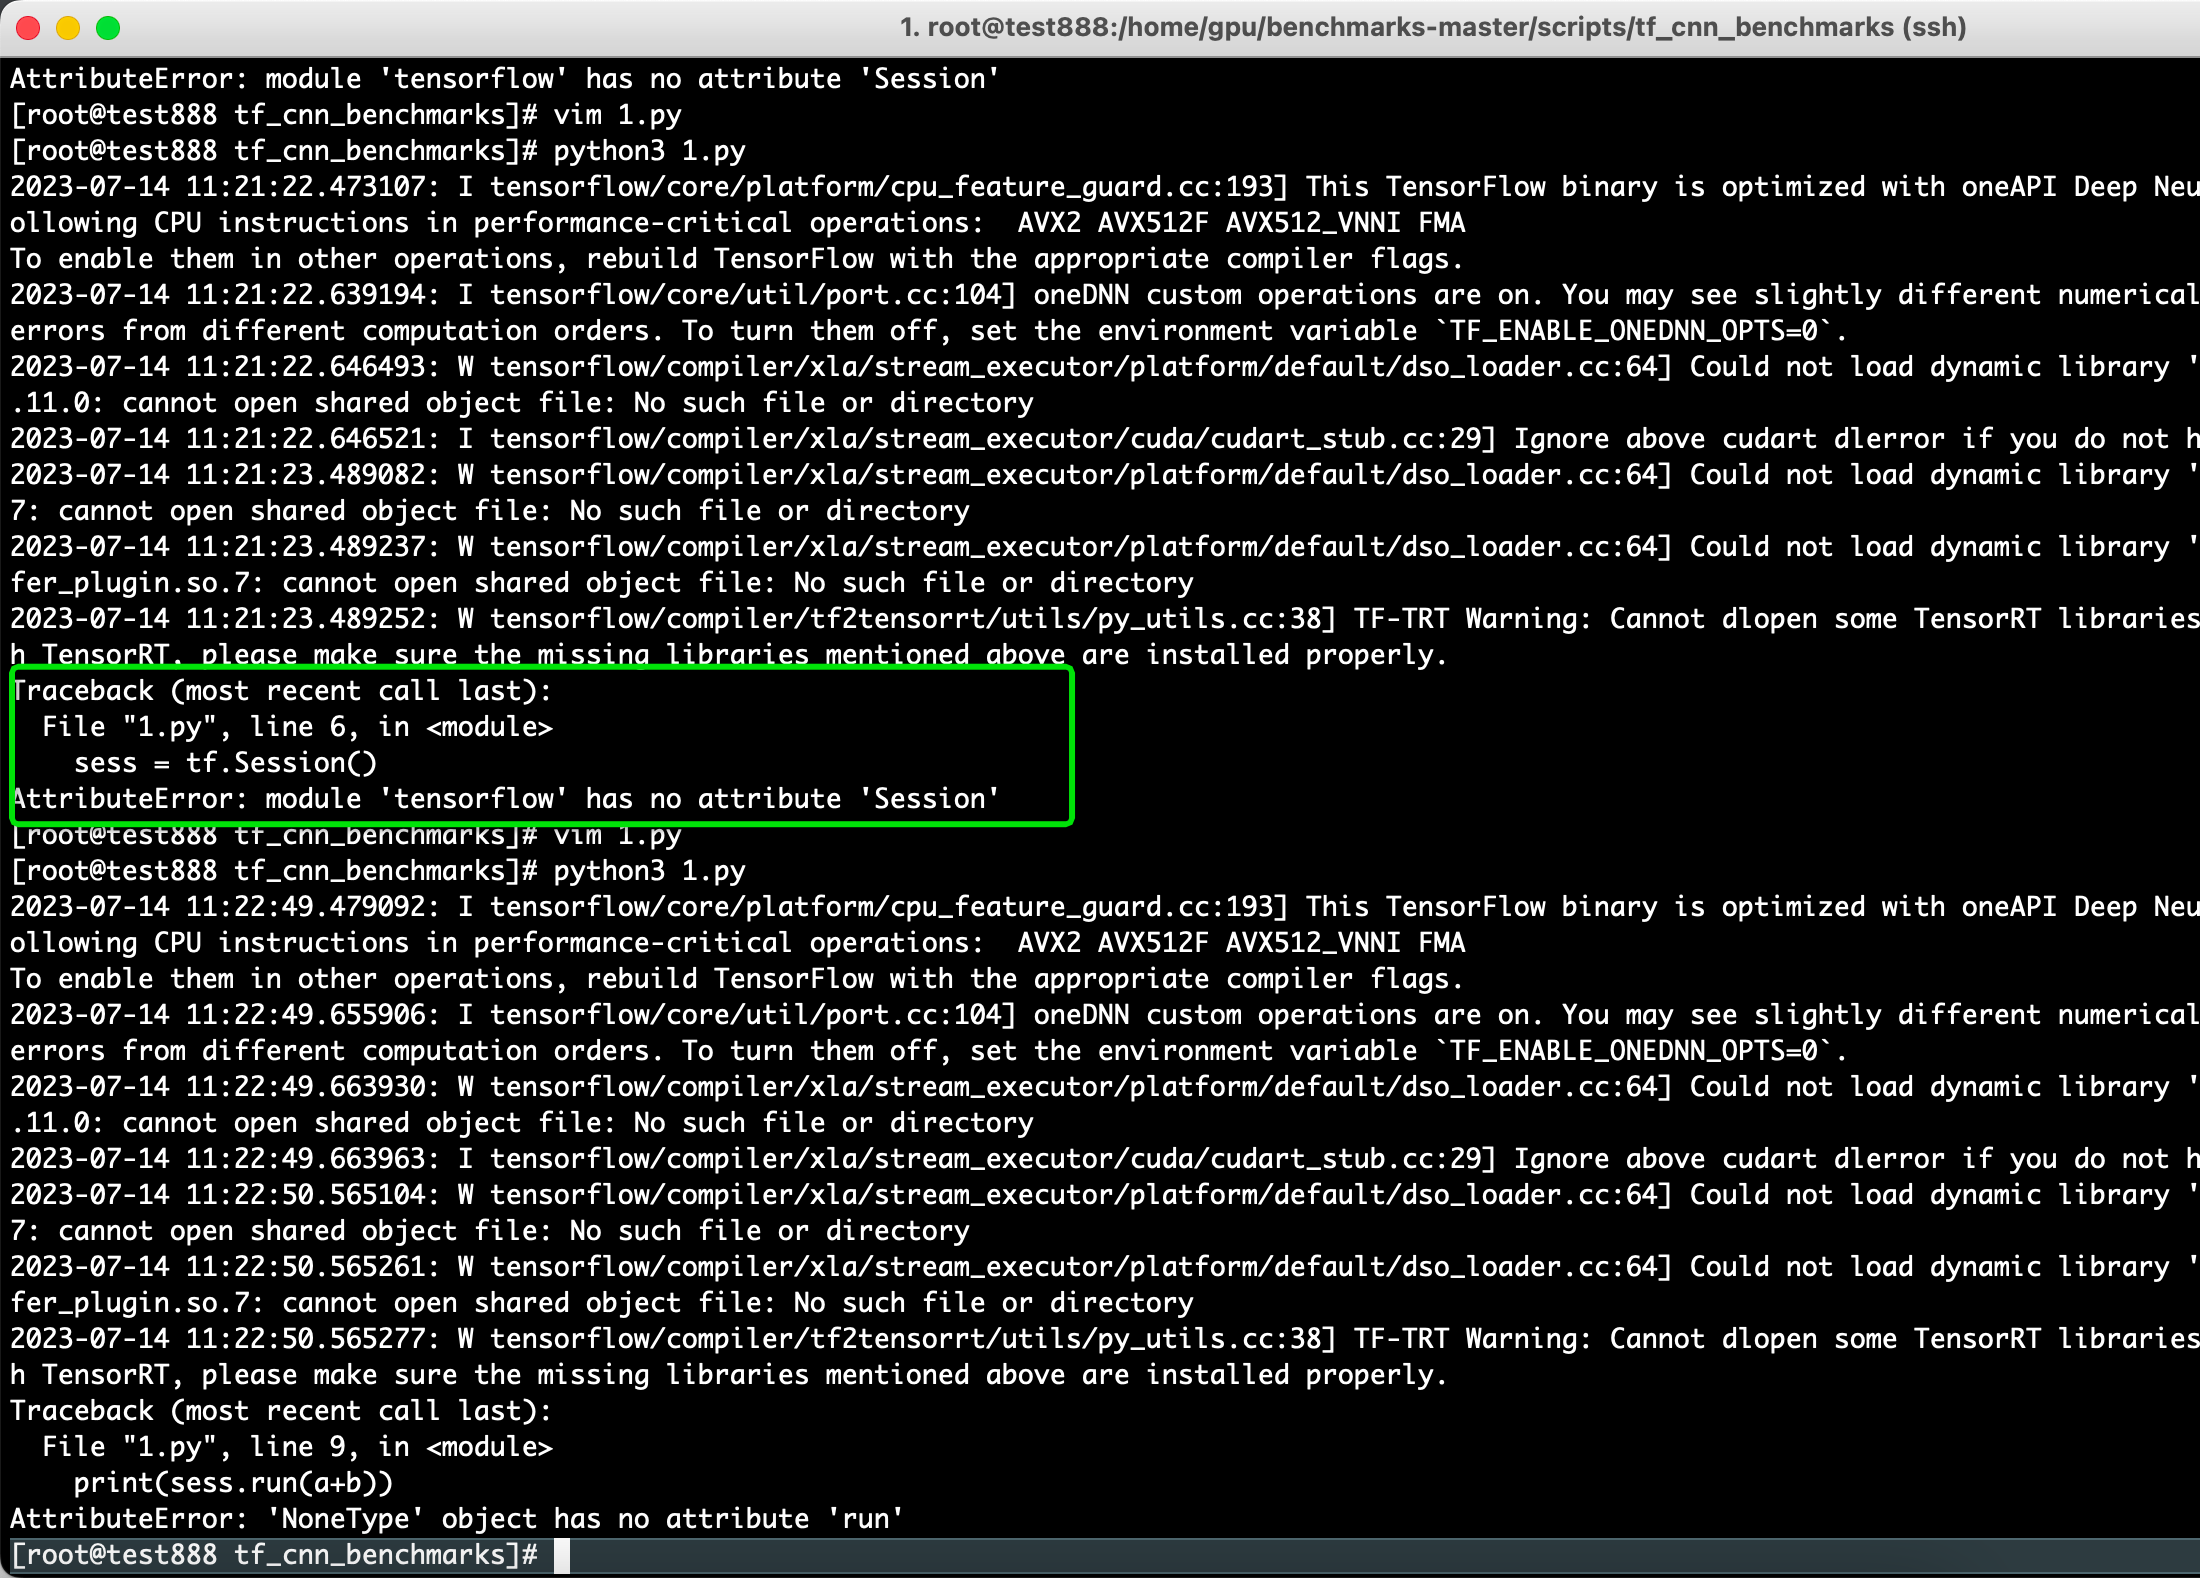
错误的意思是tensortflow模块没有Session属性,后来查阅资料发现,tensorflow2.0版本中的确没有Session这个属性,如果安装的是tensorflow2.0版本又想利用Session属性,可以将tf.Session()更改为如下
问题产生的原因:无法执行sess.run()的原因是tensorflow版本不同导致的,tensorflow版本2.0无法兼容版本1.0.
解决办法:
tf.compat.v1.disable_eager_execution()
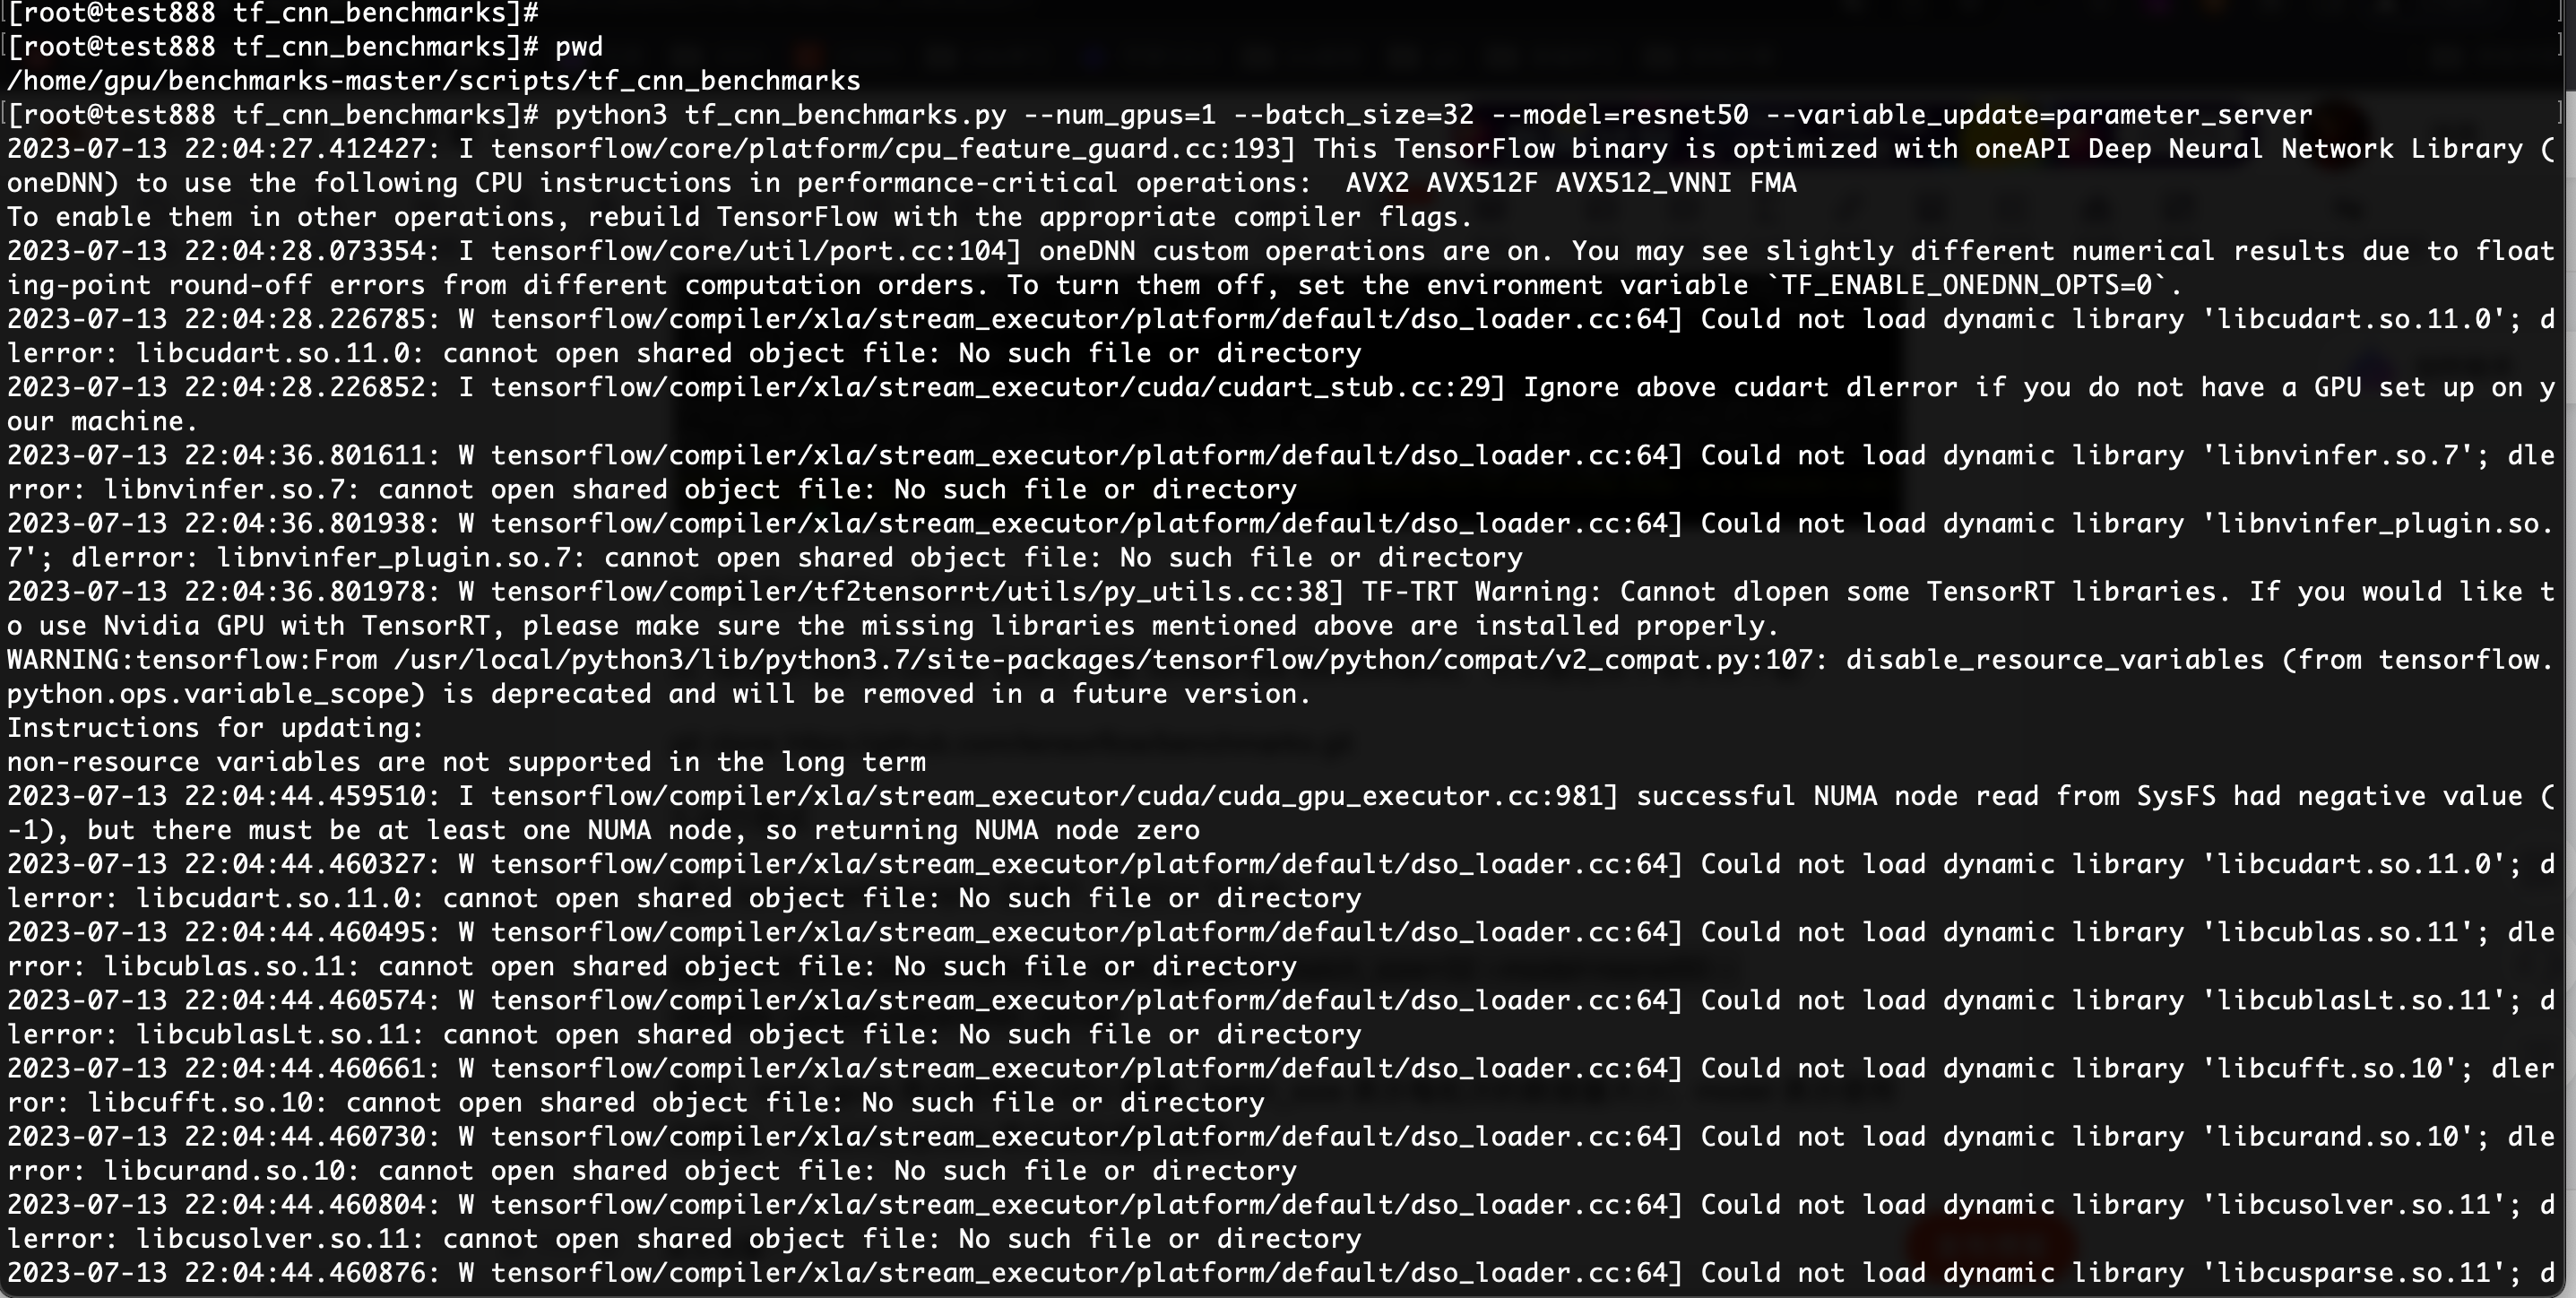
问题2:输出日志太多,可以看到上面的图有I W 分别代表info warning
设置TF_CPP_MIN_LOG_LEVEL的日志级别
最近学机器学习,每次运行代码都会出一堆Successfully opened dynamic library,还有显示各种提示,还有显卡计算信息,于是上网查了很多方法,都不行,最后发现是犯了个错。。如下,要写在import tensorflow前面
import os
os.environ['TF_CPP_MIN_LOG_LEVEL'] = '2'
import tensorflow as tf
只要写在前面就行了。。。顺序不能错 不能在 import tensorflow as tf 后面

os.environ['TF_CPP_MIN_LOG_LEVEL']无效_os.environ['tf_cpp_min_log_level'] = '2'
最终测试脚本:
import os
os.environ['TF_CPP_MIN_LOG_LEVEL'] = '2'import tensorflow as tf
import tensorflow.compat.v1 as tf
tf.compat.v1.disable_eager_execution()#sess = tf.Session()
sess =  tf.compat.v1.Session()
a = tf.constant(1)
b = tf.constant(2)
print('---------------------------')
print(sess.run(a+b))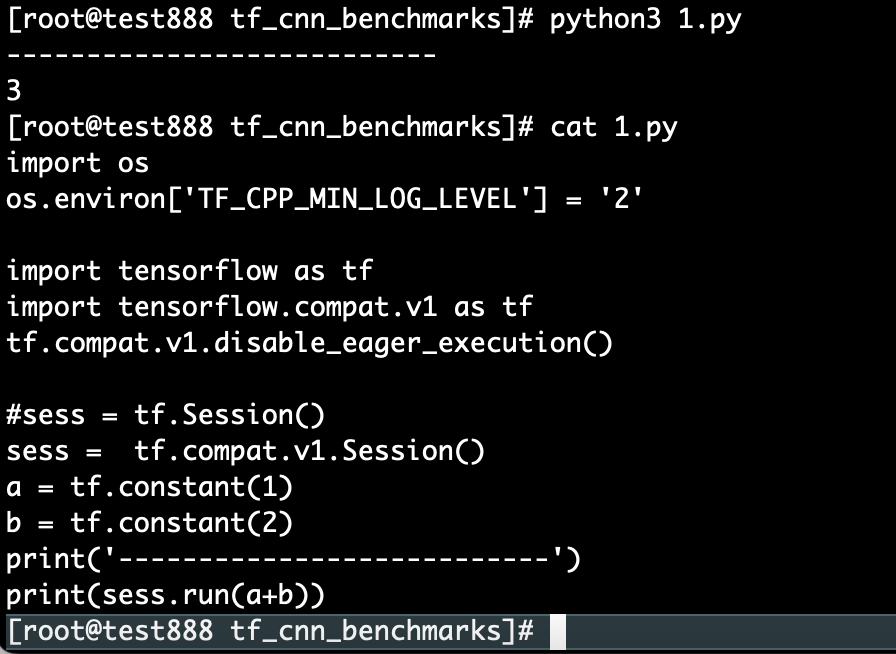
测试场景:
进入 benchmarks/scripts/ 目录下,运行以下命令:
python3 tf_cnn_benchmarks.py --num_gpus=1 --batch_size=32 --model=resnet50 --variable_update=parameter_server
其中,num_gpus 表示使用的 GPU 数量,batch_size 表示每批次的数据量大小,model 表示使用的模型,variable_update 表示优化器的选择。
运行测试后,会输出每秒钟可以处理的图像数量,根据这个数值可以评估 GPU 的性能。
7月12实际操作:
如遇
[root@test888 tf_cnn_benchmarks]# python3 tf_cnn_benchmarks.py --num_gpus=1 --batch_size=32 --model=resnet50 --variable_update=parameter_server
Traceback (most recent call last):
File "tf_cnn_benchmarks.py", line 21, in <module>
from absl import app
ModuleNotFoundError: No module named 'absl'

7.14实际操作
已放弃(吐核)--linux 已放弃(吐核) (core dumped) 问题分析
出现这种问题一般是下面这几种情况:
1.内存越界
2.使用了非线程安全的函数
3.全局数据未加锁保护
4.非法指针
5.堆栈溢出
也就是需要检查访问的内存、资源。
可以使用 strace 命令来进行分析
在程序的运行命令前加上 strace,在程序出现:已放弃(吐核),终止运行后,就可以通过 strace 打印在控制台的跟踪信息进行分析和定位问题
5. TensorFlow测试结果解读
使用 Tensorflow Benchmark 进行基准测试
镜像: nvcr.io/nvidia/tensorflow:20.10-tf2-py3
CUDA: 1.11(rtx-3090最低cuda版本为1.11)
测试代码:https://github.com/tensorflow/benchmarks
框架:tensorflow
显卡:RTX-3090(腾讯黑石服务器RTX-3090)
启动命令:
GPU:python benchmarks/scripts/tf_cnn_benchmarks/tf_cnn_benchmarks.py \
--num_gpus=1 --batch_size=128 --model=vgg16
CPU:python benchmarks/scripts/tf_cnn_benchmarks/tf_cnn_benchmarks.py \
--device=cpu --model=googlenet --data_format=NHWC --batch_size=32
# --batch_size 和 --model 可根据具体场景修改

--num_threads=1 --num_runs=10000
Initialized session in 0.682ms
Running benchmark for at least 1 iterations and at least 0.5 seconds
count=54 first=23463 curr=8019 min=7911 max=23463 avg=9268.5 std=2995
Running benchmark for at least 1000 iterations and at least 1 seconds
count=1000 first=8022 curr=6703 min=6613 max=10333 avg=6766.23 std=337
Average inference timings in us: Warmup: 9268.5, Init: 682, no stats: 6766.23
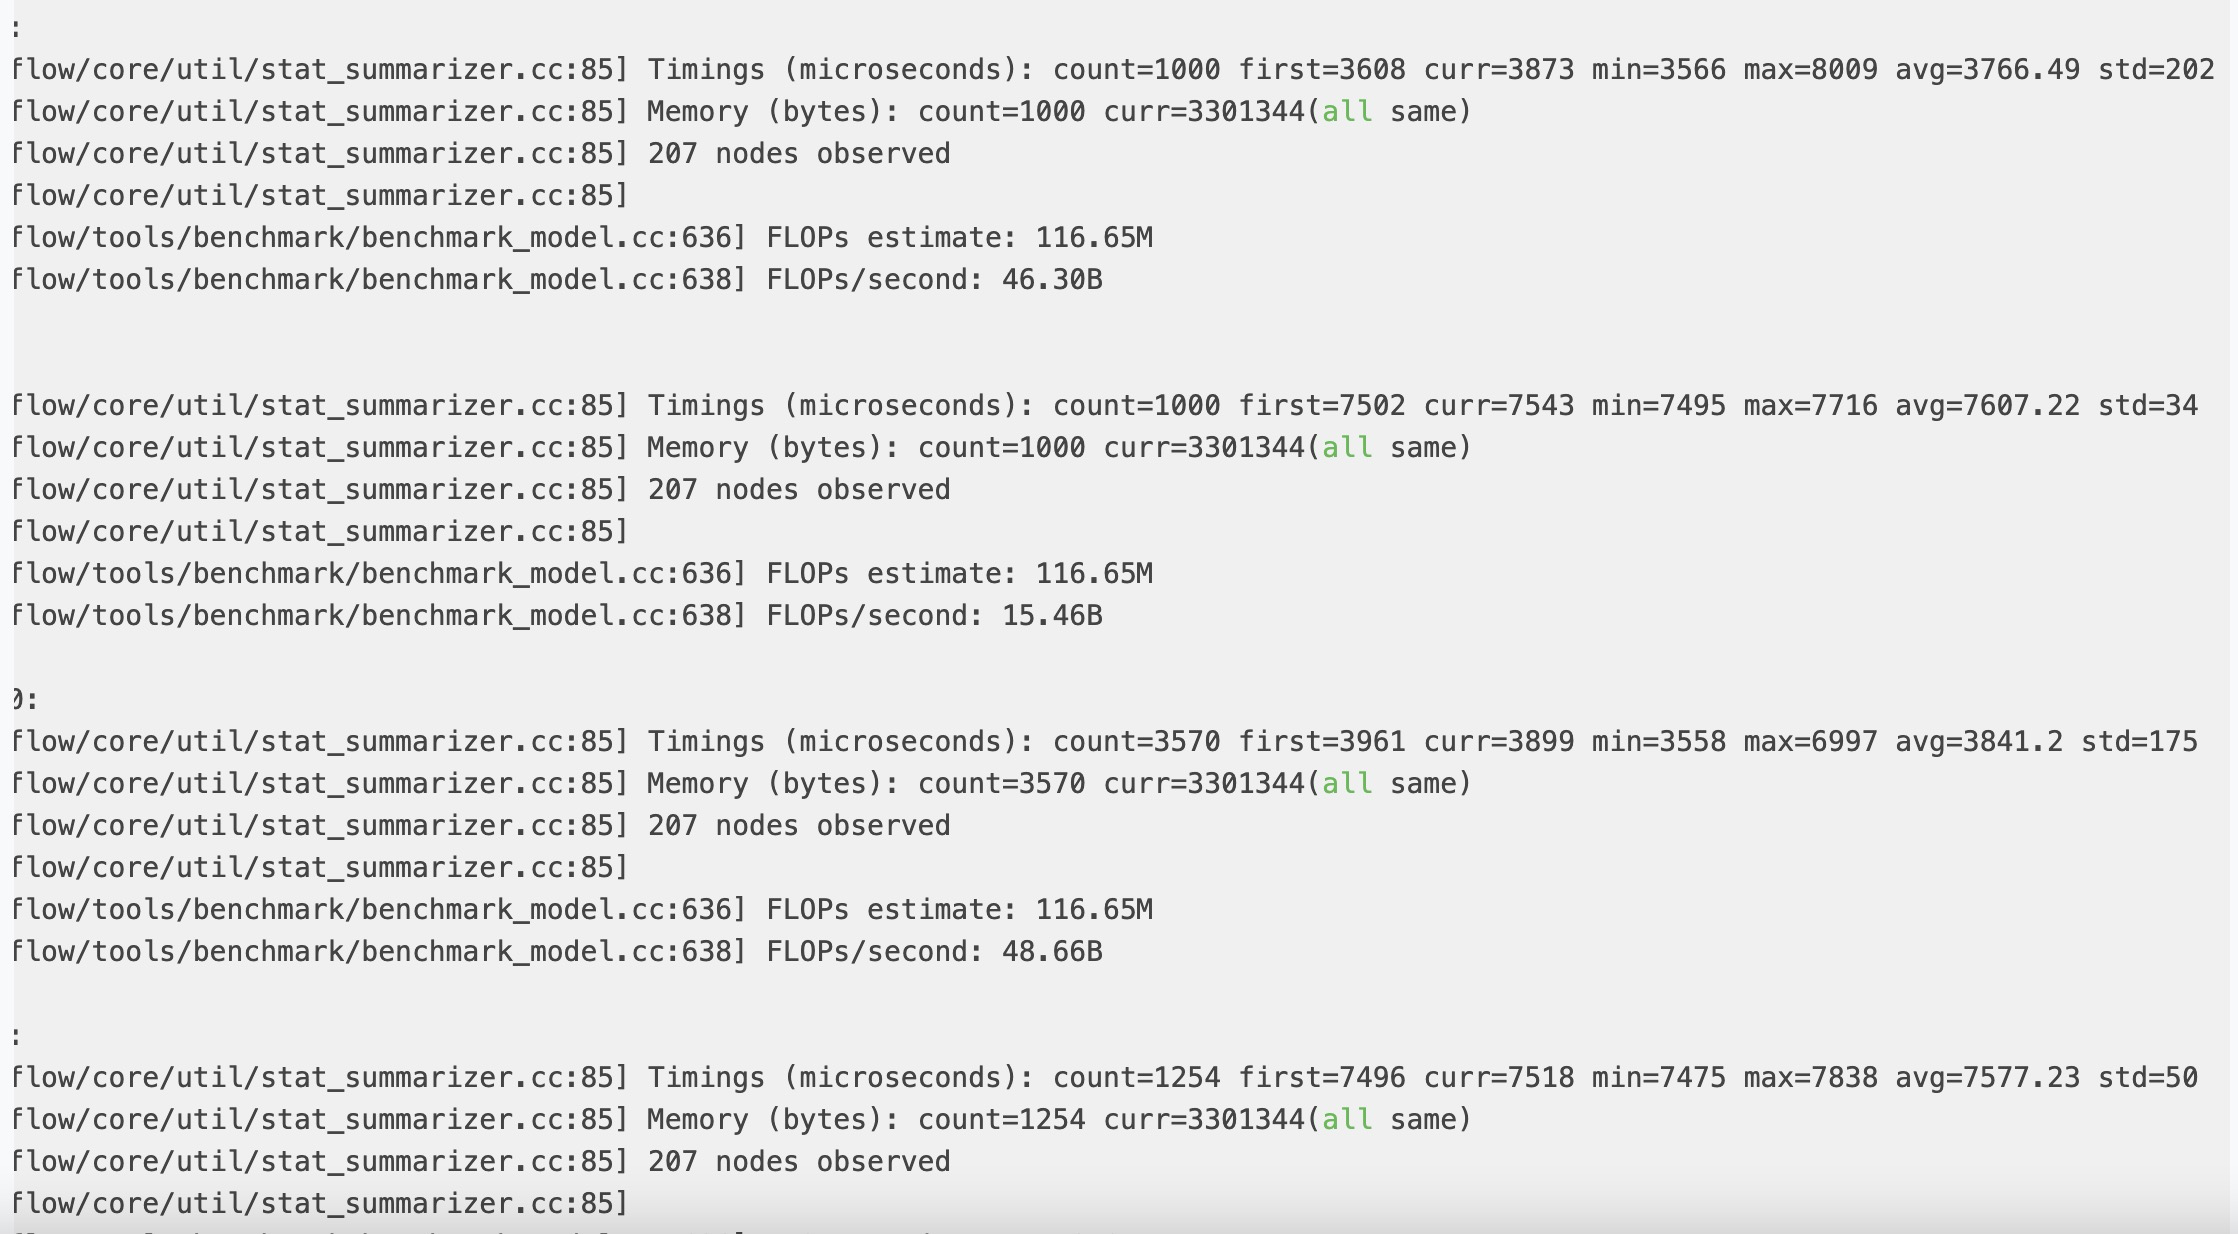
count: 实际运行次数
first: 第一次迭代所用的时间
curr: 上次迭代的时间
min: 迭代所需的最短时间
max: 迭代花费的最长时间
avg: 迭代平均时间
std:所有运行时间的标准偏差
Warmup: 预热运行平均值
Init: 启动时间(应始终与 相同Initialized session in)
no stats: 是名字很差的平均运行时间(与avg=前一行中的匹配)
num_threads:这用于设置intra_op_parallelism_threads和inter_op_parallelism_threads
6. 参考文档
Linux上安装python3
python3安装tensorflow遇到的问题
如何运行TensorFlow Benchmarks测试GPU
解读tensorflow benchmark工具的结果
测试tensorflow
CentOS7配置yum清华源_centos_飞Link-华为云开发者联盟
解决pip._vendor.urllib3.exceptions.ReadTimeoutError: HTTPSConnectionPool_nocol.的博客-CSDN博客
https://www.cnblogs.com/zmdComeOn/p/12010111.html
tensorflow使用Session模块时报错:AttributeError: module ‘tensorflow‘ has no attribute ‘Session‘,已解决_tensorflow的session报错
RuntimeError: The Session graph is empty. Add operations to the graph before calling run().解决方法
os.environ['TF_CPP_MIN_LOG_LEVEL']无效


