一、什么是PyQt6? 简单介绍一下PyQt6
1、基础简介
PyQt6 Digia 公司的 Qt 程序的 Python 中间件。Qt库是最强大的GUI库之一。PyQt6的官网:www.riverbankcomputing.co.uk/news。PyQt6是由Riverbank Computing公司开发的
资料大礼包点击蓝色字体领取
Python零基础入门到精通教学视频讲解
【整整800集】Python爬虫项目零基础入门合集,细狗都学会了,你还不会?
PyQt6 是基于 Python 的一系列模块。它是一个多平台的工具包,可以在包括Unix、Windows和Mac OS在内的大部分主要操作系统上运行。PyQt6 有两个许可证,开发人员可以在 GPL 和商业许可之间进行选择。
2、安装 PyQt6
pip install PyQt6
3、PyQt6 模块
PyQt6 类是由一系列模块组成的,包括如下的模块:
- QtCore
- QtGui
- QtWidgets
- QtDBus
- QtNetwork
- QtHelp
- QtXml
- QtSvg
- QtSql
- QtTest
1)、 界面框架部分
主类
- QLayout
- 继承类
- QGridLayout (网格布局)
- QBoxLayout(简单的上下布局)
- QStackedLayout(可切换widget的布局)
- FlowLayout
2)、 界面组件部分(其实也是Widget类)
- button
- label
- 等等
3)、 界面样式部分
- color
- size
- font
- Icon
4)、界面交互部分
- action
- event
- signal
- slot
- connect
4、概念之间关系
QWidget 作为页面的主体,挂载layout(框架),框架添加页面的组件,通过 action(动作,类似于点击),event(事件),signal(信号),slot(信号槽),connect(动作绑定)产生交互
通过样式类,类似于 Icon(图标),大小,颜色,字体等,修改界面的细节
widget 上需要有layout,layout可以继续添加widget,可以一直加下去
5、学习文档
学习文档:参考First programs in PyQt6 - center window, tooltip, quit button, message box
二、编写一个简单的pyqt6程序
1、简介
编写一个简单的pyqt6程序
2、知识点
- PyQt6
- sys
3、实战
1)、创建 python 文件
#引入类
from PyQt6.QtWidgets import (QApplication, QDialog, QPushButton, QHBoxLayout, QMessageBox
)
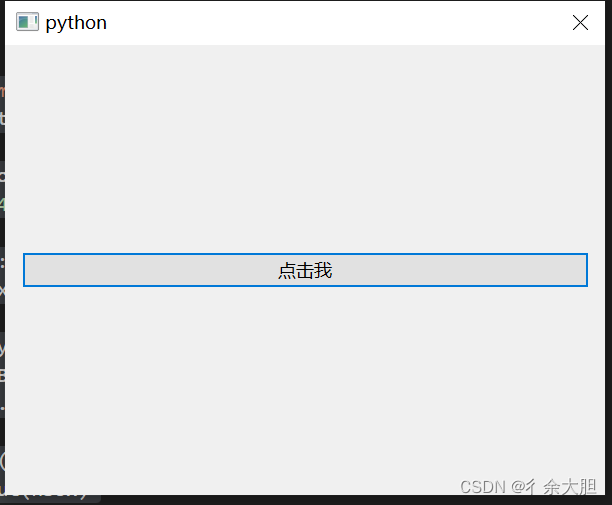
import sysif __name__ == "__main__":app = QApplication(sys.argv)window = QDialog()window.resize(400, 300)#弹出窗口def show_msg():QMessageBox.information(window, "信息提示", "你点击了我")hbox = QHBoxLayout()button = QPushButton("点击我")button.clicked.connect(show_msg)hbox.addWidget(button)window.setLayout(hbox)
#展示窗口window.show()sys.exit(app.exec())
2)、运行结果
三、PyQt6如创建菜单栏
1、主要知识点
- 文件读写
- 基础语法
- PyQt6
- sys
2、实战
菜单栏在GUI应用程序中很常见,它是位于各种菜单中的一组命令。(Mac OS 对菜单栏的处理是不同的,要得到类似的结果,我们可以添加下面这行: menubar.setNativeMenuBar(False)
import sys
from PyQt6.QtWidgets import QMainWindow, QApplication
from PyQt6.QtGui import QIcon, QActionclass Example(QMainWindow):def __init__(self):super().__init__()self.initUI()def initUI(self):exitAct = QAction(QIcon('exit.png'), '&Exit', self)exitAct.setShortcut('Ctrl+Q')exitAct.setStatusTip('Exit application')exitAct.triggered.connect(QApplication.instance().quit)self.statusBar()menubar = self.menuBar()fileMenu = menubar.addMenu('&File')fileMenu.addAction(exitAct)self.setGeometry(300, 300, 350, 250)self.setWindowTitle('Simple menu')self.show()def main():app = QApplication(sys.argv)ex = Example()sys.exit(app.exec())if __name__ == '__main__':main()
上门的示例中,创建了有一个菜单的菜单栏。这个菜单命令是终止应用,也绑定了快捷键 Ctrl+Q。示例中也创建了一个状态栏。
exitAct = QAction(QIcon('exit.png'), '&Exit', self)
exitAct.setShortcut('Ctrl+Q')
exitAct.setStatusTip('Exit application')
QAction 是行为抽象类,包括菜单栏,工具栏,或自定义键盘快捷方式。在上面的三行中,创建了一个带有特定图标和 ‘Exit’ 标签的行为。此外,还为该行为定义了一个快捷方式。第三行创建一个状态提示,当我们将鼠标指针悬停在菜单项上时,状态栏中就会显示这个提示。
exitAct.triggered.connect(QApplication.instance().quit)
当选择指定的行为时,触发了一个信号,这个信号连接了 QApplication 组件的退出操作,这会终止这个应用程序。
menubar = self.menuBar()
fileMenu = menubar.addMenu('&File')
fileMenu.addAction(exitAction)
menuBar 方法创建了一个菜单栏,然后使用 addMenu 创建一个文件菜单,使用 addAction 创建一个行为。
四、PyQt6创建一个状态栏
1、主要知识点
- 文件读写
- 基础语法
- PyQt6
- sys
2、实战
状态栏是显示状态信息的小部件。
import sys
from PyQt6.QtWidgets import QMainWindow, QApplicationclass Example(QMainWindow):def __init__(self):super().__init__()self.initUI()def initUI(self):self.statusBar().showMessage('Ready')self.setGeometry(300, 300, 350, 250)self.setWindowTitle('Statusbar')self.show()def main():app = QApplication(sys.argv)ex = Example()sys.exit(app.exec())if __name__ == '__main__':main()
使用 QMainWindow 创建状态栏
self.statusBar().showMessage(‘Ready’)
使用 QtGui.QMainWindow 方法创建状态栏,该方法的创建了一个状态栏,并返回statusbar对象,再调用 showMessage 方法在状态栏上显示一条消息。
五、Python 中创建 PyQt6 的事件对象
1、主要知识点
- 文件读写
- 基础语法
- PyQt6
- sys
2、实战
事件对象是一个 Python object,包含了一系列描述这个事件的属性,具体内容要看触发的事件。
import sys
from PyQt6.QtCore import Qt
from PyQt6.QtWidgets import QWidget, QApplication, QGridLayout, QLabelclass Example(QWidget):def __init__(self):super().__init__()self.initUI()def initUI(self):grid = QGridLayout()x = 0y = 0self.text = f'x: {x},  y: {y}'self.label = QLabel(self.text, self)grid.addWidget(self.label, 0, 0, Qt.Alignment.AlignTop)self.setMouseTracking(True)self.setLayout(grid)self.setGeometry(300, 300, 450, 300)self.setWindowTitle('Event object')self.show()def mouseMoveEvent(self, e):x = int(e.position().x())y = int(e.position().y())text = f'x: {x},  y: {y}'self.label.setText(text)def main():app = QApplication(sys.argv)ex = Example()sys.exit(app.exec())if __name__ == '__main__':main()
本例中,在标签组件里,展示了鼠标的坐标。
self.setMouseTracking(True)
鼠标跟踪默认是关闭的,鼠标移动时,组件只能在鼠标按下的时候接收到事件。开启鼠标跟踪,只移动鼠标不按下鼠标按钮,也能接收到事件。
def mouseMoveEvent(self, e):x = int(e.position().x())y = int(e.position().y())...
e 是事件对象,它包含了事件触发时候的数据。通过 position().x() 和 e.position().y() 方法,能获取到鼠标的坐标值。
self.text = f'x: {x},  y: {y}'
self.label = QLabel(self.text, self)
坐标值 x 和 y 显示在 QLabel 组件里。
六、Python 中的 PyQt6事件触发者
1、主要知识点
- 文件读写
- 基础语法
- PyQt6
- sys
2、实战
某些时候,需要知道事件的触发者是谁,PyQt6 有获取事件触发者的方法。
import sys
from PyQt6.QtWidgets import QMainWindow, QPushButton, QApplicationclass Example(QMainWindow):def __init__(self):super().__init__()self.initUI()def initUI(self):btn1 = QPushButton("Button 1", self)btn1.move(30, 50)btn2 = QPushButton("Button 2", self)btn2.move(150, 50)btn1.clicked.connect(self.buttonClicked)btn2.clicked.connect(self.buttonClicked)self.statusBar()self.setGeometry(300, 300, 450, 350)self.setWindowTitle('Event sender')self.show()def buttonClicked(self):sender = self.sender()msg = f'{sender.text()} was pressed'self.statusBar().showMessage(msg)def main():app = QApplication(sys.argv)ex = Example()sys.exit(app.exec())if __name__ == '__main__':main()
本例中有两个按钮。 buttonClicked 调用触发者方法确定了是哪个按钮触发的事件。
btn1.clicked.connect(self.buttonClicked)
btn2.clicked.connect(self.buttonClicked)
两个按钮绑定了同一个插槽。
def buttonClicked(self):sender = self.sender()msg = f'{sender.text()} was pressed'self.statusBar().showMessage(msg)
在应用的状态栏里,显示了是哪个按钮被按下。
七、Python 中 PyQt6 触发信号
1 、主要知识点
- 文件读写
- 基础语法
- PyQt6
- sys
2、实战
QObject 可以主动触发信号。下面的示例显示了如果触发自定义信号。
import sys
from PyQt6.QtCore import pyqtSignal, QObject
from PyQt6.QtWidgets import QMainWindow, QApplicationclass Communicate(QObject):closeApp = pyqtSignal()class Example(QMainWindow):def __init__(self):super().__init__()self.initUI()def initUI(self):self.c = Communicate()self.c.closeApp.connect(self.close)self.setGeometry(300, 300, 450, 350)self.setWindowTitle('Emit signal')self.show()def mousePressEvent(self, e):self.c.closeApp.emit()def main():app = QApplication(sys.argv)ex = Example()sys.exit(app.exec())if __name__ == '__main__':main()
创建了一个叫 closeApp 的信号,在鼠标按下的时候触发,和关闭插槽 QMainWindow 绑定。
class Communicate(QObject):closeApp = pyqtSignal()
外部 Communicate 类的属性 pyqtSignal 创建信号。
self.c = Communicate()
self.c.closeApp.connect(self.close)
自定义信号 closeApp 绑定到 QMainWindow 的关闭插槽上。
def mousePressEvent(self, event):self.c.closeApp.emit()
在窗口上点击鼠标按钮的时候,触发 closeApp 信号,程序终止。
八、Python 中 PyQt6 的拖拽操作
1、主要知识点
文件读写
基础语法
PyQt6
sys
2、实战
QDrag
QDrag 提供对基于 MIME 的拖放数据传输的支持。它处理拖放操作的大部分细节。传输的数据包含在 QMimeData 对象中
import sysfrom PyQt6.QtWidgets import (QPushButton, QWidget,QLineEdit, QApplication)class Button(QPushButton):def __init__(self, title, parent):super().__init__(title, parent)self.setAcceptDrops(True)def dragEnterEvent(self, e):if e.mimeData().hasFormat('text/plain'):e.accept()else:e.ignore()def dropEvent(self, e):self.setText(e.mimeData().text())class Example(QWidget):def __init__(self):super().__init__()self.initUI()def initUI(self):edit = QLineEdit('', self)edit.setDragEnabled(True)edit.move(30, 65)button = Button("Button", self)button.move(190, 65)self.setWindowTitle('Simple drag and drop')self.setGeometry(300, 300, 300, 150)def main():app = QApplication(sys.argv)ex = Example()ex.show()app.exec()if __name__ == '__main__':main()
示例展示了简单的拖拽操作。
class Button(QPushButton):def __init__(self, title, parent):super().__init__(title, parent)...
为了完成把文本拖到 QPushButton 部件上,我们必须实现某些方法才可以,所以这里创建了一个继承自 QPushButton 的 Button 类。
self.setAcceptDrops(True)
使用 setAcceptDrops 方法处理部件的释放事件。
def dragEnterEvent(self, e):if e.mimeData().hasFormat('text/plain'):e.accept()else:e.ignore()
dragEnterEvent 方法,定义了我们接受的数据类型————纯文本。
def dropEvent(self, e):self.setText(e.mimeData().text())
dropEvent 方法,处理释放事件————修改按钮组件的文本。
edit = QLineEdit('', self)
edit.setDragEnabled(True)
QLineEdit 部件支持拖放操作,这里只需要调用 setDragEnabled 方法激活它。
九、Python 中 PyQt6 的拖放按钮组件
1、主要知识点
- 文件读写
- 基础语法
- PyQt6
- sys
2、菜鸟实战
创建文件!
import sysfrom PyQt6.QtCore import Qt, QMimeData
from PyQt6.QtGui import QDrag
from PyQt6.QtWidgets import QPushButton, QWidget, QApplicationclass Button(QPushButton):def __init__(self, title, parent):super().__init__(title, parent)def mouseMoveEvent(self, e):if e.buttons() != Qt.MouseButtons.RightButton:returnmimeData = QMimeData()drag = QDrag(self)drag.setMimeData(mimeData)drag.setHotSpot(e.position().toPoint() - self.rect().topLeft())dropAction = drag.exec(Qt.DropActions.MoveAction)def mousePressEvent(self, e):super().mousePressEvent(e)if e.button() == Qt.MouseButtons.LeftButton:print('press')class Example(QWidget):def __init__(self):super().__init__()self.initUI()def initUI(self):self.setAcceptDrops(True)self.button = Button('Button', self)self.button.move(100, 65)self.setWindowTitle('Click or Move')self.setGeometry(300, 300, 550, 450)def dragEnterEvent(self, e):e.accept()def dropEvent(self, e):position = e.position()self.button.move(position.toPoint())e.setDropAction(Qt.DropActions.MoveAction)e.accept()def main():app = QApplication(sys.argv)ex = Example()ex.show()app.exec()if __name__ == '__main__':main()
本例中,窗口里有个 QPushButton,鼠标左键点击它,会在控制台打印 'press’消息,鼠标右键可以点击拖拽它。
class Button(QPushButton):def __init__(self, title, parent):super().__init__(title, parent)
基于 QPushButton 创建了一个 Button 类,并实现了两个 QPushButton 方法:mouseMoveEvent 和 mousePressEvent。mouseMoveEvent 方法是处理拖放操作开始的地方。
if e.buttons() != Qt.MouseButtons.RightButton:return
定义鼠标右键为触发拖拽操作的按钮,鼠标左键只会触发点击事件。
drag = QDrag(self)
drag.setMimeData(mimeData)drag.setHotSpot(e.position().toPoint() - self.rect().topLeft())
创建 QDrag 对象,以提供基于 MIME 数据类型的拖拽操作。
dropAction = drag.exec(Qt.DropActions.MoveAction)
drag 对象的 exec 方法执行拖拽操作。
def mousePressEvent(self, e):super().mousePressEvent(e)if e.button() == Qt.MouseButtons.LeftButton:print('press')
如果鼠标左键点击按钮,会在控制台打印 ‘press’ 消息,注意,这里在父级上也调用了 mousePressEvent 方法,不然按钮按下的动作不会展现出来。
position = e.pos() self.button.move(position)
dropEvent 方法处理鼠标释放按钮后的操作————把组件的位置修改为鼠标当前坐标。
e.setDropAction(Qt.MoveAction) e.accept()
使用 setDropAction 指定拖放操作的类型————鼠标移动。
兄弟们,今天的分享就暂时到这里,下次见!
