一、简介
pinia是 vue3 新的状态管理工具,简单来说相当于之前 vuex,它去掉了 Mutations 但是也是支持 vue2 的,需要的朋友可以参考下
二、使用方法
1.安装
npm install pinia -S
2..引入
import { createPinia,PiniaPluginContext } from 'pinia'
import { createApp,toRaw } from 'vue'
import App from './App.vue'
const store = createPinia()
const app = createApp(App)
app.use(store)
app.mount('#app')
3.创建store文件夹
在src目录下面,创建store文件
注意: pinia 不需要创建 modules 文件来区分模块化,这是它和 vuex 的区别。

store/index.ts
import {defineStore } from 'pinia'
import {Names} from './store-name'
type User = {name:string,age:number
}const result:User = {name:'xiaochen',age:888,
}const asyncResult:User ={name:'异步名字',age:999,
}const Login = ():Promise<User> =>{return new Promise((resolve) =>{setTimeout(()=>{resolve(asyncResult)},2000)})
}
//第一个参数 命名空间唯一值
export const useTestStore = defineStore(Names.TEST,{state:()=>{return{current:122,name:'xiaochen2',user:<User>{},asyncUser:<User>{},}},//相当于computed 修饰一些值 有缓存的getters:{newName ():string{return `$-${this.name}-${this.getUserAge}`},getUserAge():number{return this.user.age || 1}},//methods 可以做同步 异步也支持 提交stateactions:{// setCurrent(num:number){//     this.current = num// },//同步setUser(){this.user = result},//异步async getUser(){const resultList = await Login()this.asyncUser = resultListthis.setName('超级帅的飞机')//相互调用方法this.setAge(6666)//相互调用方法},setName (name:string){this.name = name},setAge (age:number){this.user.age = age}}})
命名空间的唯一值
export const enum Names {TEST = 'TEST',BASE = 'BASE'
}
4.使用Pinia
import { useTestStore} from "../store";
const sinaTest = useTestStore();
5.修改数据(五种方法)
方法1:直接改变
<div class="container">
Pinia:{{ sinaTest.current }} -- {{ sinaTest.name }}
<button @click="change">改变</button>
</div>
const change = () => {
sinaTest.current++;
};
方法2:利用patch直接改变
const change = () => {
sinaTest.$patch({
current: 888,
name: "黑丝",
});
};
方法3:利用$patch传递参数
const change = () => {
//可以写工厂函数
sinaTest.$patch((state) => {
state.current = 999;
state.name = "迪丽热巴";
});
};
方法4: 利用$state修改(有弊端不推荐)
const change = () => {
//可以写工厂函数
sinaTest.$state = {
current: 2000,
name: "134",
};
};
方法5: 通过actions去改变
const change = () => {
sinaTest.setCurrent(852);
};
这里只是简单了一些修改的方法 ,具体使用还是得结合业务场景去使用,具体了解可以看看Pinia官方文档
三、持久化存储
pinia 和 vuex 一样,数据是短时的,只要一刷新页面,数据就会恢复成初始状态,为了避免这个问题,可以对其采用持久化保存方法。
持久化保存的原理是在 pinia 中数据更新时,同步保存到 localStorage 或 sessionStorage 中,刷新后从本地存储中读取数据,
下面介绍两种实现的方法
一:手写
1.自己手写一个实现持久化(在main.ts写)
首先我们先了解一下pinpa能获取到的参数

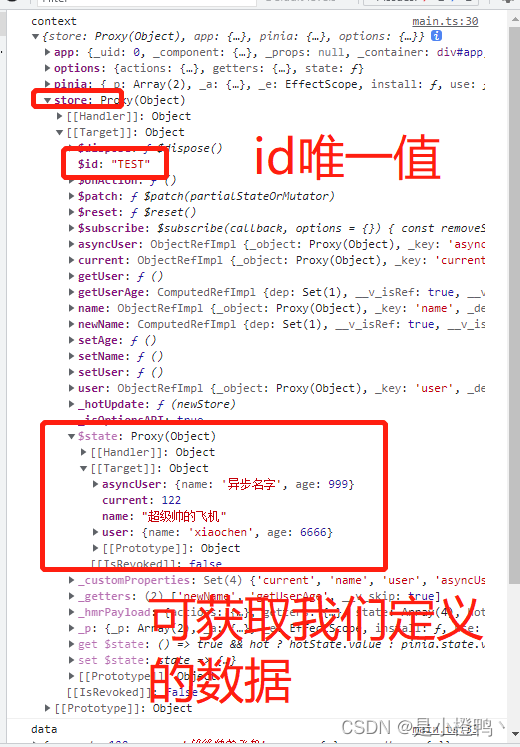
通过上面的打印我们了解到对应的数据存在哪里,我们即可以手写
//先手写我们存储数据的localStorage
const getStorage = (key:string) =>{return localStorage.getItem(key) ? JSON.parse(localStorage.getItem(key) as string):{}}//存储数据const setStorage = (key:string,value:any) => {localStorage.setItem(key,JSON.stringify(value)) //value可能是对象或者数组 所以JSON.stringify需要这个转换成字符串 ['1','2','3'] => '['1','2','3']'}
2.手写我们插件函数(柯里化优化):柯里化就是将一个多参数的函数 转换成单参数的函数
解析:options?.key ??__piniaKey__ 当key不传的时候默认是__piniaKey__ ,传的时候就是传的数据。下面使用的时候有介绍
空值合并运算符( ?? )是一个逻辑操作符,如果左侧的表达式为 null或者 undefined 时,返回其右侧表达式,否则返回左侧表达式。
//函数柯里化  柯里化就是将一个多参数的函数  转换成单参数的函数
const piniaPlugin = (options:Options) =>{return (context:PiniaPluginContext)=>{ //拿取到pinpa的参数console.log('context',context);const {store} = context //解构我们需要的storeconst data = getStorage(`${options?.key ??__piniaKey__}-${store.$id}`) //获取到keyconsole.log('data',data);//可以通过$subscribe监测到store数据变化store.$subscribe(()=>{// 每当它发生变化时,将整个状态持久化到本地存储//${options?.key ??__piniaKey__}-${store.$id} 唯一值keysetStorage(`${options?.key ??__piniaKey__}-${store.$id}`,toRaw(store.$state)) //store.$state proxy对象  toRaw把它转为原始对象})return{...data}}
}
3.使用我们的插件
store.use(piniaPlugin({key:'pinia' //传值key过去 存储用这个名字
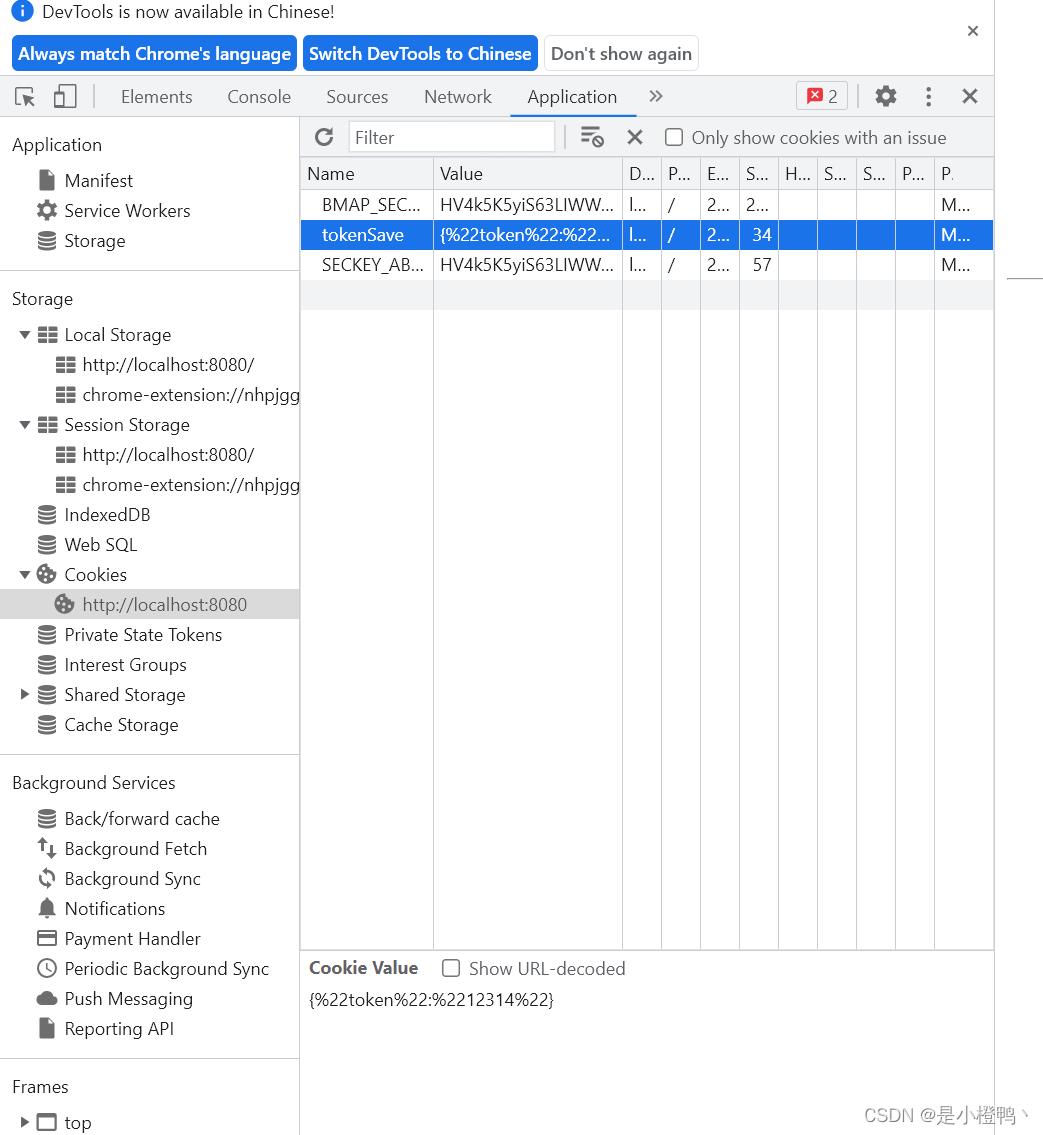
}))4.效果如下

二、使用插件
1.安装插件
npm install pinia-plugin-persist
2.引入插件
import piniaPersist from 'pinia-plugin-persist'
pinia.use(piniaPersist)
3.使用插件
①设置key,指定保存内容
export const useBaseStore = defineStore(Names.BASE, {state: () => {return {baseUrl: "http://localhost:9090",BaseCurrent: 0,};},persist: {enabled: true, // true 表示开启持久化保存strategies: [{key: 'base',storage: localStorage,paths: ['BaseCurrent','baseUrl']},],},//相当于computed 修饰一些值 有缓存的getters: {},//methods 可以做同步 异步也支持 提交stateactions: {},
}); //第一个参数 命名空间唯一值
②你甚至可以对不同数据设置不同的本地存储方式。
export const useBaseStore = defineStore(Names.BASE, {state: () => {return {baseUrl: "http://localhost:9090",BaseCurrent: 0,testType:'test',};},persist: {enabled: true, // true 表示开启持久化保存strategies: [{key: 'base',storage: localStorage,paths: ['BaseCurrent','baseUrl']},{key: 'base2',storage: sessionStorage,paths: ['testType']},],},//相当于computed 修饰一些值 有缓存的getters: {},//methods 可以做同步 异步也支持 提交stateactions: {},
}); //第一个参数 命名空间唯一值

③保存到 cookie
保存到 cookie 中当然也是可以的,不过需要手动添加 cookie 的保存方式,同样,此处也是推荐使用插件 js-cookie 来完成。一般用于存储token
npm install js-cookie
import Cookies from 'js-cookie'
//存储在cookie
const cookiesStorage: Storage = {setItem(key, state:any) {console.log('state',state);return Cookies.set(key, state, { expires: 3 }); // 设置有效期 3 天,不设置默认同 sessionStorage 有效期一致},getItem(key) {return JSON.stringify({accessToken: Cookies.get(key),});},length: 0,clear: function (): void {throw new Error("Function not implemented.");},key: function (index: number): string | null {throw new Error("Function not implemented.");},removeItem: function (key: string): void {throw new Error("Function not implemented.");}
}export const useBaseStore = defineStore(Names.BASE, {state: () => {return {baseUrl: "http://localhost:9090",BaseCurrent: 0,testType:'test',token:'12314',};},persist: {enabled: true, // true 表示开启持久化保存strategies: [{key: 'base',storage: localStorage,paths: ['BaseCurrent','baseUrl']},{key: 'base2',storage: sessionStorage,paths: ['testType']},{key: 'tokenSave',storage: cookiesStorage,paths: ['token']},],},//相当于computed 修饰一些值 有缓存的getters: {},//methods 可以做同步 异步也支持 提交stateactions: {},
}); //第一个参数 命名空间唯一值