目录
项目搭建
初始化three.js基础代码
加载环境模型
设置环境纹理
添加水面并设置阴影效果
实现幽灵小球的运动
实现相机切换和文字切屏
实现漫天星星和爱心样式
今天简单实现一个three.js的小Demo,加强自己对three知识的掌握与学习,只有在项目中才能灵活将所学知识运用起来,话不多说直接开始。
项目搭建
本案例还是借助框架书写three项目,借用vite构建工具搭建vue项目,vite这个构建工具如果有不了解的朋友,可以参考我之前对其讲解的文章:vite脚手架的搭建与使用 。搭建完成之后,用编辑器打开该项目,在终端执行 npm i 安装一下依赖,安装完成之后终端在安装 npm i three 即可。
因为我搭建的是vue3项目,为了便于代码的可读性,所以我将three.js代码单独抽离放在一个组件当中,在App根组件中进入引入该组件。具体如下:
<template><!-- 圣诞3d贺卡 --><christmasCard></christmasCard>
</template><script setup>
import christmasCard from './components/christmasCard.vue';
</script><style lang="less">*{margin: 0;padding: 0;}
</style>
初始化three.js基础代码
three.js开启必须用到的基础代码如下:
导入three库:
import * as THREE from 'three'初始化场景:
const scene = new THREE.Scene()初始化相机:
// 初始化相机
const camera = new THREE.PerspectiveCamera(75,window.innerWidth/window.innerHeight,0.1,1000)
camera.position.set(-3.23,2.98,4.06)
camera.updateProjectionMatrix()初始化渲染器:
// 初始化渲染器
const renderer = new THREE.WebGLRenderer({antialias: true // 设置抗锯齿
})
renderer.setSize(window.innerWidth,window.innerHeight)
document.body.appendChild(renderer.domElement)监听屏幕大小的改变,修改渲染器的宽高和相机的比例:
window.addEventListener("resize",()=>{ renderer.setSize(window.innerWidth,window.innerHeight)camera.aspect = window.innerWidth/window.innerHeightcamera.updateProjectionMatrix()
})导入控制器:
import { OrbitControls } from "three/examples/jsm/controls/OrbitControls"
// 初始化控制器
const controls = new OrbitControls(camera,renderer.domElement)
controls.enableDamping = true // 设置控制阻尼设置渲染函数:
const render = () =>{ requestAnimationFrame(render)renderer.render(scene,camera)controls.update()
}进行挂载:
import { onMounted } from "vue";
onMounted(()=>{render()
})
ok,写完基础代码之后,接下来开始具体的Demo实操。
加载环境模型
经过前几篇对three.js小demo的训练,相信大家对加载模型可谓是得心应手了吧,无非就四步嘛:
第一步引入加载GLTF模型和压缩模型的第三方库:
// 加载GLTF模型
import { GLTFLoader } from 'three/examples/jsm/loaders/GLTFLoader';
// 解压GLTF模型
import { DRACOLoader } from 'three/examples/jsm/loaders/DRACOLoader';第二步初始化loader:
const dracoLoader = new DRACOLoader()
dracoLoader.setDecoderPath("/draco/")
const gltfLoader = new GLTFLoader()
gltfLoader.setDRACOLoader(dracoLoader)第三步就是加载gltf模型:
gltfLoader.load("./model/scene.glb",(gltf)=>{const model = gltf.scenemodel.scale.set(0.3,0.3,0.3)scene.add(model)
})第四步就是根据具体情况添加光源:
// 添加平行光
const light = new THREE.DirectionalLight(0xffffff,1)
light.position.set(0,50,0)
scene.add(light)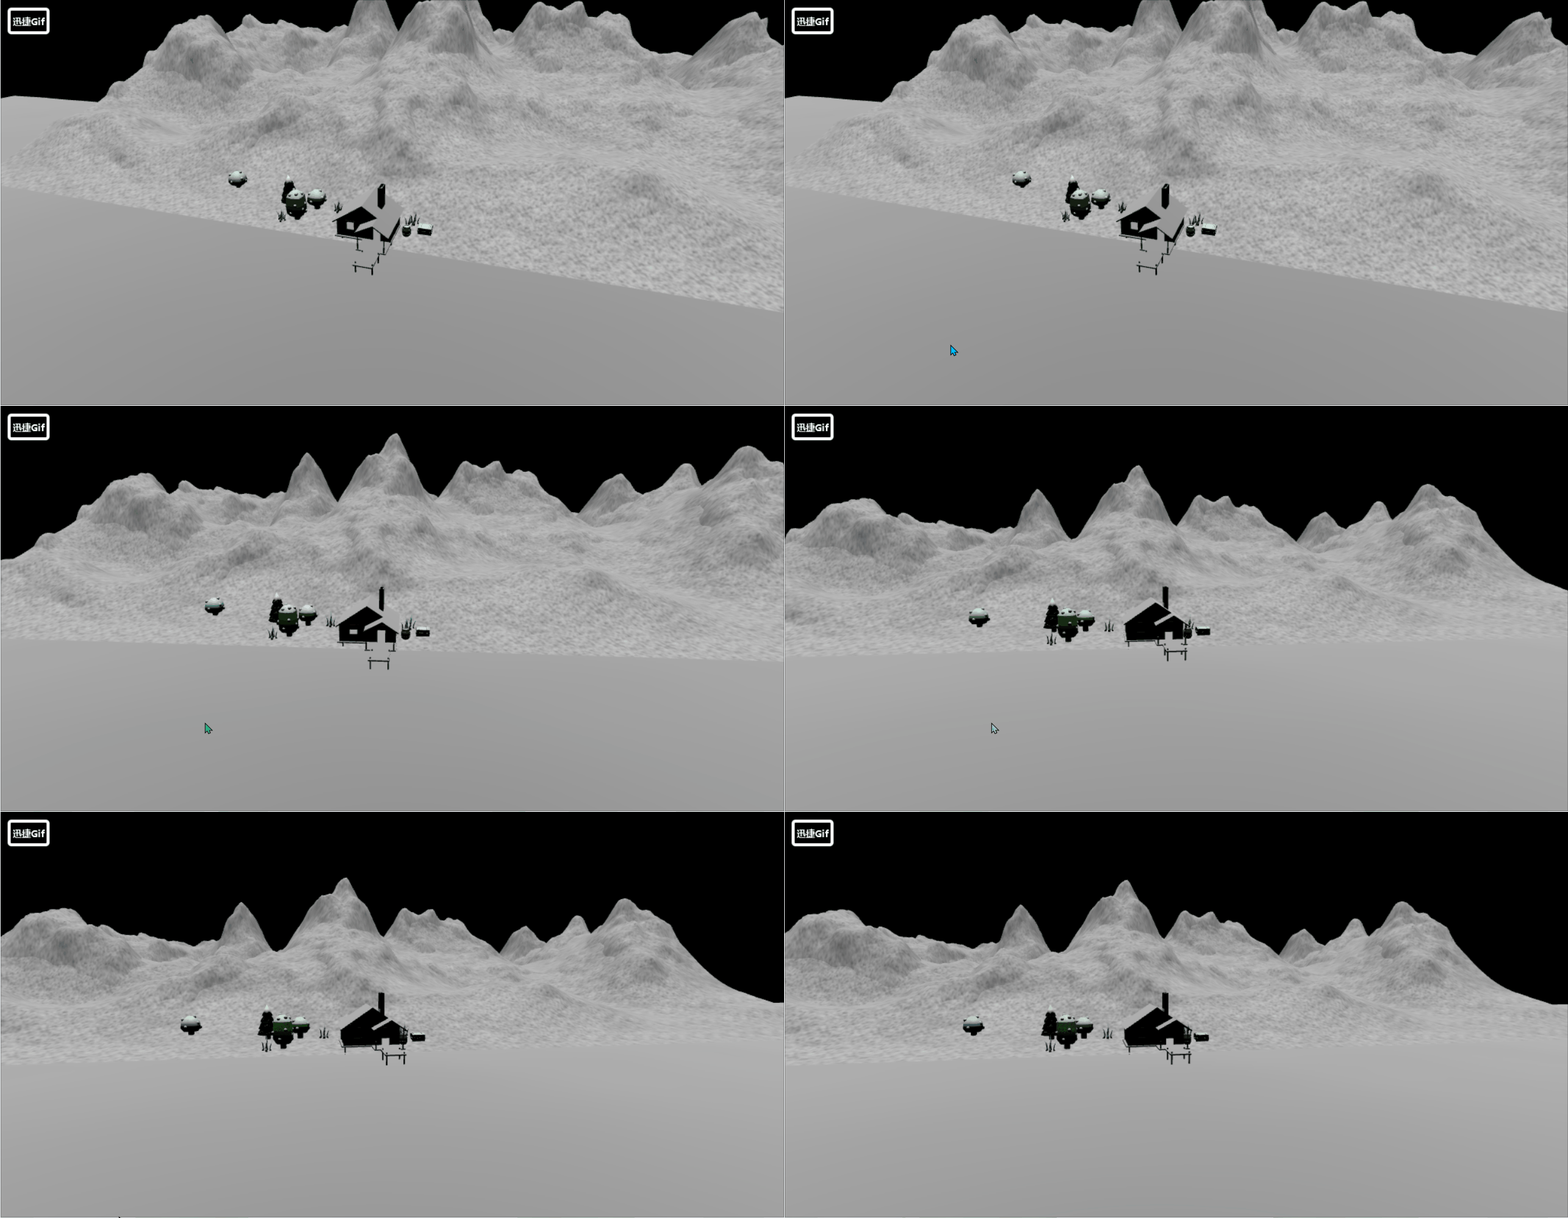
设置环境纹理
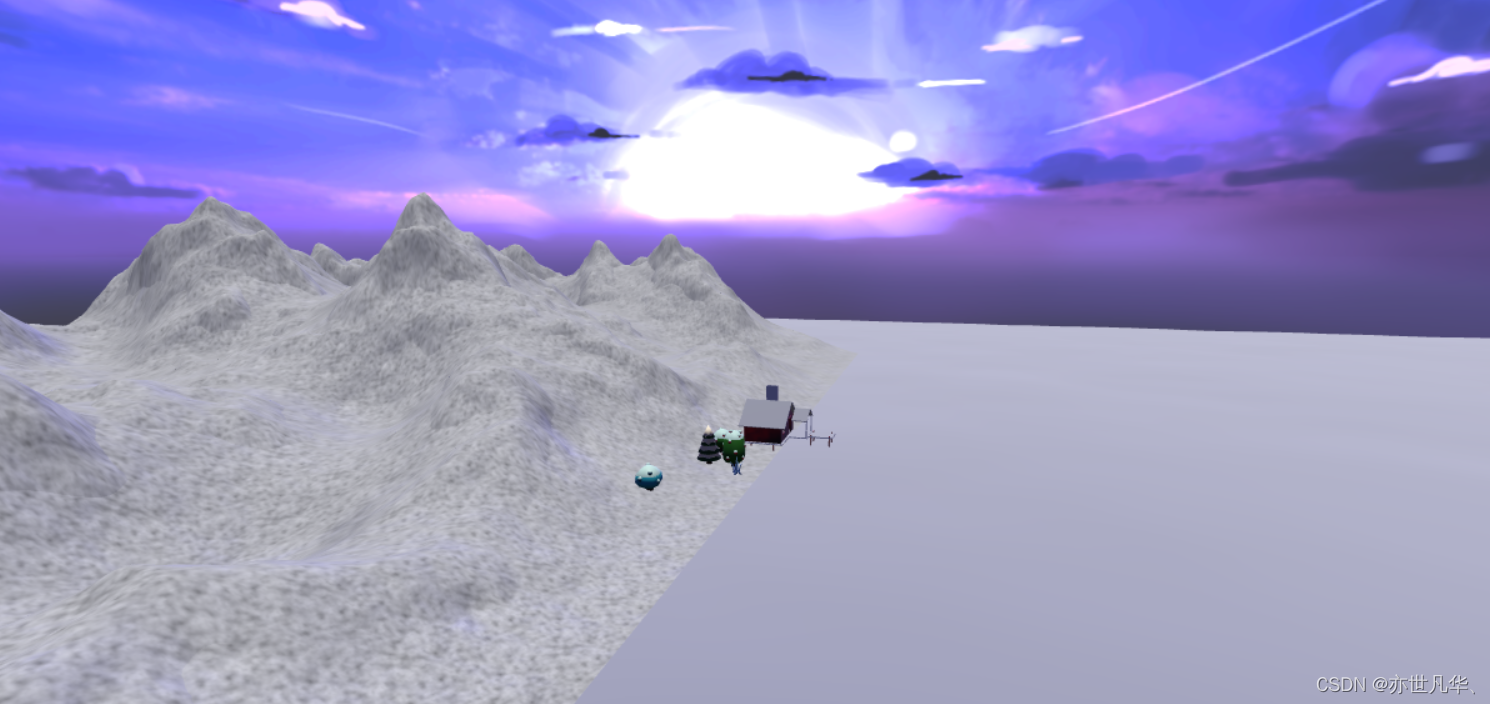
这里的话通过RGBELoader将HDR(高动态范围)格式的图片数据加载到Three.js中,并将其转换为Cubemap格式的文本形式,以用于创建更高质量、更真实的3D场景和物体。
// 解析 HDR 纹理数据
import { RGBELoader } from 'three/examples/jsm/loaders/RGBELoader'let rgbeLoader = new RGBELoader()
rgbeLoader.load('./textures/sky.hdr',(texture)=>{texture.mapping = THREE.EquirectangularReflectionMappingscene.background = texturescene.environment = texture
})
当然我们也可以设置一下环境纹理的色调映射,如下:
// 设置色调映射
renderer.toneMapping = THREE.ACESFilmicToneMapping // 色调映射技术,是在电影和电视行业中广泛使用的一种技术
renderer.toneMappingExposure = 0.3 // 色调亮光程度
这样可让环境稍微暗一点,更具有朦胧感:

添加水面并设置阴影效果
接下来通过three给我们提供的库进行创建一个水面,如下:
// 导入水面
import { Water } from 'three/examples/jsm/objects/Water2'
// 创建水面
const waterGeometry = new THREE.CircleGeometry(100,100)
const water = new Water(waterGeometry,{textureWidth: 1024,textureHeight: 1024,color: 0xeeeeff,flowDirection: new THREE.Vector2(1,1),scale: 100
})
water.rotation.x = -Math.PI /2
water.position.y = -0.1
scene.add(water)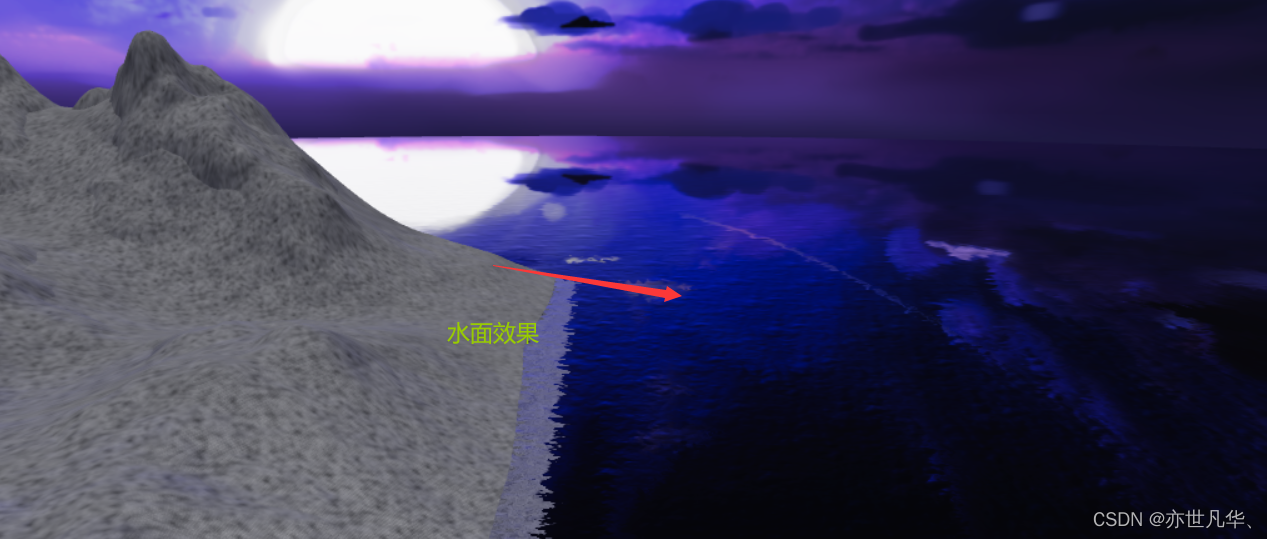
接下来通过设置一个点光源,然后给模型添加接受阴影效果,如下:
// 添加点光源
const pointLight = new THREE.PointLight(0xffffff,2,10)
pointLight.position.set(-0.05,0.8,0.1)
pointLight.castShadow = true
scene.add(pointLight)

实现幽灵小球的运动
接下来我们通过创建一个点光源组来实现三个发光的幽灵小球:
// 创建点光源组
const pointLightGroup = new THREE.Group();
pointLightGroup.position.set(-8, 2.5, -1.5);
let radius = 3;
let pointLightArr = [];
for (let i = 0; i < 3; i++) {// 创建球体当灯泡const sphereGeometry = new THREE.SphereGeometry(0.2, 32, 32);const sphereMaterial = new THREE.MeshStandardMaterial({color: 0xffffff,emissive: 0xffffff,emissiveIntensity: 10,});const sphere = new THREE.Mesh(sphereGeometry, sphereMaterial);pointLightArr.push(sphere);sphere.position.set(radius * Math.cos((i * 2 * Math.PI) / 3),Math.cos((i * 2 * Math.PI) / 3),radius * Math.sin((i * 2 * Math.PI) / 3));let pointLight = new THREE.PointLight(0xffffff, 50);sphere.add(pointLight);pointLightGroup.add(sphere);
}
scene.add(pointLightGroup);
因为要想实现动画效果,这里需要安装一个动画库,看参考我之前的文章: Gsap动画库基本使用与原理 ,这里就不再赘述。
通过使用补间函数,从0到2π,使灯泡旋转:
let options = {angle: 0,
};
gsap.to(options, {angle: Math.PI * 2,duration: 10,repeat: -1,ease: "linear",onUpdate: () => {pointLightGroup.rotation.y = options.angle;pointLightArr.forEach((item, index) => {item.position.set(radius * Math.cos((index * 2 * Math.PI) / 3),Math.cos((index * 2 * Math.PI) / 3 + options.angle * 5),radius * Math.sin((index * 2 * Math.PI) / 3));});},
});
最后实现的效果如下:

实现相机切换和文字切屏
首先先定义一个移动函数,如下:
// 使用补间动画移动相机
let timeLine1 = gsap.timeline()
let timeLine2 = gsap.timeline()
// 定义相机移动函数
const translateCamera = (position,target) =>{ timeLine1.to(camera.position, {x: position.x,y: position.y,z: position.z,duration: 1,ease: "power2.inOut",});timeLine2.to(controls.target, {x: target.x,y: target.y,z: target.z,duration: 1,ease: "power2.inOut",});
}
接下来定义文字切屏的场景:
// 添加文字场景
let scenes = [{text:'圣诞快乐',callback:()=>{// 执行函数切换位置translateCamera(new THREE.Vector3(-3.23, 3, 4.06),new THREE.Vector3(-8, 2, 0));}},{text:'感谢世界这么大还能遇见你',callback:()=>{translateCamera(new THREE.Vector3(7, 0, 23), new THREE.Vector3(0, 0, 0))}},{text:'愿与你探寻整个世界',callback:()=>{translateCamera(new THREE.Vector3(10, 3, 0), new THREE.Vector3(5, 2, 0))}},{text:'愿将天上的星星送给你',callback:()=>{translateCamera(new THREE.Vector3(7, 0, 23), new THREE.Vector3(0, 0, 0))}},{text:'愿永远和你在一起',callback:()=>{translateCamera(new THREE.Vector3(-20, 1.3, 6.6),new THREE.Vector3(5, 2, 0));}},
]
接下来通过监听鼠标滚轮事件:
let index = ref(0)
let isAnimate = false;
// 监听鼠标滚轮事件
window.addEventListener("wheel",(e) => {if (isAnimate) return;isAnimate = true;if (e.deltaY > 0) {index.value++;if (index.value > scenes.length - 1) {index.value = 0;}}scenes[index.value].callback();setTimeout(() => {isAnimate = false;}, 1000);},false
);
接下来设置文字展示的样式:
<template><div class="scenes"style="position: fixed;left: 0;top: 0;z-index: 10;pointer-events: none;transition: all 1s;":style="{transform: `translate3d(0, ${-index * 100}vh, 0)`,}"><div v-for="item in scenes" style="width: 100vw;height: 100vh;"><h1 style="padding: 100px 50px; font-size: 50px; color: #fff">{{ item.text }}</h1></div></div>
</template>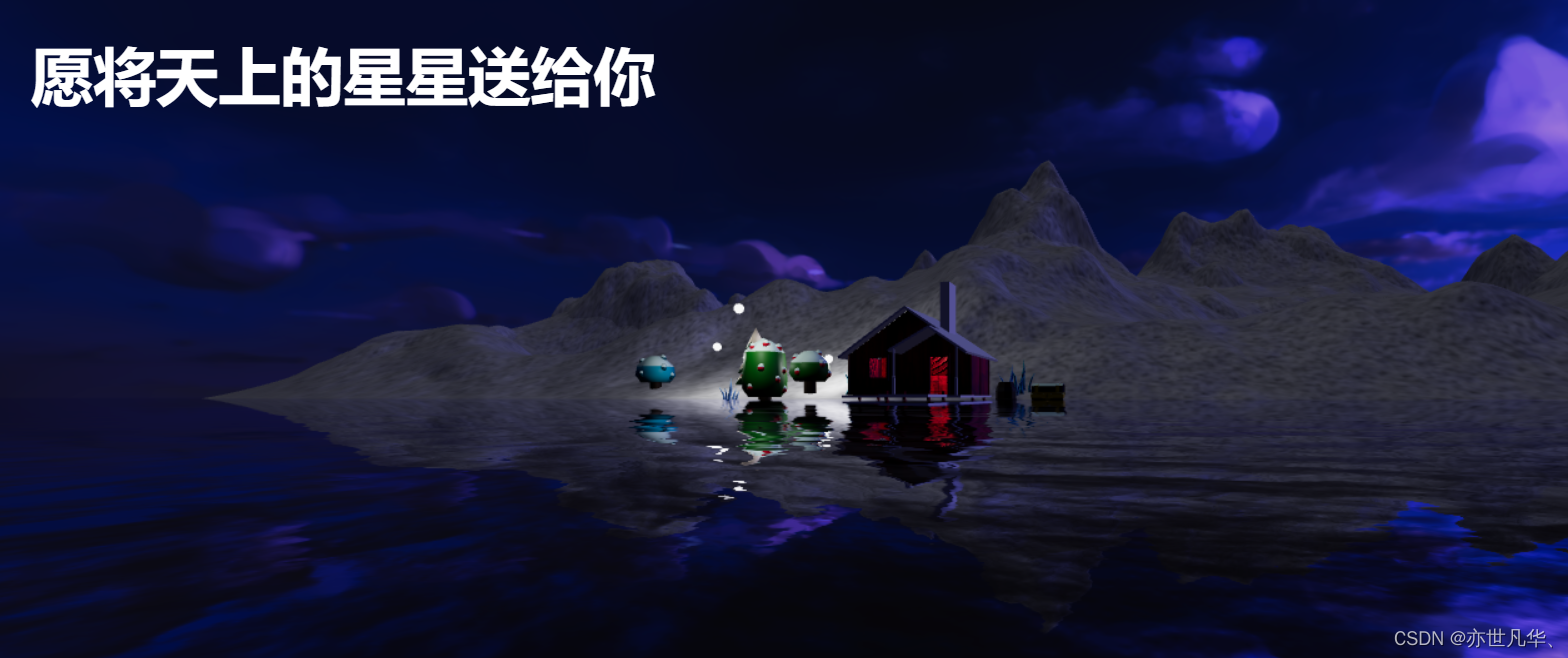
实现漫天星星和爱心样式
接下来通过InstancedMesh网格渲染优化方式,允许在渲染多个相同的模型时,只需要创建一个几何体和材质,然后通过实例化渲染多个对象,从而大大提高渲染性能。
// 实例化创建漫天星星
let starsInstance = new THREE.InstancedMesh(new THREE.SphereGeometry(0.1, 32, 32),new THREE.MeshStandardMaterial({color: 0xffffff,emissive: 0xffffff, //模拟自发光材质,并且不会受到光照的影响。emissiveIntensity: 10, // 控制发光效果强度}),100 // 创建100个
);
接下来将信息渲染到环境当中:
// 星星随机到天上
let starsArr = [];
let endArr = [];
for (let i = 0; i < 100; i++) {let x = Math.random() * 100 - 50;let y = Math.random() * 100 - 50;let z = Math.random() * 100 - 50;starsArr.push(new THREE.Vector3(x, y, z));let matrix = new THREE.Matrix4();matrix.setPosition(x, y, z);starsInstance.setMatrixAt(i, matrix);
}
scene.add(starsInstance);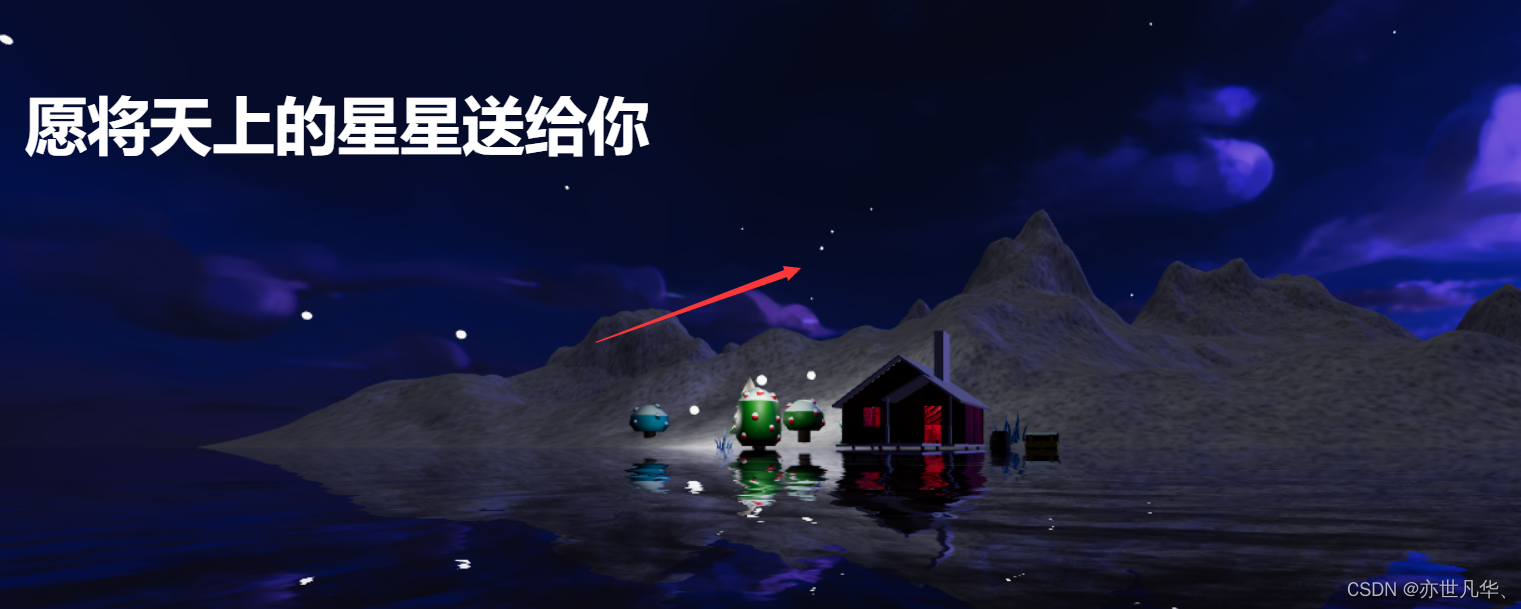
接下来实现爱心的效果:
// 创建爱心路径
let heartShape = new THREE.Shape();
heartShape.moveTo(25, 25);
heartShape.bezierCurveTo(25, 25, 20, 0, 0, 0);
heartShape.bezierCurveTo(-30, 0, -30, 35, -30, 35);
heartShape.bezierCurveTo(-30, 55, -10, 77, 25, 95);
heartShape.bezierCurveTo(60, 77, 80, 55, 80, 35);
heartShape.bezierCurveTo(80, 35, 80, 0, 50, 0);
heartShape.bezierCurveTo(35, 0, 25, 25, 25, 25);// 根据爱心路径获取点
let center = new THREE.Vector3(0, 2, 10);
for (let i = 0; i < 100; i++) {let point = heartShape.getPoint(i / 100);endArr.push(new THREE.Vector3(point.x * 0.1 + center.x,point.y * 0.1 + center.y,center.z));
}
接下啦创建爱心动画:
// 创建爱心动画
function makeHeart() {let params = {time: 0,};gsap.to(params, {time: 1,duration: 1,onUpdate: () => {for (let i = 0; i < 100; i++) {let x = starsArr[i].x + (endArr[i].x - starsArr[i].x) * params.time;let y = starsArr[i].y + (endArr[i].y - starsArr[i].y) * params.time;let z = starsArr[i].z + (endArr[i].z - starsArr[i].z) * params.time;let matrix = new THREE.Matrix4();matrix.setPosition(x, y, z);starsInstance.setMatrixAt(i, matrix);}starsInstance.instanceMatrix.needsUpdate = true;},});
}function restoreHeart() {let params = {time: 0,};gsap.to(params, {time: 1,duration: 1,onUpdate: () => {for (let i = 0; i < 100; i++) {let x = endArr[i].x + (starsArr[i].x - endArr[i].x) * params.time;let y = endArr[i].y + (starsArr[i].y - endArr[i].y) * params.time;let z = endArr[i].z + (starsArr[i].z - endArr[i].z) * params.time;let matrix = new THREE.Matrix4();matrix.setPosition(x, y, z);starsInstance.setMatrixAt(i, matrix);}starsInstance.instanceMatrix.needsUpdate = true;},});
}
在场景中进行调用函数即可:
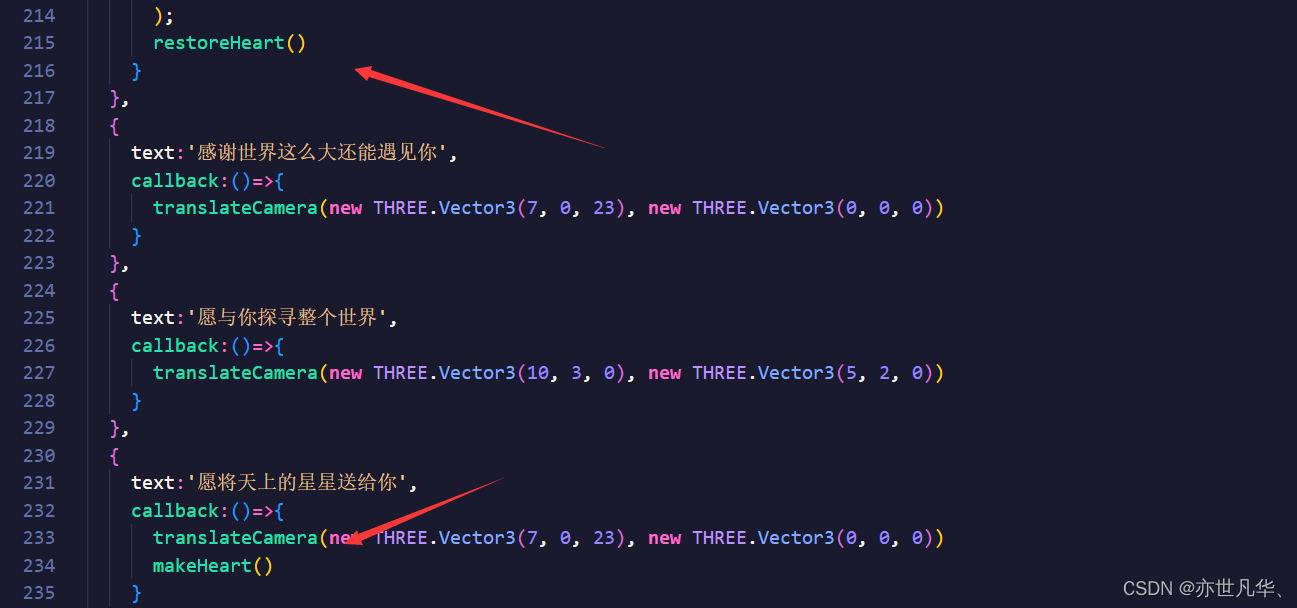
在定义一个定时器,让页面在刚加载的时候就开始调用,在设置一个监听函数,当用户点击屏幕的时候,定时器清除,然后用户可以自行手动去切换场景:
var timer = setInterval(function() {var scrollEvent = new WheelEvent('wheel', { deltaY: 100 });window.dispatchEvent(scrollEvent);
}, 3000);document.addEventListener('click', function() {clearInterval(timer);
});
相关效果图如下:

demo做完,给出本案例的完整代码:(获取素材也可以私信博主)
<template><div class="scenes"style="position: fixed;left: 0;top: 0;z-index: 10;pointer-events: none;transition: all 1s;":style="{transform: `translate3d(0, ${-index * 100}vh, 0)`,}"><div v-for="item in scenes" style="width: 100vw;height: 100vh;"><h1 style="padding: 100px 50px; font-size: 50px; color: #fff">{{ item.text }}</h1></div></div>
</template><script setup>
import { ref } from 'vue';
import * as THREE from 'three'
// 导入动画库
import gsap from 'gsap';
import { onMounted } from "vue";
// 加载GLTF模型
import { GLTFLoader } from 'three/examples/jsm/loaders/GLTFLoader';
// 解压GLTF模型
import { DRACOLoader } from 'three/examples/jsm/loaders/DRACOLoader';
// 导入控制器
import { OrbitControls } from 'three/examples/jsm/controls/OrbitControls';
// 解析 HDR 纹理数据
import { RGBELoader } from 'three/examples/jsm/loaders/RGBELoader'
// 导入水面
import { Water } from 'three/examples/jsm/objects/Water2'// 初始化场景
const scene = new THREE.Scene()
// 初始化相机
const camera = new THREE.PerspectiveCamera(75,window.innerWidth/window.innerHeight,0.1,1000)
camera.position.set(-3.23,2.98,4.06)
camera.updateProjectionMatrix()// 初始化渲染器
const renderer = new THREE.WebGLRenderer({antialias: true // 设置抗锯齿
})
renderer.setSize(window.innerWidth,window.innerHeight)
document.body.appendChild(renderer.domElement)// 监听页面变化
window.addEventListener("resize",()=>{  renderer.setSize(window.innerWidth,window.innerHeight)camera.aspect = window.innerWidth/window.innerHeightcamera.updateProjectionMatrix()
})// 设置色调映射
renderer.toneMapping = THREE.ACESFilmicToneMapping // 色调映射技术,是在电影和电视行业中广泛使用的一种技术
renderer.toneMappingExposure = 0.3 // 色调亮光程度
// 设置渲染器允许阴影效果
renderer.shadowMap.enabled = true
renderer.physicallyCorrectLights = true// 初始化控制器
const controls = new OrbitControls(camera,renderer.domElement)
controls.target.set(-8,2,0)
controls.enableDamping = true // 设置控制阻尼const render = () =>{ requestAnimationFrame(render)renderer.render(scene,camera)controls.update()
}onMounted(()=>{render()
})// 初始化loader
const dracoLoader = new DRACOLoader()
dracoLoader.setDecoderPath("/draco/")
const gltfLoader = new GLTFLoader()
gltfLoader.setDRACOLoader(dracoLoader)
// 加载模型
gltfLoader.load("./model/scene.glb",(gltf)=>{const model = gltf.scenemodel.traverse((child)=>{if(child.name === 'Plane'){child.visible = false}// 设置物体是允许接收和投射阴影的if(child.isMesh){child.castShadow = truechild.receiveShadow = true}})scene.add(model)
})// 创建水面
const waterGeometry = new THREE.CircleGeometry(100,100)
const water = new Water(waterGeometry,{textureWidth: 1024,textureHeight: 1024,color: 0xeeeeff,flowDirection: new THREE.Vector2(1,1),scale: 100
})
water.rotation.x = -Math.PI /2
water.position.y = -0.1
scene.add(water)// 添加平行光
const light = new THREE.DirectionalLight(0xffffff,1)
light.position.set(0,50,0)
scene.add(light)
// 添加点光源
const pointLight = new THREE.PointLight(0xffffff,50,10)
pointLight.position.set(0.1, 2.4, 0)
pointLight.castShadow = true
scene.add(pointLight)// 创建点光源组
const pointLightGroup = new THREE.Group();
pointLightGroup.position.set(-8, 2.5, -1.5);
let radius = 3;
let pointLightArr = [];
for (let i = 0; i < 3; i++) {// 创建球体当灯泡const sphereGeometry = new THREE.SphereGeometry(0.2, 32, 32);const sphereMaterial = new THREE.MeshStandardMaterial({color: 0xffffff,emissive: 0xffffff,emissiveIntensity: 10,});const sphere = new THREE.Mesh(sphereGeometry, sphereMaterial);pointLightArr.push(sphere);sphere.position.set(radius * Math.cos((i * 2 * Math.PI) / 3),Math.cos((i * 2 * Math.PI) / 3),radius * Math.sin((i * 2 * Math.PI) / 3));let pointLight = new THREE.PointLight(0xffffff, 50);sphere.add(pointLight);pointLightGroup.add(sphere);
}
scene.add(pointLightGroup);// 使用补间函数,从0到2π,使灯泡旋转
let options = {angle: 0,
};
gsap.to(options, {angle: Math.PI * 2,duration: 10,repeat: -1,ease: "linear",onUpdate: () => {pointLightGroup.rotation.y = options.angle;pointLightArr.forEach((item, index) => {item.position.set(radius * Math.cos((index * 2 * Math.PI) / 3),Math.cos((index * 2 * Math.PI) / 3 + options.angle * 5),radius * Math.sin((index * 2 * Math.PI) / 3));});},
});// 加载纹理贴图
let rgbeLoader = new RGBELoader()
rgbeLoader.load('./textures/sky.hdr',(texture)=>{texture.mapping = THREE.EquirectangularReflectionMappingscene.background = texturescene.environment = texture
})// 使用补间动画移动相机
let timeLine1 = gsap.timeline()
let timeLine2 = gsap.timeline()
// 定义相机移动函数
const translateCamera = (position,target) =>{ timeLine1.to(camera.position, {x: position.x,y: position.y,z: position.z,duration: 1,ease: "power2.inOut",});timeLine2.to(controls.target, {x: target.x,y: target.y,z: target.z,duration: 1,ease: "power2.inOut",});
}// 添加文字场景
let scenes = [{text:'圣诞快乐',callback:()=>{// 执行函数切换位置translateCamera(new THREE.Vector3(-3.23, 3, 4.06),new THREE.Vector3(-8, 2, 0));restoreHeart()}},{text:'感谢世界这么大还能遇见你',callback:()=>{translateCamera(new THREE.Vector3(7, 0, 23), new THREE.Vector3(0, 0, 0))}},{text:'愿与你探寻整个世界',callback:()=>{translateCamera(new THREE.Vector3(10, 3, 0), new THREE.Vector3(5, 2, 0))}},{text:'愿将天上的星星送给你',callback:()=>{translateCamera(new THREE.Vector3(7, 0, 23), new THREE.Vector3(0, 0, 0))makeHeart()}},{text:'愿永远和你在一起',callback:()=>{translateCamera(new THREE.Vector3(-20, 1.3, 6.6),new THREE.Vector3(5, 2, 0));}},
]let index = ref(0)
let isAnimate = false;
// 监听鼠标滚轮事件
window.addEventListener("wheel",(e) => {if (isAnimate) return;isAnimate = true;if (e.deltaY > 0) {index.value++;if (index.value > scenes.length - 1) {index.value = 0;}}scenes[index.value].callback();setTimeout(() => {isAnimate = false;}, 1000);},false
);// 实例化创建漫天星星
let starsInstance = new THREE.InstancedMesh(new THREE.SphereGeometry(0.1, 32, 32),new THREE.MeshStandardMaterial({color: 0xffffff,emissive: 0xffffff, //模拟自发光材质,并且不会受到光照的影响。emissiveIntensity: 10, // 控制发光效果强度}),100 // 创建100个
);
// 星星随机到天上
let starsArr = [];
let endArr = [];
for (let i = 0; i < 100; i++) {let x = Math.random() * 100 - 50;let y = Math.random() * 100 - 50;let z = Math.random() * 100 - 50;starsArr.push(new THREE.Vector3(x, y, z));let matrix = new THREE.Matrix4();matrix.setPosition(x, y, z);starsInstance.setMatrixAt(i, matrix);
}
scene.add(starsInstance);// 创建爱心路径
let heartShape = new THREE.Shape();
heartShape.moveTo(25, 25);
heartShape.bezierCurveTo(25, 25, 20, 0, 0, 0);
heartShape.bezierCurveTo(-30, 0, -30, 35, -30, 35);
heartShape.bezierCurveTo(-30, 55, -10, 77, 25, 95);
heartShape.bezierCurveTo(60, 77, 80, 55, 80, 35);
heartShape.bezierCurveTo(80, 35, 80, 0, 50, 0);
heartShape.bezierCurveTo(35, 0, 25, 25, 25, 25);// 根据爱心路径获取点
let center = new THREE.Vector3(0, 2, 10);
for (let i = 0; i < 100; i++) {let point = heartShape.getPoint(i / 100);endArr.push(new THREE.Vector3(point.x * 0.1 + center.x,point.y * 0.1 + center.y,center.z));
}// 创建爱心动画
function makeHeart() {let params = {time: 0,};gsap.to(params, {time: 1,duration: 1,onUpdate: () => {for (let i = 0; i < 100; i++) {let x = starsArr[i].x + (endArr[i].x - starsArr[i].x) * params.time;let y = starsArr[i].y + (endArr[i].y - starsArr[i].y) * params.time;let z = starsArr[i].z + (endArr[i].z - starsArr[i].z) * params.time;let matrix = new THREE.Matrix4();matrix.setPosition(x, y, z);starsInstance.setMatrixAt(i, matrix);}starsInstance.instanceMatrix.needsUpdate = true;},});
}function restoreHeart() {let params = {time: 0,};gsap.to(params, {time: 1,duration: 1,onUpdate: () => {for (let i = 0; i < 100; i++) {let x = endArr[i].x + (starsArr[i].x - endArr[i].x) * params.time;let y = endArr[i].y + (starsArr[i].y - endArr[i].y) * params.time;let z = endArr[i].z + (starsArr[i].z - endArr[i].z) * params.time;let matrix = new THREE.Matrix4();matrix.setPosition(x, y, z);starsInstance.setMatrixAt(i, matrix);}starsInstance.instanceMatrix.needsUpdate = true;},});
}var timer = setInterval(function() {var scrollEvent = new WheelEvent('wheel', { deltaY: 100 });window.dispatchEvent(scrollEvent);
}, 3000);document.addEventListener('click', function() {clearInterval(timer);
});</script>
<style lang="less" scoped></style>