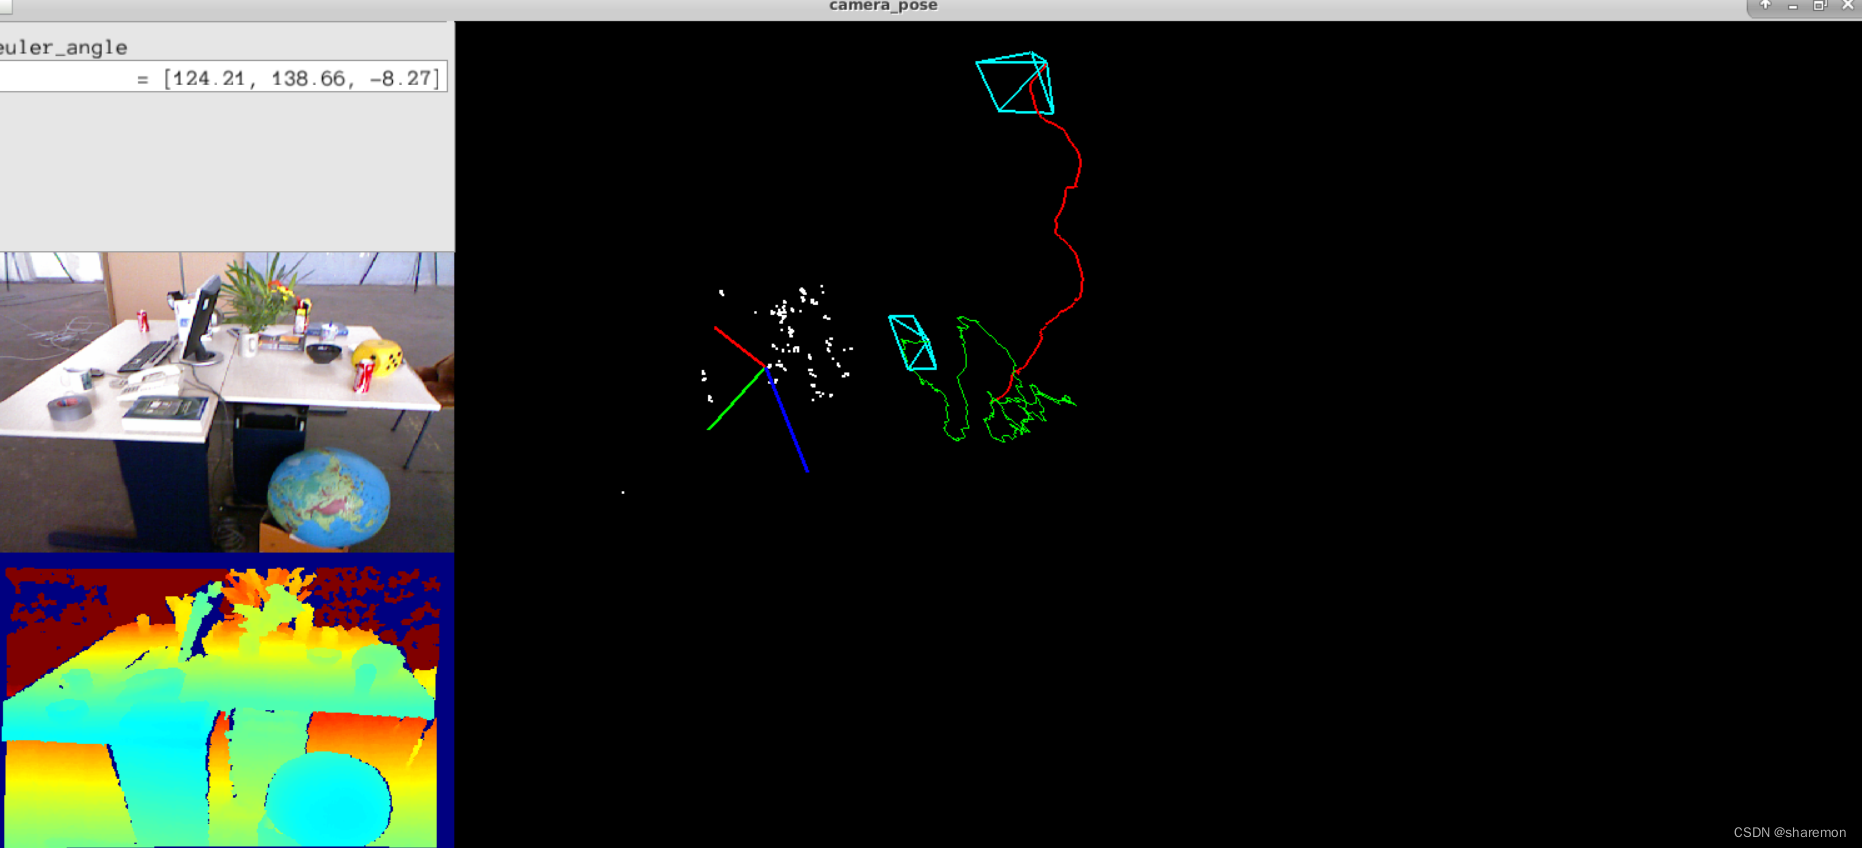
v0.1版本的oSLAM实现了基于orb特征点的简单视觉里程计,通过连续两帧的rgbd数据实现相机相对位姿的估计。
这部分理论上相对简单一点,咱们就直接上实现。
- VisualOdometer类
VisualOdometer.hpp
#pragma once
#include <vector>
#include <opencv2/opencv.hpp>
#include <Eigen/Core>
#include <Eigen/Geometry>
#include "Frame.hpp"namespace oSLAM
{class VisualOdometer{private:std::vector<Frame> frames;int max_key_points_num;double cx, cy, fx, fy;double depth_scale;std::vector<cv::DMatch> matches;void feature_extract(const cv::Mat& rgb, Frame& frame);void calc_depth(const cv::Mat& depth, Frame& frame);void feature_match(const Frame& ref, const Frame& cur, std::vector<cv::DMatch>& matches);void calc_pose_relative(const Frame& ref, Frame& cur, const std::vector<cv::DMatch>& matches);void pose_estimation_3d2d(const std::vector<cv::Point3d> &pts1, const std::vector<cv::Point2d> &pts2, cv::Mat &R, cv::Mat &t);void pose_estimation_3d3d(const std::vector<cv::Point3d> &pts1, const std::vector<cv::Point3d> &pts2, cv::Mat &R, cv::Mat &t);public:void add(double timestamp, const cv::Mat &rgb, const cv::Mat& depth);void set_pose(int frame_idx, const cv::Mat& R, const cv::Mat& T);void get_pose(int frame_idx, cv::Mat& R, cv::Mat& T);void get_3d_points(int frame_idx, std::vector<cv::Point3d> &key_points_3d);VisualOdometer(int max_key_points_num, double cx, double cy, double fx, double fy, double depth_scale);~VisualOdometer();};
}
VisualOdometer.cpp
#include "VisualOdometer.hpp"
#include <Eigen/Core>
#include <Eigen/Dense>
#include <Eigen/SVD>using namespace oSLAM;
using namespace std;
using namespace cv;VisualOdometer::VisualOdometer(int max_key_points_num, double cx, double cy, double fx, double fy, double depth_scale)
{VisualOdometer::max_key_points_num = max_key_points_num;VisualOdometer::cx = cx;VisualOdometer::cy = cy;VisualOdometer::fx = fx;VisualOdometer::fy = fy;VisualOdometer::depth_scale = depth_scale;
}VisualOdometer::~VisualOdometer()
{
}void VisualOdometer::feature_extract(const cv::Mat &rgb, Frame &frame)
{Ptr<ORB> orb_detector = ORB::create(max_key_points_num);orb_detector->detect(rgb, frame.key_points);orb_detector->compute(rgb, frame.key_points, frame.descriptors);
}void VisualOdometer::calc_depth(const cv::Mat &depth, Frame &frame)
{for (int i=0;i<frame.key_points.size();i++){double x = frame.key_points[i].pt.x;double y = frame.key_points[i].pt.y;double dis = depth.at<uint16_t>(int(y),int(x)) / depth_scale;frame.key_points_3d.push_back(Point3d((x-cx)/fx*dis, (y-cy)/fy*dis, dis));}
}void VisualOdometer::pose_estimation_3d2d(const std::vector<cv::Point3d> &pts1, const std::vector<cv::Point2d> &pts2, cv::Mat &R, cv::Mat &t)
{// 利用PnP求解位姿初值Mat K = (Mat_<double>(3,3) << fx, 0, cx, 0, fy, cy,0, 0, 1);Mat rvec, tvec;solvePnPRansac(pts1, pts2, K, Mat::zeros(1, 5, CV_64FC1), rvec, tvec);Rodrigues(rvec, R);t = (Mat_<double>(3,1) << tvec.at<double>(0), tvec.at<double>(1), tvec.at<double>(2));// 优化位姿和3D点坐标// ToDo
}void VisualOdometer::pose_estimation_3d3d(const std::vector<cv::Point3d> &pts1, const std::vector<cv::Point3d> &pts2, cv::Mat &R, cv::Mat &t)
{Point3d p1(0, 0, 0), p2(0, 0, 0); // center of massint N = pts1.size();for (int i = 0; i < N; i++){p1 += pts1[i];p2 += pts2[i];}p1 = Point3d(Vec3d(p1) / N);p2 = Point3d(Vec3d(p2) / N);vector<Point3d> q1(N), q2(N); // remove the centerfor (int i = 0; i < N; i++){q1[i] = pts1[i] - p1;q2[i] = pts2[i] - p2;}// compute q1*q2^TEigen::Matrix3d W = Eigen::Matrix3d::Zero();for (int i = 0; i < N; i++){W += Eigen::Vector3d(q1[i].x, q1[i].y, q1[i].z) * Eigen::Vector3d(q2[i].x, q2[i].y, q2[i].z).transpose();}// SVD on WEigen::JacobiSVD<Eigen::Matrix3d> svd(W, Eigen::ComputeFullU | Eigen::ComputeFullV);Eigen::Matrix3d U = svd.matrixU();Eigen::Matrix3d V = svd.matrixV();Eigen::Matrix3d R_ = U * (V.transpose());if (R_.determinant() < 0){R_ = -R_;}Eigen::Vector3d t_ = Eigen::Vector3d(p1.x, p1.y, p1.z) - R_ * Eigen::Vector3d(p2.x, p2.y, p2.z);// convert to cv::MatR = (Mat_<double>(3, 3) << R_(0, 0), R_(0, 1), R_(0, 2),R_(1, 0), R_(1, 1), R_(1, 2),R_(2, 0), R_(2, 1), R_(2, 2));t = (Mat_<double>(3, 1) << t_(0, 0), t_(1, 0), t_(2, 0));
}void VisualOdometer::calc_pose_relative(const Frame& ref, Frame& cur, const std::vector<cv::DMatch>& matches)
{vector<Point3d> ref_key_points_3d, cur_key_points_3d;vector<Point2d> ref_key_points_2d, cur_key_points_2d;// 筛选3D点for(auto match : matches){Point3d ref_key_point_3d = ref.key_points_3d[match.queryIdx];Point3d cur_key_point_3d = cur.key_points_3d[match.trainIdx];if (ref_key_point_3d.z == 0 || cur_key_point_3d.z == 0){continue;}ref_key_points_3d.push_back(ref_key_point_3d);cur_key_points_3d.push_back(cur_key_point_3d);ref_key_points_2d.push_back(ref.key_points[match.queryIdx].pt);cur_key_points_2d.push_back(cur.key_points[match.trainIdx].pt);}// 3D点计算位姿Mat R, T;//pose_estimation_3d3d(cur_key_points_3d, ref_key_points_3d, R, T);pose_estimation_3d2d(ref_key_points_3d, cur_key_points_2d, R, T);cur.R = R * ref.R;cur.T = R * ref.T + T;
}void VisualOdometer::feature_match(const Frame& ref, const Frame& cur, std::vector<cv::DMatch>& matches)
{vector<DMatch> initial_matches;BFMatcher matcher(NORM_HAMMING);matcher.match(ref.descriptors, cur.descriptors, initial_matches);double min_dis = initial_matches[0].distance;for(auto match : initial_matches){if (match.distance < min_dis)min_dis = match.distance;}matches.clear();for(auto match : initial_matches){if (match.distance <= MAX(min_dis * 2, 30))matches.push_back(match);}
}void VisualOdometer::add(double timestamp, const Mat &rgb, const Mat &depth)
{Frame frame;frame.time_stamp = timestamp;frame.rgb = rgb.clone();frame.depth = depth.clone();// 提取rgb图像的orb特征点VisualOdometer::feature_extract(rgb, frame);// 提取关键点的深度信息VisualOdometer::calc_depth(depth, frame);// 如果不是第一帧if (VisualOdometer::frames.size() == 0){frame.R = Mat::eye(3,3,CV_64FC1);frame.T = Mat::zeros(3,1,CV_64FC1);}else{// 当前帧与上一帧特征点匹配VisualOdometer::feature_match(VisualOdometer::frames[VisualOdometer::frames.size()-1], frame,VisualOdometer::matches);// 计算相对位姿关系VisualOdometer::calc_pose_relative(VisualOdometer::frames[VisualOdometer::frames.size()-1], frame,VisualOdometer::matches);}// 将当前帧加入队列VisualOdometer::frames.push_back(frame);
}void VisualOdometer::get_pose(int frame_idx, Mat &R, Mat &T)
{if (VisualOdometer::frames.size() <= abs(frame_idx)){R = Mat();T = Mat();return;}else{if (frame_idx >= 0){R = VisualOdometer::frames[frame_idx].R.clone();T = VisualOdometer::frames[frame_idx].T.clone();}else{R = VisualOdometer::frames[VisualOdometer::frames.size() + frame_idx].R.clone();T = VisualOdometer::frames[VisualOdometer::frames.size() + frame_idx].T.clone();}}
}void VisualOdometer::set_pose(int frame_idx, const cv::Mat& R, const cv::Mat& T)
{if (VisualOdometer::frames.size() <= abs(frame_idx)){return;}else{if (frame_idx >= 0){VisualOdometer::frames[frame_idx].R = R.clone();VisualOdometer::frames[frame_idx].T = T.clone();}else{VisualOdometer::frames[VisualOdometer::frames.size() + frame_idx].R = R.clone();VisualOdometer::frames[VisualOdometer::frames.size() + frame_idx].T = T.clone();}}
}void VisualOdometer::get_3d_points(int frame_idx, std::vector<cv::Point3d> &key_points_3d)
{if (VisualOdometer::frames.size() <= abs(frame_idx)){key_points_3d.clear();return;}else{if (frame_idx >= 0){key_points_3d = VisualOdometer::frames[frame_idx].key_points_3d;}else{key_points_3d = VisualOdometer::frames[VisualOdometer::frames.size() + frame_idx].key_points_3d;}}
}
- Frame类
#pragma once
#include <vector>
#include <opencv2/opencv.hpp>namespace oSLAM
{class Frame{public:std::vector<cv::KeyPoint> key_points;cv::Mat descriptors;std::vector<cv::Point3d> key_points_3d;cv::Mat R;cv::Mat T;cv::Mat rgb;cv::Mat depth;double time_stamp;};
}
最终在rgbd_dataset_freiburg2_desk数据集上测试类一下效果,感觉有点拉,跑着跑着就飘了(红色的是真值,绿色的是计算结果),等实现了完整的vo在回来分析一下。

结果展示使用了Pangolin和yuntianli91的pangolin_tutorial


