目录
1. 介绍
2. 代码介绍
2.1 create_modules 部分
2.1.1 不同层的处理
2.1.2 信息的融合
2.1.3 yolo 层的处理
2.2 get_yolo_layers
2.3 前向传播
3. 完整代码
1. 介绍
根据 上一节 解析的cfg文件,本章将配置文件cfg 搭建YOLO V3 SPP网络
本章的代码经过了相应的更改
搭建网络的代码在models py文件下

YOLO V3 SPP 网络如下:

2. 代码介绍
因为搭建网络的代码较长,并且调用比较多,所以这里只介绍重点部分

2.1 create_modules 部分
首先,传入的参数是 解析的cfg配置文件 ,self.module_defs 是字典的形式,如下:

2.1.1 不同层的处理
首先,cfg中 [net] 的部分不需要,弹出就行了
![]()
遍历解析好的cfg配置文件字典,然后根据不同 [] 里面的key 去获取即可

例如卷积层:
注 :卷积 + BN + 激活函数

2.1.2 信息的融合
在yolo v3 spp中,信息的融合有两个:shortcut 和 spp 模块
其中,shortcut 是 高维和低维信息的add
spp 是高维和低维信息在channel维度 的concatenate

其中,FeatureConcat 为spp中的特征层拼接
spp 模块如下:

WeightedFeatureFusion 为shortcut 的add

2.1.3 yolo 层的处理
这里的yolo 层是对yolo网络输出进行后处理的操作,没有包括在网络中

YOLOLayer 大概就是训练的时候,怎么产生预测框,然后计算定位损失;在测试的时候,怎么将不同尺度的信息,还原回原来的图像上等等
具体的可以看这部分代码:
# yolo 的预测进行处理,不是yolo v3 spp的输出层
class YOLOLayer(nn.Module):def __init__(self, anchors, nc, stride):super(YOLOLayer, self).__init__()self.anchors = torch.Tensor(anchors)        # anchorsself.stride = stride                        # layer stride 特征图上一步对应原图上的步距 [32, 16, 8]self.na = 3                                 # 每一个cell里面预测3个 anchorsself.nc = nc                                # 预测类别的个数self.no = nc + 5                            # 每一个anchor预测的参数个数 ,(x,y,w,h+置信度+ nc)self.nx, self.ny, self.ng = 0, 0, (0, 0)    # initialize number of x, y gridpointsself.anchor_vec = self.anchors / self.stride    # 将anchors大小缩放到grid尺度self.anchor_wh = self.anchor_vec.view(1, self.na, 1, 1, 2)  # batch_size,3,grid_h, grid_w, anchor的w和hself.grid = Nonedef create_grids(self, ng=(13, 13), device="cpu"):self.nx, self.ny = ngself.ng = torch.tensor(ng, dtype=torch.float)# build xy offsets 构建每个cell处的anchor的xy偏移量(在feature map上的)if not self.training:  # 训练模式不需要回归到最终预测boxesyv, xv = torch.meshgrid([torch.arange(self.ny, device=device),torch.arange(self.nx, device=device)])# batch_size, na, grid_h, grid_w, whself.grid = torch.stack((xv, yv), 2).view((1, 1, self.ny, self.nx, 2)).float()if self.anchor_vec.device != device:self.anchor_vec = self.anchor_vec.to(device)self.anchor_wh = self.anchor_wh.to(device)def forward(self, p):bs, _, ny, nx = p.shape  # p为预测值,batch_size, predict_param(75), grid(13), grid(13)print(p.shape)if (self.nx, self.ny) != (nx, ny) or self.grid is None:  # fix no grid bugself.create_grids((nx, ny), p.device)# view: (batch_size, 75, 13, 13) -> (batch_size, 3, 75, 13, 13)# permute: (batch_size, 3, 75, 13, 13) -> (batch_size, 3, 13, 13, 75)# [bs, anchor, grid, grid, xywh + obj + classes]p = p.view(bs, self.na, self.no, self.ny, self.nx).permute(0, 1, 3, 4, 2).contiguous()  # permute 内存是不连续的,所以调用contiguous方法if self.training:return pelse:  # inference# p = [bs, anchor, grid, grid, xywh + obj + classes]io = p.clone()  # inference outputio[..., :2] = torch.sigmoid(io[..., :2]) + self.grid     # sigmoid(x,y) + cell坐标io[..., 2:4] = torch.exp(io[..., 2:4]) * self.anchor_wh  # exp(w,h) * anchor (w,h)io[..., :4] *= self.stride                  # 将cell坐标,换算映射回原图尺度torch.sigmoid_(io[..., 4:])return io.view(bs, -1, self.no), p  # view [1, 3, 13, 13, 25] as [1, 507, 25]
2.2 get_yolo_layers
这一层主要获得 yolo 层


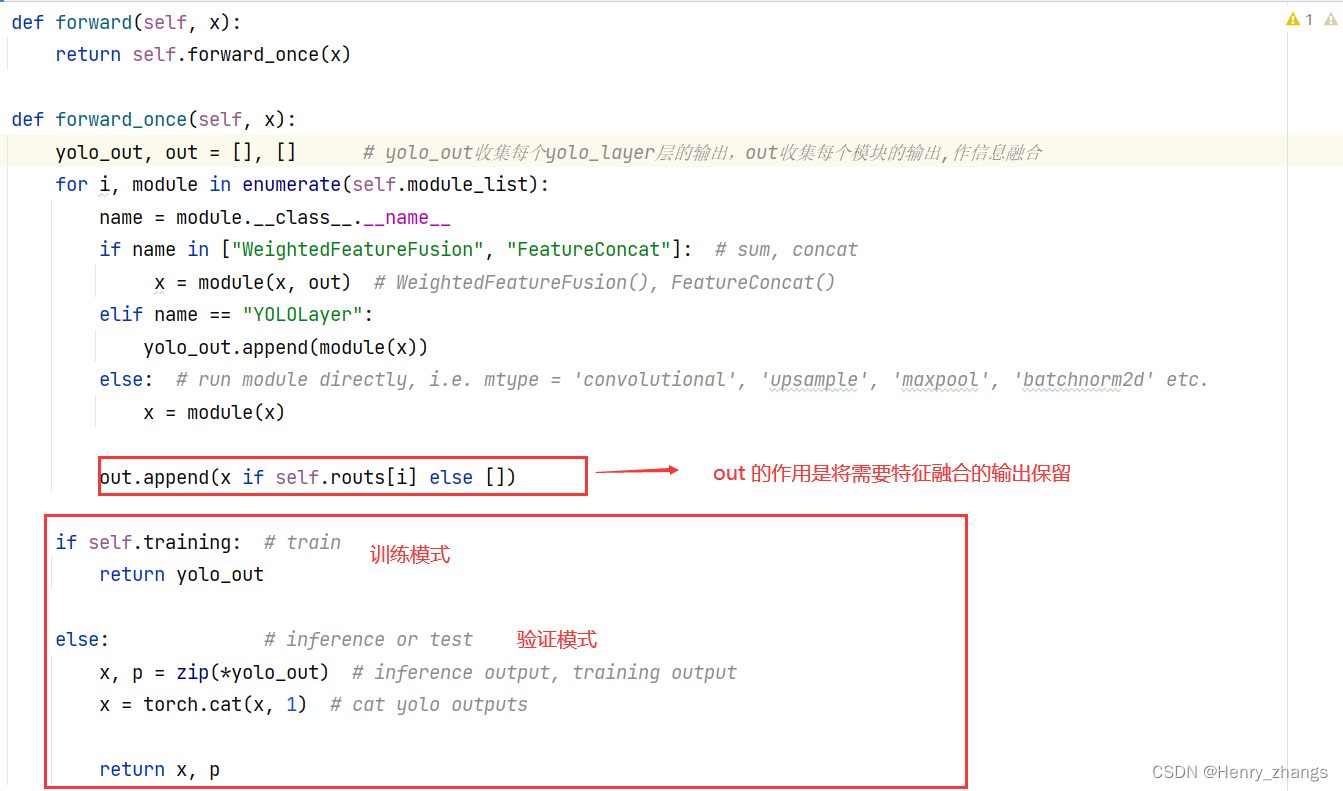
2.3 前向传播
如下:

3. 完整代码
代码如下:
import math
import torch.nn as nn
import torch
from build_utils.parse_config import parse_model_cfg    # 解析 cfg 的函数# 将多个特征矩阵在channel维度进行concatenate拼接
class FeatureConcat(nn.Module):def __init__(self, layers):super(FeatureConcat, self).__init__()self.layers = layers  # layer indicesself.multiple = len(layers) > 1  # multiple layers flagdef forward(self, x, outputs):      # x 不能删return torch.cat([outputs[i] for i in self.layers], 1) if self.multiple else outputs[self.layers[0]]# 将多个特征矩阵的值进行融合(add操作)
class WeightedFeatureFusion(nn.Module):def __init__(self, layers):super(WeightedFeatureFusion, self).__init__()self.layers = layers  # layer indicesself.n = len(layers) + 1  # number of layers 融合的特征矩阵个数def forward(self, x, outputs):for i in range(self.n - 1):a = outputs[self.layers[i]]  # feature to addx = x + areturn x# 根据解析的cfg 配置信息,逐层搭建yolo v3 spp网络
def create_modules(modules_defs: list):modules_defs.pop(0)         # 将第一个 [net] 信息删除,这里使用不到output_filters = [3]        # 对应卷积核的个数,第一个为输入的rgb 3通道module_list = nn.ModuleList()   # 网络的模块routs = []                 # 统计哪些特征层的输出会被后续的层使用到(可能是特征融合,也可能是拼接)yolo_index = -1for i, mdef in enumerate(modules_defs):         # 遍历搭建每个层结构modules = nn.Sequential()# 卷积层if mdef["type"] == "convolutional":bn = mdef["batch_normalize"]        # bn = 1使用 BN层,0为不启用BN层filters = mdef["filters"]           # 卷积核的个数k = mdef["size"]                    # 卷积核大小stride = mdef["stride"]             # stride 步距modules.add_module("Conv2d", nn.Conv2d(in_channels=output_filters[-1],out_channels=filters,kernel_size=k,stride=stride,padding=k // 2 if mdef["pad"] else 0,bias=not bn))if bn:      # 使用BN的话,卷积层后面要接BN层modules.add_module("BatchNorm2d", nn.BatchNorm2d(filters))else:       # 如果该卷积操作没有bn层,意味着该层为 yolo的 predictorrouts.append(i)if mdef["activation"] == "leaky":modules.add_module("activation", nn.LeakyReLU(0.1, inplace=True))else:       # 除了 yolo的 predictor,都是leaky激活pass# 最大池化层elif mdef["type"] == "maxpool":k = mdef["size"]            # kernel sizestride = mdef["stride"]modules = nn.MaxPool2d(kernel_size=k, stride=stride, padding=(k - 1) // 2)# 上采样层elif mdef["type"] == "upsample":stride = mdef["stride"]modules = nn.Upsample(scale_factor=stride)# routeelif mdef["type"] == "route":  # [-2],  [-1,-3,-5,-6], [-1, 61]layers = mdef["layers"]filters = sum([output_filters[l + 1 if l > 0 else l] for l in layers])      # 距离特征层的个数routs.extend([i + l if l < 0 else l for l in layers])modules = FeatureConcat(layers=layers)      # 特征层拼接# shortcut 结构elif mdef["type"] == "shortcut":layers = mdef["from"]               # 相对索引filters = output_filters[-1]routs.append(i + layers[0])modules = WeightedFeatureFusion(layers=layers)   # residual 的add操作# yolo 层elif mdef["type"] == "yolo":yolo_index += 1         # 记录是第几个yolo_layer [0, 1, 2]stride = [32, 16, 8]    # 不同尺度输出的下采样倍数# 对yolo的预测进行后处理modules = YOLOLayer(anchors=mdef["anchors"][mdef["mask"]],      # anchor listnc=mdef["classes"],                         # number of classesstride=stride[yolo_index])try:j = -1# bias: shape(255,) 索引0对应Sequential中的Conv2d# view: shape(3, 85)b = module_list[j][0].bias.view(modules.na, -1)b.data[:, 4] += -4.5  # objb.data[:, 5:] += math.log(0.6 / (modules.nc - 0.99))  # cls (sigmoid(p) = 1/nc)module_list[j][0].bias = torch.nn.Parameter(b.view(-1), requires_grad=True)except Exception as e:print('WARNING: smart bias initialization failure.', e)else:print("Warning: Unrecognized Layer Type: " + mdef["type"])# 添加模块module_list.append(modules)output_filters.append(filters)# 相对索引找到信息融合的层routs_binary = [False] * len(modules_defs)for i in routs:routs_binary[i] = Truereturn module_list, routs_binary# yolo 的预测进行处理,不是yolo v3 spp的输出层
class YOLOLayer(nn.Module):def __init__(self, anchors, nc, stride):super(YOLOLayer, self).__init__()self.anchors = torch.Tensor(anchors)        # anchorsself.stride = stride                        # layer stride 特征图上一步对应原图上的步距 [32, 16, 8]self.na = 3                                 # 每一个cell里面预测3个 anchorsself.nc = nc                                # 预测类别的个数self.no = nc + 5                            # 每一个anchor预测的参数个数 ,(x,y,w,h+置信度+ nc)self.nx, self.ny, self.ng = 0, 0, (0, 0)    # initialize number of x, y gridpointsself.anchor_vec = self.anchors / self.stride    # 将anchors大小缩放到grid尺度self.anchor_wh = self.anchor_vec.view(1, self.na, 1, 1, 2)  # batch_size,3,grid_h, grid_w, anchor的w和hself.grid = Nonedef create_grids(self, ng=(13, 13), device="cpu"):self.nx, self.ny = ngself.ng = torch.tensor(ng, dtype=torch.float)# build xy offsets 构建每个cell处的anchor的xy偏移量(在feature map上的)if not self.training:  # 训练模式不需要回归到最终预测boxesyv, xv = torch.meshgrid([torch.arange(self.ny, device=device),torch.arange(self.nx, device=device)])# batch_size, na, grid_h, grid_w, whself.grid = torch.stack((xv, yv), 2).view((1, 1, self.ny, self.nx, 2)).float()if self.anchor_vec.device != device:self.anchor_vec = self.anchor_vec.to(device)self.anchor_wh = self.anchor_wh.to(device)def forward(self, p):bs, _, ny, nx = p.shape  # p为预测值,batch_size, predict_param(75), grid(13), grid(13)if (self.nx, self.ny) != (nx, ny) or self.grid is None:  # fix no grid bugself.create_grids((nx, ny), p.device)# view: (batch_size, 75, 13, 13) -> (batch_size, 3, 75, 13, 13)# permute: (batch_size, 3, 75, 13, 13) -> (batch_size, 3, 13, 13, 75)# [bs, anchor, grid, grid, xywh + obj + classes]p = p.view(bs, self.na, self.no, self.ny, self.nx).permute(0, 1, 3, 4, 2).contiguous()  # permute 内存是不连续的,所以调用contiguous方法if self.training:return pelse:  # inference# p = [bs, anchor, grid, grid, xywh + obj + classes]io = p.clone()  # inference outputio[..., :2] = torch.sigmoid(io[..., :2]) + self.grid     # sigmoid(x,y) + cell坐标io[..., 2:4] = torch.exp(io[..., 2:4]) * self.anchor_wh  # exp(w,h) * anchor (w,h)io[..., :4] *= self.stride                  # 将cell坐标,换算映射回原图尺度torch.sigmoid_(io[..., 4:])return io.view(bs, -1, self.no), p  # view [1, 3, 13, 13, 25] as [1, 507, 25]# 获取网络中三个"YOLOLayer"模块对应的索引
def get_yolo_layers(self):return [i for i, m in enumerate(self.module_list) if m.__class__.__name__ == 'YOLOLayer']  # [89, 101, 113]# Darknet 网络
class Darknet(nn.Module):def __init__(self, cfg):        # 需要传入yolo v3 spp 的配置文件super(Darknet, self).__init__()self.module_defs = parse_model_cfg(cfg)                # 解析网络对应的.cfg文件self.module_list, self.routs = create_modules(self.module_defs)   # 根据解析的网络结构一层一层去搭建self.yolo_layers = get_yolo_layers(self)    # 获取所有YOLOLayer层的索引def forward(self, x):return self.forward_once(x)def forward_once(self, x):yolo_out, out = [], []      # yolo_out收集每个yolo_layer层的输出,out收集每个模块的输出,作信息融合for i, module in enumerate(self.module_list):name = module.__class__.__name__if name in ["WeightedFeatureFusion", "FeatureConcat"]:  # sum, concatx = module(x, out)  # WeightedFeatureFusion(), FeatureConcat()elif name == "YOLOLayer":yolo_out.append(module(x))else:  # run module directly, i.e. mtype = 'convolutional', 'upsample', 'maxpool', 'batchnorm2d' etc.x = module(x)out.append(x if self.routs[i] else [])if self.training:  # trainreturn yolo_outelse:              # inference or testx, p = zip(*yolo_out)  # inference output, training outputx = torch.cat(x, 1)  # cat yolo outputsreturn x, p# net = Darknet(cfg='./cfg/my_yolov3.cfg')        # 建立yolo v3 spp网络
# from torchsummary import summary
# print(summary(model=net.cuda(),input_size=(3,512,512)))


