文章目录
- 1.引入
- 2.静止的方块
- 3.移动的方块
1.引入
那么我们今天就来实现一下矩形的移动
注意:本篇文章的内容都是基于此前用空格控制的小球的基础上进行开发的,详见:C++图形开发(8):空格键控制小球起跳
先来回忆下之前的代码吧~
#include<graphics.h>
#include<conio.h>
#include<stdio.h>int main() {double width, height;//定义画面长度、宽度width = 600;height = 400;initgraph(width, height); double ball_x, ball_y,ball_vy, r,g;//定义小球x轴、y轴、y轴方向的速度、半径、重力加速度g = 0.6;r = 20;ball_x = width / 4;//x坐标等于整个画面x轴长度的四分之一ball_y = height - r;//y坐标等于画面的y轴长度减去圆的半径(保证圆在画面的最底端)ball_vy = 0; //最初小球落在地面上时y轴方向的速度为0while (1){if (_kbhit()) {char input = _getch();if (input == ' ') {ball_vy = -16;}}ball_vy = ball_vy + g;//根据牛顿力学定律得ball_y = ball_y + ball_vy;//小球y轴方向的变化if (ball_y >= height - r) {ball_vy = 0;//小球落地以后速度清零ball_y = height - r;}cleardevice();fillcircle(ball_x, ball_y, r);Sleep(10);}_getch();closegraph();return 0;
}
2.静止的方块
首先我们要定义所需的变量:
double rect_left_x, rect_top_y, rect_width, rect_height;
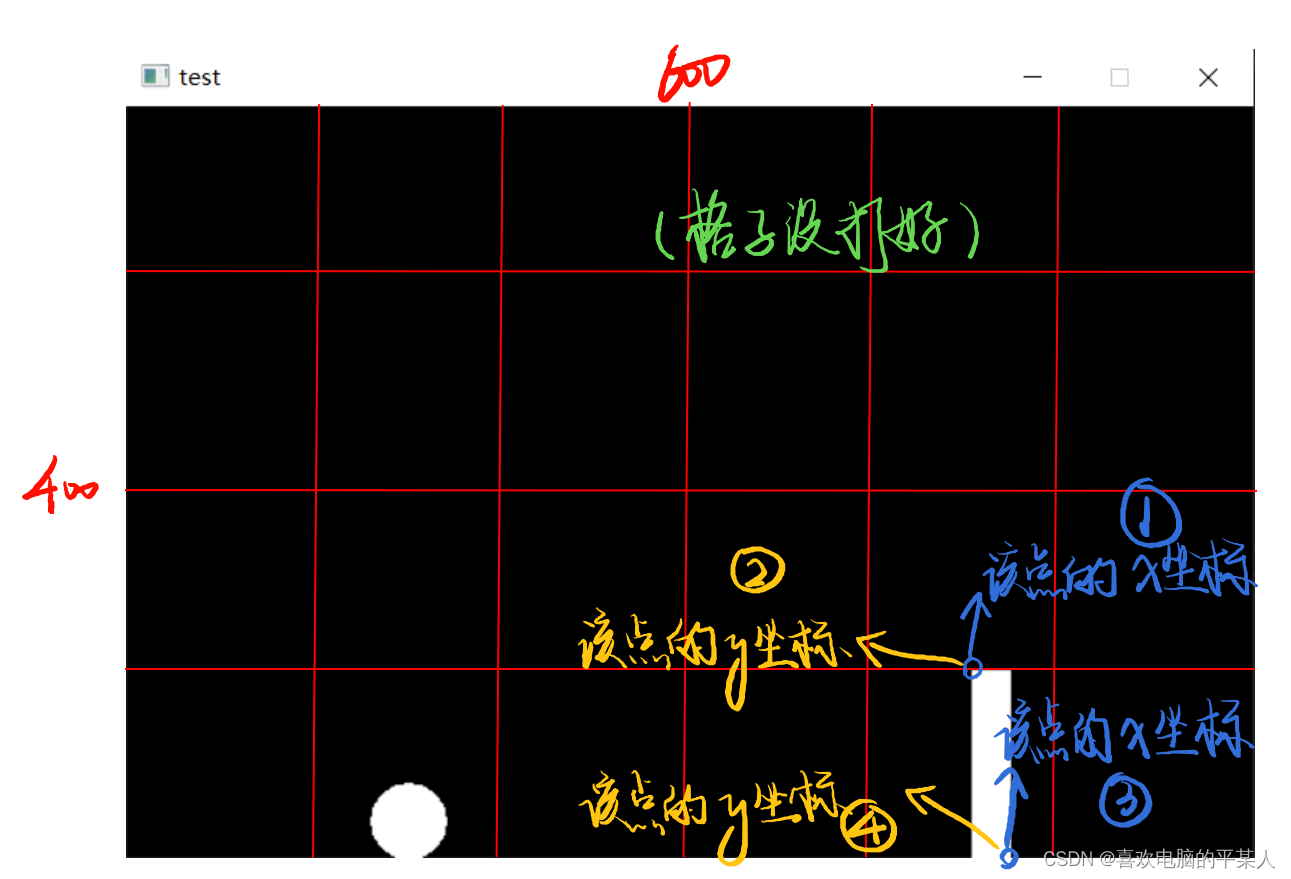
这几个变量的含义:

①:rect_left_x
②:rect_top_y
③:rect_width
④:rect_height
那么接下来我们就来给这些变量赋一下值:(这里建议按我的方法赋,来实现最终呈现的效果可以随整个屏幕宽度、长度的变化而进行自适应)
rect_width = 20;
rect_height = 100;
rect_left_x = width * 3 / 4;
rect_top_y = height - rect_height;
3.移动的方块
我们已经实现了按下空格键使小球跳起,接下来我们就来实现方块的移动
接下来我们定义一个变量来控制方块的x轴方向的移动速度(当然,方块也不会涉及到y轴方向的移动速度):
double rect_vx = -3;
再把方块的移动加上,整段代码就是:
#include<graphics.h>
#include<conio.h>
#include<stdio.h>int main() {double width, height;//定义画面长度、宽度width = 600;height = 400;initgraph(width, height); double ball_x, ball_y,ball_vy, r,g;//定义小球x轴、y轴、y轴方向的速度、半径、重力加速度g = 0.6;r = 20;ball_x = width / 4;//x坐标等于整个画面x轴长度的四分之一ball_y = height - r;//y坐标等于画面的y轴长度减去圆的半径(保证圆在画面的最底端)ball_vy = 0; //最初小球落在地面上时y轴方向的速度为0double rect_left_x, rect_top_y, rect_width, rect_height;//定义方块的各个位置变量rect_width = 20;rect_height = 100;rect_left_x = width * 3 / 4;rect_top_y = height - rect_height;double rect_vx = -3;//定义方块的移动速度while (1){if (_kbhit()) {char input = _getch();if (input == ' ') {ball_vy = -16;}}ball_vy = ball_vy + g;//根据牛顿力学定律得ball_y = ball_y + ball_vy;//小球y轴方向的变化if (ball_y >= height - r) {ball_vy = 0;//小球落地以后速度清零ball_y = height - r;}rect_left_x = rect_left_x + rect_vx;cleardevice();fillrectangle(rect_left_x, height - rect_height, rect_left_x + rect_width, height);fillcircle(ball_x, ball_y, r);Sleep(10);}_getch();closegraph();return 0;
}
当然,或许你已经发现了,这样的方块从右向左运动到头就会消失,因此,我们要向之前的小球一样,加一个if-else语句:
if (rect_left_x <= 0) {rect_left_x = width;
}
那么完整的代码就是:
#include<graphics.h>
#include<conio.h>
#include<stdio.h>int main() {double width, height;//定义画面长度、宽度width = 600;height = 400;initgraph(width, height); double ball_x, ball_y,ball_vy, r,g;//定义小球x轴、y轴、y轴方向的速度、半径、重力加速度g = 0.6;r = 20;ball_x = width / 4;//x坐标等于整个画面x轴长度的四分之一ball_y = height - r;//y坐标等于画面的y轴长度减去圆的半径(保证圆在画面的最底端)ball_vy = 0; //最初小球落在地面上时y轴方向的速度为0double rect_left_x, rect_top_y, rect_width, rect_height;//定义方块的各个位置变量rect_width = 20;rect_height = 100;rect_left_x = width * 3 / 4;rect_top_y = height - rect_height;double rect_vx = -3;//定义方块的移动速度while (1){if (_kbhit()) {char input = _getch();if (input == ' ') {ball_vy = -16;}}ball_vy = ball_vy + g;//根据牛顿力学定律得ball_y = ball_y + ball_vy;//小球y轴方向的变化if (ball_y >= height - r) {ball_vy = 0;//小球落地以后速度清零ball_y = height - r;}rect_left_x = rect_left_x + rect_vx;if (rect_left_x <= 0) {rect_left_x = width;//方块消失以后重新出现}cleardevice();fillrectangle(rect_left_x, height - rect_height, rect_left_x + rect_width, height);fillcircle(ball_x, ball_y, r);Sleep(10);}_getch();closegraph();return 0;
}
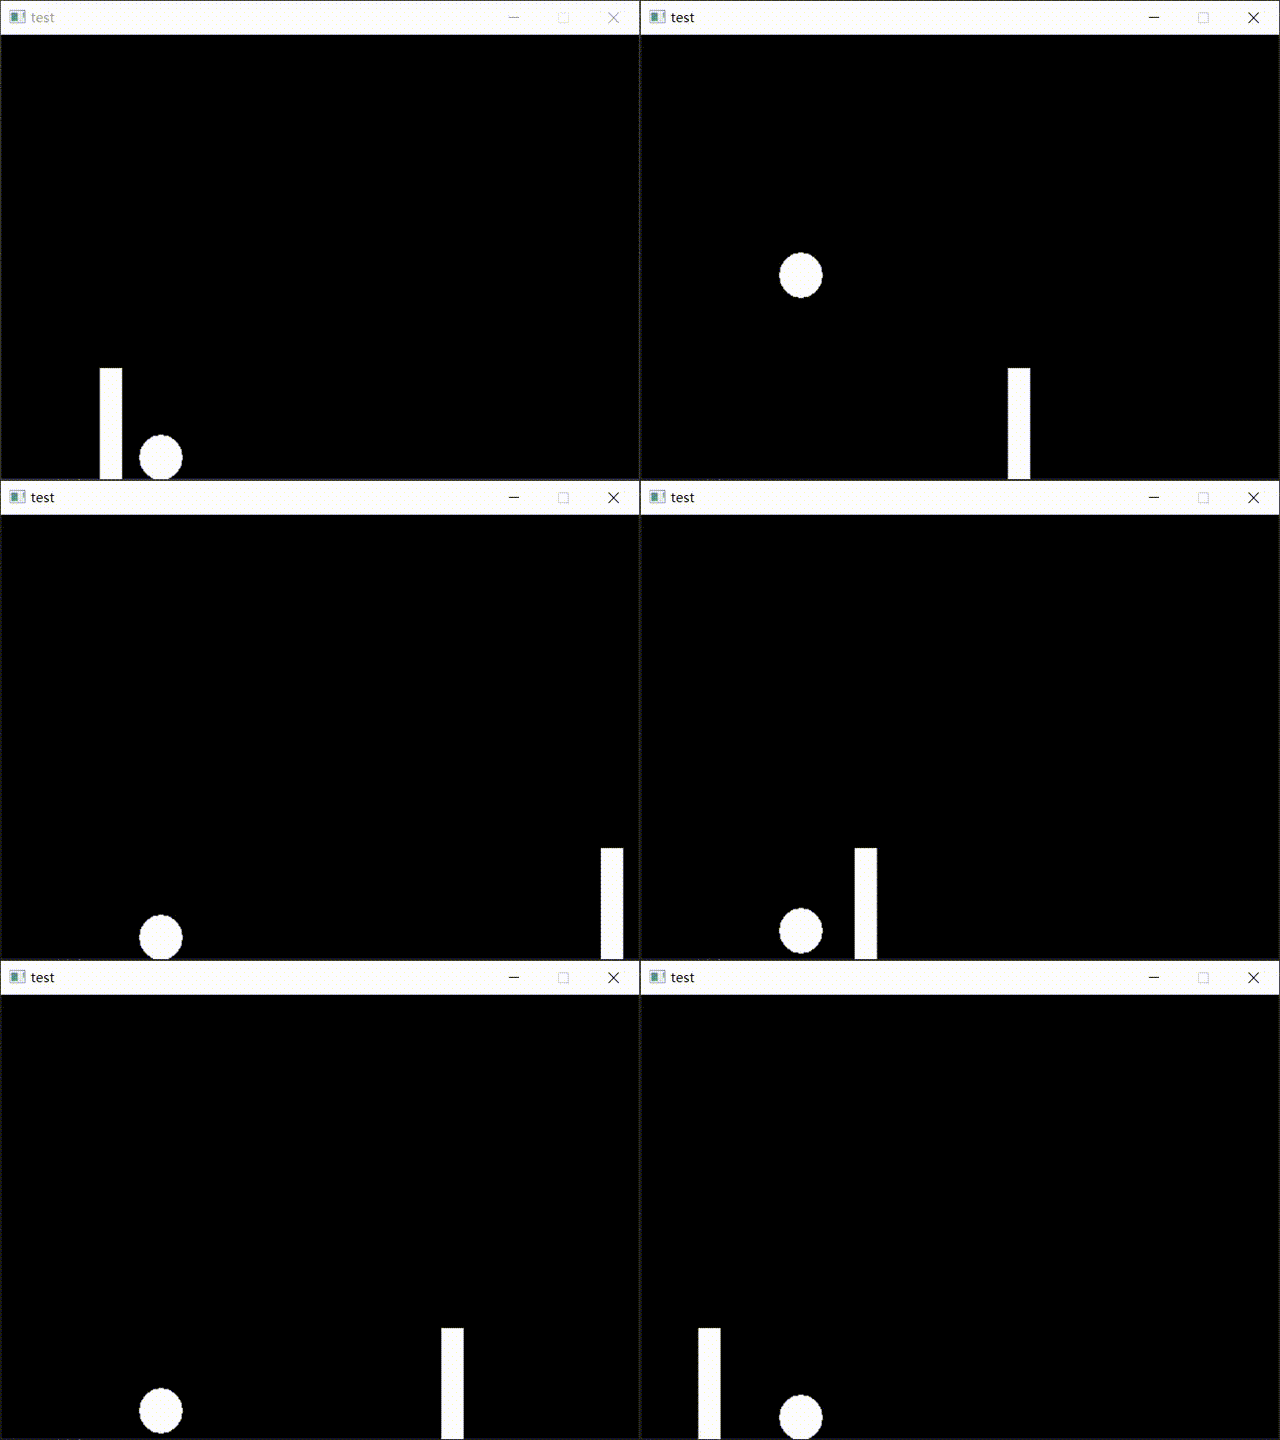
效果:


