JSX 简介
JSX = Javascript + XML。在 Javascript 里写 XML,同时拥有 Javascript 的灵活性和 HTML 的语义化。
Template vs JSX
template 是 Vue 的默认写法,也更推荐。因为 template 语法是固定的,Vue 在编译层面为它做了很多静态标记的优化。JSX 虽然性能不如 template,但更加灵活。
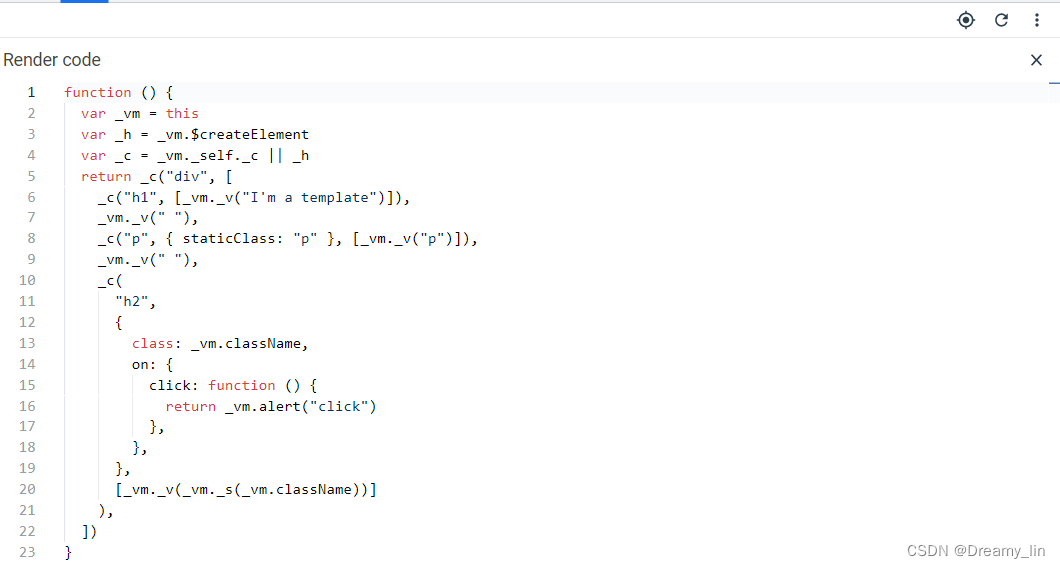
Vue 会将 template 解析为 render 函数,运行时,通过 render 函数返回虚拟 dom。可通过 Vue Devtools 的 “show render code” 看到组件编译后的结果


_c: createElement、_v: createTextNode、_s: toString
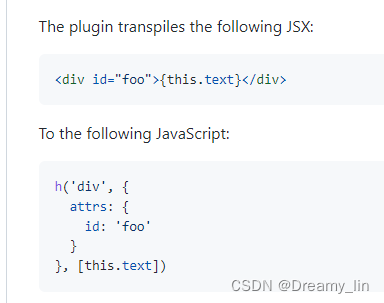
通过 @vue/babel-preset-jsx( babel 7+)或 vuejs/babel-plugin-transform-vue-jsx(Babel 6)可以在 Vue 里去转换 jsx 语法,最终转换为 createElement 调用的形式。可在 render 里直接返回,或者写在 methods 里,不建议写在 computed 里,会缓存。
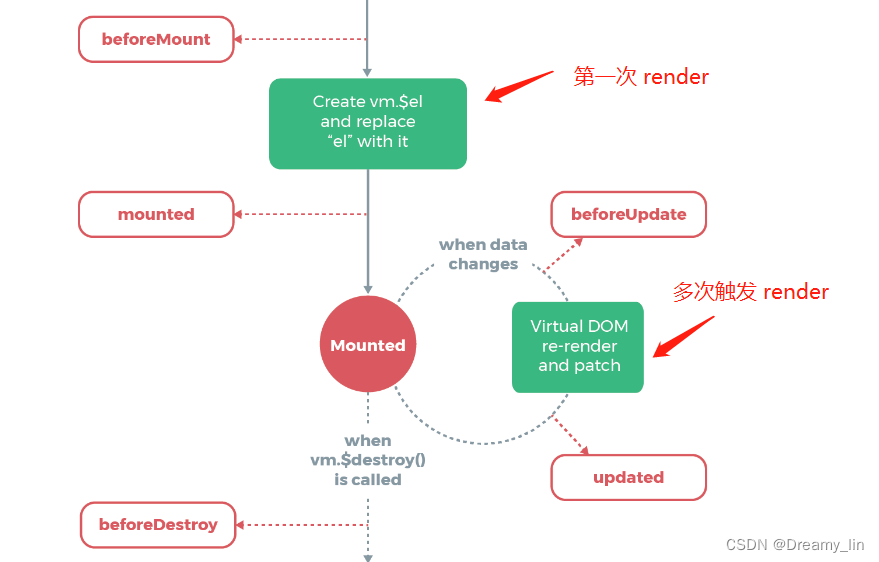
附个 render 生命周期:
babel-preset-jsx 的安装和配置
JSX 语法
建议先学习下 Vue 的渲染函数
JSX 的使用可从 createElement 的数据对象上借鉴,亲测都可用,下面来自官方:
{// 与 `v-bind:class` 的 API 相同,// 接受一个字符串、对象或字符串和对象组成的数组'class': {foo: true,bar: false},// 与 `v-bind:style` 的 API 相同,// 接受一个字符串、对象,或对象组成的数组style: {color: 'red',fontSize: '14px'},// 普通的 HTML attributeattrs: {id: 'foo'},// 组件 propprops: {myProp: 'bar'},// DOM propertydomProps: {innerHTML: 'baz'},// 事件监听器在 `on` 内,// 但不再支持如 `v-on:keyup.enter` 这样的修饰器。// 需要在处理函数中手动检查 keyCode。on: {click: this.clickHandler},// 仅用于组件,用于监听原生事件,而不是组件内部使用// `vm.$emit` 触发的事件。nativeOn: {click: this.nativeClickHandler},// 自定义指令。注意,你无法对 `binding` 中的 `oldValue`// 赋值,因为 Vue 已经自动为你进行了同步。directives: [{name: 'my-custom-directive',value: '2',expression: '1 + 1',arg: 'foo',modifiers: {bar: true}}],// 作用域插槽的格式为// { name: props => VNode | Array<VNode> }scopedSlots: {default: props => createElement('span', props.text)},// 如果组件是其它组件的子组件,需为插槽指定名称slot: 'name-of-slot',// 其它特殊顶层 propertykey: 'myKey',ref: 'myRef',// 如果你在渲染函数中给多个元素都应用了相同的 ref 名,// 那么 `$refs.myRef` 会变成一个数组。refInFor: true
}
上面的直接搬到 JSX 中:
render (h) { // 最好带个 h,否则无法生效const data = {ref: 'myRef',// 指令directives: [{name: 'my-custom-directive',value: '2'}],// 接受一个字符串、对象或字符串和对象组成的数组'class': {foo: true,bar: false},props: {level: this.level},on: {'click': this.clickHandler}}// 也可以分开写, 插件会智能合并return <div class="a" {...data}></div>
}
或者
<custom-buttonid="custom-button"style={{ marginTop: "10px" }}count={count}type="button"domPropsInnerHTML={`hello ${this.count}.`}onChange={onChange}
/>
class,staticClass,style,key,ref,refInFor,slot,scopedSlots 这些被认为是顶级属性,而 props、html 的 attrs 属性,不需要加前缀,插件会统一分类到 attrs 属性下,在运行阶段根据是否 props 声明,再决定归属是 props 还是 attrs。
上面没有覆盖到的用法,如下
v-model
如果安装了 babel-preset-jsx,可直接用
<custom-dialog vModel={this.visible}></custom-dialog>
如果不支持 vModel,可以用事件监听的方式
<custom-dialog on-input={(val) => this.visible = val} value={this.visible}></custom-dialog>
若 custom-dialog 使用的是自定义 model
model: {prop: 'visible',event: 'change'}
那么,prop 和 event 都要改为对应的
<custom-dialog on-change={this.handleChange} visible={this.dialogVisible}></custom-dialog>
.sync
需要改为事件的写法
<custom-dialog on: {{'update:visible': val => {this.dialogVisible= val}}}visible={this.dialogVisible}
></custom-dialog>
v-if 和 v-for
只要在原生 Javascript 能够实现的,Vue 的 JSX 就不会有专门的替代方案,比如 v-if 和 v-for :
v-if:
return type ? <div> type 1 </div> :  <div> type 0 </div>
// 或
if (type) {return <div> type 1 </div>
} else {return <div> type 0 </div>
}
v-for:
<div>{ arr.length ? arr.map(item => <li>item</li>) : <li>empty</li> }
</div>
默认插槽、具名插槽、作用域插槽
需要借由 this.$slots 或 this.$scopedSlots 来传入
默认插槽:
<div> {this.$slots.default} </div>
具名插槽:
<div> {this.$slots.title} </div>
作用域插槽:
<div> {this.$scopedSlots.title({text:'hello scope'})} </div>
引入图片
<img src={require('../images/icon.svg')} alt="图片" />
函数式组件
这里直接看 Vue 官方文档 就很详尽了。需要注意下,render 的第二个参数 context 的传入,组件的一切需要都是通过 context 参数传递的
Vue.component('my-component', {functional: true,// Props 是可选的props: {// ...},// 为了弥补缺少的实例// 提供第二个参数作为上下文render: function (createElement, context) {// ...}
})
事件 & 按键修饰符
事件 & 按键修饰符
以上是平常使用时,踩过的坑。后续有新增的再往里补充。友情提醒,官方文档也过几眼,能解决大部分问题。

