需要源码请点赞关注收藏后评论区留下QQ~~~
一、铃声播放
虽然媒体播放器MediaPlayer既可用来播放视频,也可以用来播放音频,但是在具体的使用场合,MediaPlayer存在某些播音方面的不足之处 包括以下几点
1:初始化比较消耗资源 尤其是播放短铃声时反应偏慢
2:同时只能播放一个媒体文件 无法同时播放多个声音
3:只能播放已经完成转码的音频文件,无法播放原始音频,也不能进行流式播放
Android提供了铃声工具Ringtone处理铃声的播放 下面式Ringtone的常用方法
play 开始播放铃声
stop 停止播放铃声
isPlaying 判断铃声是否正在播放
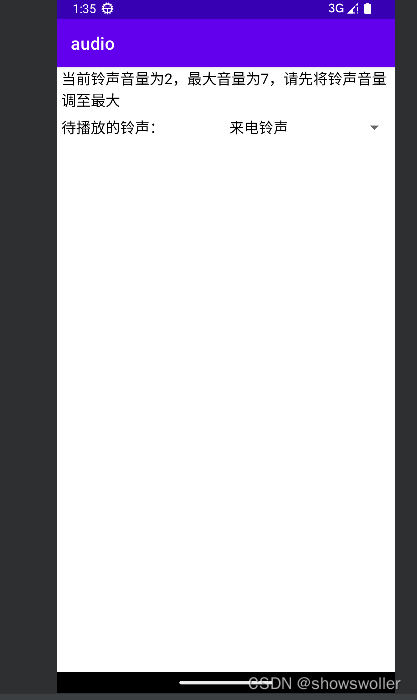
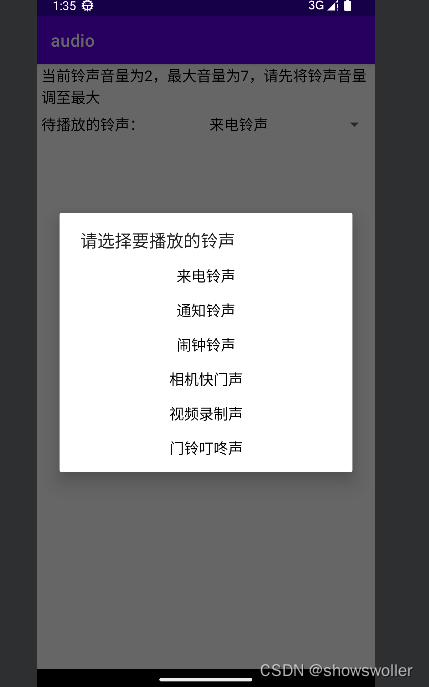
下面是实战效果 可以在下拉框中选择不同的声音
此处带着耳机或者真机测试可以听到不同的声音~~


代码如下
Java类
package com.example.audio;import android.annotation.SuppressLint;
import android.content.Context;
import android.media.AudioManager;
import android.media.Ringtone;
import android.media.RingtoneManager;
import android.net.Uri;
import android.os.Bundle;
import android.view.View;
import android.widget.AdapterView;
import android.widget.AdapterView.OnItemSelectedListener;
import android.widget.ArrayAdapter;
import android.widget.Spinner;
import android.widget.TextView;import androidx.appcompat.app.AppCompatActivity;@SuppressLint("DefaultLocale")
public class RingToneActivity extends AppCompatActivity {private TextView tv_volume; // 声明一个文本视图对象private Ringtone mRingtone; // 声明一个铃声对象@Overrideprotected void onCreate(Bundle savedInstanceState) {super.onCreate(savedInstanceState);setContentView(R.layout.activity_ring_tone);tv_volume = findViewById(R.id.tv_volume);initVolumeInfo(); // 初始化音量信息initRingSpinner(); // 初始化铃声下拉框// 生成本App自带的铃声文件res/raw/ring.ogg的Uri实例uriArray[uriArray.length - 1] = Uri.parse("android.resource://" + getPackageName() + "/" + R.raw.ring);}// 初始化音量信息private void initVolumeInfo() {// 从系统服务中获取音频管理器AudioManager audio = (AudioManager) getSystemService(Context.AUDIO_SERVICE);// 获取铃声的最大音量int maxVolume = audio.getStreamMaxVolume(AudioManager.STREAM_RING);// 获取铃声的当前音量int nowVolume = audio.getStreamVolume(AudioManager.STREAM_RING);String desc = String.format("当前铃声音量为%d,最大音量为%d,请先将铃声音量调至最大",nowVolume, maxVolume);tv_volume.setText(desc);}// 初始化铃声下拉框private void initRingSpinner() {ArrayAdapter<String> ringAdapter = new ArrayAdapter<>(this,R.layout.item_select, ringArray);Spinner sp_ring = findViewById(R.id.sp_ring);sp_ring.setPrompt("请选择要播放的铃声");sp_ring.setAdapter(ringAdapter);sp_ring.setOnItemSelectedListener(new RingSelectedListener());sp_ring.setSelection(0);}private String[] ringArray = {"来电铃声", "通知铃声", "闹钟铃声","相机快门声", "视频录制声", "门铃叮咚声"};private Uri[] uriArray = {RingtoneManager.getDefaultUri(RingtoneManager.TYPE_RINGTONE), // 来电铃声RingtoneManager.getDefaultUri(RingtoneManager.TYPE_NOTIFICATION), // 通知铃声RingtoneManager.getDefaultUri(RingtoneManager.TYPE_ALARM), // 闹钟铃声Uri.parse("file:///system/media/audio/ui/camera_click.ogg"), // 相机快门声Uri.parse("file:///system/media/audio/ui/VideoRecord.ogg"), // 视频录制声null};class RingSelectedListener implements OnItemSelectedListener {public void onItemSelected(AdapterView<?> arg0, View arg1, int arg2, long arg3) {if (mRingtone != null) {mRingtone.stop(); // 停止播放铃声}// 从铃声文件的URI中获取铃声对象mRingtone = RingtoneManager.getRingtone(RingToneActivity.this, uriArray[arg2]);mRingtone.play(); // 开始播放铃声}public void onNothingSelected(AdapterView<?> arg0) {}}@Overrideprotected void onStop() {super.onStop();mRingtone.stop(); // 停止播放铃声}}
XML文件
<LinearLayout xmlns:android="http://schemas.android.com/apk/res/android"android:layout_width="match_parent"android:layout_height="match_parent"android:orientation="vertical" ><TextViewandroid:id="@+id/tv_volume"android:layout_width="match_parent"android:layout_height="wrap_content"android:paddingLeft="5dp"android:textColor="@color/black"android:textSize="17sp" /><LinearLayoutandroid:layout_width="match_parent"android:layout_height="40dp"android:paddingLeft="5dp"android:orientation="horizontal" ><TextViewandroid:layout_width="wrap_content"android:layout_height="match_parent"android:gravity="center"android:text="待播放的铃声:"android:textColor="@color/black"android:textSize="17sp" /><Spinnerandroid:id="@+id/sp_ring"android:layout_width="0dp"android:layout_height="match_parent"android:layout_weight="1"android:gravity="left|center"android:spinnerMode="dialog" /></LinearLayout></LinearLayout>二、声音池调度
对于MediaPlayer无法同时播放多个声音的问题,Android提供了声音池工具SoundPoo,通过声音池即可同时播放多个音频,声音池可以事先加载多个音频,在需要时再播放指定音频 有以下几个好处
1:资源占用最小 不像MediaPlayer那么占用资源
2:相对MediaPlayer来说延迟时间非常短
3:可以同时播放多个音频 从而实现游戏过程中多个声音叠加的情景
SoundPool同样有以下几个缺陷
1:声音池最大只能申请1MB的内存 只能播放一些很短的声音片段
2:不要轻易调用pause和stop方法 容易引起App崩溃
3:建议使用声音池播放ogg格式的音频 对WAV格式的支持不太友好
4:待播放的音频要提前加载到声音池中 不要等到播放的时候才加载 否则可能播放不出来
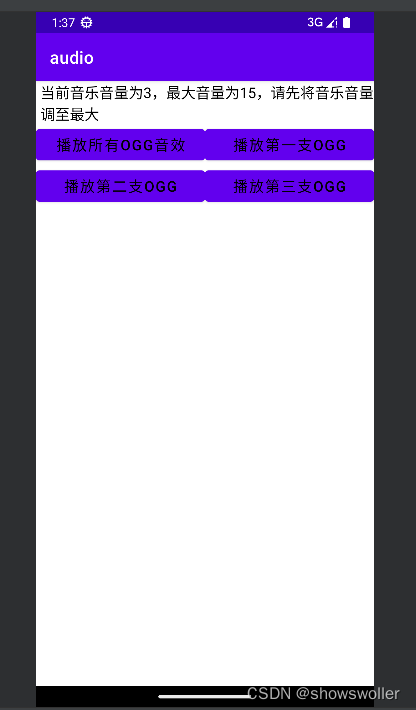
实战效果如下
点击按钮即可播放对应的音频 注意此处可以多种音频同时播放

代码如下
Java类
package com.example.audio;import android.annotation.SuppressLint;
import android.content.Context;
import android.media.AudioAttributes;
import android.media.AudioManager;
import android.media.SoundPool;
import android.os.Bundle;
import android.view.View;
import android.view.View.OnClickListener;
import android.widget.TextView;import androidx.appcompat.app.AppCompatActivity;import java.util.HashMap;@SuppressLint("DefaultLocale")
public class SoundPoolActivity extends AppCompatActivity implements OnClickListener {private TextView tv_volume; // 声明一个文本视图对象private SoundPool mSoundPool; // 初始化一个声音池对象private HashMap<Integer, Integer> mSoundMap = new HashMap<>(); // 声音编号映射@Overrideprotected void onCreate(Bundle savedInstanceState) {super.onCreate(savedInstanceState);setContentView(R.layout.activity_sound_pool);tv_volume = findViewById(R.id.tv_volume);findViewById(R.id.btn_play_all).setOnClickListener(this);findViewById(R.id.btn_play_first).setOnClickListener(this);findViewById(R.id.btn_play_second).setOnClickListener(this);findViewById(R.id.btn_play_third).setOnClickListener(this);initVolumeInfo(); // 初始化音量信息initSound(); // 初始化声音池}// 初始化音量信息private void initVolumeInfo() {// 从系统服务中获取音频管理器AudioManager audio = (AudioManager) getSystemService(Context.AUDIO_SERVICE);// 获取音乐的最大音量int maxVolume = audio.getStreamMaxVolume(AudioManager.STREAM_MUSIC);// 获取音乐的当前音量int nowVolume = audio.getStreamVolume(AudioManager.STREAM_MUSIC);String desc = String.format("当前音乐音量为%d,最大音量为%d,请先将音乐音量调至最大",nowVolume, maxVolume);tv_volume.setText(desc);}// 初始化声音池private void initSound() {// 初始化声音池,最多容纳三个声音AudioAttributes attributes = new AudioAttributes.Builder().setLegacyStreamType(AudioManager.STREAM_MUSIC).build();SoundPool.Builder builder = new SoundPool.Builder();builder.setMaxStreams(3).setAudioAttributes(attributes);mSoundPool = builder.build();loadSound(1, R.raw.beep1); // 加载第一个声音loadSound(2, R.raw.beep2); // 加载第二个声音loadSound(3, R.raw.ring); // 加载第三个声音}// 把音频资源添加进声音池private void loadSound(int seq, int resid) {// 把声音文件加入到声音池中,同时返回该声音文件的编号int soundID = mSoundPool.load(this, resid, 1);mSoundMap.put(seq, soundID);}// 播放指定序号的声音private void playSound(int seq) {int soundID = mSoundMap.get(seq);// 播放声音池中指定编号的音频mSoundPool.play(soundID, 1.0f, 1.0f, 1, 0, 1.0f);}@Overridepublic void onClick(View v) {if (v.getId() == R.id.btn_play_all) { //同时播放三个声音playSound(1); // 播放指定序号的声音playSound(2); // 播放指定序号的声音playSound(3); // 播放指定序号的声音} else if (v.getId() == R.id.btn_play_first) { // 播放第一个声音playSound(1); // 播放指定序号的声音} else if (v.getId() == R.id.btn_play_second) { // 播放第二个声音playSound(2); // 播放指定序号的声音} else if (v.getId() == R.id.btn_play_third) { // 播放第三个声音playSound(3); // 播放指定序号的声音}}@Overrideprotected void onDestroy() {super.onDestroy();if (mSoundPool != null) {mSoundPool.release(); // 释放声音池资源}}}
XML文件
<LinearLayout xmlns:android="http://schemas.android.com/apk/res/android"android:layout_width="match_parent"android:layout_height="match_parent"android:orientation="vertical" ><TextViewandroid:id="@+id/tv_volume"android:layout_width="match_parent"android:layout_height="wrap_content"android:paddingLeft="5dp"android:textColor="@color/black"android:textSize="17sp" /><LinearLayoutandroid:layout_width="match_parent"android:layout_height="wrap_content"android:orientation="horizontal" ><Buttonandroid:id="@+id/btn_play_all"android:layout_width="0dp"android:layout_height="wrap_content"android:layout_weight="1"android:gravity="center"android:text="播放所有ogg音效"android:textColor="@color/black"android:textSize="17sp" /><Buttonandroid:id="@+id/btn_play_first"android:layout_width="0dp"android:layout_height="wrap_content"android:layout_weight="1"android:gravity="center"android:text="播放第一支ogg"android:textColor="@color/black"android:textSize="17sp" /></LinearLayout><LinearLayoutandroid:layout_width="match_parent"android:layout_height="wrap_content"android:orientation="horizontal" ><Buttonandroid:id="@+id/btn_play_second"android:layout_width="0dp"android:layout_height="wrap_content"android:layout_weight="1"android:gravity="center"android:text="播放第二支ogg"android:textColor="@color/black"android:textSize="17sp" /><Buttonandroid:id="@+id/btn_play_third"android:layout_width="0dp"android:layout_height="wrap_content"android:layout_weight="1"android:gravity="center"android:text="播放第三支ogg"android:textColor="@color/black"android:textSize="17sp" /></LinearLayout></LinearLayout>创作不易 觉得有帮助请点赞关注收藏~~~


