背景
抖音包体积优化提出的“键常量池裁剪”是基于腾讯的AndResGuard资源混淆之后做的进一步处理,也就是对resources.arsc文件的处理。而资源混淆,就是对resources.arsc文件进行修改。那么我们可以尝试基于这个思路,对AndResGuard插件源码进行解析,获悉他对resources.arsc文件的处理详情。
入口
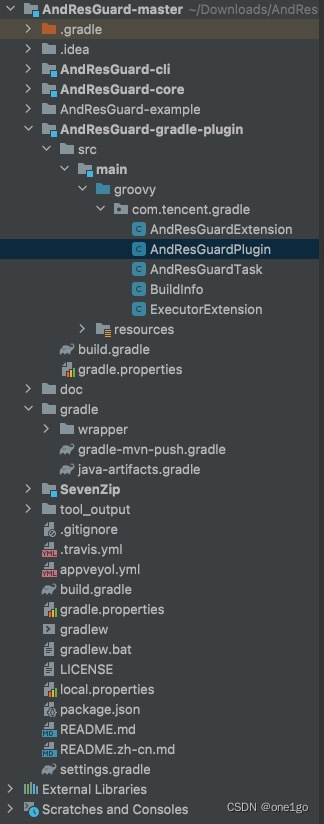
下载AndResGuard源码后,项目结构如上。作为一个gradle插件,打开他的入口AndResGuardPlugin,首先会执行的是apply方法
class AndResGuardPlugin implements Plugin<Project> {public static final String USE_APK_TASK_NAME = "UseApk"@Overridevoid apply(Project project) {...project.afterEvaluate {...createTask(project, USE_APK_TASK_NAME)...}}private static void createTask(Project project, variantName) {def taskName = "resguard${variantName}"if (project.tasks.findByPath(taskName) == null) {def task = project.task(taskName, type: AndResGuardTask)if (variantName != USE_APK_TASK_NAME) {task.dependsOn "assemble${variantName}"}}}
}
此处创建了AndResGuardTask,并在打包后执行
assemble:打包命令,具体详情可以参考 https://www.jianshu.com/p/db62617cbbff
那么接下来解析AndResGuardTask类,他是一个task,那么直接看run方法
run() {...buildConfigs.each { config ->...RunGradleTask(config, config.file.getAbsolutePath(), config.minSDKVersion, config.targetSDKVersion)...}}
此处执行了RunGradleTask函数
def RunGradleTask(config, String absPath, int minSDKVersion, int targetSDKVersion) {...configuration.whiteList.each { res ->if (res.startsWith("R")) {whiteListFullName.add(packageName + "." + res)} else {whiteListFullName.add(res)}}InputParam.Builder builder = new InputParam.Builder().setMappingFile(configuration.mappingFile).setWhiteList(whiteListFullName).setUse7zip(configuration.use7zip).setMetaName(configuration.metaName).setFixedResName(configuration.fixedResName).setKeepRoot(configuration.keepRoot).setMergeDuplicatedRes(configuration.mergeDuplicatedRes).setCompressFilePattern(configuration.compressFilePattern).setZipAlign(getZipAlignPath()).setSevenZipPath(sevenzip.path).setOutBuilder(useFolder(config.file)).setApkPath(absPath).setUseSign(configuration.useSign).setDigestAlg(configuration.digestalg).setMinSDKVersion(minSDKVersion).setTargetSDKVersion(targetSDKVersion)if (configuration.finalApkBackupPath != null && configuration.finalApkBackupPath.length() > 0) {builder.setFinalApkBackupPath(configuration.finalApkBackupPath)} else {builder.setFinalApkBackupPath(absPath)}if (configuration.useSign) {if (signConfig == null) {throw new GradleException("can't the get signConfig for release build")}builder.setSignFile(signConfig.storeFile).setKeypass(signConfig.keyPassword).setStorealias(signConfig.keyAlias).setStorepass(signConfig.storePassword)if (signConfig.hasProperty('v3SigningEnabled') && signConfig.v3SigningEnabled) {builder.setSignatureType(InputParam.SignatureType.SchemaV3)} else if (signConfig.hasProperty('v2SigningEnabled') && signConfig.v2SigningEnabled) {builder.setSignatureType(InputParam.SignatureType.SchemaV2)}}InputParam inputParam = builder.create()Main.gradleRun(inputParam)}
这里主要做了两件事
- 获取构建参数,也就是在使用gradle时,注册的那些参数
- 调用Main.gradleRun,这是一个java函数,也就是说具体的逻辑最终都是用java实现的
实现
进入Main类,解析他的gradleRun函数
public class Main {...private void run(InputParam inputParam) {...resourceProguard(new File(inputParam.outFolder),finalApkFile,inputParam.apkPath,inputParam.signatureType,inputParam.minSDKVersion);...}protected void resourceProguard(File outputDir, File outputFile, String apkFilePath, InputParam.SignatureType signatureType, int minSDKVersoin) {...try {ApkDecoder decoder = new ApkDecoder(config, apkFile);/* 默认使用V1签名 */decodeResource(outputDir, decoder, apkFile);buildApk(decoder, apkFile, outputFile, signatureType, minSDKVersoin);} catch (Exception e) {e.printStackTrace();goToError();}}private void decodeResource(File outputFile, ApkDecoder decoder, File apkFile)throws AndrolibException, IOException, DirectoryException {if (outputFile == null) {mOutDir = new File(mRunningLocation, apkFile.getName().substring(0, apkFile.getName().indexOf(".apk")));} else {mOutDir = outputFile;}decoder.setOutDir(mOutDir.getAbsoluteFile());decoder.decode();}private void buildApk(ApkDecoder decoder, File apkFile, File outputFile, InputParam.SignatureType signatureType, int minSDKVersion)throws Exception {...}}protected void goToError() {System.exit(ERRNO_USAGE);}
}
跟着方法读取gradleRun==>run==>resourceProguard==>decodeResource & buildApk
此处做了两件事
- 解析APK资源,并对文件进行修改 - decodeResource
- 重新构建APK - buildApk
解析修改APK资源
读到decodeResource方法,可知他是交给了ApkDecoder#decode方法,代码如下
public void decode() throws AndrolibException, IOException, DirectoryException {if (hasResources()) {ensureFilePath();// read the resources.arsc checking for STORED vs DEFLATE compression// this will determine whether we compress on rebuild or not.System.out.printf("decoding resources.arsc\n");RawARSCDecoder.decode(apkFile.getDirectory().getFileInput("resources.arsc"));ResPackage[] pkgs = ARSCDecoder.decode(apkFile.getDirectory().getFileInput("resources.arsc"), this);//把没有纪录在resources.arsc的资源文件也拷进dest目录copyOtherResFiles();ARSCDecoder.write(apkFile.getDirectory().getFileInput("resources.arsc"), this, pkgs);}}
此处总共执行了四件事
- 确定文件路径,解压APK - ensureFilePath
- 第一次解析resources.arsc文件,读取资源文件信息并保存 - RawARSCDecoder.decode
- 第二次解析resources.arsc文件,进行混淆 - ARSCDecoder.decode
- 重新生成resources.arsc - ARSCDecoder.write
确定文件信息
跟踪 ensureFilePath 可得
private void ensureFilePath() throws IOException {Utils.cleanDir(mOutDir);String unZipDest = new File(mOutDir, TypedValue.UNZIP_FILE_PATH).getAbsolutePath();System.out.printf("unziping apk to %s\n", unZipDest);mCompressData = FileOperation.unZipAPk(apkFile.getAbsoluteFile().getAbsolutePath(), unZipDest);dealWithCompressConfig();//将res混淆成rif (!config.mKeepRoot) {mOutResFile = new File(mOutDir.getAbsolutePath() + File.separator + TypedValue.RES_FILE_PATH);} else {mOutResFile = new File(mOutDir.getAbsolutePath() + File.separator + "res");}//这个需要混淆各个文件夹mRawResFile = new File(mOutDir.getAbsoluteFile().getAbsolutePath()+ File.separator+ TypedValue.UNZIP_FILE_PATH+ File.separator+ "res");mOutTempDir = new File(mOutDir.getAbsoluteFile().getAbsolutePath() + File.separator + TypedValue.UNZIP_FILE_PATH);//这里纪录原始res目录的文件Files.walkFileTree(mRawResFile.toPath(), new ResourceFilesVisitor());if (!mRawResFile.exists() || !mRawResFile.isDirectory()) {throw new IOException("can not found res dir in the apk or it is not a dir");}mOutTempARSCFile = new File(mOutDir.getAbsoluteFile().getAbsolutePath() + File.separator + "resources_temp.arsc");mOutARSCFile = new File(mOutDir.getAbsoluteFile().getAbsolutePath() + File.separator + "resources.arsc");String basename = apkFile.getName().substring(0, apkFile.getName().indexOf(".apk"));mResMappingFile = new File(mOutDir.getAbsoluteFile().getAbsolutePath()+ File.separator+ TypedValue.RES_MAPPING_FILE+ basename+ TypedValue.TXT_FILE);mMergeDuplicatedResMappingFile = new File(mOutDir.getAbsoluteFile().getAbsolutePath()+ File.separator+ TypedValue.MERGE_DUPLICATED_RES_MAPPING_FILE+ basename+ TypedValue.TXT_FILE);}
此处总共执行了这几件事
- 解压APK - FileOperation.unZipAPk
- 压缩APK资源 - dealWithCompressConfig
APK中很多资源是以stored方式存储的,这些资源都是没被压缩的,通过修改他的压缩方式达到压缩的目的
在使用AndResGuard时通过compressFilePattern参数配置
未被压缩的资源包含如下
static const char* kNoCompressExt[] = {".jpg", ".jpeg", ".png", ".gif",".wav", ".mp2", ".mp3", ".ogg", ".aac",".mpg", ".mpeg", ".mid", ".midi", ".smf", ".jet",".rtttl", ".imy", ".xmf", ".mp4", ".m4a",".m4v", ".3gp", ".3gpp", ".3g2", ".3gpp2",".amr", ".awb", ".wma", ".wmv", ".webm", ".mkv"
}
- 将res混淆成r
- 纪录原始res目录的文件
- 创建新的resources.arsc输出文件和mapping文件
第一次解析文件,存储原资源信息
RawARSCDecoder.decode(apkFile.getDirectory().getFileInput("resources.arsc"))
可见此处解析的是apk的resources.arsc文件,进入该方法
public static ResPackage[] decode(InputStream arscStream) throws AndrolibException {try {RawARSCDecoder decoder = new RawARSCDecoder(arscStream);System.out.printf("parse to get the exist names in the resouces.arsc first\n");return decoder.readTable();} catch (IOException ex) {throw new AndrolibException("Could not decode arsc file", ex);}}
继续看decoder.readTable()方法
private ResPackage[] readTable() throws IOException, AndrolibException {nextChunkCheckType(Header.TYPE_TABLE);int packageCount = mIn.readInt();StringBlock.read(mIn);ResPackage[] packages = new ResPackage[packageCount];nextChunk();for (int i = 0; i < packageCount; i++) {packages[i] = readTablePackage();}return packages;}
读到readTablePackage方法
private ResPackage readTablePackage() throws IOException, AndrolibException {...while (mHeader.type == Header.TYPE_LIBRARY) {readLibraryType();}while (mHeader.type == Header.TYPE_SPEC_TYPE) {readTableTypeSpec();}...}
看到此处有readLibraryType和readTableTypeSpec方法,我们先看readLibraryType方法
private void readLibraryType() throws AndrolibException, IOException {...while (mHeader.type == Header.TYPE_TYPE) {readTableTypeSpec();}}
此处调用了readTableTypeSpec方法,所以直接读readTableTypeSpec方法即可
private void readTableTypeSpec() throws AndrolibException, IOException {...while (mHeader.type == Header.TYPE_TYPE) {readConfig();nextChunk();}}
继续readConfig方法分析
private void readConfig() throws IOException, AndrolibException {...int[] entryOffsets = mIn.readIntArray(entryCount);for (int i = 0; i < entryOffsets.length; i++) {if (entryOffsets[i] != -1) {mResId = (mResId & 0xffff0000) | i;readEntry();}}}
readEntry
*/private void readEntry() throws IOException, AndrolibException {/* size */mIn.skipBytes(2);short flags = mIn.readShort();int specNamesId = mIn.readInt();putTypeSpecNameStrings(mCurTypeID, mSpecNames.getString(specNamesId));boolean readDirect = false;if ((flags & ENTRY_FLAG_COMPLEX) == 0) {readDirect = true;readValue(readDirect, specNamesId);} else {readDirect = false;readComplexEntry(readDirect, specNamesId);}}private void putTypeSpecNameStrings(int type, String name) {Set<String> names = mExistTypeNames.get(type);if (names == null) {names = new HashSet<>();}names.add(name);mExistTypeNames.put(type, names);}
- 将资源类型的名称存在mExistTypeNames里,key为资源类型,value为名称集合 - putTypeSpecNameStrings
- 避免混淆后的名称与混淆前的名称出现相同的情况
- 需要防止由于某些非常恶心的白名单,导致出现重复id
第二次解析,进行混淆处理
ResPackage[] pkgs = ARSCDecoder.decode(apkFile.getDirectory().getFileInput("resources.arsc"), this);
分析这个方法,进入ARSCDecoder.decode
public static ResPackage[] decode(InputStream arscStream, ApkDecoder apkDecoder) throws AndrolibException {try {ARSCDecoder decoder = new ARSCDecoder(arscStream, apkDecoder);ResPackage[] pkgs = decoder.readTable();return pkgs;} catch (IOException ex) {throw new AndrolibException("Could not decode arsc file", ex);}}private ResPackage[] readTable() throws IOException, AndrolibException {nextChunkCheckType(Header.TYPE_TABLE);int packageCount = mIn.readInt();mTableStrings = StringBlock.read(mIn);ResPackage[] packages = new ResPackage[packageCount];nextChunk();for (int i = 0; i < packageCount; i++) {packages[i] = readPackage();}mMappingWriter.close();...mMergeDuplicatedResMappingWriter.close();...return packages;}
- 这里实际上是读取resource.arsc的package部分
- mMappingWriter - mapping文件写入类
- mMergeDuplicatedResMappingWriter - 合并旧mapping文件写入类
主要的逻辑在readPackage
private ResPackage readPackage() throws IOException, AndrolibException {...mPkg = new ResPackage(id, name);// 系统包名不混淆if (mPkg.getName().equals("android")) {mPkg.setCanResguard(false);} else {mPkg.setCanResguard(true);}nextChunk();while (mHeader.type == Header.TYPE_LIBRARY) {readLibraryType();}while (mHeader.type == Header.TYPE_SPEC_TYPE) {readTableTypeSpec();}return mPkg;}
- 这里有个处理,就是判断系统包名不混淆
- 然后是核心的readLibraryType和readTableTypeSpec方法,readLibraryType里面调用的也是readTableTypeSpec方法,所以此处直接看readTableTypeSpec方法
private void readTableTypeSpec() throws AndrolibException, IOException {...// first meet a type of resourceif (mCurrTypeID != id) {mCurrTypeID = id;initResGuardBuild(mCurrTypeID);}// 是否混淆文件路径mShouldResguardForType = isToResguardFile(mTypeNames.getString(id - 1));// 对,这里是用来描述差异性的!!!mIn.skipBytes(entryCount * 4);mResId = (0xff000000 & mResId) | id << 16;while (nextChunk().type == Header.TYPE_TYPE) {readConfig();}}
- 在白名单里的不需要混淆 - initResGuardBuild
- 某些文件路径不需要混淆,比如string,array - isToResguardFile
- 进行混淆处理 - readConfig
看下 initResGuardBuild 方法
private void initResGuardBuild(int resTypeId) {// we need remove string from resguard candidate list if it exists in white listHashSet<Pattern> whiteListPatterns = getWhiteList(mType.getName());// init resguard buildermResguardBuilder.reset(whiteListPatterns);mResguardBuilder.removeStrings(RawARSCDecoder.getExistTypeSpecNameStrings(resTypeId));// 如果是保持mapping的话,需要去掉某部分已经用过的mappingreduceFromOldMappingFile();}/*** 如果是保持mapping的话,需要去掉某部分已经用过的mapping*/private void reduceFromOldMappingFile() {if (mPkg.isCanResguard()) {if (mApkDecoder.getConfig().mUseKeepMapping) {// 判断是否走keepmappingHashMap<String, HashMap<String, HashMap<String, String>>> resMapping = mApkDecoder.getConfig().mOldResMapping;String packName = mPkg.getName();if (resMapping.containsKey(packName)) {HashMap<String, HashMap<String, String>> typeMaps = resMapping.get(packName);String typeName = mType.getName();if (typeMaps.containsKey(typeName)) {HashMap<String, String> proguard = typeMaps.get(typeName);// 去掉所有之前保留的命名,为了简单操作,mapping里面有的都去掉mResguardBuilder.removeStrings(proguard.values());}}}}}
此处主要做了两件事
- 白名单不混淆
- 如果保持之前的mapping的话,需要去掉这些已经用掉的mapping,新的文件用新的mapping
接着看isToResguardFile方法
/*** 为了加速,不需要处理string,id,array,这几个是肯定不是的*/private boolean isToResguardFile(String name) {return (!name.equals("string") && !name.equals("id") && !name.equals("array"));}
看注释,基本上已经可以明白他的用途
接着看 readConfig 方法
private void readConfig() throws IOException, AndrolibException {...int[] entryOffsets = mIn.readIntArray(entryCount);for (int i = 0; i < entryOffsets.length; i++) {mCurEntryID = i;if (entryOffsets[i] != -1) {mResId = (mResId & 0xffff0000) | i;readEntry();}}}private void readEntry() throws IOException, AndrolibException {mIn.skipBytes(2);short flags = mIn.readShort();int specNamesId = mIn.readInt();if (mPkg.isCanResguard()) {// 混淆过或者已经添加到白名单的都不需要再处理了if (!mResguardBuilder.isReplaced(mCurEntryID) && !mResguardBuilder.isInWhiteList(mCurEntryID)) {Configuration config = mApkDecoder.getConfig();boolean isWhiteList = false;if (config.mUseWhiteList) {isWhiteList = dealWithWhiteList(specNamesId, config);}if (!isWhiteList) {dealWithNonWhiteList(specNamesId, config);}}}if ((flags & ENTRY_FLAG_COMPLEX) == 0) {readValue(true, specNamesId);} else {readComplexEntry(false, specNamesId);}}
通过以上代码可知
- 已经混淆过或者已经添加到白名单的都不需要再处理了 - dealWithWhiteList
- 具体的混淆操作 - dealWithNonWhiteList
接着看dealWithNonWhiteList方法
private void dealWithNonWhiteList(int specNamesId, Configuration config) throws AndrolibException, IOException {String replaceString = null;boolean keepMapping = false;if (config.mUseKeepMapping) {String packName = mPkg.getName();if (config.mOldResMapping.containsKey(packName)) {HashMap<String, HashMap<String, String>> typeMaps = config.mOldResMapping.get(packName);String typeName = mType.getName();if (typeMaps.containsKey(typeName)) {HashMap<String, String> nameMap = typeMaps.get(typeName);String specName = mSpecNames.get(specNamesId).toString();if (nameMap.containsKey(specName)) {keepMapping = true;replaceString = nameMap.get(specName);}}}}if (!keepMapping) {replaceString = mResguardBuilder.getReplaceString();}mResguardBuilder.setInReplaceList(mCurEntryID);if (replaceString == null) {throw new AndrolibException("readEntry replaceString == null");}generalResIDMapping(mPkg.getName(), mType.getName(), mSpecNames.get(specNamesId).toString(), replaceString);mPkg.putSpecNamesReplace(mResId, replaceString);// arsc name列混淆成固定名字, 减少string pool大小boolean useFixedName = config.mFixedResName != null && config.mFixedResName.length() > 0;String fixedName = useFixedName ? config.mFixedResName : replaceString;mPkg.putSpecNamesblock(fixedName, replaceString);mType.putSpecResguardName(replaceString);}- config.mUseKeepMapping - 如果设置了config.mUseKeepMapping为true,就用老的mapping文件混淆
- 新的或者没设置mUseKeepMapping,就通过mResguardBuilder.getReplaceString()取,它实际上是组装的混淆字符串数组
public String getReplaceString() throws AndrolibException {if (mReplaceStringBuffer.isEmpty()) {throw new AndrolibException(String.format("now can only proguard less than 35594 in a single type\n"));}return mReplaceStringBuffer.remove(0);}可以看到他取的是mReplaceStringBuffer,取出后移除该元素,防止重复。
mReplaceStringBuffer是一个集合,它的组装如下
private String[] mAToZ = {"a", "b", "c", "d", "e", "f", "g", "h", "i", "j", "k", "l", "m", "n", "o", "p", "q", "r", "s", "t", "u", "v","w", "x", "y", "z"};private String[] mAToAll = {"0", "1", "2", "3", "4", "5", "6", "7", "8", "9", "_", "a", "b", "c", "d", "e", "f", "g", "h", "i", "j", "k","l", "m", "n", "o", "p", "q", "r", "s", "t", "u", "v", "w", "x", "y", "z"};/*** 在window上面有些关键字是不能作为文件名的* CON, PRN, AUX, CLOCK$, NUL* COM1, COM2, COM3, COM4, COM5, COM6, COM7, COM8, COM9* LPT1, LPT2, LPT3, LPT4, LPT5, LPT6, LPT7, LPT8, and LPT9.*/private HashSet<String> mFileNameBlackList;public ResguardStringBuilder() {mFileNameBlackList = new HashSet<>();mFileNameBlackList.add("con");mFileNameBlackList.add("prn");mFileNameBlackList.add("aux");mFileNameBlackList.add("nul");mReplaceStringBuffer = new ArrayList<>();mIsReplaced = new HashSet<>();mIsWhiteList = new HashSet<>();}public void reset(HashSet<Pattern> blacklistPatterns) {mReplaceStringBuffer.clear();mIsReplaced.clear();mIsWhiteList.clear();for (int i = 0; i < mAToZ.length; i++) {String str = mAToZ[i];if (!Utils.match(str, blacklistPatterns)) {mReplaceStringBuffer.add(str);}}for (int i = 0; i < mAToZ.length; i++) {String first = mAToZ[i];for (int j = 0; j < mAToAll.length; j++) {String str = first + mAToAll[j];if (!Utils.match(str, blacklistPatterns)) {mReplaceStringBuffer.add(str);}}}for (int i = 0; i < mAToZ.length; i++) {String first = mAToZ[i];for (int j = 0; j < mAToAll.length; j++) {String second = mAToAll[j];for (int k = 0; k < mAToAll.length; k++) {String third = mAToAll[k];String str = first + second + third;if (!mFileNameBlackList.contains(str) && !Utils.match(str, blacklistPatterns)) {mReplaceStringBuffer.add(str);}}}}}
- 替换后的id放到mIsReplaced set中
- 写入mapping文件 - generalResIDMapping
- 设置替换后的名称 - putSpecNamesReplace
继续读之后的readValue方法
/*** @param flags whether read direct*/private void readValue(boolean flags, int specNamesId) throws IOException, AndrolibException {...//这里面有几个限制,一对于string ,id, array我们是知道肯定不用改的,第二看要那个type是否对应有文件路径if (mPkg.isCanResguard()&& flags&& type == TypedValue.TYPE_STRING&& mShouldResguardForType&& mShouldResguardTypeSet.contains(mType.getName())) {if (mTableStringsResguard.get(data) == null) {...File resRawFile = new File(mApkDecoder.getOutTempDir().getAbsolutePath() + File.separator + compatibaleraw);File resDestFile = new File(mApkDecoder.getOutDir().getAbsolutePath() + File.separator + compatibaleresult);MergeDuplicatedResInfo filterInfo = null;boolean mergeDuplicatedRes = mApkDecoder.getConfig().mMergeDuplicatedRes;if (mergeDuplicatedRes) {filterInfo = mergeDuplicated(resRawFile, resDestFile, compatibaleraw, result);if (filterInfo != null) {resDestFile = new File(filterInfo.filePath);result = filterInfo.fileName;}}...if (!resRawFile.exists()) {System.err.printf("can not find res file, you delete it? path: resFile=%s\n", resRawFile.getAbsolutePath());} else {...if (filterInfo == null) {FileOperation.copyFileUsingStream(resRawFile, resDestFile);}//already copiedmApkDecoder.removeCopiedResFile(resRawFile.toPath());mTableStringsResguard.put(data, result);}}}}- resRawFile - 原始文件
- resDestFile - 混淆后的文件
- mergeDuplicated - 资源过滤,过滤重复资源,减少apk体积
- copyFileUsingStream - 讲原文件内容复制给混淆后的文件
- mTableStringsResguard - 混淆后的全局经放到mTableStringsResguard字典里
重新生成resources.arsc
ARSCDecoder.write(apkFile.getDirectory().getFileInput("resources.arsc"), this, pkgs);
接着分析此方法
public static void write(InputStream arscStream, ApkDecoder decoder, ResPackage[] pkgs) throws AndrolibException {...for (int i = 0; i < packageCount; i++) {mCurPackageID = i;writePackage();}// 最后需要把整个的size重写回去reWriteTable();}private void writePackage() throws IOException, AndrolibException {...if (mPkgs[mCurPackageID].isCanResguard()) {int specSizeChange = StringBlock.writeSpecNameStringBlock(mIn,mOut,mPkgs[mCurPackageID].getSpecNamesBlock(),mCurSpecNameToPos);mPkgsLenghtChange[mCurPackageID] += specSizeChange;mTableLenghtChange += specSizeChange;} else {StringBlock.writeAll(mIn, mOut);}writeNextChunk(0);while (mHeader.type == Header.TYPE_LIBRARY) {writeLibraryType();}while (mHeader.type == Header.TYPE_SPEC_TYPE) {writeTableTypeSpec();}}private void writeTableTypeSpec() throws AndrolibException, IOException {...while (writeNextChunk(0).type == Header.TYPE_TYPE) {writeConfig();}}private void writeConfig() throws IOException, AndrolibException {...for (int i = 0; i < entryOffsets.length; i++) {if (entryOffsets[i] != -1) {mResId = (mResId & 0xffff0000) | i;writeEntry();}}}private void writeEntry() throws IOException, AndrolibException {...if (pkg.isCanResguard()) {specNamesId = mCurSpecNameToPos.get(pkg.getSpecRepplace(mResId));if (specNamesId < 0) {throw new AndrolibException(String.format("writeEntry new specNamesId < 0 %d", specNamesId));}}mOut.writeInt(specNamesId);if ((flags & ENTRY_FLAG_COMPLEX) == 0) {writeValue();} else {writeComplexEntry();}}private void writeValue() throws IOException, AndrolibException {/* size */mOut.writeCheckShort(mIn.readShort(), (short) 8);/* zero */mOut.writeCheckByte(mIn.readByte(), (byte) 0);byte type = mIn.readByte();mOut.writeByte(type);int data = mIn.readInt();mOut.writeInt(data);}
- writeTableNameStringBlock - 重写全局字符串池,计算混淆后全局字符串池长度与混淆前的差值。后面 reWriteTable() 方法会用到 mTableLenghtChange
- 重写package
- 最后需要把整个的size重写回去
可以看到此处重写了resources.arsc 文件,如果想按照自己的方式构建此文件,在此处可以尝试添加代码
重新构建APK
private void buildApk(ApkDecoder decoder, File apkFile, File outputFile, InputParam.SignatureType signatureType, int minSDKVersion)throws Exception {ResourceApkBuilder builder = new ResourceApkBuilder(config);String apkBasename = apkFile.getName();apkBasename = apkBasename.substring(0, apkBasename.indexOf(".apk"));builder.setOutDir(mOutDir, apkBasename, outputFile);System.out.printf("[AndResGuard] buildApk signatureType: %s\n", signatureType);switch (signatureType) {case SchemaV1:builder.buildApkWithV1sign(decoder.getCompressData());break;case SchemaV2:case SchemaV3:builder.buildApkWithV2V3Sign(decoder.getCompressData(), minSDKVersion, signatureType);break;}}
此处简单分析,根据不同签名方式进行打包操作
总结
整个资源混淆流程如下
- 解压APK,混淆res目录为r
- 第一次解析resources.arsc,保存原来的资源信息,为mapping文件做准备
- 第二次解析resources.arsc,生成混淆信息
- 重新生成resources.arsc
- 重新打包成APK
**从以上流程可知,如果需要对键常量池进行裁剪,可以尝试在第4步进行操作
