MyBatis学习笔记
- 一、入门
- 二、XML配置
- 1、configuration(配置)
- 2、properties(属性)
- 3、settings(设置)
- 4、typeAliases(类型别名)
- 5、typeHandlers(类型处理器)
- 6、objectFactory(对象工厂)
- 7、plugins(插件)
- 8、environments(环境配置)
- 9、environment(环境变量)
- 10、transactionManager(事务管理器)
- 11、dataSource(数据源)
- 12、databaseIdProvider(数据库厂商标识)
- 13、mappers(映射器)
- 三、XML映射文件
- 1、 `select`
- (1)返回值类型(`List`)
- (1)记录封装
- (3)自定义映射(`resultMap`)
- (4)**关联查询**
- 2、`insert update delete`
- 3、参数
- 4、结果映射
- 5、自动映射
- 6、缓存
- 1、一级缓存
- (1)一级缓存体验
- (2)sqlSession不同
- (3)sqlSession相同,查询条件不同.(当前一级缓存中还没有这个数据)
- (4)sqlSession相同,两次查询之间执行了增删改操作(这次增删改可能对当前数据有影响)
- (5)sqlSession相同,手动清除了一级缓存(缓存清空)
- 2、二级缓存
- 3、 缓存的一些参数配置
- 4、缓存原理图示
- 5、第三方缓存整合原理ehcache适配包
- 四、动态`SQL`
- OGNL
- 1、`if`
- 2、trim 去掉前缀后缀
- 3、choose (when、otherwise)分支选择:swtich-case
- 4、foreach
- 6、批量保存
- 1、MYSQL 中数据的保存
- 2、Oracle中数据库批量保存
- 1、第一种批量添加方式:
- 2、第二种方法:
- 7、内置参数_parameter&_databaseId
- 1、MySQL和Oraacle中配置
- 2、bind
- 3、SQL抽取可重用的字段
- 五、MyBatis-Spring整合
- 六、MyBatis逆向工程
- 1、导入需要的配置包
- 2、编写配置类mbg.XML
- 3、运行
- 4、测试结果
- 5、封装查询条件
- 1、查询所有
- 2、带条件查询
- 七、MyBatis-工作原理
- 1、获取sqlSessionFactory对象
- 八、插件
- 九、MyBatis实用场景
- 1 PageHelper插件进行分页
- 2 批量操作
- 3 存储过程
- 4 typeHandler处理枚举
- 八、`Java API`
本文所有代码免费下载-MyBatis学习课件&代码
一、入门
二、XML配置
1、configuration(配置)
2、properties(属性)
3、settings(设置)
4、typeAliases(类型别名)
5、typeHandlers(类型处理器)
6、objectFactory(对象工厂)
7、plugins(插件)
8、environments(环境配置)
9、environment(环境变量)
10、transactionManager(事务管理器)
11、dataSource(数据源)
12、databaseIdProvider(数据库厂商标识)
13、mappers(映射器)
三、XML映射文件
1、 select
(1)返回值类型(List)
<!-- public List<Employee> getEmpsByLastNameLike(String lastName); --><!--resultType:如果返回的是一个集合,要写集合中元素的类型 --><select id="getEmpsByLastNameLike" resultType="com.atguigu.mybatis.bean.Employee">select * from tbl_employee where last_name like #{lastName}</select>
(1)记录封装
单记录
<!--public Map<String, Object> getEmpByIdReturnMap(Integer id); resultType="map" 这里可以直接写map的原因是因为MyBatis已经自动的写了别名map--><select id="getEmpByIdReturnMap" resultType="map">select * from tbl_employee where id=#{id}</select>
多记录
//多条记录封装一个map:Map<Integer,Employee>:键是这条记录的主键,值是记录封装后的javaBean//@MapKey:告诉<u>mybatis</u>封装这个map的时候使用哪个属性作为map的key@MapKey("lastName")public Map<String, Employee>
getEmpByLastNameLikeReturnMap(String lastName);<!--XML中配置 -->
<!--public Map<Integer, Employee> getEmpByLastNameLikeReturnMap(String lastName);  --><select id="getEmpByLastNameLikeReturnMap" resultType="com.atguigu.mybatis.bean.Employee">select * from tbl_employee where last_name like #{lastName}</select>

(3)自定义映射(resultMap)
<mapper namespace="com.atguigu.mybatis.dao.EmployeeMapperPlus"><!--自定义某个javaBean的封装规则type:自定义规则的Java类型id:唯一id方便引用--><resultMap type="com.atguigu.mybatis.bean.Employee"  id="MySimpleEmp"><!--指定主键列的封装规则id定义主键,底层有优化;column:指定哪一列property:指定对应的javaBean属性--><id column="id" property="id"/><!-- 定义普通列封装规则 --><result column="last_name" property="lastName"/><!-- 其他不指定的列会自动封装:我们只要写resultMap就把全部的映射规则都写上。 --><result column="email" property="email"/><result column="gender" property="gender"/></resultMap><!-- resultMap:自定义结果集映射规则;  --><!-- public Employee getEmpById(Integer id); --><select id="getEmpById"  resultMap="MySimpleEmp">select * from tbl_employee where id=#{id}</select>
</mapper>
(4)关联查询
级联属性
联合查询:级联属性封装结果集
eg:dept.id
eg:dept.departmentName
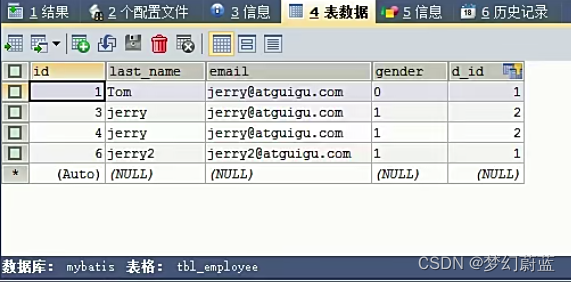
部门表结构:
<resultMap type="com.atguigu.mybatis.bean.Employee" id="MyDifEmp"><id column="id" property="id"/><result column="last_name" property="lastName"/ ><result column="gender" property="gender"/><result column="did" property="dept.id"/><result column="dept_name"
property="dept.departmentName"/></resultMap><!--  public Employee getEmpAndDept(Integer id);--><select id="getEmpAndDept" resultMap="MyDifEmp">SELECT  e.id id,e.last_name last_name,e.gender gender,e.d_id d_id,  d.id did,d.dept_name dept_nameFROM tbl_employee e,tbl_dept dHERE e.d_id=d.id AND e.id=#{id}</select>
association
1、使用association定义关联的单个对象的封装规则
<resultMap type="com.atguigu.mybatis.bean.Employee" id="MyDifEmp2"><id column="id" property="id"/><result column="last_name" property="lastName"/><result column="gender" property="gender"/><!--association可以指定联合的javaBean对象property="dept":指定哪个属性是联合的对象javaType:指定这个属性对象的类型[不能省略]--><!--定义的association 的封装规则 下面的id是 dept的返回值主键--><association property="dept" javaType="com.atguigu.mybatis.bean.Department"><id column="did" property="id"/><result column="dept_name" property="departmentName"/></association></resultMap>
2、使用association进行分步查询:
(1)先按照员工id查询员工信息
(2)根据查询员工信息中的d_id值去部门表查出部门信息
(3)部门设置到员工中;
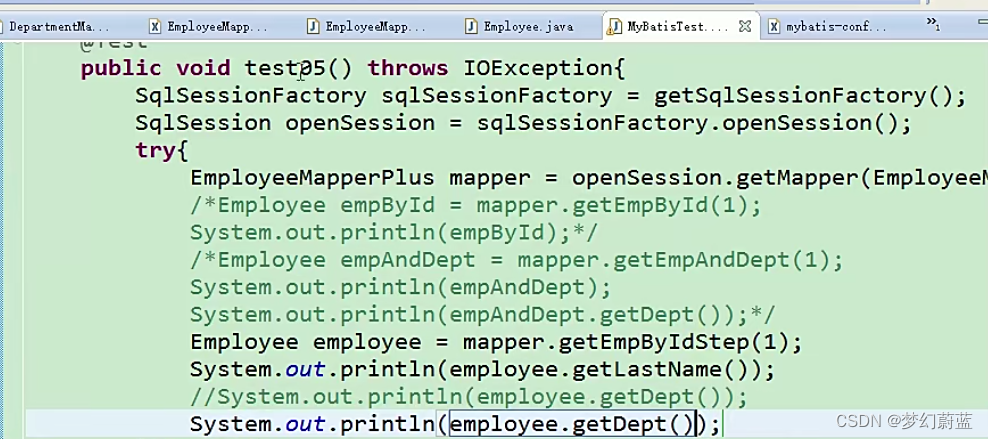
<!-- id last_name email gender d_id --><resultMap type="com.atguigu.mybatis.bean.Employee" id="MyEmpByStep"><id column="id" property="id"/><result column="last_name" property="lastName"/><result column="email" property="email"/><result column="gender" property="gender"/><!-- association定义关联对象的封装规则select:表明当前属性是调用select指定的方法查出的结果column:指定将哪一列的值传给这个方法流程:使用select指定的方法(传入column指定的这列参数的值)查出对象,并封装给property指定的属性--><association property="dept" select="com.atguigu.mybatis.dao.DepartmentMapper.getDeptById"column="d_id"></association></resultMap><!-- public Employee getEmpByIdStep(Integer id);--><select id="getEmpByIdStep" resultMap="MyEmpByStep">select * from tbl_employee where id=#{id}<if test="_parameter!=null">and 1=1</if></select>
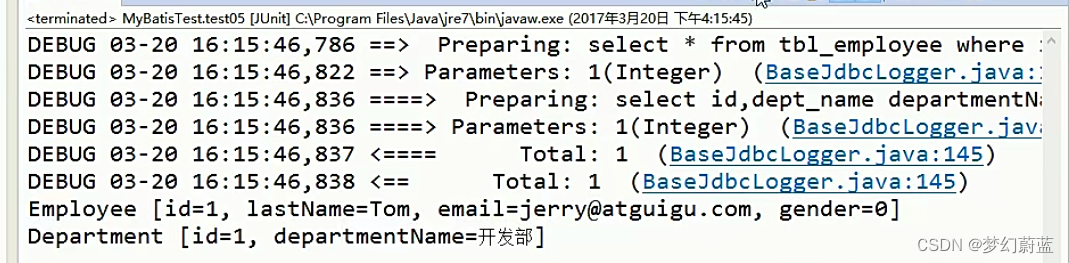
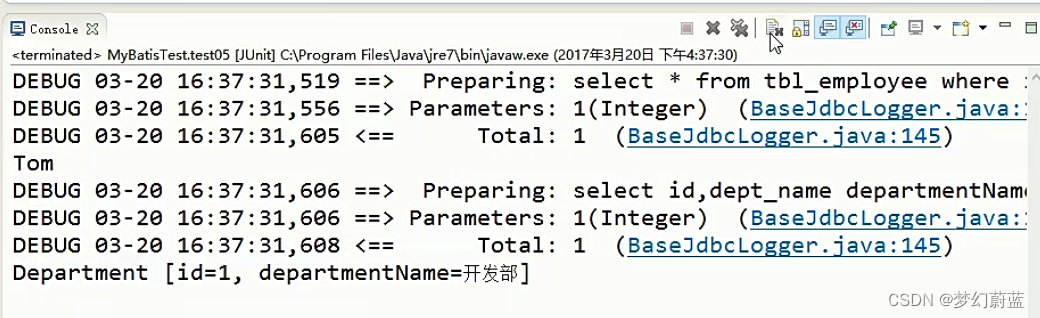
测试:
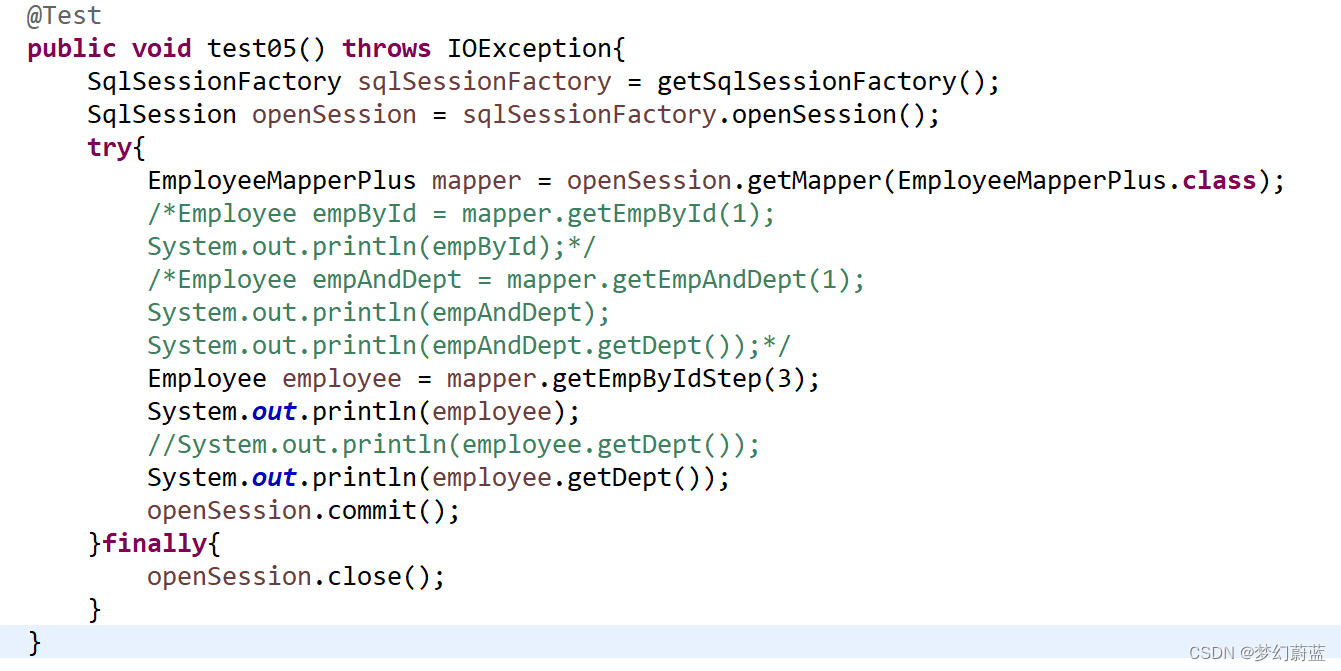
运行结果
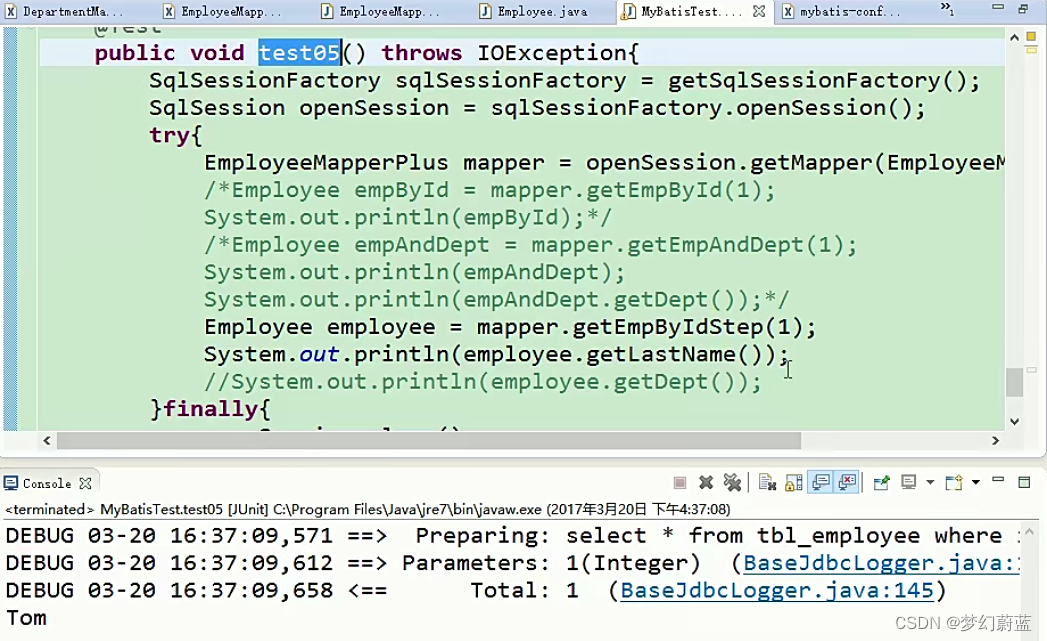
3、延迟加载
可以使用延迟加载(懒加载);
(按需加载) Employee==>Dept:
我们每次查询Employee对象的时候,都将一起查询出来。
部门信息在我们使用的时候再去查询;
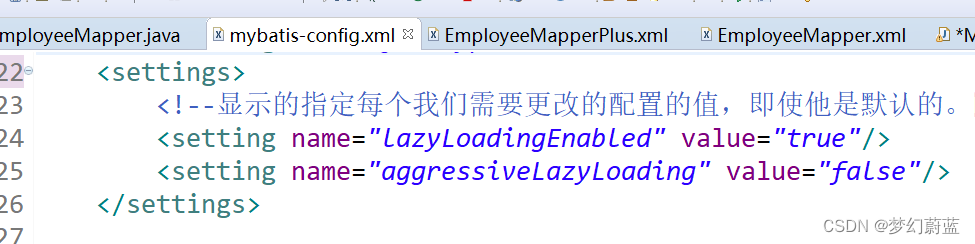
分段查询的基础之上加上两个配置:
<settings><!--显示的指定每个我们需要更改的配置的值,即使他是默认的。防止版本更新带来的问题 lazyLoadingEnabled:懒加载aggressiveLaz yLoading:启用时,具有延时的属性将被加载,否则按需加载 --><setting name="lazyLoadingEnabled" value="true"/><setting name="aggressiveLazyLoading" value="false"/></settings>
不开启的时候,会一次发送两个
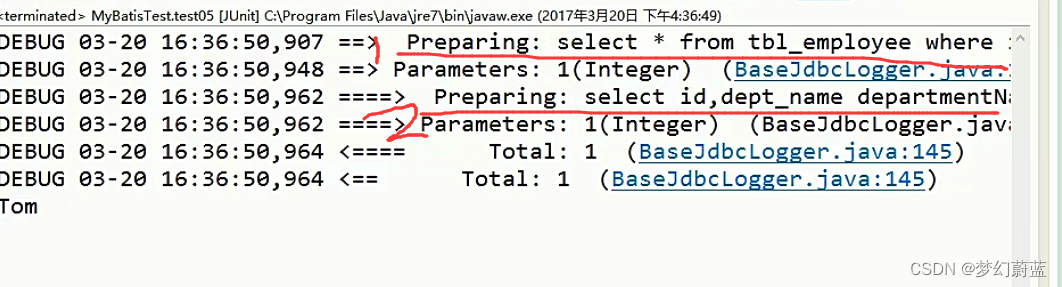
查单个表,会发送一次
查相关表,会查两次
会在两个查询结果之间再发送一次SQL请求
4、collection定义关联集合封装规则
association 场景二:
查询部门的时候将部门对应的所有员工信息也查询出来:注释在DepartmentMapper.xml中
<!-- public class Department {private Integer id;private String departmentName;private List<Employee> emps;did dept_name || eid last_name email gender --><!--嵌套结果集的方式,使用collection标签定义关联的集合类型的属性封装规则 --><resultMap type="com.atguigu.mybatis.bean.Department" id="MyDept"><id column="did" property="id"/><result column="dept_name" property="departmentName"/><!-- collection定义关联集合类型的属性的封装规则 ofType:指定集合里面元素的类型--><collection property="emps" ofType="com.atguigu.mybatis.bean.Employee"><!-- 定义这个集合中元素的封装规则 column:查询中的字段名property:javaBean中的对应字段--><id column="eid" property="id"/><result column="last_name" property="lastName"/><result column="email" property="email"/><result column="gender" property="gender"/></collection></resultMap><!-- public Department getDeptByIdPlus(Integer id); --><select id="getDeptByIdPlus" resultMap="MyDept">SELECT d.id did,d.dept_name dept_name,e.id eid,e.last_name last_name,e.email email,e.gender genderFROM tbl_dept dLEFT JOIN tbl_employee eON d.id=e.d_idWHERE d.id=#{id}</select>
collection:分段查询
<resultMap type="com.atguigu.mybatis.bean.Department" id="MyDeptStep"><id column="id" property="id"/><id column="dept_name" property="departmentName"/><collection property="emps" select="com.atguigu.mybatis.dao.EmployeeMapperPlus.getEmpsByDeptId"column="{deptId=id}" fetchType="lazy"></collection></resultMap><!-- public Department getDeptByIdStep(Integer id); --><select id="getDeptByIdStep" resultMap="MyDeptStep">select id,dept_name from tbl_dept where id=#{id}</select>
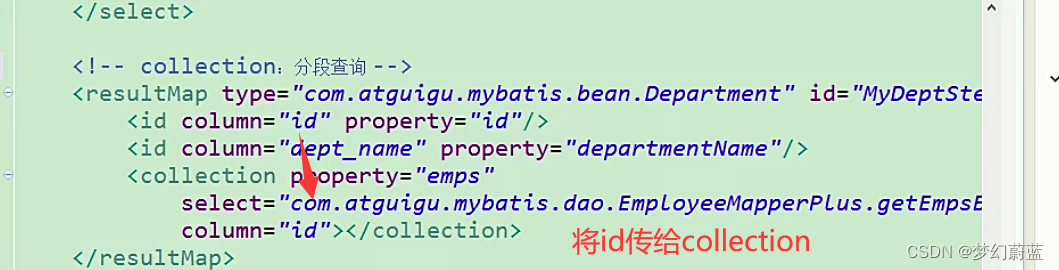
扩展:
- 多列的值传递过去:
- 将多列的值封装map传递;
- column=“{key1=column1,key2=column2}”
- fetchType=“lazy”:表示使用延迟加载;
- lazy:延迟
- eager:立即
discriminator鉴别器(使用频率比较低)
<!-- <discriminator javaType=""></discriminator>鉴别器:mybatis可以使用discriminator判断某列的值,然后根据某列的值改变封装行为封装Employee:如果查出的是女生:就把部门信息查询出来,否则不查询;如果是男生,把last_name这一列的值赋值给email;--><resultMap type="com.atguigu.mybatis.bean.Employee" id="MyEmpDis"><id column="id" property="id"/><result column="last_name" property="lastName"/><result column="email" property="email"/><result column="gender" property="gender"/><!--column:指定判定的列名javaType:列值对应的java类型 --><discriminator javaType="string" column="gender"><!--女生 resultType:指定封装的结果类型;不能缺少。/resultMap--><case value="0" resultType="com.atguigu.mybatis.bean.Employee"><association property="dept" select="com.atguigu.mybatis.dao.DepartmentMapper.getDeptById"column="d_id"></association></case><!--男生 ;如果是男生,把last_name这一列的值赋值给email; --><case value="1" resultType="com.atguigu.mybatis.bean.Employee"><id column="id" property="id"/><result column="last_name" property="lastName"/><result column="last_name" property="email"/><result column="gender" property="gender"/></case></discriminator></resultMap>
<select id="getEmpByIdStep" resultMap="MyEmpDis">select * from tbl_employee where id=#{id}
</select>
2、insert update delete
3、参数
单个参数:
mybatis不会做特殊处理,
#{参数名/任意名}:取出参数值。
多个参数:mybatis会做特殊处理。
  多个参数会被封装成 一个map,key:param1...paramN,或者参数的索引也可以value:传入的参数值#{}就是从map中获取指定的key的值;操作:方法:public Employee getEmpByIdAndLastName(Integer id,String lastName);取值:#{id},#{lastName}异常:org.apache.ibatis.binding.BindingException: Parameter 'id' not found. Available parameters are [1, 0, param1, param2]【命名参数】:明确指定封装参数时map的key;@Param("id")多个参数会被封装成 一个map,key:使用@Param注解指定的值value:参数值#{指定的key}取出对应的参数值
public Employee getEmpByIdAndLastName(@Param("id")Integer  id,@Param("lastName")String lastName);
POJO:
如果多个参数正好是我们业务逻辑的数据模型,我们就可以直接传入<u>pojo</u>;#{属性名}:取出传入的<u>pojo</u>的属性值
Map:
如果多个参数不是业务模型中的数据,没有对应的<u>pojo</u>,不经常使用,为了方便,我们也可以传入map#{key}:取出map中对应的值
TO:
如果多个参数不是业务模型中的数据,但是经常要使用,推荐来编写一个TO(Transfer Object)数据传输对象
Page{<u>int</u> index;<u>int</u> size;
}
思考
public Employee getEmp(@Param("id")Integer id,String  lastName);取值:id==>#{id/param1}   lastName==>#{param2}
public Employee getEmp(Integer id,@Param("e")Employee
<u>emp</u>);
取值:id==>#{param1}
lastName===>#{param2.lastName/e.lastName}
特别注意:如果是Collection(List、Set)类型或者是数组
 也会特殊处理。也是把传入的list或者数组封装在map中。key:Collection(collection),如果是List还可以使用这个key(list)数组(array)
public Employee getEmpById(List<Integer> <u>ids</u>);取值:取出第一个id的值:   #{list[0]}
#{} 与${}的区别
#{}:可以获取map中的值或者pojo对象属性的值;
${}:可以获取map中的值或者pojo对象属性的值;
select * from tbl_employee where id=${id} and  last_name=#{lastName}
Preparing: select * from tbl_employee where id=2 and last_name=?
区别:#{}:是以预编译的形式,将参数设置到<u>sql</u>语句中;PreparedStatement;防止<u>sql</u>注入${}:取出的值直接拼装在<u>sql</u>语句中;会有安全问题;大多情况下,我们去参数的值都应该去使用#{};原生<u>jdbc</u>不支持占位符的地方我们就可以使用${}进行取值比如分表、排序。。。;按照年份分表拆分select * from ${year}_salary where <u>xxx</u>;select * from tbl_employee order by ${f_name} ${order}
#{}:更丰富的用法:
在Oracle中如果SQL中含有null字段,序号设置 **jdbcTypeForNull=NULL**规定参数的一些规则:javaType、 jdbcType、 mode(存储过程)、
numericScale、resultMap、 typeHandler、 jdbcTypeName、 expression(未来准备支持的功能);jdbcType通常需要在某种特定的条件下被设置:在我们数据为null的时候,有些数据库可能不能识别<u>mybatis</u>对null的默认处理。比如Oracle(报错);JdbcType OTHER:无效的类型;因为<u>mybatis</u>对所有的null都映射的是原生<u>Jdbc</u>的OTHER类型,oracle不能正确处理;由于全局配置中:jdbcTypeForNull=OTHER;oracle不支持;两种办法1、#{email,jdbcType=OTHER};2、jdbcTypeForNull=NULL<setting name="jdbcTypeForNull"   value="NULL"/>
4、结果映射
5、自动映射
6、缓存
两级缓存:
一级缓存:(本地缓存):sqlSession级别的缓存。一级缓存是一直开启的;SqlSession级别的一个Map
与数据库同一次会话期间查询到的数据会放在本地缓存中。
以后如果需要获取相同的数据,直接从缓存中拿,没必要再去查询数据库;一级缓存失效情况(没有使用到当前一级缓存的情况,效果就是,还需要再向数据库发出查询):
1、sqlSession不同。
2、sqlSession相同,查询条件不同.(当前一级缓存中还没有这个数据)
3、sqlSession相同,两次查询之间执行了增删改操作(这次增删改可能对当前数据有影响)
4、sqlSession相同,手动清除了一级缓存(缓存清空)二级缓存:(全局缓存):基于namespace级别的缓存:一个namespace对应一个二级缓存:
工作机制:
1、一个会话,查询一条数据,这个数据就会被放在当前会话的一级缓存中;
2、如果会话关闭;一级缓存中的数据会被保存到二级缓存中;新的会话查询信息,就可以参照二级缓存中的内容;
3、sqlSession=EmployeeMapper>Employee
DepartmentMapper===>Department
不同namespace查出的数据会放在自己对应的缓存中(map)
效果:数据会从二级缓存中获取
查出的数据都会被默认先放在一级缓存中。
只有会话提交或者关闭以后,一级缓存中的数据才会转移到二级缓存中
使用:
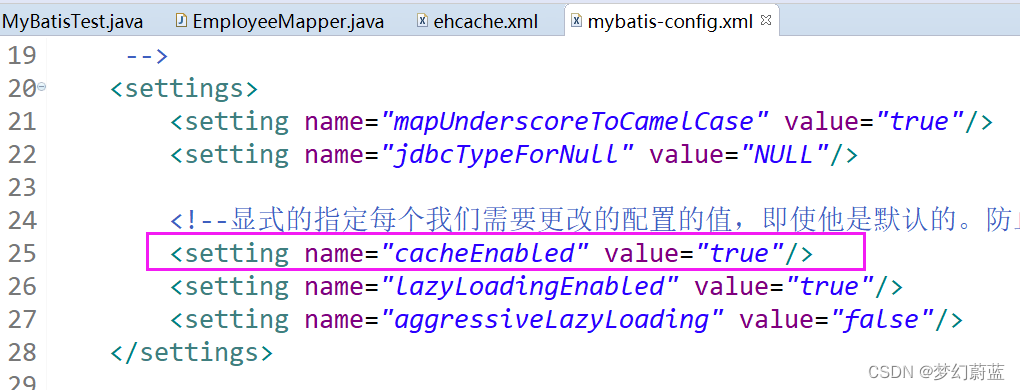
1)、开启全局二级缓存配置:
2)、去mapper.xml中配置使用二级缓存:
3)、我们的POJO需要实现序列化接口
和缓存有关的设置/属性:
1)、cacheEnabled=true:false:关闭缓存(二级缓存关闭)(一级缓存一直可用的)
2)、每个select标签都有useCache=“true”:
false:不使用缓存(一级缓存依然使用,二级缓存不使用)
3)、【每个增删改标签的:flushCache=“true”:(一级二级都会清除)】
增删改执行完成后就会清楚缓存;
测试:flushCache=“true”:一级缓存就清空了;二级也会被清除;
查询标签:flushCache=“false”:
如果flushCache=true;每次查询之后都会清空缓存;缓存是没有被使用的;
4)、sqlSession.clearCache();只是清楚当前session的一级缓存;
5)、localCacheScope:本地缓存作用域:(一级缓存SESSION);当前会话的所有数据保存在会话缓存中;
STATEMENT:可以禁用一级缓存;
第三方缓存整合:
1)、导入第三方缓存包即可;
2)、导入与第三方缓存整合的适配包;官方有;
3)、mapper.xml中使用自定义缓存 @throws
IOException
1、一级缓存
一级缓存:(本地缓存):sqlSession级别的缓存。一级缓存是一直开启的;SqlSession级别的一个Map
与数据库同一次会话期间查询到的数据会放在本地缓存中。
以后如果需要获取相同的数据,直接从缓存中拿,没必要再去查询数据库;一级缓存失效情况(没有使用到当前一级缓存的情况,效果就是,还需要再向数据库发出查询):
1、sqlSession不同。
2、sqlSession相同,查询条件不同.(当前一级缓存中还没有这个数据)
3、sqlSession相同,两次查询之间执行了增删改操作(这次增删改可能对当前数据有影响)
4、sqlSession相同,手动清除了一级缓存(缓存清空)
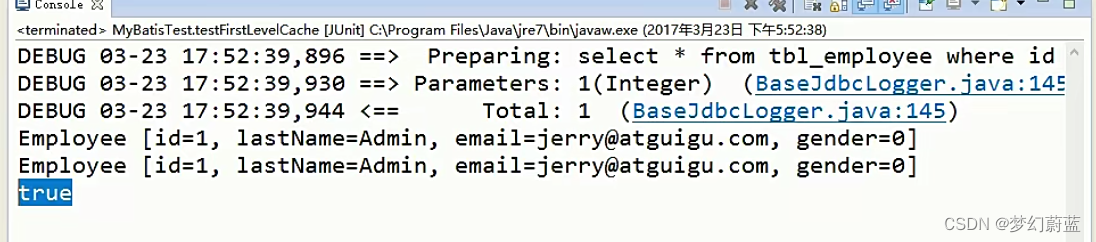
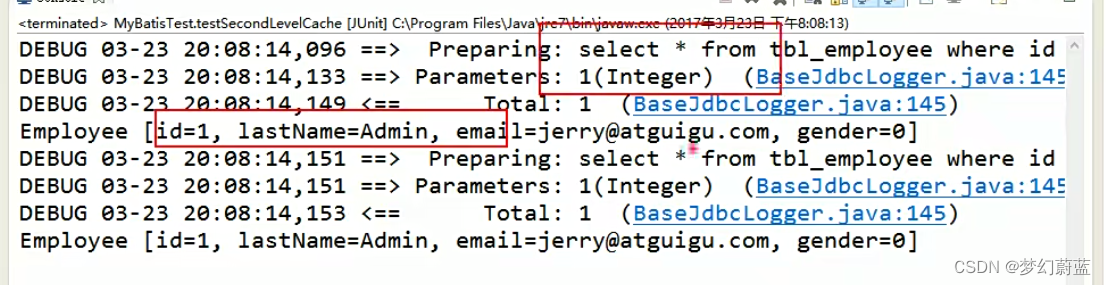
(1)一级缓存体验
@Testpublic void testFirstLevelCache() throws IOException{SqlSessionFactory sqlSessionFactory = getSqlSessionFactory();SqlSession openSession = sqlSessionFactory.openSession();try{EmployeeMapper mapper = openSession.getMapper(EmployeeMapper.class);Employee emp01 = mapper.getEmpById(1);System.out.println(emp01);//xxxxxEmployee emp02 = mapper.getEmpById(1);System.out.println(emp02);System.out.println(emp01==emp02);}finally{openSession.close();}}
由下图结果可知,两次查询只有第一次发送了SQL,第二次直接在缓存中获取。
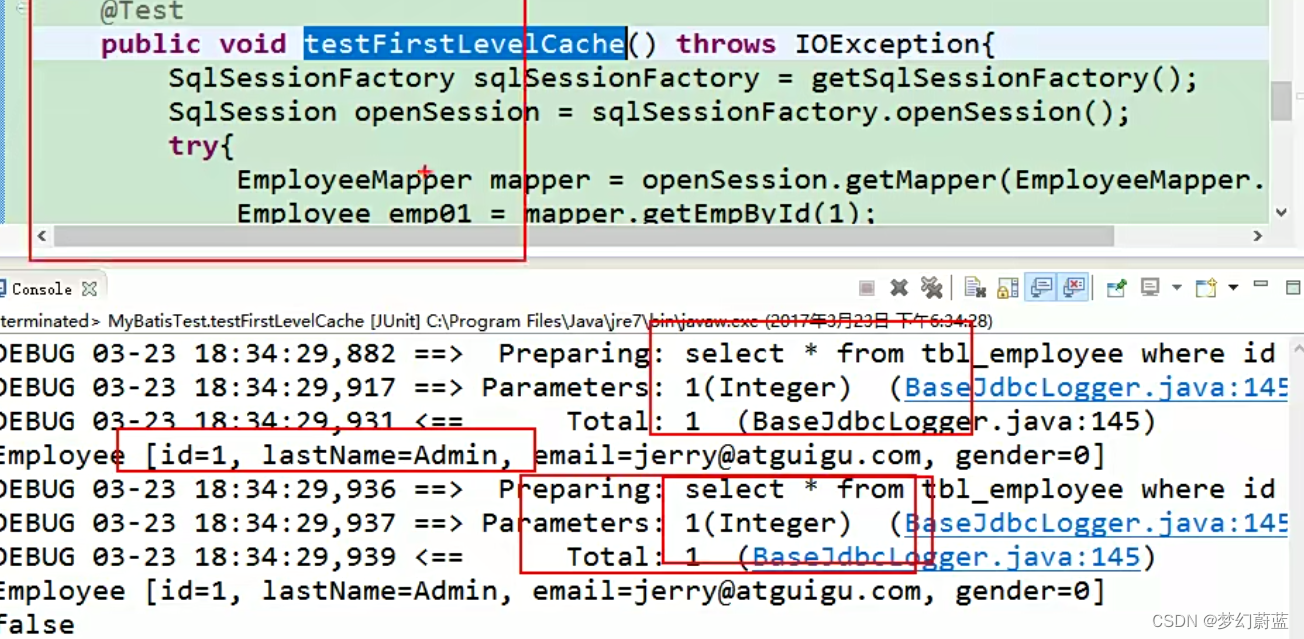
(2)sqlSession不同
@Testpublic void testFirstLevelCache() throws IOException{SqlSessionFactory sqlSessionFactory = getSqlSessionFactory();SqlSession openSession = sqlSessionFactory.openSession();try{EmployeeMapper mapper = openSession.getMapper(EmployeeMapper.class);Employee emp01 = mapper.getEmpById(1);System.out.println(emp01);//xxxxx//1、sqlSession不同。SqlSession openSession2 = sqlSessionFactory.openSession();EmployeeMapper mapper2 = openSession2.getMapper(EmployeeMapper.class);Employee emp02 = mapper.getEmpById(1); System.out.println(emp02); System.out.println(emp01==emp02);}finally{openSession.close();}}
结果:
发送两次SQL
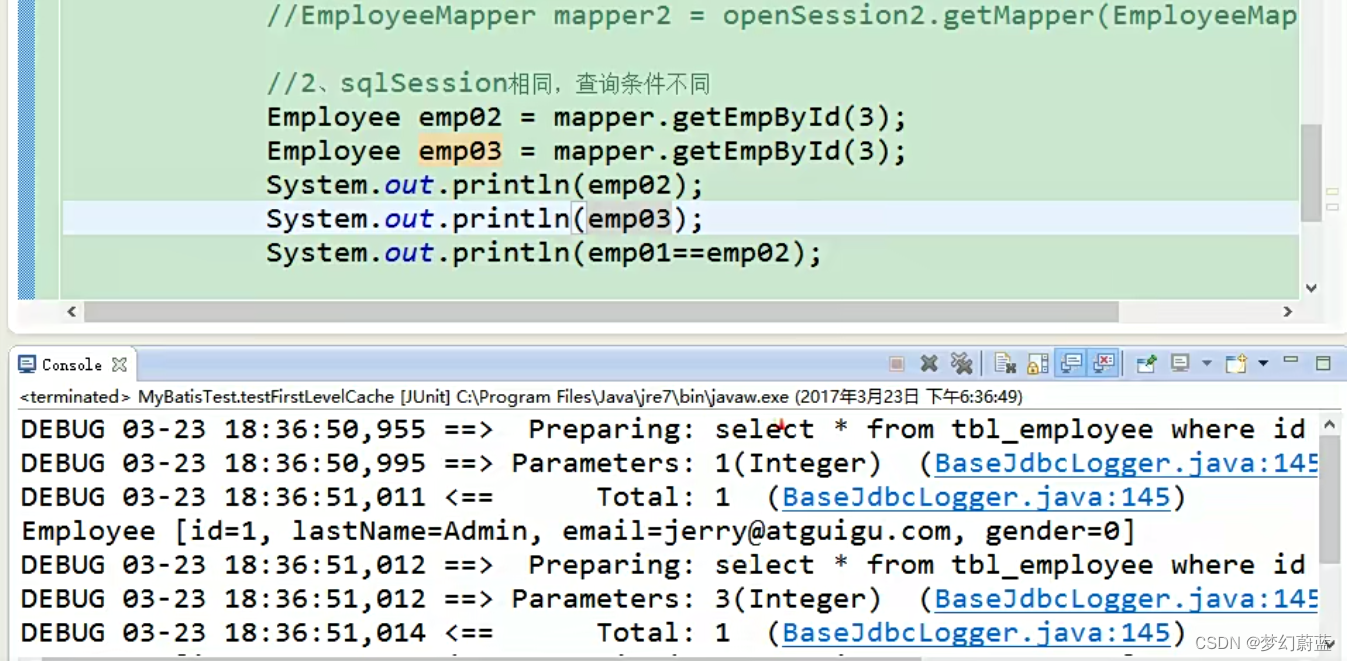
(3)sqlSession相同,查询条件不同.(当前一级缓存中还没有这个数据)
@Testpublic void testFirstLevelCache() throws IOException{SqlSessionFactory sqlSessionFactory = getSqlSessionFactory();SqlSession openSession = sqlSessionFactory.openSession();try{EmployeeMapper mapper = openSession.getMapper(EmployeeMapper.class);Employee emp01 = mapper.getEmpById(1);System.out.println(emp01);//xxxxx//2、sqlSession相同,查询条件不同 Employee emp02 = mapper.getEmpById(3); System.out.println(emp02); System.out.println(emp01==emp02);}finally{openSession.close();}}
查询结果:
发送两次SQL,因为当前的缓存中还没有3号员工的 信息
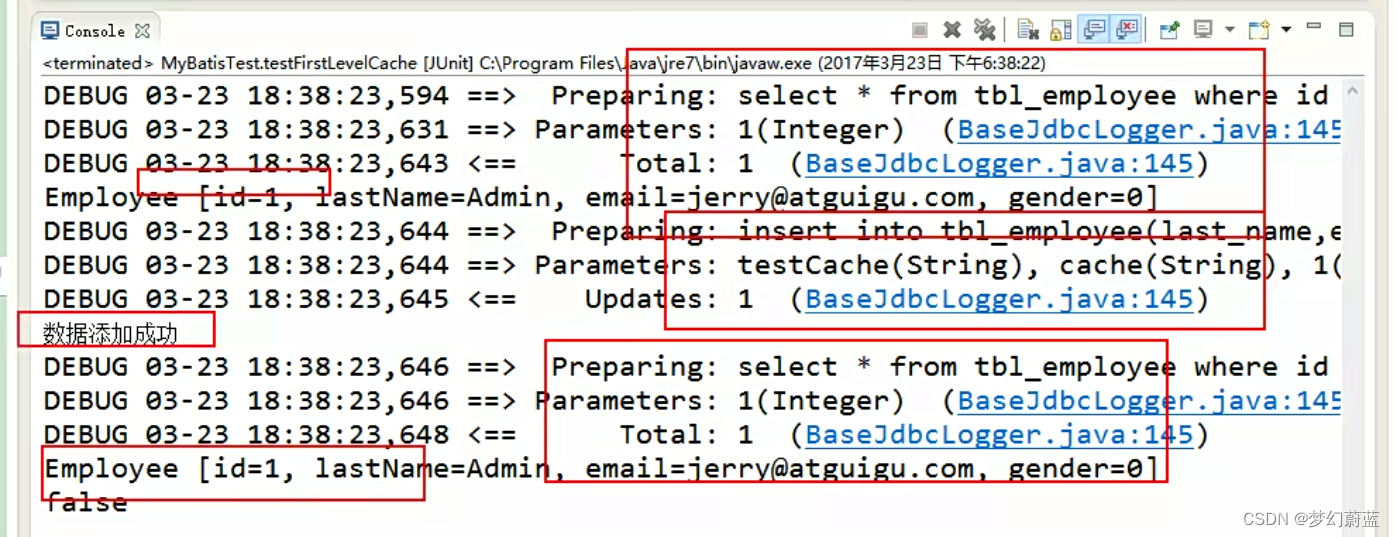
(4)sqlSession相同,两次查询之间执行了增删改操作(这次增删改可能对当前数据有影响)
@Testpublic void testFirstLevelCache() throws IOException{SqlSessionFactory sqlSessionFactory = getSqlSessionFactory();SqlSession openSession = sqlSessionFactory.openSession();try{EmployeeMapper mapper = openSession.getMapper(EmployeeMapper.class);Employee emp01 = mapper.getEmpById(1);System.out.println(emp01);//xxxxx//3、sqlSession相同,两次查询之间执行了增删改操作(这次增删改可能对当前数据有影响)mapper.addEmp(new Employee(null, "testCache", "cache", "1"));System.out.println("数据添加成功"); Employee emp02 = mapper.getEmpById(1); System.out.println(emp02); System.out.println(emp01==emp02);}finally{openSession.close();}}
测试结果:
由一下结果可知,在经过增删改查后,数据库有变化,则需要重新查询SQL
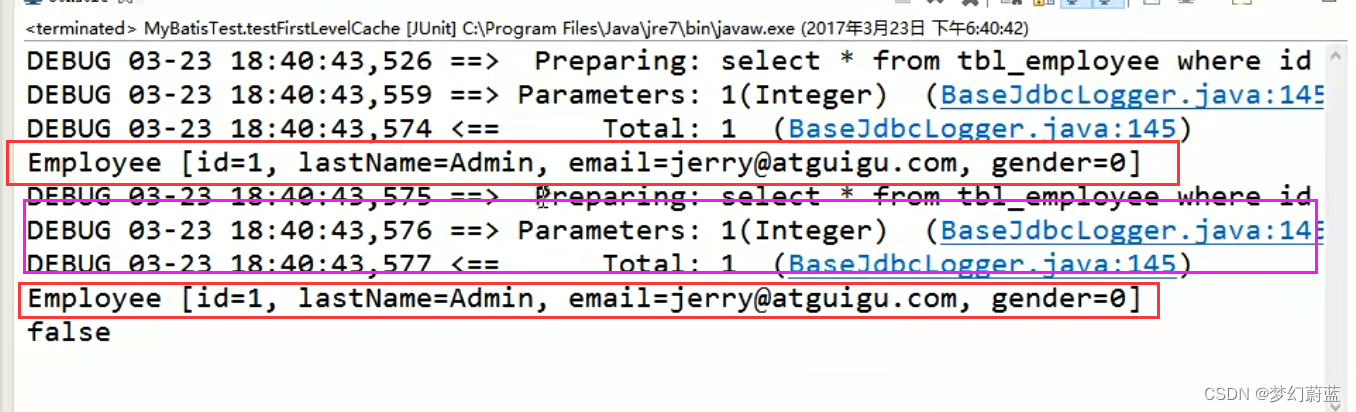
(5)sqlSession相同,手动清除了一级缓存(缓存清空)
@Testpublic void testFirstLevelCache() throws IOException{SqlSessionFactory sqlSessionFactory = getSqlSessionFactory();SqlSession openSession = sqlSessionFactory.openSession();try{EmployeeMapper mapper = openSession.getMapper(EmployeeMapper.class);Employee emp01 = mapper.getEmpById(1);System.out.println(emp01);//xxxxx//4、sqlSession相同,手动清除了一级缓存(缓存清空)//openSession.clearCache();Employee emp02 = mapper.getEmpById(1); System.out.println(emp02);System.out.println(emp01==emp02);}finally{openSession.close();}}
测试结果:
在手动清空缓存之后,会再次提交SQL
2、二级缓存
二级缓存:(全局缓存):基于namespace级别的缓存:一个namespace对应一个二级缓存:
工作机制:
1、一个会话,查询一条数据,这个数据就会被放在当前会话的一级缓存中;
2、如果会话关闭;一级缓存中的数据会被保存到二级缓存中;新的会话查询信息,就可以参照二级缓存中的内容;
3、sqlSession=EmployeeMapper>Employee
DepartmentMapper===>Department
不同namespace查出的数据会放在自己对应的缓存中(map)
效果:数据会从二级缓存中获取
查出的数据都会被默认先放在一级缓存中。
只有会话提交或者关闭以后,一级缓存中的数据才会转移到二级缓存中
使用:
1)、开启全局二级缓存配置:
2)、去mapper.xml中配置使用二级缓存:
3)、我们的POJO需要实现序列化接口
和缓存有关的设置/属性:
1)、cacheEnabled=true:false:关闭缓存(二级缓存关闭)(一级缓存一直可用的)
2)、每个select标签都有useCache=“true”:
false:不使用缓存(一级缓存依然使用,二级缓存不使用)
3)、【每个增删改标签的:flushCache=“true”:(一级二级都会清除)】
增删改执行完成后就会清楚缓存;
测试:flushCache=“true”:一级缓存就清空了;二级也会被清除;
查询标签:flushCache=“false”:
如果flushCache=true;每次查询之后都会清空缓存;缓存是没有被使用的;
4)、sqlSession.clearCache();只是清楚当前session的一级缓存;
5)、localCacheScope:本地缓存作用域:(一级缓存SESSION);当前会话的所有数据保存在会话缓存中;
STATEMENT:可以禁用一级缓存;
1、开启全局二级缓存
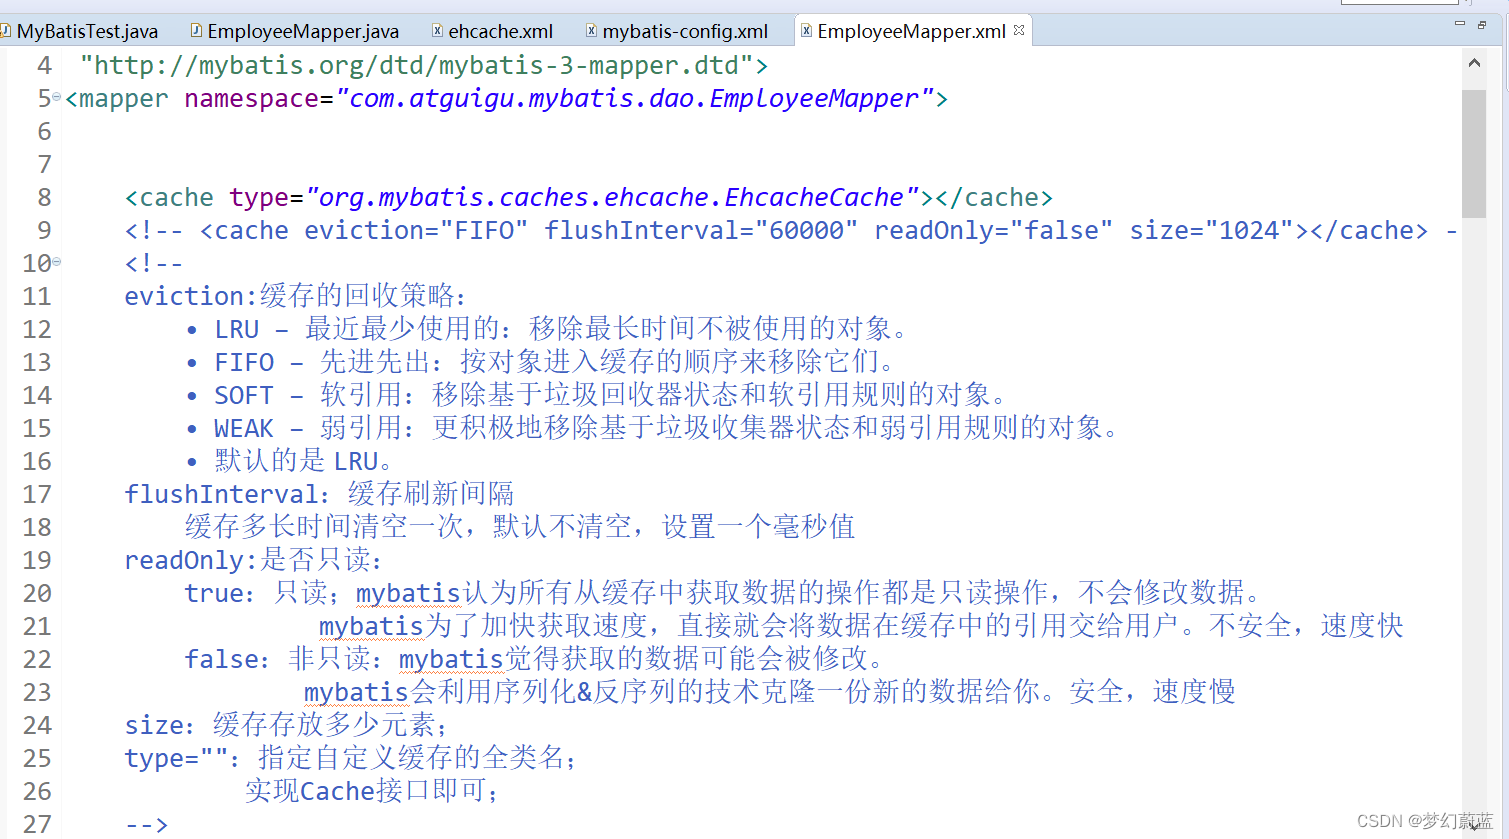
2、在mapper中配置使用二级缓存
不需要设置,使用默认的设置即可
<cache></cache>
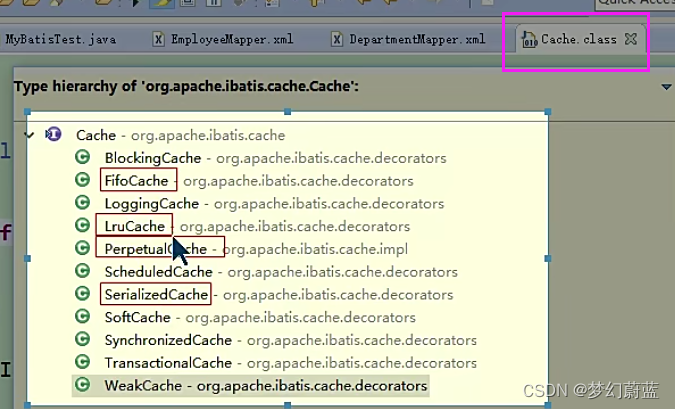
<cache eviction="FIFO" flushInterval="60000" readOnly="false" size="1024"></cache>
eviction:缓存的回收策略:• LRU – 最近最少使用的:移除最长时间不被使用的对象。• FIFO – 先进先出:按对象进入缓存的顺序来移除它们。• SOFT – 软引用:移除基于垃圾回收器状态和软引用规则的对象。• WEAK – 弱引用:更积极地移除基于垃圾收集器 状态和弱引用规则的对象。• 默认的是 LRU。flushInterval:缓存刷新间隔缓存多长时间清空一次,默认不清空,设置一个毫秒值readOnly:是否只读:true:只读;mybatis认为所有从缓存中获取数据的操作都是只读操作,不会修改数据。mybatis为了加快获取速度,直接就会将数据在缓存中的引用交给用户。不安全,速度快false:非只读:mybatis觉得获取的数据可能会被修改。mybatis会利用序列化&反序列的技术克隆一份新的数据给你。安全,速度慢size:缓存存放多少元素;type="":指定自定义缓存的全类名;实现Cache接口即可;
3、我们的POJO需要实现序列化接口
public class Employee implements Serializable{
private static final long serialVersionUID = 1L;
}
package com.atguigu.mybatis.bean;import java.io.Serializable;import org.apache.ibatis.type.Alias;@Alias("emp")
public class Employee implements Serializable{/*** */private static final long serialVersionUID = 1L;private Integer id;private String lastName;private String email;private String gender;private Department dept;public Employee() {super();}public Employee(Integer id, String lastName, String email, String gender,Department dept) {super();this.id = id;this.lastName = lastName;this.email = email;this.gender = gender;this.dept = dept;}public Employee(Integer id, String lastName, String email, String gender) {super();this.id = id;this.lastName = lastName;this.email = email;this.gender = gender;}public Department getDept() {return dept;}public void setDept(Department dept) {this.dept = dept;}public Integer getId() {return id;}public void setId(Integer id) {this.id = id;}public String getLastName() {return lastName;}public void setLastName(String lastName) {this.lastName = lastName;}public String getEmail() {return email;}public void setEmail(String email) {this.email = email;}public String getGender() {return gender;}public void setGender(String gender) {this.gender = gender;}@Overridepublic String toString() {return "Employee [id=" + id + ", lastName=" + lastName + ", email="+ email + ", gender=" + gender + "]";}}
未开启之前,发两次SQL
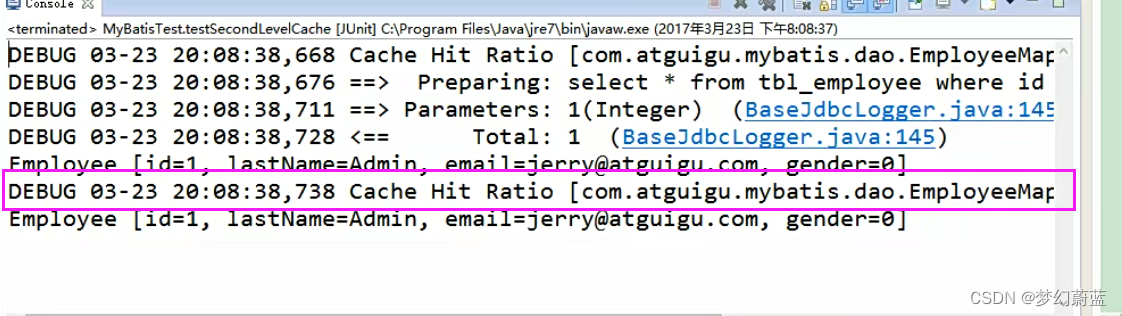
测试代码:
@Testpublic void testSecondLevelCache() throws IOException{SqlSessionFactory sqlSessionFactory = getSqlSessionFactory();SqlSession openSession = sqlSessionFactory.openSession();SqlSession openSession2 = sqlSessionFactory.openSession();try{//1、两次同时查询一个mapperEmployeeMapper mapper = openSession.getMapper(EmployeeMapper.class);EmployeeMapper mapper2 = openSession2.getMapper(EmployeeMapper.class);Employee emp01 = mapper.getEmpById(1);System.out.println(emp01);openSession.close();//第二次查询是从二级缓存中拿到的数据,并没有发送新的sql//mapper2.addEmp(new Employee(null, "aaa", "nnn", "0"));Employee emp02 = mapper2.getEmpById(1);System.out.println(emp02);openSession2.close();}finally{}}
开启缓存的效果:
3、sqlSession=EmployeeMapper>Employee
DepartmentMapper===>Department
不同namespace查出的数据会放在自己对应的缓存中(map)
效果:数据会从二级缓存中获取
查出的数据都会被默认先放在一级缓存中。
只有会话提交或者关闭以后,一级缓存中的数据才会转移到二级缓存中 从缓存中获取数据
3、 缓存的一些参数配置
<!-- public void addEmp(Employee employee); --><!-- parameterType:参数类型,可以省略, 获取自增主键的值:mysql支持自增主键,自增主键值的获取,mybatis也是利用statement.getGenreatedKeys();useGeneratedKeys="true";使用自增主键获取主键值策略keyProperty;指定对应的主键属性,也就是mybatis获取到主键值以后,将这个值封装给javaBean的哪个属性flushCache:清空缓存,清空一级缓存--><insert id="addEmp" parameterType="com.atguigu.mybatis.bean.Employee"useGeneratedKeys="true" keyProperty="id" databaseId="mysql"flushCache="true">insert into tbl_employee(last_name,email,gender) values(#{lastName},#{email},#{gender})</insert>
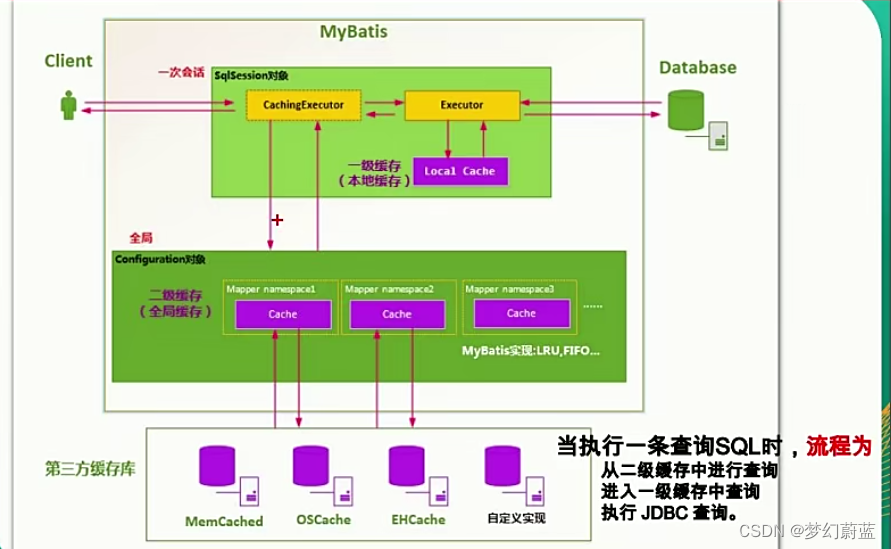
4、缓存原理图示
cache 接口中的缓存
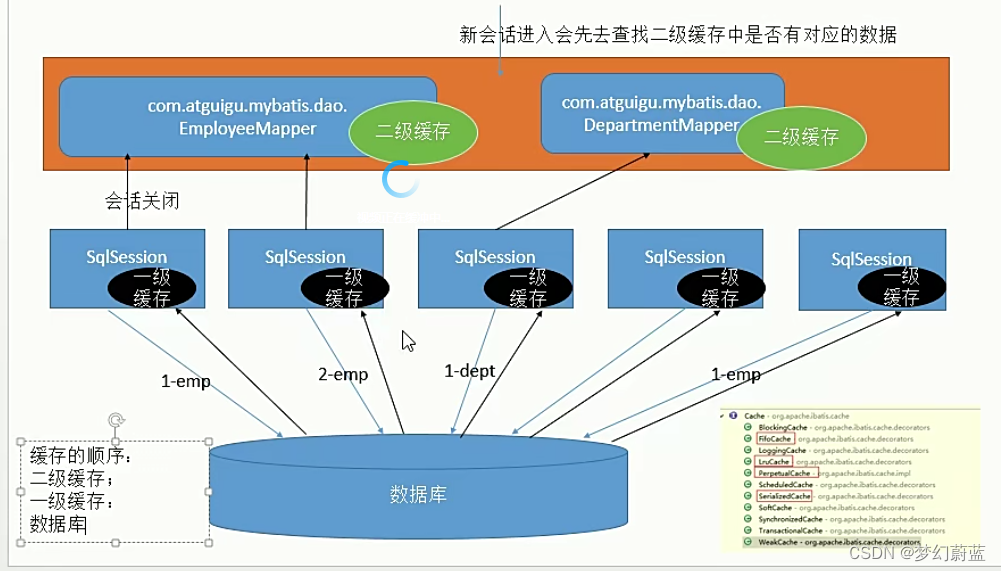
执行的时候,先找二级缓存,再找一级缓存,没有在进行JDBC操作。
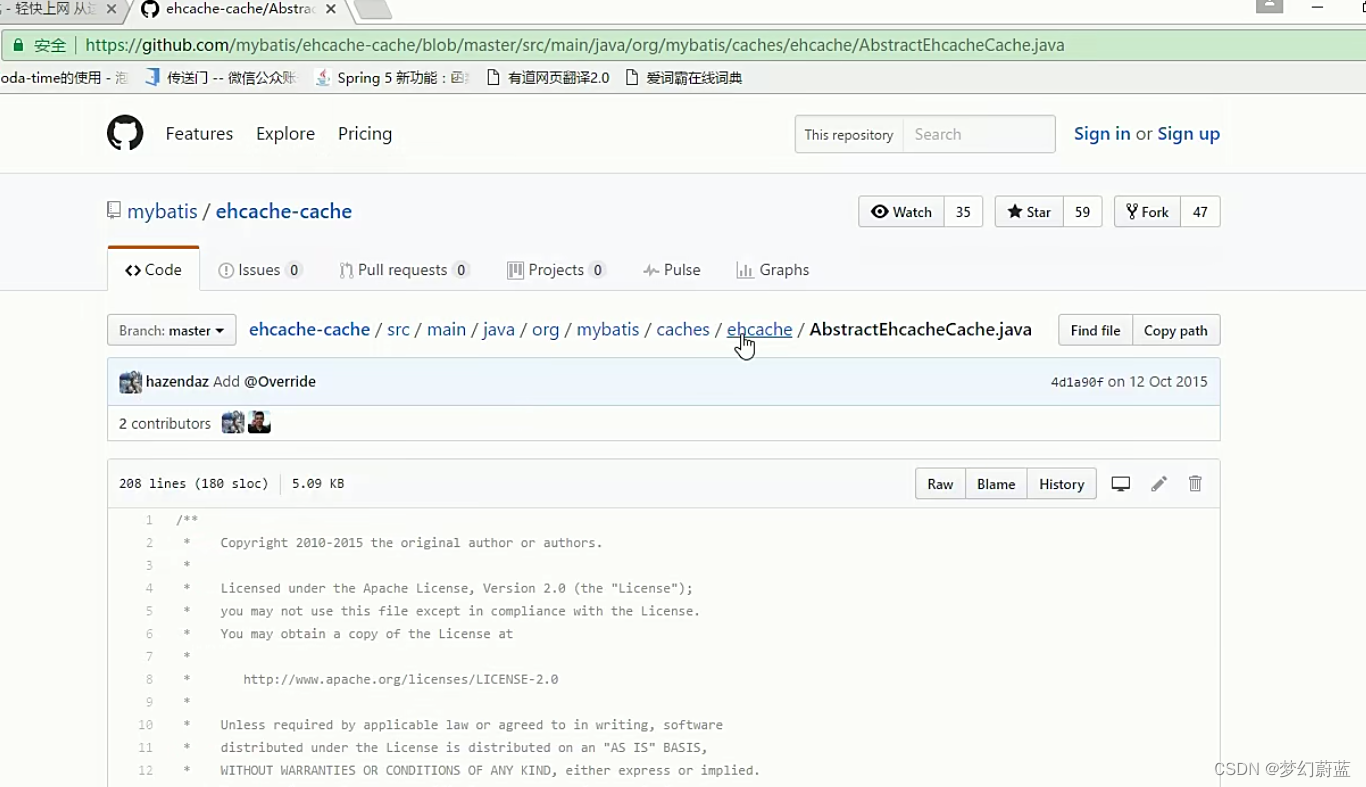
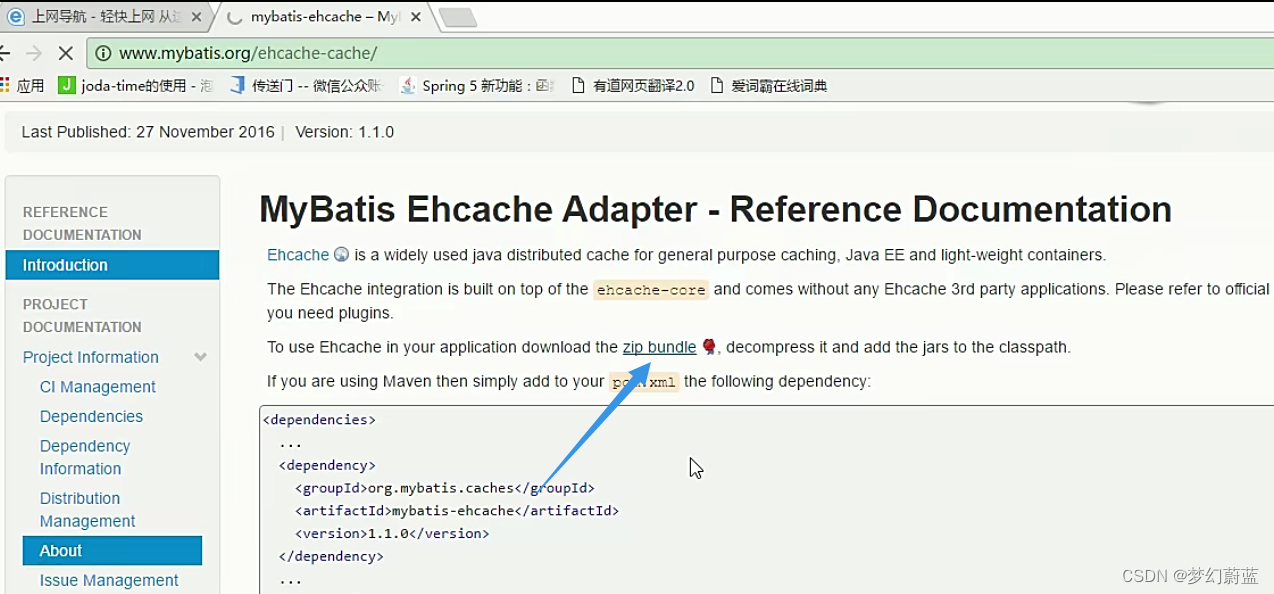
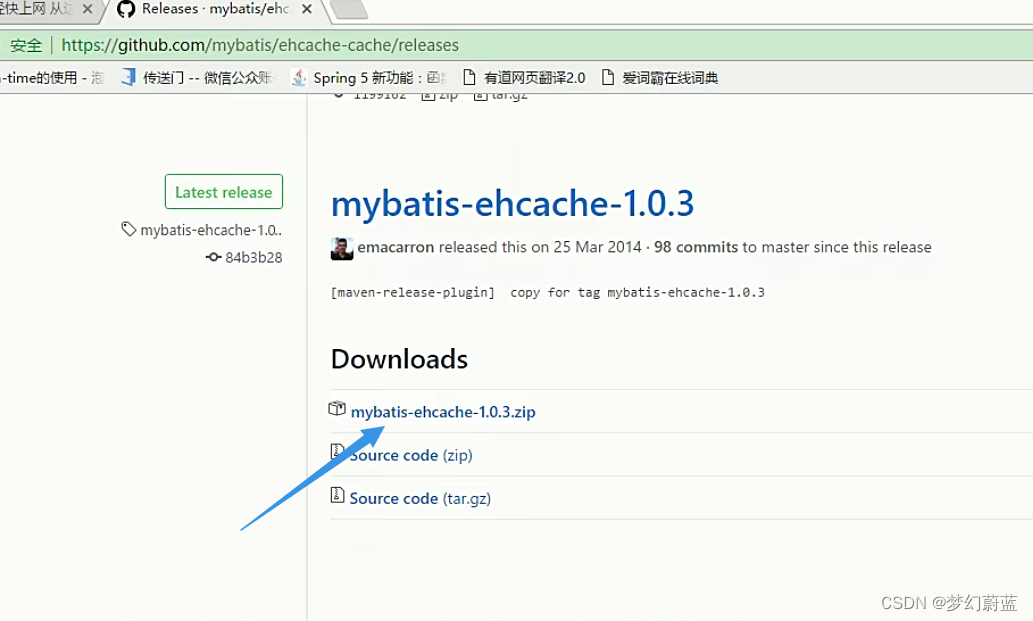
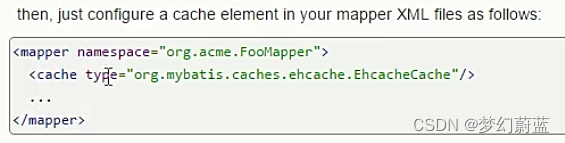
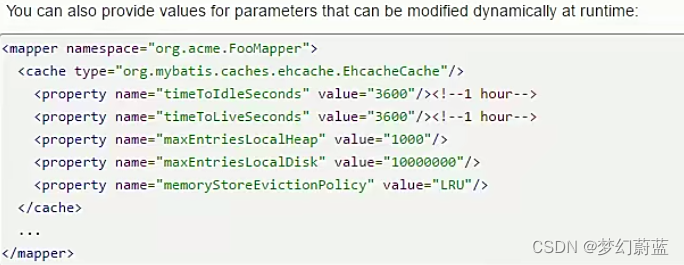
5、第三方缓存整合原理ehcache适配包
缓存整合步骤
*第三方缓存整合:
* 1)、导入第三方缓存包即可;
* 2)、导入与第三方缓存整合的适配包;官方有;
* 3)、mapper.xml中使用自定义缓存
<cache type="org.mybatis.caches.ehcache.EhcacheCache"></cache>
在官网下載整合包


导入整合包,
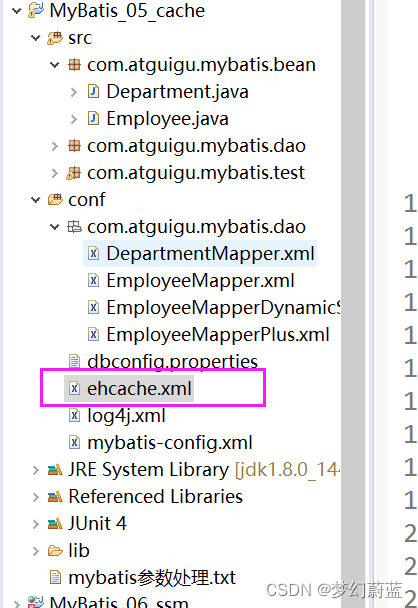
指定存放路径,
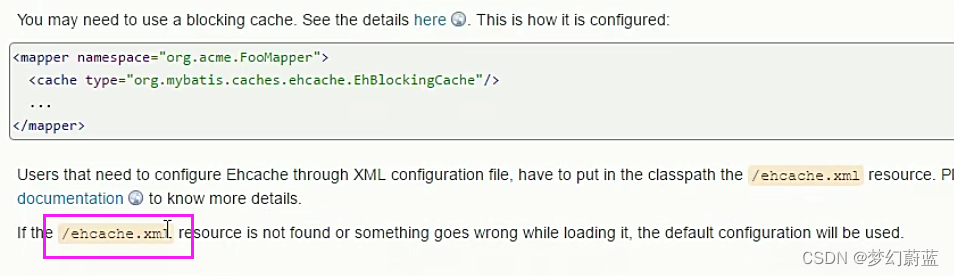 将这个ehcache.xml复制到路径下,

结构目录如下:
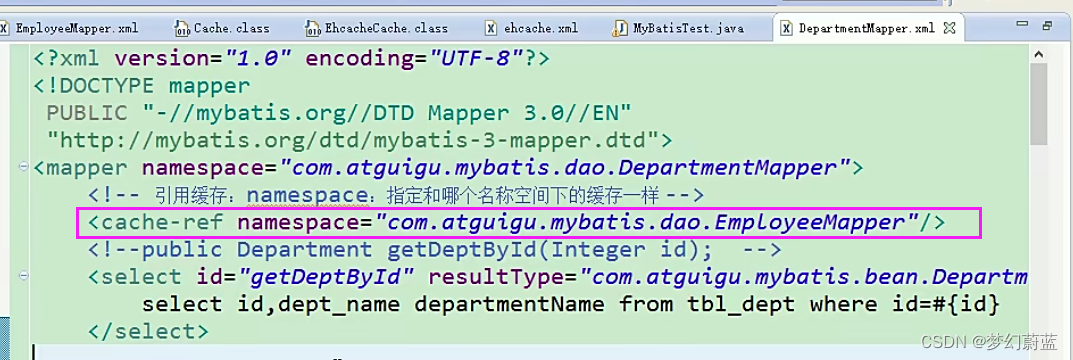
在别的namespace中引用ehcache,方法:
<mapper namespace="com.atguigu.mybatis.dao.EmployeeMapper"><cache type="org.mybatis.caches.ehcache.EhcacheCache"></cache>
</mapper>
引用上面的cache
<mapper namespace="com.atguigu.mybatis.dao.DepartmentMapper"><!-- 引用缓存:namespace:指定和哪个名称空间下的缓存一样 --><cache-ref namespace="com.atguigu.mybatis.dao.EmployeeMapper"/><!--public Department getDeptById(Integer id);  --><select id="getDeptById" resultType="com.atguigu.mybatis.bean.Department">select id,dept_name departmentName from tbl_dept where id=#{id}</select>
</mapper>
四、动态SQL
if
choose (when, otherwise)
trim (where, set)
foreach
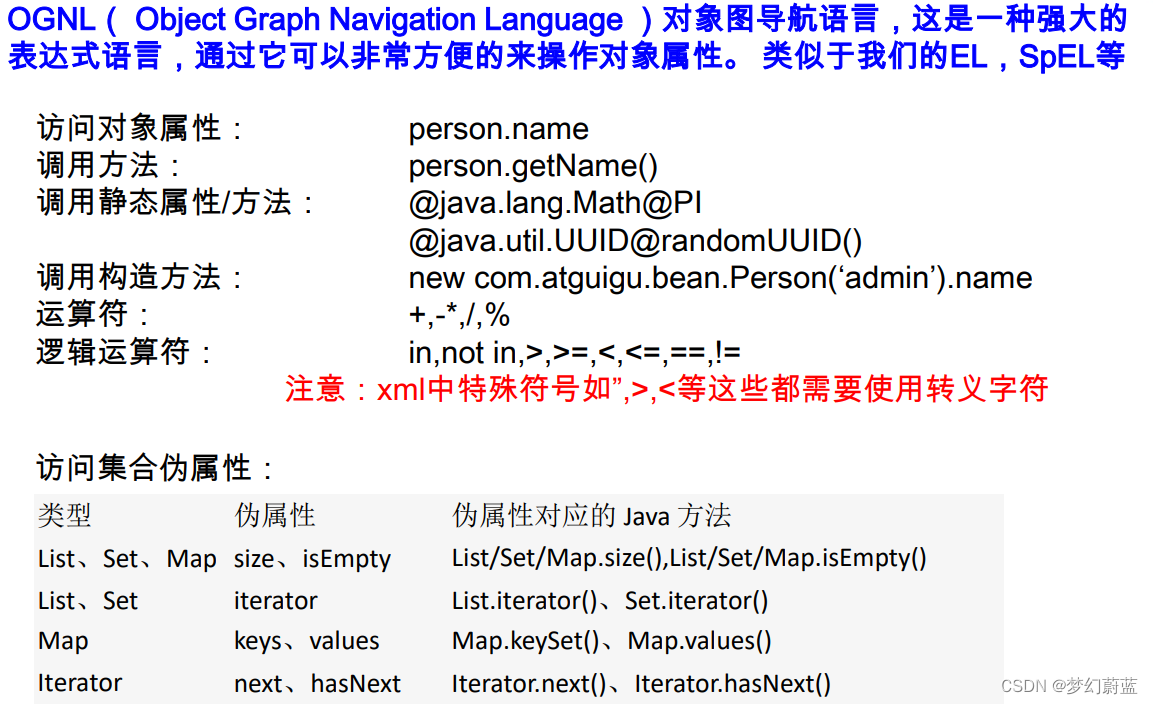
OGNL
1、if
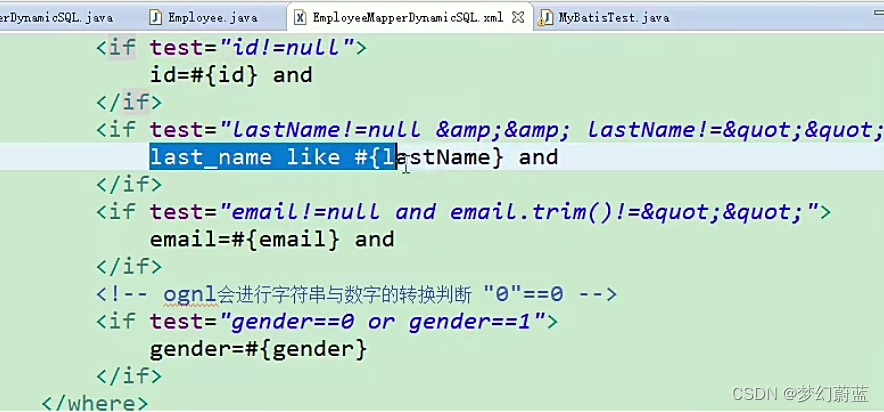
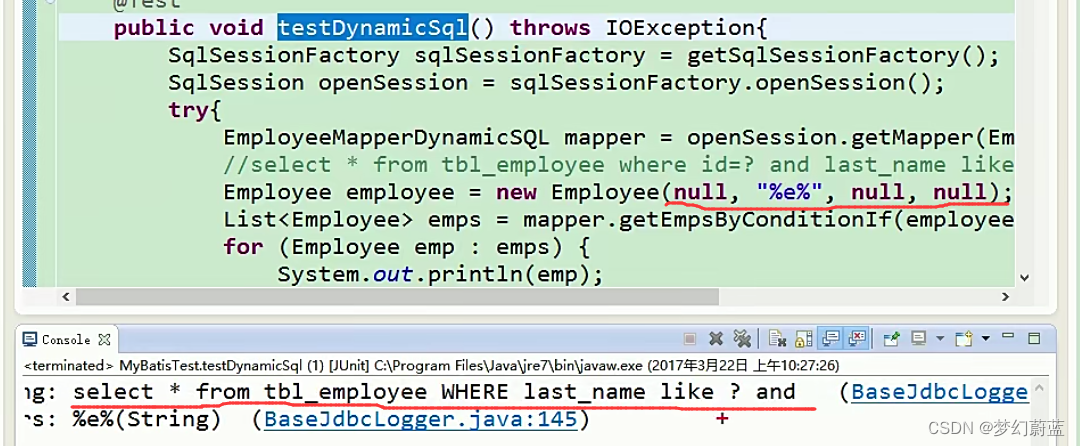
<!-- 查询员工,要求,携带了哪个字段查询条件就带上这个字段的值 --><!-- public List<Employee> getEmpsByConditionIf(Employee employee); --><select id="getEmpsByConditionIf" resultType="com.atguigu.mybatis.bean.Employee">select * from tbl_employee<!-- test:判断表达式(OGNL)OGNL参照PPT或者官方文档。c:if test从参数中取值进行判断遇见特殊符号应该去写转义字符:&&:&&'':""--><if test="id!=null">id=#{id}</if><!--<if test="lastName!=null && lastName!='' "> --><if test="lastName!=null && lastName!=""">and last_name like #{lastName}</if><if test="email!=null and email.trim()!=""">and email=#{email}</if> <!-- OGML 会进行字符串与数字的转换判断 "0"==0 --><if test="gender==0 or gender==1">and gender=#{gender}</if></select>
演示效果:
在不合法的时候,该字段不会展示在SQL查询中,实现动态的SQL查询
查询的时候如果某些条件没带,可能SQL拼装会出问题
1、给where 后面加1=1,以后的条件都and XXX.
2、MyBatis 使用WHERE 标签将所有的查询条件包括在内,MyBatis 就会将where 标签中片状的SQL,多出来的and 或者or去掉
3、将and写在每一句的后面,可能造成只去掉第一个多出来的and或者or
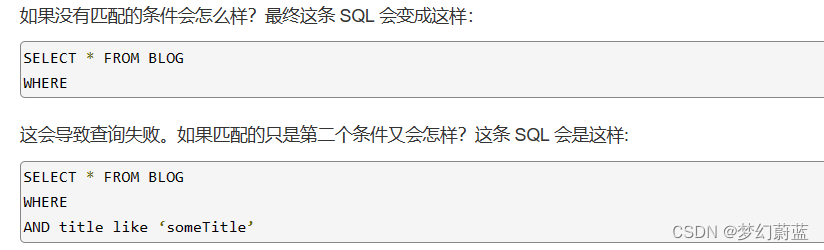
完整代码,加上where
where 元素只会在子元素返回任何内容的情况下才插入 “WHERE” 子句。而且,若子句的开头为 “AND” 或 “OR”,where 元素也会将它们去除。
<!-- 查询员工,要求,携带了哪个字段查询条件就带上这个字段的值 --><!-- public List<Employee> getEmpsByConditionIf(Employee employee); --><select id="getEmpsByConditionIf" resultType="com.atguigu.mybatis.bean.Employee">select * from tbl_employee<!-- where --><where><!-- test:判断表达式(OGNL)OGNL参照PPT或者官方文档。c:if test从参数中取值进行判断遇见特殊符号应该去写转义字符:&&:&&'':""--><if test="id!=null">id=#{id}</if><!--<if test="lastName!=null && lastName!='' "> --><if test="lastName!=null && lastName!=""">and last_name like #{lastName}</if><if test="email!=null and email.trim()!=""">and email=#{email}</if> <!-- OGML 会进行字符串与数字的转换判断 "0"==0 --><if test="gender==0 or gender==1">and gender=#{gender}</if></where></select>
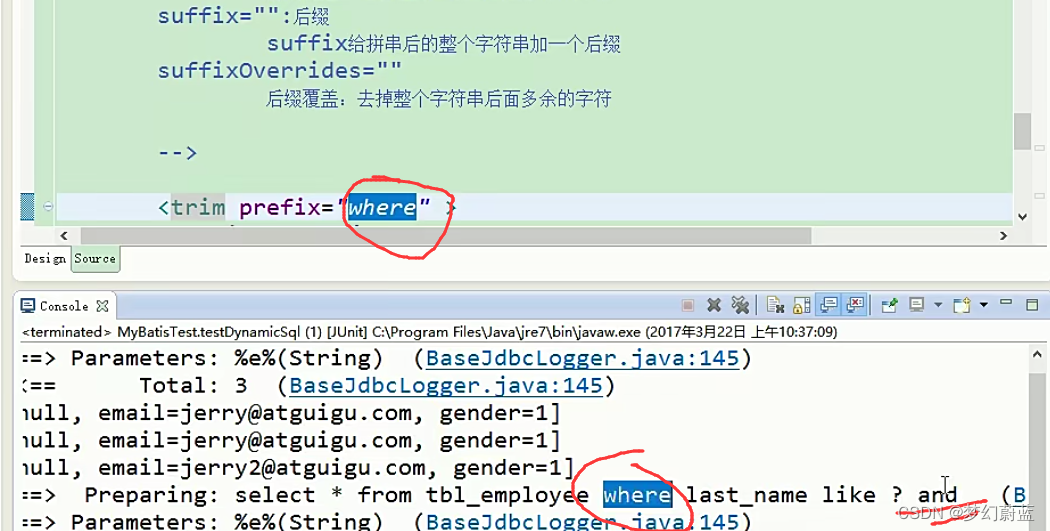
2、trim 去掉前缀后缀
where
<!--public List<Employee> getEmpsByConditionTrim(Employee employee); --><select id="getEmpsByConditionTrim" resultType="com.atguigu.mybatis.bean.Employee">select * from tbl_employee<!-- 后面多出的and或者or where标签不能解决 prefix="":前缀:trim标签体中是整个字符串拼串 后的结果。prefix给拼串后的整个字符串加一个前缀 prefixOverrides="":前缀覆盖: 去掉整个字符串前面多余的字符suffix="":后缀suffix给拼串后的整个字符串加一个后缀 suffixOverrides=""后缀覆盖:去掉整个字符串后面多余的字符--><!-- 自定义字符串的截取规则 --><trim prefix="where" suffixOverrides="and"><if test="id!=null">id=#{id} and</if><if test="lastName!=null && lastName!=""">last_name like #{lastName} and</if><if test="email!=null and email.trim()!=""">email=#{email} and</if> <!-- ognl会进行字符串与数字的转换判断 "0"==0 --><if test="gender==0 or gender==1">gender=#{gender}</if></trim></select>
未加suffixOverrides=""的效果
set(封装修改条件)
带的某一列的值,更新某一列。
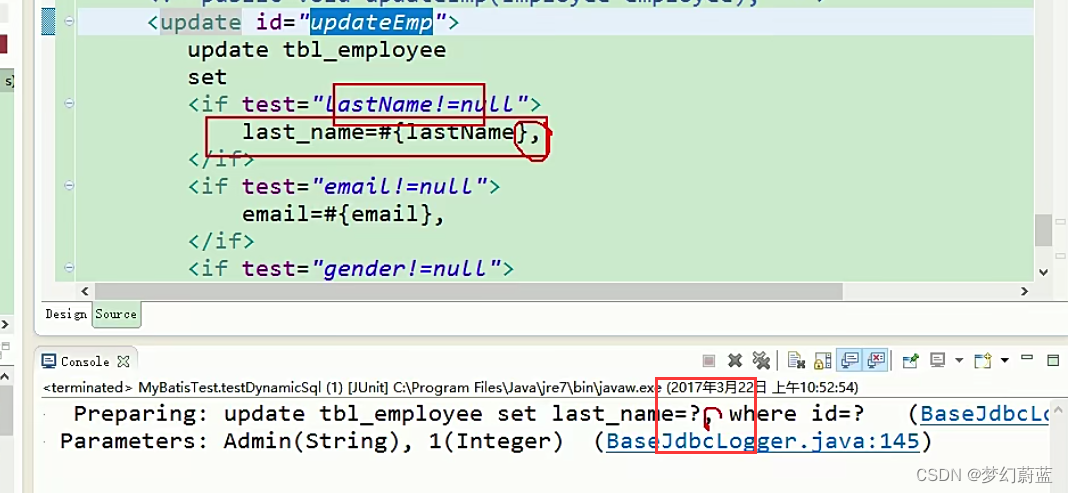
不加set标签
<!--public void updateEmp(Employee employee);  --><update id="updateEmp"><!-- Set标签的使用 -->update tbl_employee set<if test="lastName!=null">last_name=#{lastName},</if><if test="email!=null">email=#{email},</if><if test="gender!=null">gender=#{gender}</if>where id=#{id} </update>
只更新一列,会出错,
加set标签
<!--public void updateEmp(Employee employee); --><update id="updateEmp"><!-- Set标签的使用 -->update tbl_employee <set><if test="lastName!=null">last_name=#{lastName},</if><if test="email!=null">email=#{email},</if><if test="gender!=null">gender=#{gender}</if></set>where id=#{id} </update>
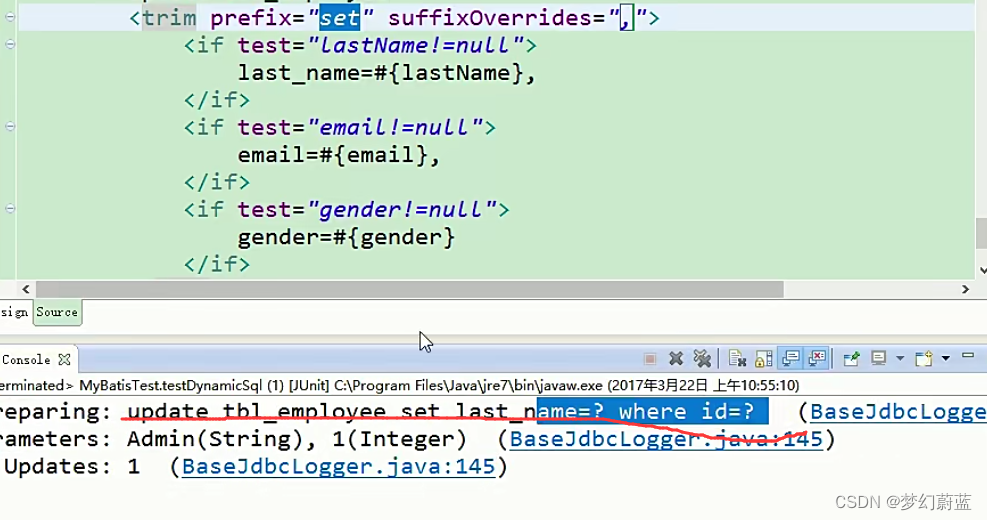
另一种方案,加trim标签
update tbl_employee <update id="updateEmp"><trim prefix="set" suffixOverrides=","><if test="lastName!=null">last_name=#{lastName},</if><if test="email!=null">email=#{email},</if><if test="gender!=null">gender=#{gender}</if></trim>where id=#{id} --></update>
测试:
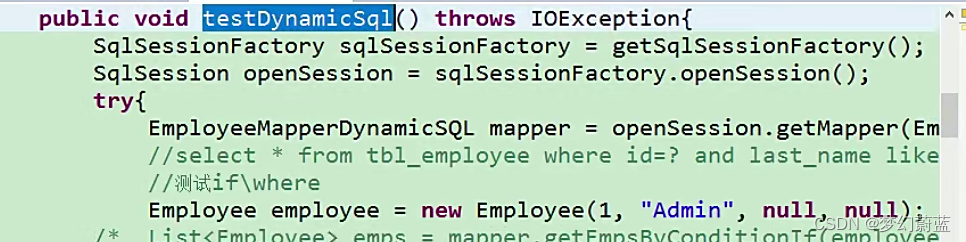
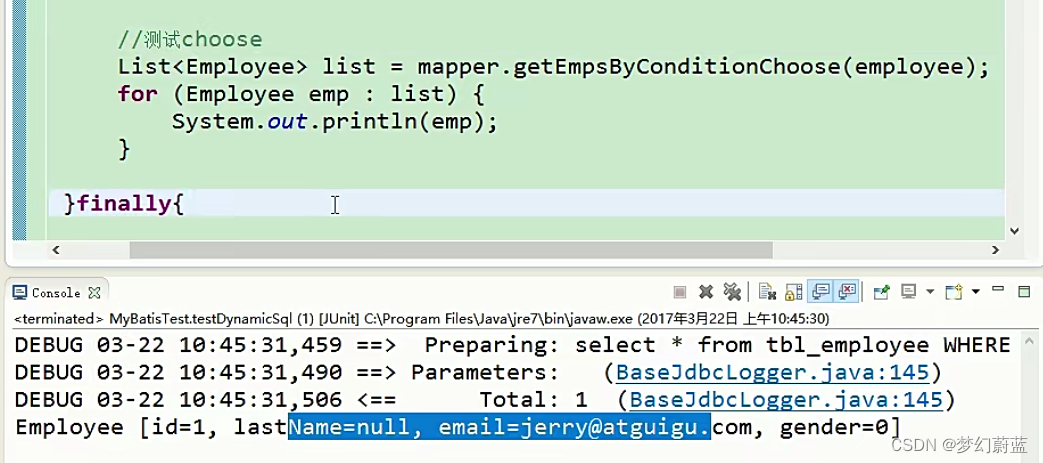
3、choose (when、otherwise)分支选择:swtich-case
如果带了id就用id查,如果带了lastName就用lastName查;只会进入其中一个
<!-- public List<Employee> getEmpsByConditionChoose(Employee employee); --><select id="getEmpsByConditionChoose" resultType="com.atguigu.mybatis.bean.Employee">select * from tbl_employee <where><!-- 如果带了id就用id查,如果带了lastName就用lastName查;只会进入其中一个 --><choose><when test="id!=null">id=#{id}</when><when test="lastName!=null">last_name like #{lastName}</when><when test="email!=null">email = #{email}</when><otherwise>gender = 0</otherwise></choose></where></select>
4、foreach
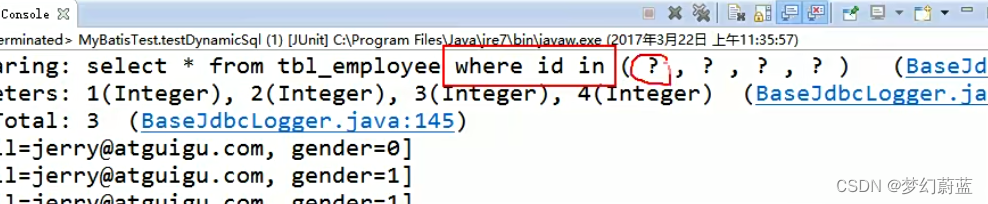
<!--public List<Employee> getEmpsByConditionForeach(List<Integer> ids); --><select id="getEmpsByConditionForeach" resultType="com.atguigu.mybatis.bean.Employee">select * from tbl_employee<!--collection:指定要遍历的集合:list类型的参数会特殊处理封装在map中,map的key就叫listitem:将当前遍历出的元素赋值给指定的变量separator:每个元素之间的分隔符open:遍历出所有结果拼接一个开始的字符close:遍历出所有结果拼接一个结束的字符index:索引。遍历list的时候是index就是索引,item就是当前值遍历map的时候index表示的就是map的key,item就是map的值#{变量名}就能取出变量的值也就是当前遍历出的元素--><foreach collection="ids" item="item_id" separator=","open="where id in(" close=")">#{item_id}</foreach></select>
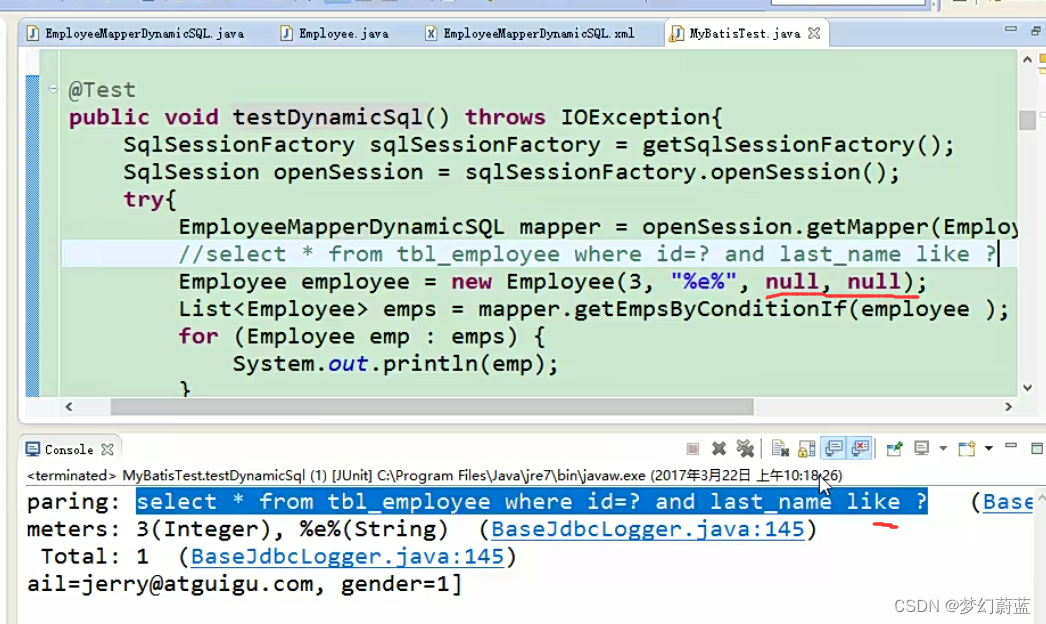
测试:
@Testpublic void testDynamicSql() throws IOException{SqlSessionFactory sqlSessionFactory = getSqlSessionFactory();SqlSession openSession = sqlSessionFactory.openSession();try{EmployeeMapperDynamicSQL mapper = openSession.getMapper(EmployeeMapperDynamicSQL.class);Employee employee = new Employee(1, "Admin", null, null);List<Employee> list = mapper.getEmpsByConditionForeach(Arrays.asList(1,2));for (Employee emp : list) {System.out.println(emp);}}finally{openSession.close();}}
测试结果:
6、批量保存
1、MYSQL 中数据的保存
XML配置
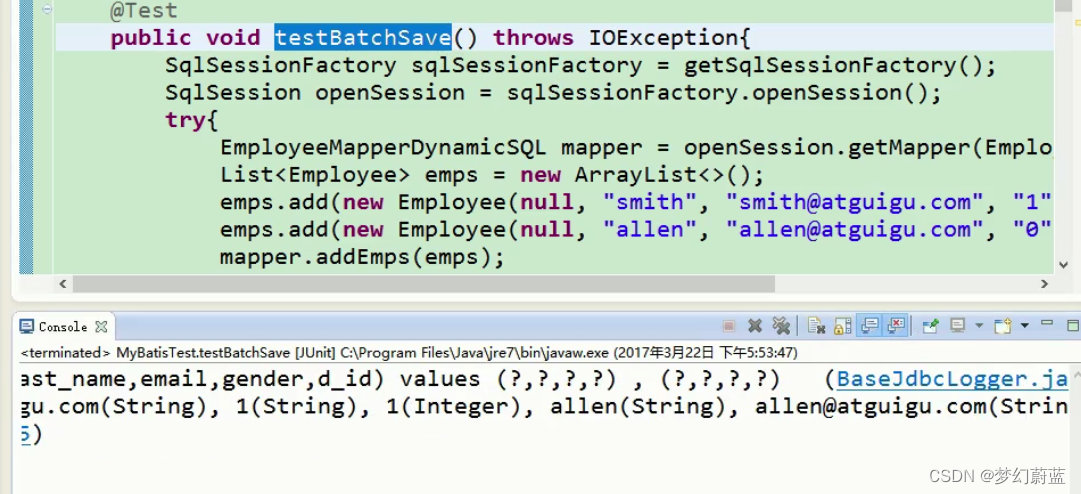
<!-- 批量保存 --><!--public void addEmps(@Param("emps")List<Employee> emps); --><!--MySQL下批量保存:可以foreach遍历 mysql支持values(),(),()语法--><insert id="addEmps">insert into tbl_employee(last_name,email,gender,d_id) values<foreach collection="emps" item="emp" separator=",">(#{emp.lastName},#{emp.email},#{emp.gender},#{emp.dept.id})</foreach></insert>
测试方法:
@Testpublic void testBatchSave() throws IOException{SqlSessionFactory sqlSessionFactory = getSqlSessionFactory();SqlSession openSession = sqlSessionFactory.openSession();try{EmployeeMapperDynamicSQL mapper = openSession.getMapper(EmployeeMapperDynamicSQL.class);List<Employee> emps = new ArrayList<>();emps.add(new Employee(null, "smith0x1", "smith0x1@atguigu.com", "1",new Department(1)));emps.add(new Employee(null, "allen0x1", "allen0x1@atguigu.com", "0",new Department(1)));mapper.addEmps(emps);openSession.commit();}finally{openSession.close();}}
测试结果:
另一种配置方式:

jdbc.driver=com.mysql.jdbc.Driver
jdbc.url=jdbc:mysql://localhost:3306/mybatis?allowMultiQueries=true
jdbc.username=root
jdbc.password=123456
<!-- 这种方式需要数据库连接属性allowMultiQueries=true;这种分号分隔多个sql可以用于其他的批量操作(删除,修改) --><insert id="addEmps"><foreach collection="emps" item="emp" separator=";">insert into tbl_employee(last_name,email,gender,d_id)values(#{emp.lastName},#{emp.email},#{emp.gender},#{emp.dept.id})</foreach></insert>
效果:
N个SQL语句的拼接
2、Oracle中数据库批量保存
<!-- Oracle数据库批量保存: Oracle不支持values(),(),()Oracle支持的批量方式1、多个insert放在begin - end里面begininsert into employees(employee_id,last_name,email) values(employees_seq.nextval,'test_001','test_001@atguigu.com');insert into employees(employee_id,last_name,email) values(employees_seq.nextval,'test_002','test_002@atguigu.com');end;2、利用中间表:insert into employees(employee_id,last_name,email)select employees_seq.nextval,lastName,email from(select 'test_a_01' lastName,'test_a_e01' email from dualunionselect 'test_a_02' lastName,'test_a_e02' email from dualunionselect 'test_a_03' lastName,'test_a_e03' email from dual) -->
1、第一种批量添加方式:
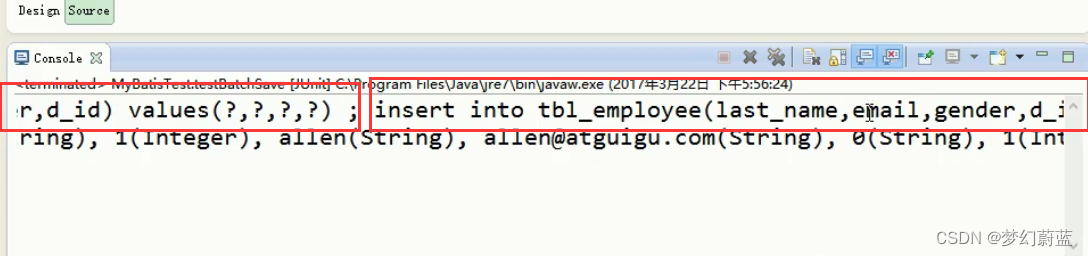
<insert id="addEmps" databaseId="oracle"><!-- oracle第一种批量方式 --><foreach collection="emps" item="emp" open="begin" close="end;">insert into employees(employee_id,last_name,email) values(employees_seq.nextval,#{emp.lastName},#{emp.email});</foreach>
</insert>
测试方法:
@Testpublic void testBatchSave() throws IOException{SqlSessionFactory sqlSessionFactory = getSqlSessionFactory();SqlSession openSession = sqlSessionFactory.openSession();try{EmployeeMapperDynamicSQL mapper = openSession.getMapper(EmployeeMapperDynamicSQL.class);List<Employee> emps = new ArrayList<>();emps.add(new Employee(null, "smith0x1", "smith0x1@atguigu.com", "1",new Department(1)));emps.add(new Employee(null, "allen0x1", "allen0x1@atguigu.com", "0",new Department(1)));mapper.addEmps(emps);openSession.commit();}finally{openSession.close();}}
测试结果:
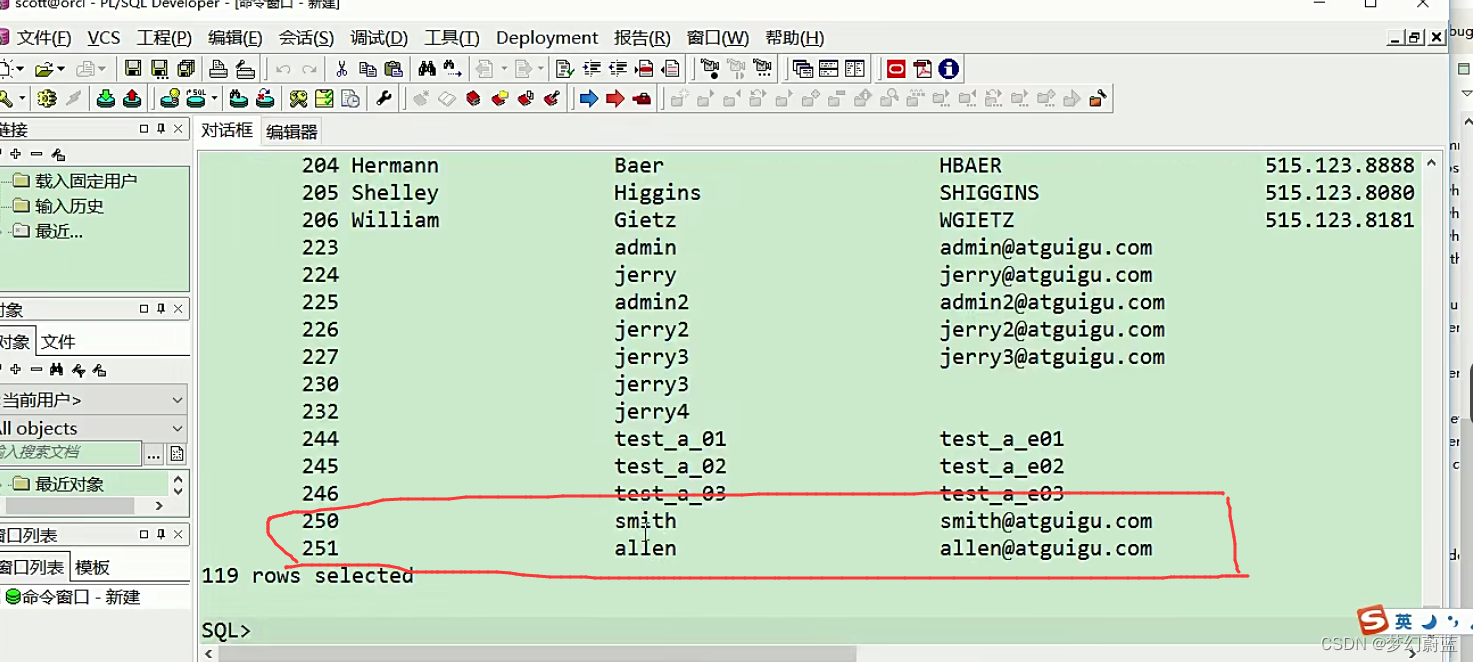
2、第二种方法:
<insert id="addEmps1" databaseId="oracle">insert into employees(employee_id,last_name,email)select employees_seq.nextval,lastName,email from(<foreach collection="emps" item="emp" separator="union">select #{emp.lastName} lastName,#{emp.email} email from dual</foreach>)</insert>
或者:
<insert id="addEmps1" databaseId="oracle">insert into employees(employee_id,last_name,email)<foreach collection="emps" item="emp" separator="union"open="select employees_seq.nextval,lastName,email from("close=")">select #{emp.lastName} lastName,#{emp.email} email from dual</foreach></insert>
测试方法:同第一种测试
@Testpublic void testBatchSave() throws IOException{SqlSessionFactory sqlSessionFactory = getSqlSessionFactory();SqlSession openSession = sqlSessionFactory.openSession();try{EmployeeMapperDynamicSQL mapper = openSession.getMapper(EmployeeMapperDynamicSQL.class);List<Employee> emps = new ArrayList<>();emps.add(new Employee(null, "smith0x1", "smith0x1@atguigu.com", "1",new Department(1)));emps.add(new Employee(null, "allen0x1", "allen0x1@atguigu.com", "0",new Department(1)));mapper.addEmps(emps);openSession.commit();}finally{openSession.close();}}
7、内置参数_parameter&_databaseId
1、MySQL和Oraacle中配置
不只是方法传递过来的参数可以被用来判断,取值。。。
mybatis默认还有两个内置参数:
_parameter:代表整个参数
单个参数:_parameter就是这个参数
多个参数:参数会被封装为一个map;_parameter就是代表这个map
_databaseId:如果配置了databaseIdProvider标签。
_databaseId就是代表当前数据库的别名oracle
XML配置
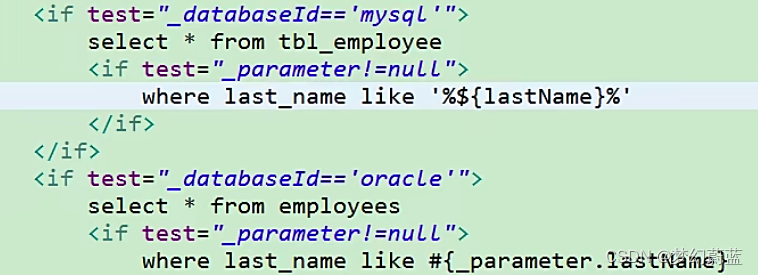
<!--public List<Employee> getEmpsTestInnerParameter(Employee employee); --><select id="getEmpsTestInnerParameter" resultType="com.atguigu.mybatis.bean.Employee"><if test="_databaseId=='mysql'">select * from tbl_employee </if><if test="_databaseId=='oracle'">select * from employees </if></select>
另一种写法:
<!--public List<Employee> getEmpsTestInnerParameter(Employee employee); _parameter:代表整个参数单个参数:_parameter就是这个参数多个参数:参数会被封装为一个map;_parameter就是代表这个map_databaseId:如果配置了databaseIdProvider标签。_databaseId就是代表当前数据库的别名oracle--><select id="getEmpsTestInnerParameter" resultType="com.atguigu.mybatis.bean.Employee"><if test="_databaseId=='mysql'">select * from tbl_employee<if test="_parameter!=null">where last_name = #{_parameter.lastName}</if></if><if test="_databaseId=='oracle'">select * from employees<if test="_parameter!=null">where last_name = #{_parameter.lastName}</if></if></select>
测试
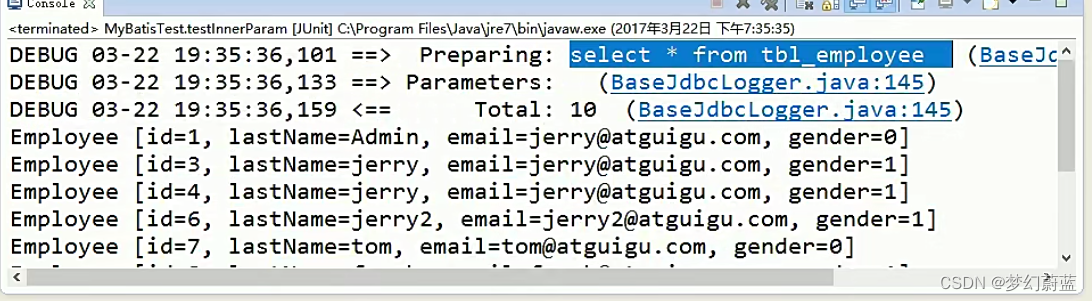
@Testpublic void testInnerParam() throws IOException{SqlSessionFactory sqlSessionFactory = getSqlSessionFactory();SqlSession openSession = sqlSessionFactory.openSession();try{EmployeeMapperDynamicSQL mapper = openSession.getMapper(EmployeeMapperDynamicSQL.class);List<Employee> list = mapper.getEmpsTestInnerParameter(employee2);for (Employee employee : list) {System.out.println(employee);}}finally{openSession.close();}}
运行结果:
2、bind
实现模糊查询:
(1)在测试方法中写“%e%”
@Testpublic void testInnerParam() throws IOException{SqlSessionFactory sqlSessionFactory = getSqlSessionFactory();SqlSession openSession = sqlSessionFactory.openSession();try{EmployeeMapperDynamicSQL mapper = openSession.getMapper(EmployeeMapperDynamicSQL.class);Employee employee2 = new Employee();employee2.setLastName("%e%");List<Employee> list = mapper.getEmpsTestInnerParameter(employee2);for (Employee employee : list) {System.out.println(employee);}}finally{openSession.close();}}
运行结果:

(2)在XML中拼接%
<select id="getEmpsTestInnerParameter" resultType="com.atguigu.mybatis.bean.Employee"><!-- bind:可以将OGNL表达式的值绑定到一个变量中,方便后来引用这个变量的值 --><if test="_databaseId=='mysql'">select * from tbl_employee<if test="_parameter!=null">where last_name like '%${lastName}%'</if></if><if test="_databaseId=='oracle'">select * from employees<if test="_parameter!=null">where last_name like #{_parameter.lastName}</if></if></select>
测试结果: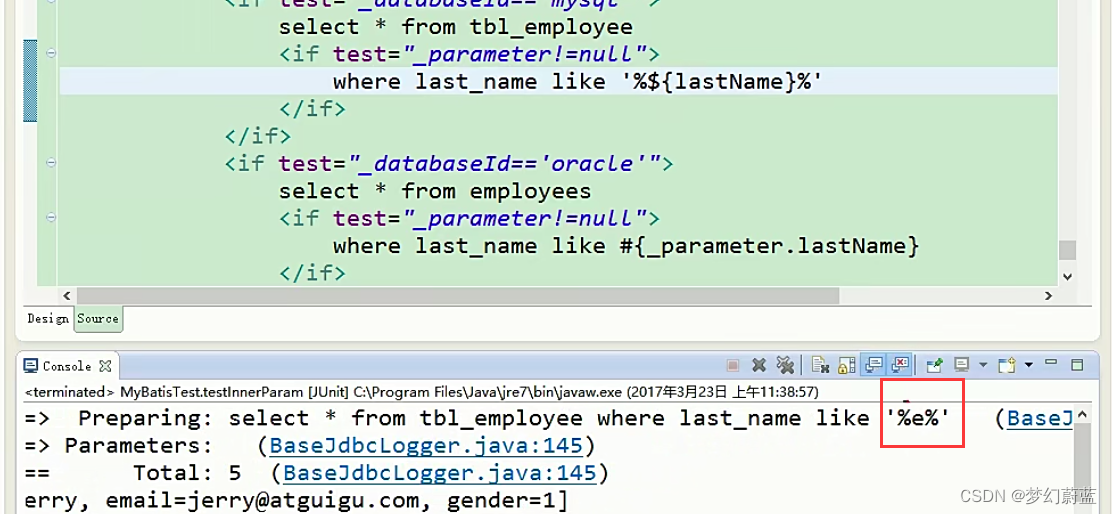
(3)使用bind解决
流程分析:value=“‘%’+lastName+'%'中拼接的字符串,赋值给name=”_lastName"中的值,在以后的调用中,直接输入#{_lastName}即可取出来值。
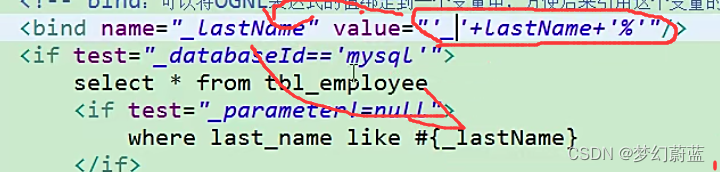
<!--public List<Employee> getEmpsTestInnerParameter(Employee employee); --><select id="getEmpsTestInnerParameter" resultType="com.atguigu.mybatis.bean.Employee"><!-- bind:可以将OGNL表达式的值绑定到一个变量中,方便后来引用这个变量的值 value:要绑定的值_lastName:被赋值的变量--><bind name="_lastName" value="'%'+lastName+'%'"/><if test="_databaseId=='mysql'">select * from tbl_employee<if test="_parameter!=null">where last_name like #{_lastName}</if></if><if test="_databaseId=='oracle'">select * from employees<if test="_parameter!=null">where last_name like #{_parameter.lastName}</if></if></select>
测试结果:
总结:
开发中还是按照传参进行,在传参的时候直接穿%e% 零活运用。
在XML中不做设置
where last_name like #{lastName}
<select id="getEmpsTestInnerParameter" resultType="com.atguigu.mybatis.bean.Employee"><!-- bind:可以将OGNL表达式的值绑定到一个变量中,方便后来引用这个变量的值 value:要绑定的值--><bind name="_lastName" value="'%'+lastName+'%'"/><if test="_databaseId=='mysql'">select * from tbl_employee<if test="_parameter!=null">where last_name like #{lastName}</if></if><if test="_databaseId=='oracle'">select * from employees<if test="_parameter!=null">where last_name like #{_parameter.lastName}</if></if></select>
@Testpublic void testInnerParam() throws IOException{SqlSessionFactory sqlSessionFactory = getSqlSessionFactory();SqlSession openSession = sqlSessionFactory.openSession();try{EmployeeMapperDynamicSQL mapper = openSession.getMapper(EmployeeMapperDynamicSQL.class);Employee employee2 = new Employee();employee2.setLastName("%e%");List<Employee> list = mapper.getEmpsTestInnerParameter(employee2);for (Employee employee : list) {System.out.println(employee);}}finally{openSession.close();}}
3、SQL抽取可重用的字段
抽取可重用的sql片段。方便后面引用
1、sql抽取:经常将要查询的列名,或者插入用的列名抽取出来方便引用
2、include来引用已经抽取的sql:
3、include还可以自定义一些property,sql标签内部就能使用自定义的属性
include-property:取值的正确方式${prop},
#{不能使用这种方式}
XML中
<sql id="insertColumn"><if test="_databaseId=='oracle'">employee_id,last_name,email</if><if test="_databaseId=='mysql'">last_name,email,gender,d_id</if></sql><!-- 改写批量保存 --><!--public void addEmps(@Param("emps")List<Employee> emps); --><!--MySQL下批量保存:可以foreach遍历 mysql支持values(),(),()语法--><insert id="addEmps">insert into tbl_employee(<include refid="insertColumn"></include>) values<foreach collection="emps" item="emp" separator=",">(#{emp.lastName},#{emp.email},#{emp.gender},#{emp.dept.id})</foreach></insert>
3、include还可以自定义一些property,sql标签内部就能使用自定义的属性
include-property:取值的正确方式${prop},
#{不能使用这种方式}
验证
<insert id="addEmps" databaseId="oracle"><!-- oracle第二种批量方式 -->insert into employees(<!-- 引用外部定义的sql --><include refid="insertColumn"><property name="testColomn" value="abc"/></include>)<foreach collection="emps" item="emp" separator="union"open="select employees_seq.nextval,lastName,email from("close=")">select #{emp.lastName} lastName,#{emp.email} email from dual</foreach></insert>
<sql id="insertColumn"><if test="_databaseId=='oracle'">employee_id,last_name,email,${testColomn}</if><if test="_databaseId=='mysql'">last_name,email,gender,d_id</if></sql>
测试结果:

五、MyBatis-Spring整合
下载依赖包,官网下载或者在学习资料中的如图所示。 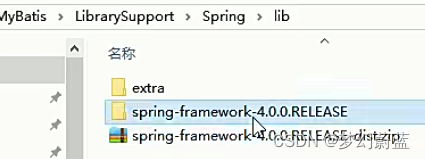
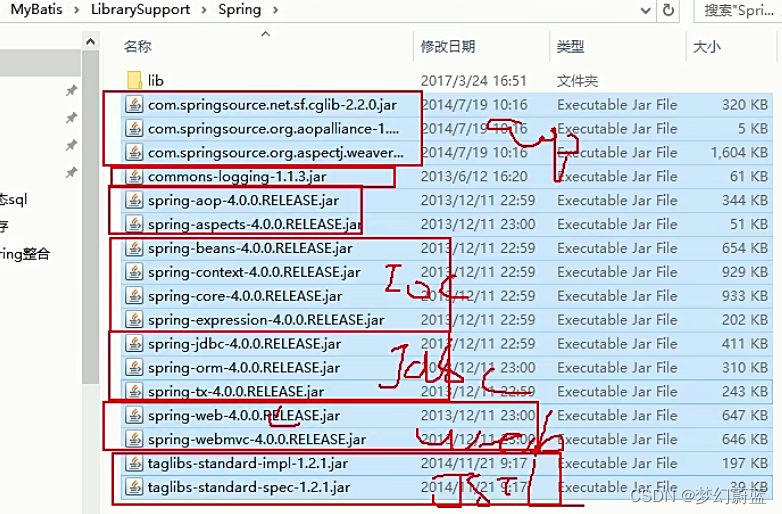
效果:
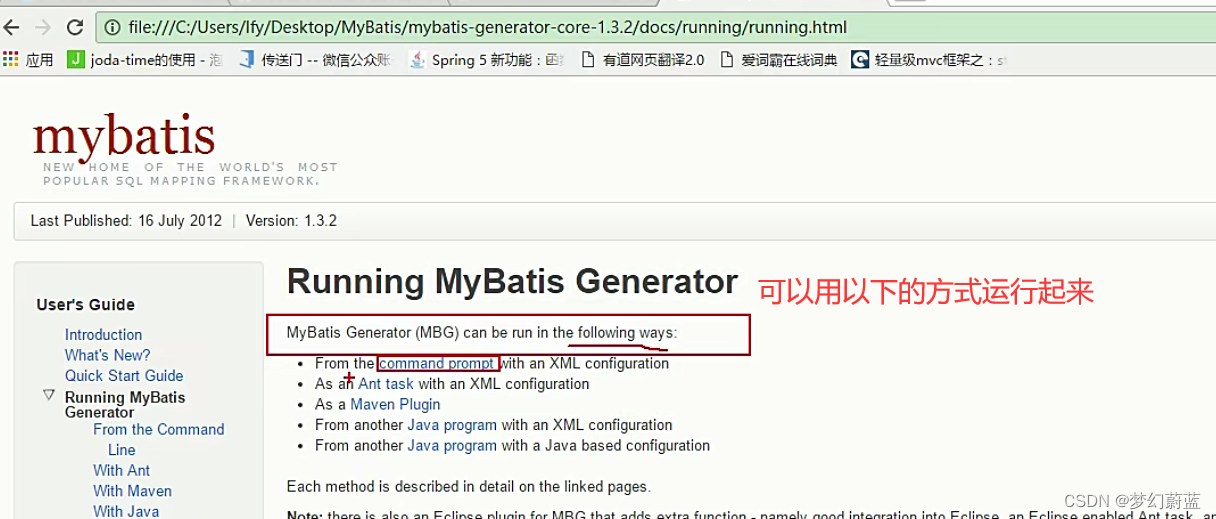
六、MyBatis逆向工程
简称MBG,是一个专门为MyBatis框架使用者定制的代码生成器,可以快速的根据表生成对应的映射文件,接口,以及bean类。支持基本的增删改查,以及QBC风格的条件查询。但是表连接、存储过程等这些复杂sql的定义需要我们手工编写
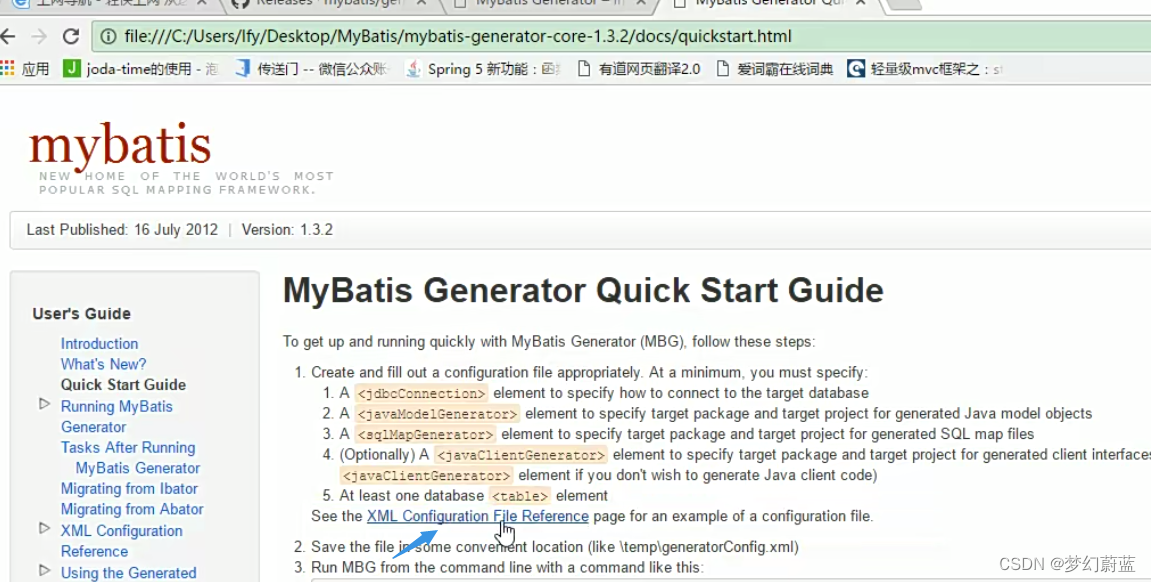
官方文档地址
http://www.mybatis.org/generator/
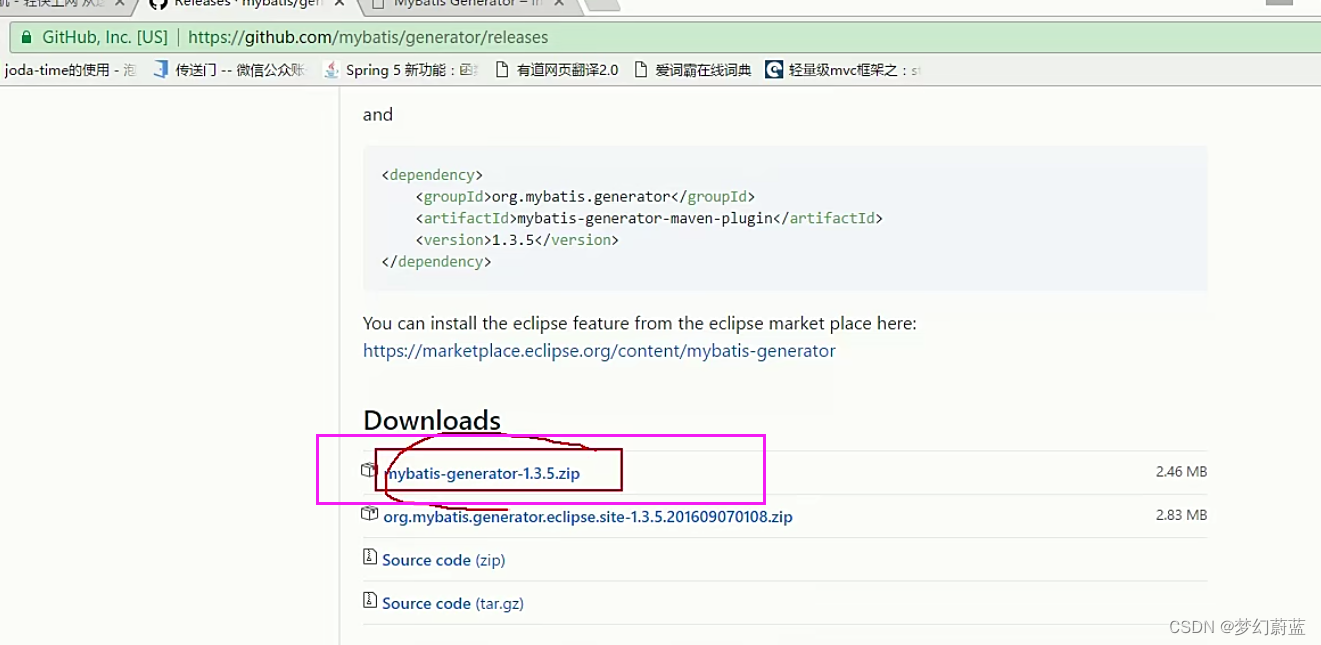
• 官方工程地址
https://github.com/mybatis/generator/releases
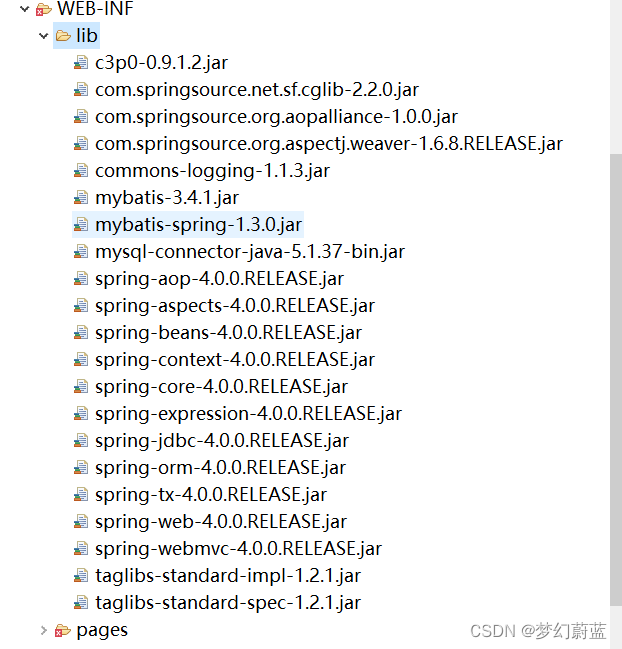
1、导入需要的配置包
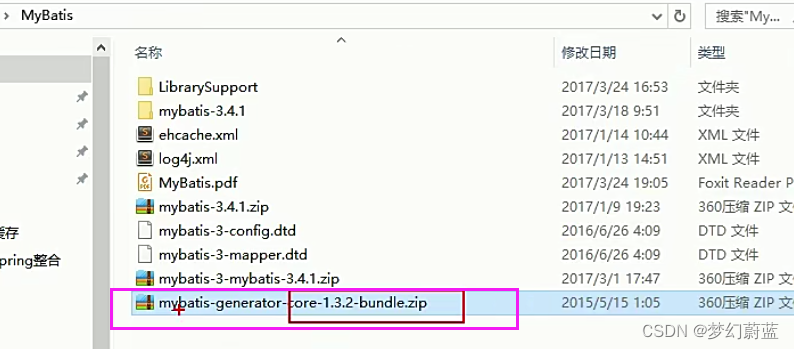
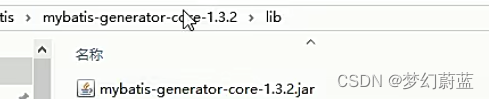
解压取出jar包
复制以下的配置文件进行修改即可
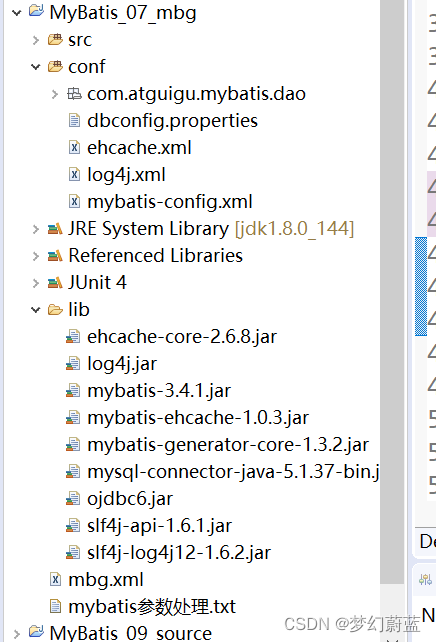
2、编写配置类mbg.XML

<?xml version="1.0" encoding="UTF-8"?>
<!DOCTYPE generatorConfigurationPUBLIC "-//mybatis.org//DTD MyBatis Generator Configuration 1.0//EN""http://mybatis.org/dtd/mybatis-generator-config_1_0.dtd">
<generatorConfiguration><!-- targetRuntime="MyBatis3Simple":生成简单版的CRUDMyBatis3:豪华版--><context id="DB2Tables" targetRuntime="MyBatis3"><!-- jdbcConnection:指定如何连接到目标数据库 --><jdbcConnection driverClass="com.mysql.jdbc.Driver"connectionURL="jdbc:mysql://localhost:3306/mybatis?allowMultiQueries=true"userId="root"password="123456"></jdbcConnection> <!--  --><javaTypeResolver ><property name="forceBigDecimals" value="false" /></javaTypeResolver><!-- javaModelGenerator:指定javaBean的生成策略 targetPackage="test.model":目标包名targetProject="\MBGTestProject\src":目标工程--><javaModelGenerator targetPackage="com.atguigu.mybatis.bean" targetProject=".\src"><property name="enableSubPackages" value="true" /><property name="trimStrings" value="true" /></javaModelGenerator><!-- sqlMapGenerator:sql映射生成策略: --><sqlMapGenerator targetPackage="com.atguigu.mybatis.dao"  targetProject=".\conf"><property name="enableSubPackages" value="true" /></sqlMapGenerator><!-- javaClientGenerator:指定mapper接口所在的位置 --><javaClientGenerator type="XMLMAPPER" targetPackage="com.atguigu.mybatis.dao"  targetProject=".\src"> <property name="enableSubPackages" value="true" />    </javaClientGenerator><!-- 指定要逆向分析哪些表:根据表要创建javaBean --><table tableName="tbl_dept" domainObjectName="Department"></table><table tableName="tbl_employee" domainObjectName="Employee"></table></context>
</generatorConfiguration>
3、运行
演示的使用 方式运行起来
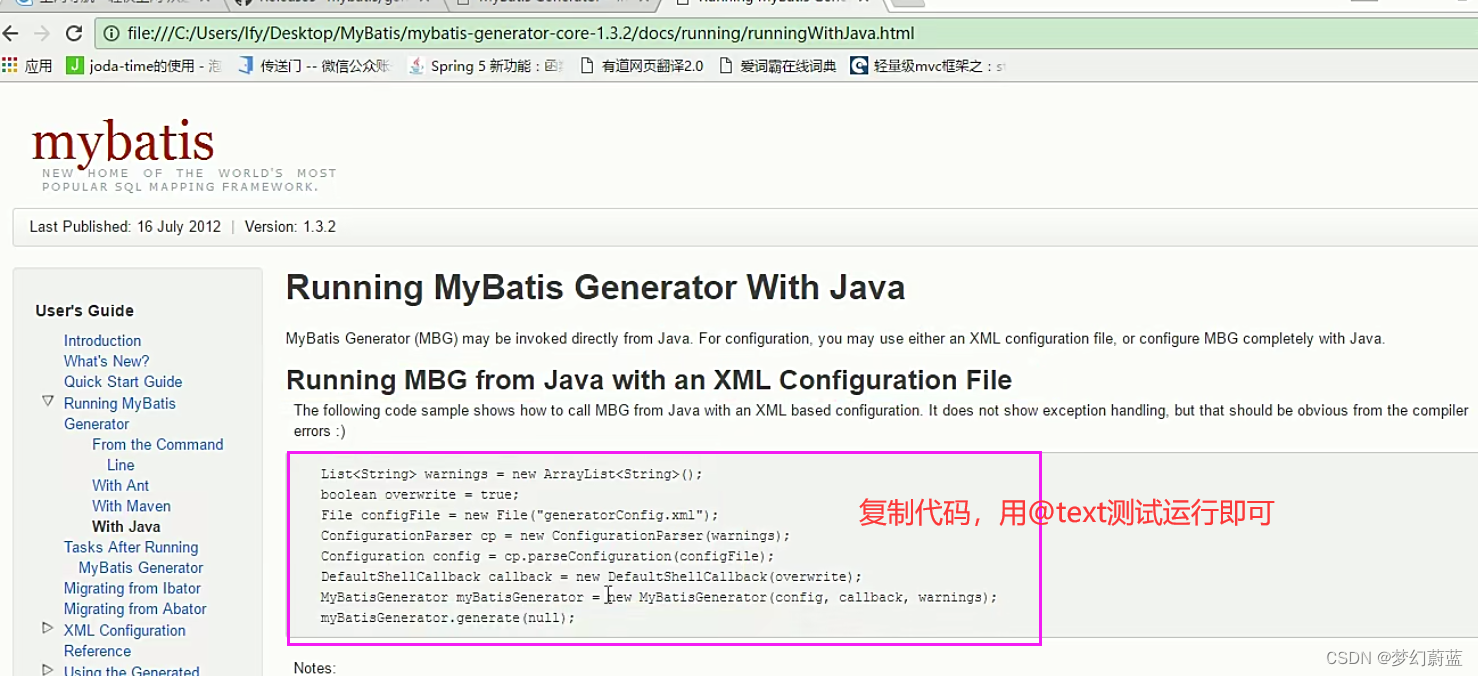
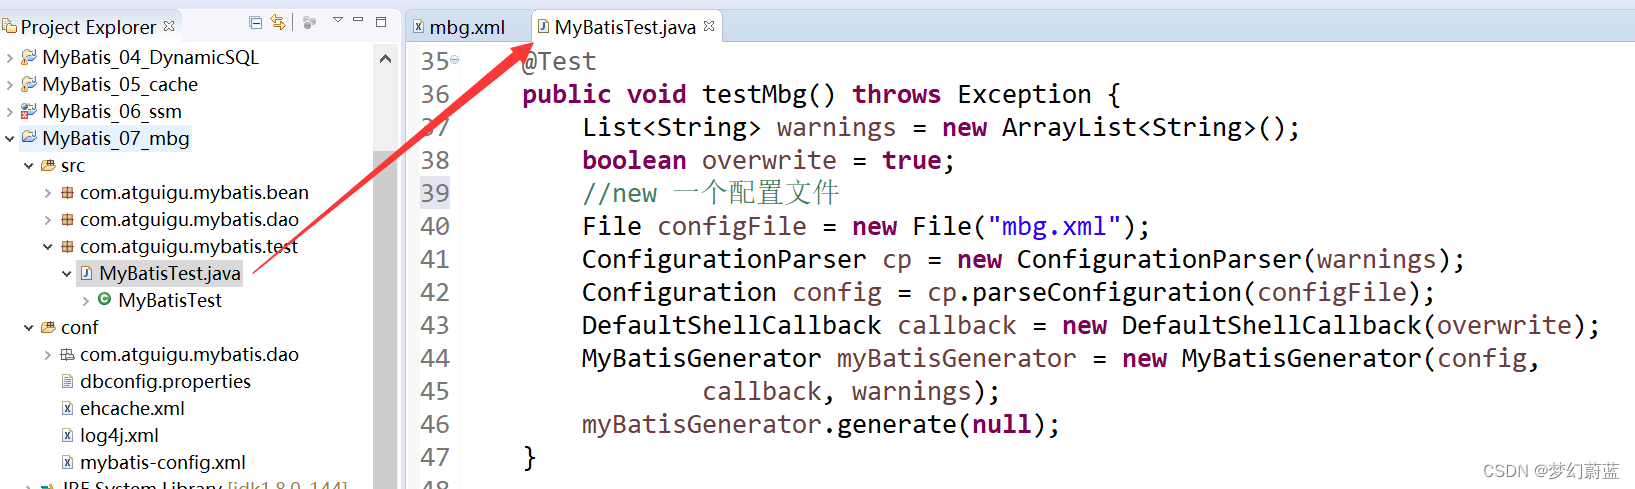
@Testpublic void testMbg() throws Exception {List<String> warnings = new ArrayList<String>();boolean overwrite = true;//new 一个配置文件File configFile = new File("mbg.xml");ConfigurationParser cp = new ConfigurationParser(warnings);Configuration config = cp.parseConfiguration(configFile);DefaultShellCallback callback = new DefaultShellCallback(overwrite);MyBatisGenerator myBatisGenerator = new MyBatisGenerator(config,callback, warnings);myBatisGenerator.generate(null);}
4、测试结果
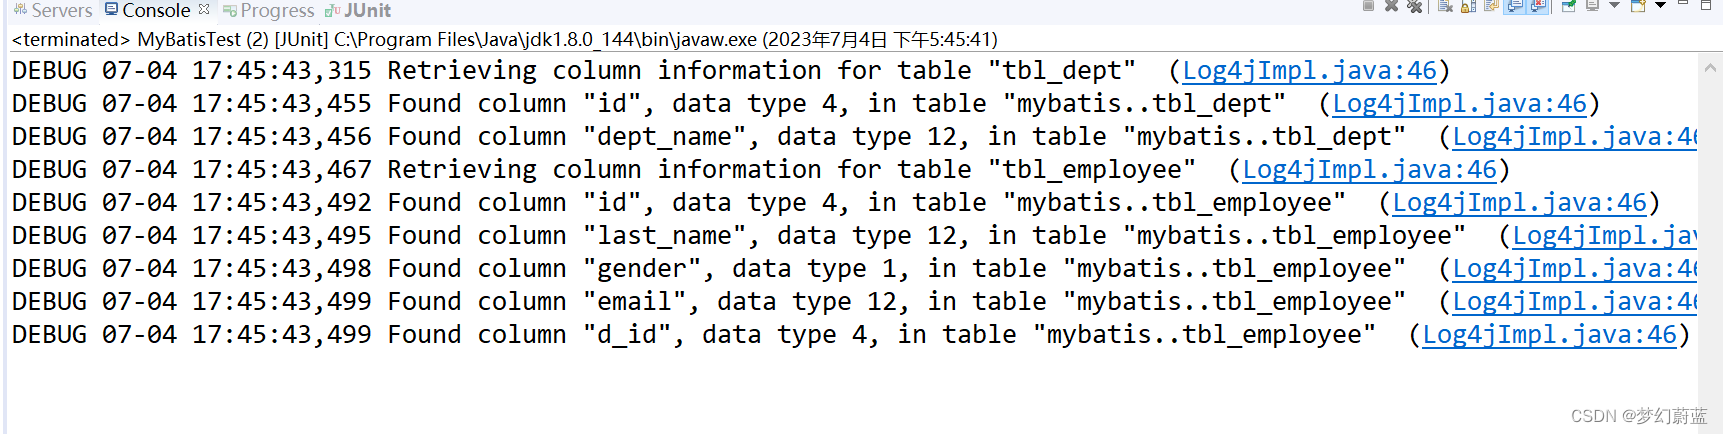
刷新之后: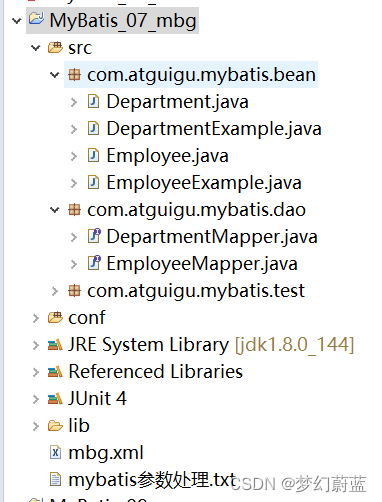
方法使用测试:
@Testpublic void testMyBatis3Simple() throws IOException{SqlSessionFactory sqlSessionFactory = getSqlSessionFactory();SqlSession openSession = sqlSessionFactory.openSession();try{EmployeeMapper mapper = openSession.getMapper(EmployeeMapper.class);List<Employee> list = mapper.selectByExample(null);for (Employee employee : list) {System.out.println(employee.getId());}}finally{openSession.close();}}
测试结果
5、封装查询条件
1、查询所有
@Testpublic void testMyBatis3() throws IOException{SqlSessionFactory sqlSessionFactory = getSqlSessionFactory();SqlSession openSession = sqlSessionFactory.openSession();try{EmployeeMapper mapper = openSession.getMapper(EmployeeMapper.class);//xxxExample就是封装查询条件的//1、查询所有List<Employee> emps = mapper.selectByExample(null);for (Employee employee : list) {System.out.println(employee.getId());}}finally{openSession.close();}}

2、带条件查询
查询员工名字中有e字母的,和员工性别是1的
创建一个Criteria,这个Criteria就是拼装查询条件
封装的方法中找需要的
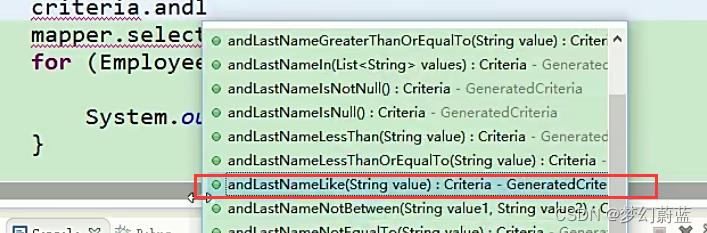
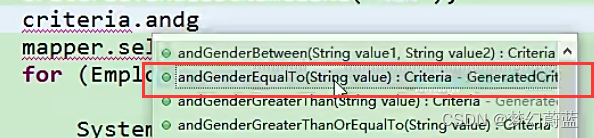
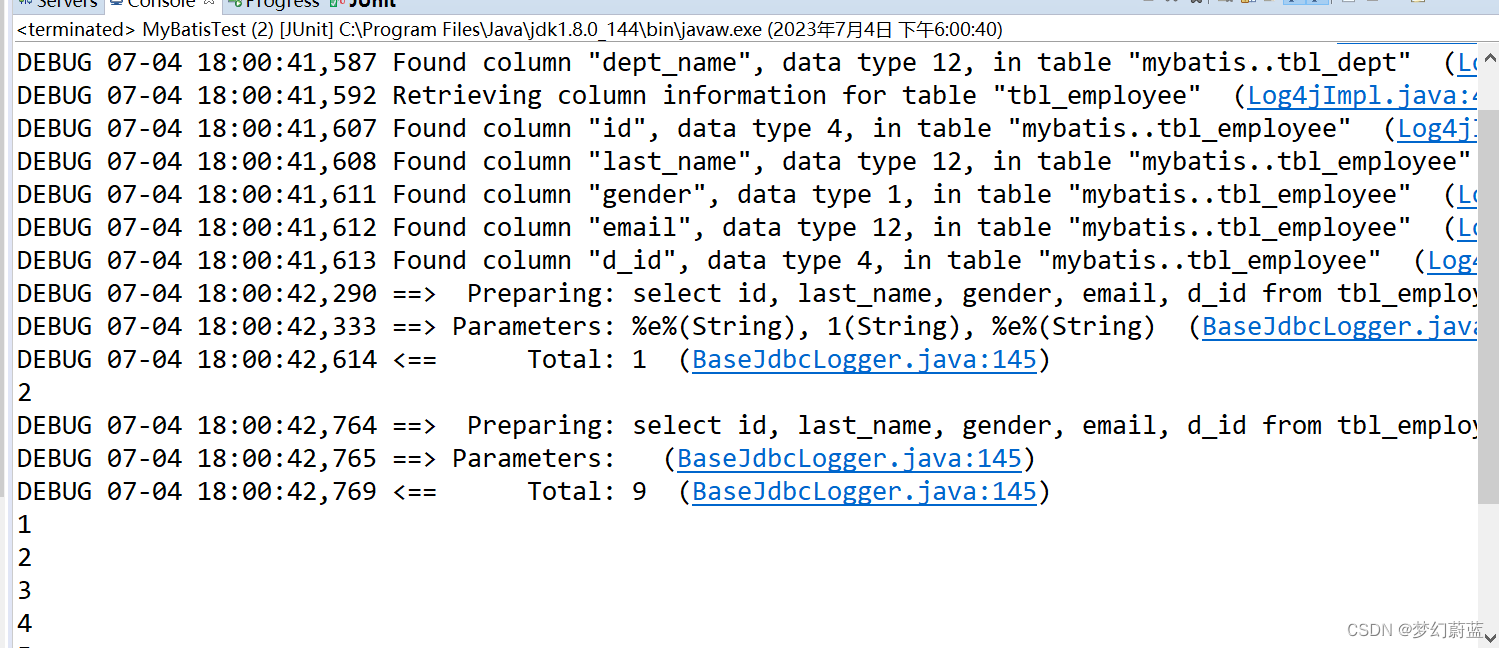
@Testpublic void testMyBatis3() throws IOException{SqlSessionFactory sqlSessionFactory = getSqlSessionFactory();SqlSession openSession = sqlSessionFactory.openSession();try{EmployeeMapper mapper = openSession.getMapper(EmployeeMapper.class);//xxxExample就是封装查询条件的//2、查询员工名字中有e字母的,和员工性别是1的//封装员工查询条件的exampleEmployeeExample example = new EmployeeExample();//创建一个Criteria,这个Criteria就是拼装查询条件//select id, last_name, email, gender, d_id from tbl_employee //WHERE ( last_name like ? and gender = ? ) or email like "%e%"Criteria criteria = example.createCriteria();criteria.andLastNameLike("%e%");criteria.andGenderEqualTo("1");//在创建一个criteria2。拼装起来Criteria criteria2 = example.createCriteria();criteria2.andEmailLike("%e%");example.or(criteria2);List<Employee> list = mapper.selectByExample(example);for (Employee employee : list) {System.out.println(employee.getId());}}finally{openSession.close();}}
测试结果:
拼装后的SQL语句
select id, last_name, gender, email, d_id
from tbl_employee
WHERE ( last_name like ? and gender = ? ) or( email like ? )
DEBUG 07-04 18:28:23,732 ==>  Preparing: select id, last_name, gender, email, d_id from tbl_employee WHERE ( last_name like ? and gender = ? ) or( email like ? )   (BaseJdbcLogger.java:145)
DEBUG 07-04 18:28:23,781 ==> Parameters: %e%(String), 1(String), %e%(String)  (BaseJdbcLogger.java:145)
DEBUG 07-04 18:28:23,812 <==      Total: 1  (BaseJdbcLogger.java:145)
2
七、MyBatis-工作原理
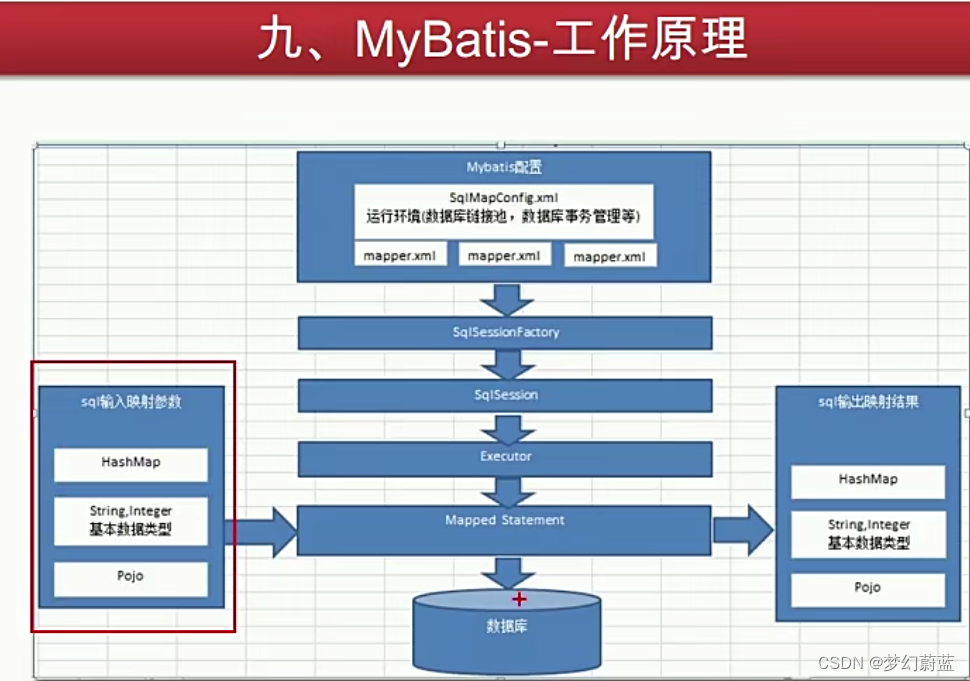
- 1、获取sqlSessionFactory对象:
-
解析文件的每一个信息保存在Configuration中,返回包含Configuration的DefaultSqlSession; -
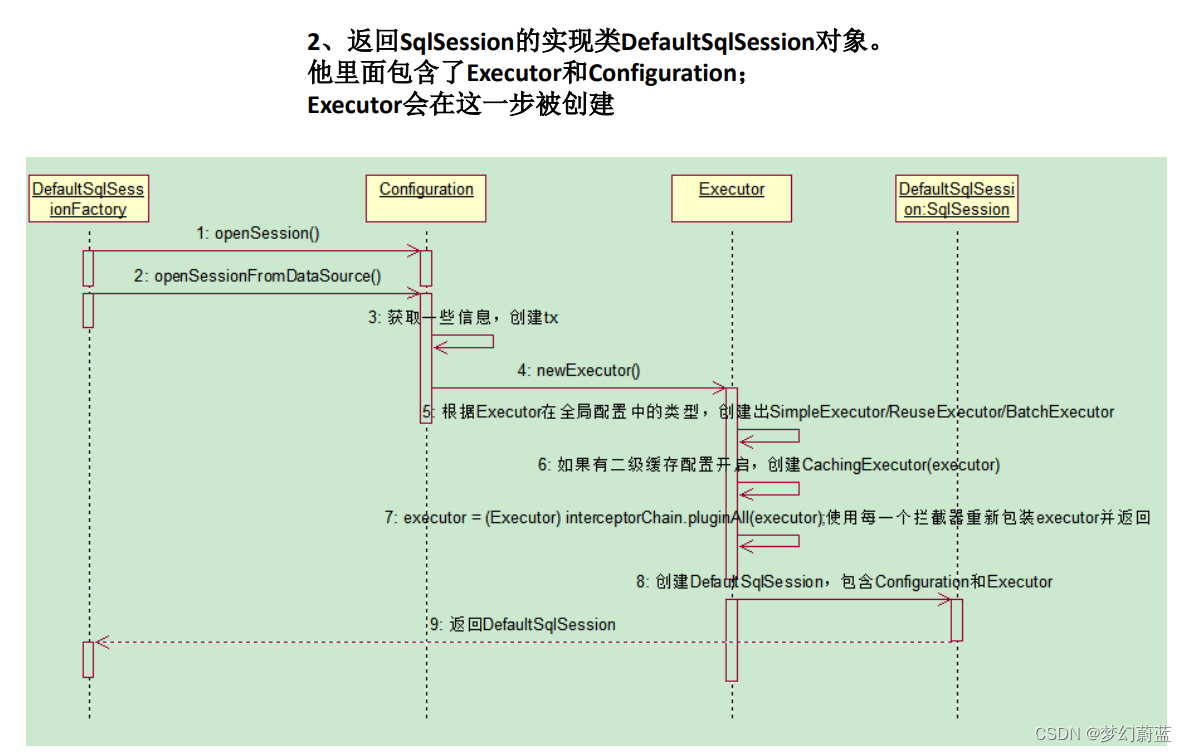
注意:【MappedStatement】:代表一个增删改查的详细信息 - 2、获取sqlSession对象
-
返回一个DefaultSQlSession对象,包含Executor和Configuration; -
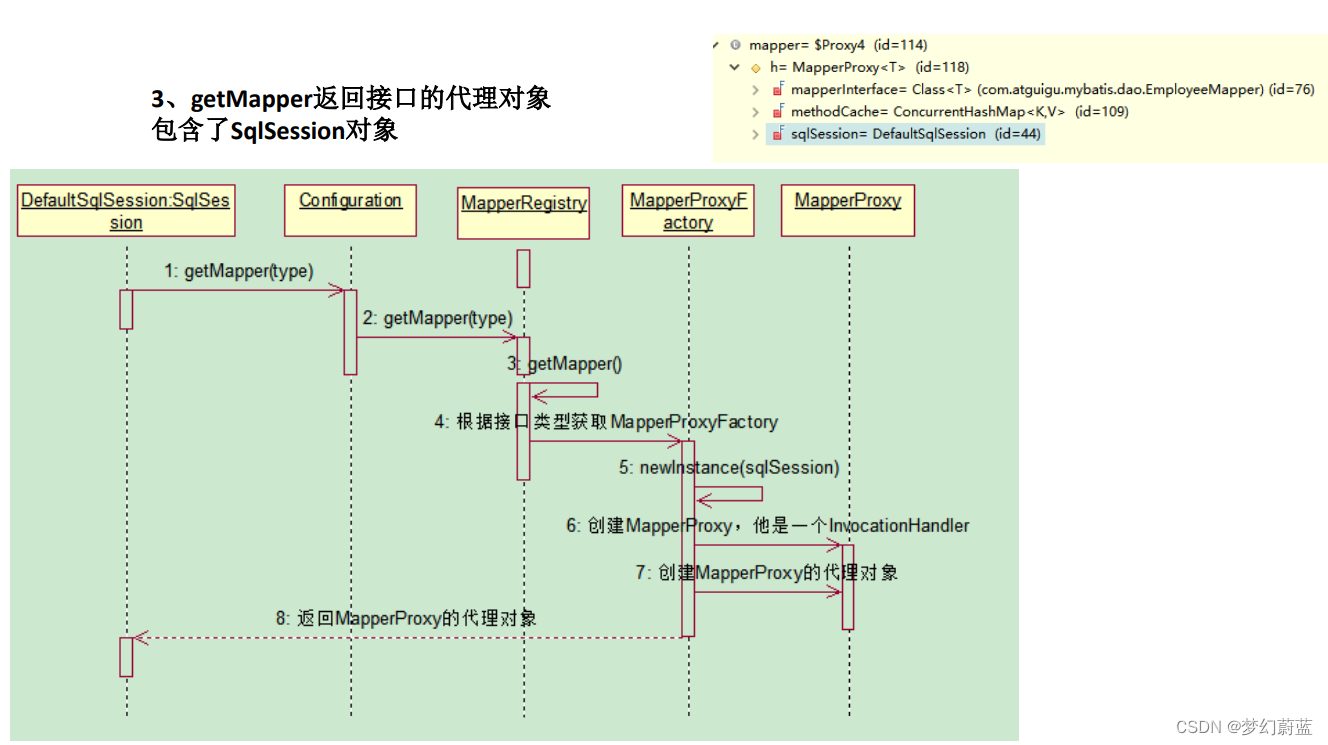
这一步会创建Executor对象; - 3、获取接口的代理对象(MapperProxy)
-
getMapper,使用MapperProxyFactory创建一个MapperProxy的代理对象 -
代理对象里面包含了,DefaultSqlSession(Executor) - 4、执行增删改查方法
- 总结:
- 1、根据配置文件(全局,sql映射)初始化出Configuration对象
- 2、创建一个DefaultSqlSession对象,
-
他里面包含Configuration以及 -
Executor(根据全局配置文件中的defaultExecutorType创建出对应的Executor) - 3、DefaultSqlSession.getMapper():拿到Mapper接口对应的MapperProxy;
- 4、MapperProxy里面有(DefaultSqlSession);
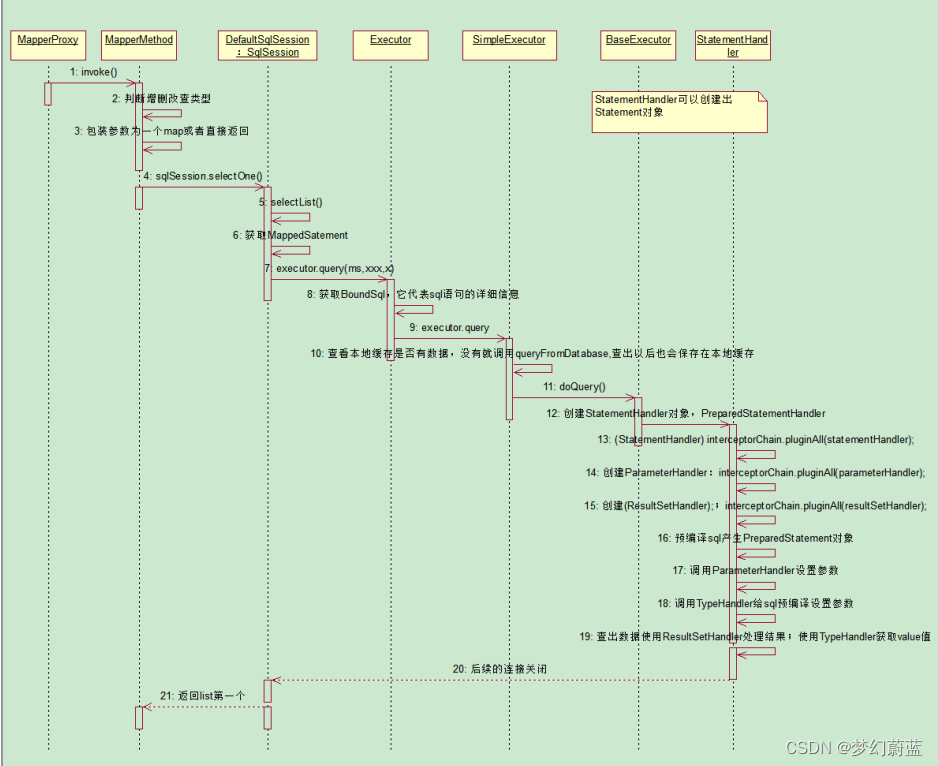
- 5、执行增删改查方法:
-
1)、调用DefaultSqlSession的增删改查(Executor); -
2)、会创建一个StatementHandler对象。 -
(同时也会创建出ParameterHandler和ResultSetHandler) -
3)、调用StatementHandler预编译参数以及设置参数值; -
使用ParameterHandler来给sql设置参数 -
4)、调用StatementHandler的增删改查方法; -
5)、ResultSetHandler封装结果 - 注意:
-
四大对象每个创建的时候都有一个interceptorChain.pluginAll(parameterHandler);
-
1、获取sqlSessionFactory对象

查询流程
八、插件
插件原理:
* 插件原理
* 在四大对象创建的时候
* 1、每个创建出来的对象不是直接返回的,而是
* interceptorChain.pluginAll(parameterHandler);
* 2、获取到所有的Interceptor(拦截器)(插件需要实现的接口);
* 调用interceptor.plugin(target);返回target包装后的对象
* 3、插件机制,我们可以使用插件为目标对象创建一个代理对象;AOP(面向切面)
* 我们的插件可以为四大对象创建出代理对象;
* 代理对象就可以拦截到四大对象的每一个执行;
*
public Object pluginAll(Object target) {for (Interceptor interceptor : interceptors) {target = interceptor.plugin(target);}return target;}
MyBatis在四大对象的创建过程中,都会有插件进行介入。插件可以利用动态代理机制一层层的包装目标对象,而实现在目标对象执行目标方法之前进行拦截的效果。
• MyBatis 允许在已映射语句执行过程中的某一点进行
拦截调用。
• 默认情况下,MyBatis 允许使用插件来拦截的方法调
用包括:
• Executor (update, query, flushStatements, commit, rollback,
getTransaction, close, isClosed)
• ParameterHandler (getParameterObject, setParameters)
• ResultSetHandler (handleResultSets, handleOutputParameters)
• StatementHandler (prepare, parameterize, batch, update, query)
插件开发步骤
– 1)、编写插件实现Interceptor接口,并使用
@Intercepts注解完成插件签名

– 2)、在全局配置文件中注册插件

1)、按照插件注解声明,按照插件配置顺序调用插件plugin方
法,生成被拦截对象的动态代理
• 2)、多个插件依次生成目标对象的代理对象,层层包裹,先声
明的先包裹;形成代理链
• 3)、目标方法执行时依次从外到内执行插件的intercept方法。
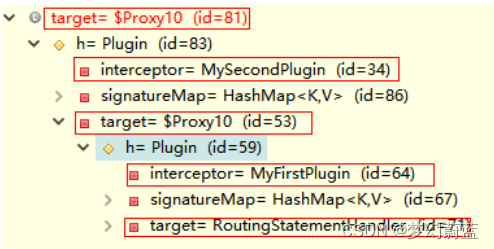
• 4)、多个插件情况下,我们往往需要在某个插件中分离出目标
对象。可以借助MyBatis提供的SystemMetaObject类来进行获
取最后一层的h以及target属性的值
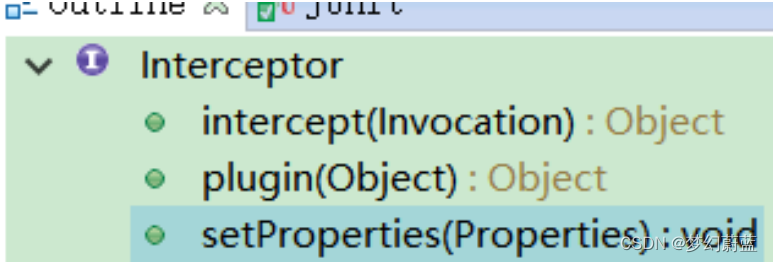
Interceptor接口
• Intercept:拦截目标方法执行
• plugin:生成动态代理对象,可以使用MyBatis提
供的Plugin类的wrap方法
• setProperties:注入插件配置时设置的属性
常用代码:
从代理链中分离真实被代理对象
//1、分离代理对象。由于会形成多次代理,所以需要通过一个
while 循环分离出最终被代理对象,从而方便提取信息
MetaObject metaObject = SystemMetaObject.forObject(target);
while (metaObject.hasGetter("h")) {
Object h = metaObject.getValue("h");
metaObject = SystemMetaObject.forObject(h);
}
//2、获取到代理对象中包含的被代理的真实对象
Object obj = metaObject.getValue("target");
//3、获取被代理对象的MetaObject方便进行信息提取
MetaObject forObject = SystemMetaObject.forObject(obj);
九、MyBatis实用场景
1 PageHelper插件进行分页
pagehelper/Mybatis-PageHelper官网
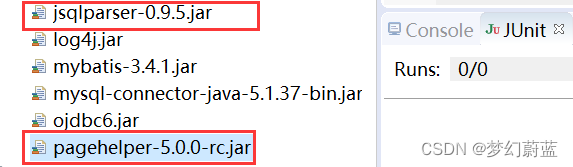
1、下载源码包:
官网下载,或在文件中查找
2、配置拦截器
在 MyBatis 配置 xml 中配置拦截器插件
<plugins><!-- com.github.pagehelper为PageHelper类所在包名 --><plugin interceptor="com.github.pagehelper.PageInterceptor"></plugin>
</plugins>
3、使用
@Testpublic void test01() throws IOException {// 1、获取sqlSessionFactory对象SqlSessionFactory sqlSessionFactory = getSqlSessionFactory();// 2、获取sqlSession对象SqlSession openSession = sqlSessionFactory.openSession();try {EmployeeMapper mapper = openSession.getMapper(EmployeeMapper.class);Page<Object> page = PageHelper.startPage(5, 1);List<Employee> emps = mapper.getEmps();//传入要连续显示多少页PageInfo<Employee> info = new PageInfo<>(emps, 5);for (Employee employee : emps) {System.out.println(employee);}/*System.out.println("当前页码:"+page.getPageNum());System.out.println("总记录数:"+page.getTotal());System.out.println("每页的记录数:"+page.getPageSize());System.out.println("总页码:"+page.getPages());*////xxxSystem.out.println("当前页码:"+info.getPageNum());System.out.println("总记录数:"+info.getTotal());System.out.println("每页的记录数:"+info.getPageSize());System.out.println("总页码:"+info.getPages());System.out.println("是否第一页:"+info.isIsFirstPage());System.out.println("连续显示的页码:");int[] nums = info.getNavigatepageNums();for (int i = 0; i < nums.length; i++) {System.out.println(nums[i]);}//xxxx} finally {openSession.close();}}
PageInfo用法
//获取第1页,10条内容,默认查询总数count
PageHelper.startPage(1, 10);
List<User> list = userMapper.selectAll();
//用PageInfo对结果进行包装
PageInfo page = new PageInfo(list);
//测试PageInfo全部属性
//PageInfo包含了非常全面的分页属性
assertEquals(1, page.getPageNum());
assertEquals(10, page.getPageSize());
assertEquals(1, page.getStartRow());
assertEquals(10, page.getEndRow());
assertEquals(183, page.getTotal());
assertEquals(19, page.getPages());
assertEquals(1, page.getFirstPage());
assertEquals(8, page.getLastPage());
assertEquals(true, page.isFirstPage());
assertEquals(false, page.isLastPage());
assertEquals(false, page.isHasPreviousPage());
assertEquals(true, page.isHasNextPage());
2 批量操作
配置SQL
<?xml version="1.0" encoding="UTF-8" ?>
<!DOCTYPE mapperPUBLIC "-//mybatis.org//DTD Mapper 3.0//EN""http://mybatis.org/dtd/mybatis-3-mapper.dtd">
<mapper namespace="com.atguigu.mybatis.dao.EmployeeMapper">
<!--
namespace:名称空间;指定为接口的全类名
id:唯一标识
resultType:返回值类型
#{id}:从传递过来的参数中取出id值public Employee getEmpById(Integer id);--><select id="getEmpById" resultType="com.atguigu.mybatis.bean.Employee">select id,last_name lastName,email,gender,empStatus from tbl_employee where id = #{id}</select><!--public List<Employee> getEmps();  --><select id="getEmps" resultType="com.atguigu.mybatis.bean.Employee">select id,last_name lastName,email,gender from tbl_employee</select><!--public Long addEmp(Employee employee);  --><insert id="addEmp" useGeneratedKeys="true" keyProperty="id">insert into tbl_employee(last_name,email,gender,empStatus) values(#{lastName},#{email},#{gender},#{empStatus})</insert><!-- public void getPageByProcedure(); 1、使用select标签定义调用存储过程2、statementType="CALLABLE":表示要调用存储过程3、{call procedure_name(params)}--><select id="getPageByProcedure" statementType="CALLABLE" databaseId="oracle">{call hello_test(#{start,mode=IN,jdbcType=INTEGER},#{end,mode=IN,jdbcType=INTEGER},#{count,mode=OUT,jdbcType=INTEGER},#{emps,mode=OUT,jdbcType=CURSOR,javaType=ResultSet,resultMap=PageEmp})}</select><resultMap type="com.atguigu.mybatis.bean.Employee" id="PageEmp"><id column="EMPLOYEE_ID" property="id"/><result column="LAST_NAME" property="email"/><result column="EMAIL" property="email"/></resultMap></mapper>
测试:
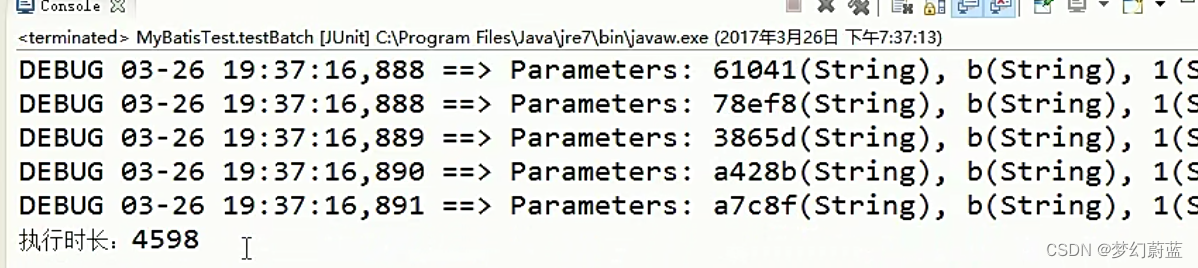
@Testpublic void testBatch() throws IOException{SqlSessionFactory sqlSessionFactory = getSqlSessionFactory();//可以执行批量操作的sqlSessionSqlSession openSession = sqlSessionFactory.openSession(ExecutorType.BATCH);long start = System.currentTimeMillis();try{EmployeeMapper mapper = openSession.getMapper(EmployeeMapper.class);for (int i = 0; i < 10000; i++) {mapper.addEmp(new Employee(UUID.randomUUID().toString().substring(0, 5), "b", "1"));}openSession.commit();long end = System.currentTimeMillis();//批量:(预编译sql一次==>设置参数===>10000次===>执行(1次))//Parameters: 616c1(String), b(String), 1(String)==>4598//非批量:(预编译sql=设置参数=执行)==》10000 10200System.out.println("执行时长:"+(end-start));}finally{openSession.close();}}
测试结果
先预编译,最后一块发送执行。
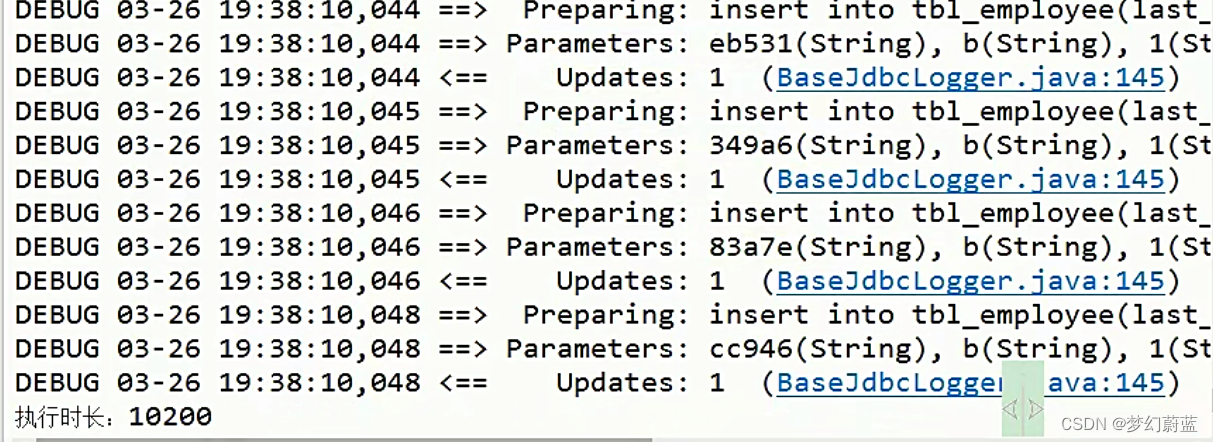
非批量操作
SqlSession openSession = sqlSessionFactory.openSession(ExecutorType.BATCH);
发送一个SQL,预编译,执行
3 存储过程
4 typeHandler处理枚举
八、Java API
目录结构
SqlSession